
首先 windows10 安装好了 wsl2
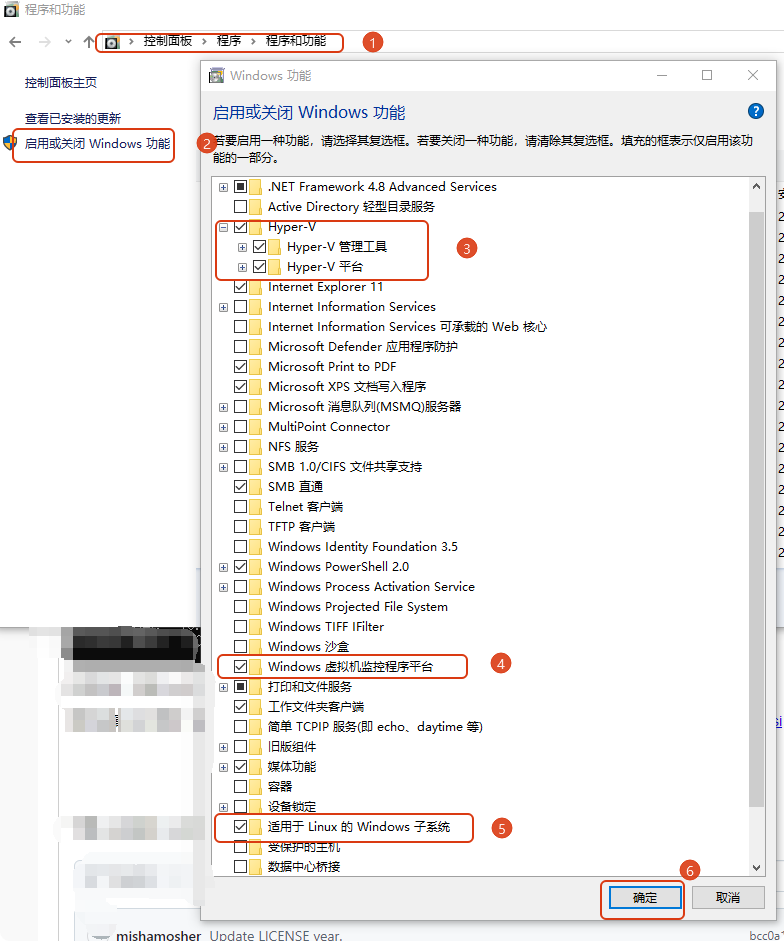
启用虚拟机功能
等待系统更新重启
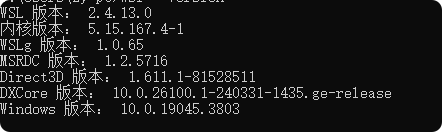
尝试 输入 wsl --version 是否以下输出
如果没有,更新 wsl2 , 输入命令 wsl --update
更新较慢 或不更新 请尝试 下载安装包 https://wslstorestorage.blob.core.windows.net/wslblob/wsl_update_x64.msi 手动安装
下载 wsl版的 centOS7 github网站地址: https://github.com/mishamosher/CentOS-WSL


下载好后解压 运行 CentOS7.exe 安装

管理员权限打开 Windows PowerShell 输入命令查看 安装是否成功 wsl -l -v


 wsl 一些命令:

1.wsl -l -v                                               #查看wsl安装的有效分发
2.wsl --shutdown                                           #关闭所有运行的分发
3.wsl --export Ubuntu-22.04 E:/Ubuntu-22.04.tar                         #导出Ubuntu-22.04 到 e盘 Ubuntu-22.04.tar
4.wsl --unregister Ubuntu-22.04                                    #卸载已安装的分发
5.wsl --import Ubuntu-22.04  E:/Ubuntu-22.04    E:/Ubuntu-22.04.tar  --version 2     #导入刚刚导出的 Ubuntu-22.04《linuxwsl.tar》 到 E:/linuxwsl文件夹 并设置wsl 版本为 wsl2
6.wsl -d {指定版本号}                                          #启动指定的版本
1.============================================WSL2安装的LinuxCentOS7 系统怎么修改root密码 ====================================================
[root@DESKTOP-4ER0J8T ~]# sudo passwd root #如果在安装的时候,没用创建root用户,那么可以使用命令,直接修改密码。
2.============================================创建用户 并给用户 root 权限 ==================================================================
[root@DESKTOP-4ER0J8T ~]# sudo -i #进入 root 用户的shell
[root@DESKTOP-4ER0J8T ~]# sudo -s command #以root 身份执行command命令
[root@DESKTOP-4ER0J8T ~]# sudo adduser mysqlUser01 #新建一个用户
[root@DESKTOP-4ER0J8T ~]# sudo passwd mysqlUser01 #使用 passwd 给用户设置密码
############ Changing password for user mysqlUser01.
############ New password:
############ BAD PASSWORD: The password is shorter than 8 characters
############ Retype new password:
############ passwd: all authentication tokens updated successfully.
[root@DESKTOP-4ER0J8T ~]# sudo usermod -aG wheel mysqlUser01 #使用usermod 命令将用户添加到wheel组
[root@DESKTOP-4ER0J8T ~]# su - mysqlUser01 #切换到 新用户
[mysqlUser01 @DESKTOP-4ER0J8T ~]$ sudo whoami #whoami
############ We trust you have received the usual lecture from the local System
############ Administrator. It usually boils down to these three things:

############# 1) Respect the privacy of others.
############# 2) Think before you type.
############# 3) With great power comes great responsibility.

############ [sudo] password for mysqlUser01  :
############ root      #显示root 说明获得了 root权限
3.============================================更新 yum list 错误解决===========================================================================
############ Loaded plugins: fastestmirror
############ Determining fastest mirrors
############ Could not retrieve mirrorlist http://mirrorlist.centos.org/?release=7&arch=x86_64&repo=os&infra=genclo error was
############ 14: curl#7 - "Failed connect to mirrorlist.centos.org:80; Connection refused"
############ One of the configured repositories failed (Unknown),
############ and yum doesn't have enough cached data to continue. At this point the only
############ safe thing yum can do is fail. There are a few ways to work "fix" this:
############ 1. Contact the upstream for the repository and get them to fix the problem.
############ 2. Reconfigure the baseurl/etc. for the repository, to point to a working
############ upstream. This is most often useful if you are using a newer
############ distribution release than is supported by the repository (and the
############ packages for the previous distribution release still work).
############ 3. Run the command with the repository temporarily disabled
############ yum --disablerepo=<repoid> ...
############ 4. Disable the repository permanently, so yum won't use it by default. Yum
############ will then just ignore the repository until you permanently enable it
############ again or use --enablerepo for temporary usage:
############ yum-config-manager --disable <repoid>
############ or
############ subscription-manager repos --disable=<repoid>
############ 5. Configure the failing repository to be skipped, if it is unavailable.
############ Note that yum will try to contact the repo. when it runs most commands,
############ so will have to try and fail each time (and thus. yum will be be much
############ slower). If it is a very temporary problem though, this is often a nice
############ compromise:
############ yum-config-manager --save --setopt=<repoid>.skip_if_unavailable=true
############ Cannot find a valid baseurl for repo: base/7/x86_64
删除官方镜像源
[root@DESKTOP-4ER0J8T /]# rm /etc/yum.repos.d/CentOS-Base.repo
############ rm: remove write-protected regular file ‘/etc/yum.repos.d/CentOS-Base.repo’? y
更换阿里云镜像源
[root@DESKTOP-4ER0J8T /]# curl -o /etc/yum.repos.d/CentOS-Base.repo https://mirrors.aliyun.com/repo/Centos-7.repo
############ % Total % Received % Xferd Average Speed Time Time Time Current
############ Dload Upload Total Spent Left Speed
############ 100 2523 100 2523 0 0 6560 0 --:--:-- --:--:-- --:--:-- 6553
最后执行测试命令,
[root@DESKTOP-4ER0J8T /]# yum list -y #检查是否可用
[root@DESKTOP-4ER0J8T /]# yum install wget -y #安装wget
[root@DESKTOP-4ER0J8T /]# yum install vim -y #安装vim
4. ============================================ systemctl 命令 wsl2 centOS7 无法获得D-Bus连接:不允许操作 问题 Failed to get D-Bus connection: Operation not permitted===============================================
**systemd没有启用引起的,其它Linux发行版上默认还是init,以下命令来查看
[root@DESKTOP-4ER0J8T /]# ps --no-headers -o comm 1
############ init(CentOS7) #显示init
**给CentOS添加wsl.conf配置文件(设置systemd为启用),可通过下面命令来完成:
[root@DESKTOP-4ER0J8T /]# echo -e "[boot]\nsystemd=true" | sudo tee -a /etc/wsl.conf
############ [boot]
############ systemd=true
重启centOS7 测试
[root@DESKTOP-4ER0J8T /] exit
wsl --shutdown
wsl -d CentOS7
[root@DESKTOP-4ER0J8T ~]# systemctl

ctrl+c 退出
相关博客:https://www.cnblogs.com/fengjq/p/17616874.html 查看详细说明
5.============================================ WSL2- 使用Shell工具连接centOS7 ==================================================================================
[root@DESKTOP-4ER0J8T ~]# sudo netstat -tulnp | grep :22 #检查是否启动了 SSH默认端口(通常是22)。如果没有执行下面步骤
[root@DESKTOP-4ER0J8T ~]# yum install openssh-server -y #安装openSSH 服务
############ Loaded plugins: fastestmirror
############ Loading mirror speeds from cached hostfile
############ * base: mirrors.aliyun.com
############ * extras: mirrors.aliyun.com
############ * updates: mirrors.aliyun.com
############ Resolving Dependencies
############ --> Running transaction check
############ ---> Package openssh-server.x86_64 0:7.4p1-22.el7_9 will be updated
############ ---> Package openssh-server.x86_64 0:7.4p1-23.el7_9 will be an update
############ --> Processing Dependency: openssh = 7.4p1-23.el7_9 for package: openssh-server-7.4p1-23.el7_9.x86_64
############ --> Running transaction check
############ ---> Package openssh.x86_64 0:7.4p1-22.el7_9 will be updated
############ --> Processing Dependency: openssh = 7.4p1-22.el7_9 for package: openssh-clients-7.4p1-22.el7_9.x86_64
############ ...........
############ Updated:
############ openssh-server.x86_64 0:7.4p1-23.el7_9
############ Dependency Updated:
############ openssh.x86_64 0:7.4p1-23.el7_9 openssh-clients.x86_64 0:7.4p1-23.el7_9
############ Complete!
[root@DESKTOP-4ER0J8T ~]# systemctl start sshd #启动ssh 服务 (第一次启动有点慢, 等一等,另开一个窗口 systemctl status sshd 查询一下状态),

[root@DESKTOP-4ER0J8T ~]# sudo netstat -tulnp | grep :22 #检查是否启动了 SSH默认端口(通常是22)。如果没有执行下面步骤
[root@DESKTOP-4ER0J8T ~]# vim /etc/ssh/sshd_config #修改sshd_config 文件中行号的内容,如果没有 vim 使用yum install vim 安装一个
17行 Port 22
19行 ListenAddress 0.0.0.0
20行 ListenAddress ::
22行 HostKey /etc/ssh/ssh_host_rsa_key
24行 HostKey /etc/ssh/ssh_host_ecdsa_key
25行 HostKey /etc/ssh/ssh_host_ed25519_key
38行 PermitRootLogin yes
65行 PasswordAuthentication yes
[root@DESKTOP-4ER0J8T ~]# sudo netstat -tulnp | grep :22 #检查是否启动了 SSH默认端口(通常是22)。 (如果netstat不可用,你可能需要安装net-tools包。yum install net-tools)

[root@DESKTOP-4ER0J8T ~]# ifconfig #查看ip地址(如果没有ifconfig 使用 ip addr ) 并使用 ssh 连接 wsl2里的centOS7
=============================================================================end====================================================================================
小知识:
【1】
****** Ctrl+Z:将当前程序放入后台(暂停状态)
****** Ctrl+Z的作用是将当前正在运行的前台进程放到后台,并且使它停止执行(即进入暂停状态),这个操作并不会结束进程,而是使其挂起,一旦进程被挂起,你可以使用bg命令使其在后台继续运行,或者使用fg命令将其带回前台。
****** 使用场景: 当你需要暂时离开一个正在运行的程序,而又不想关闭它时,可以使用Ctrl+Z。
****** Ctrl+C:中断当前程序
****** Ctrl+C是一个发送SIGINT(中断信号)给当前进程的信号,默认情况下,这会导致进程终止,与Ctrl+Z不同的是,Ctrl+C通常会结束进程,除非程序特别设计来捕获并处理这个信号。
****** 使用场景: 当你想要快速终止一个正在运行的程序时,可以使用Ctrl+C。
****** Ctrl+D:结束输入;在 shell 中表示EOF(文件结束)
****** Ctrl+D在不同的上下文中有不同的作用,在大多数shell中,按下Ctrl+D会发送一个EOF(End of File)信号,通常用来表示输入结束,在某些情况下,如在空白行的Ctrl+D,它可以退出当前终端,或者在cat等命令后使用,表示结束输入。
****** 使用场景: 当你在shell提示符下输入文本或数据流,并想结束输入时,可以使用Ctrl+D。
****** Ctrl+Z将进程放入后台后,如何将它恢复至前台?
****** 要将一个后台暂停的进程恢复到前台,你可以使用fg命令,使用jobs命令查看当前挂起的进程及其编号,然后通过fg %n(其中n是进程编号)将指定进程带到前台。
****** 如果一个程序忽略Ctrl+C的中断信号,我该如何终止它?
****** 如果一个程序被设计为忽略SIGINT信号(通常是Ctrl+C),你可能需要使用更强制的方法来终止它,可以尝试使用Ctrl+发送SIGQUIT信号,或者使用kill命令配合进程ID直接发送SIGTERM或SIGKILL信号,如果你知道进程ID,可以运行kill 9 PID来强制结束该进程。
【2】
****** vim显示行号
****** 在 Vim 中显示行号,可以使用以下命令:
****** 普通模式下输入 :set number 或者简写为 :set nu 来显示行号。
****** 如果想让 Vim 永远显示行号,可以将 set number 添加到你的 Vim 配置文件 ~/.vimrc 中。
****** 在 ~/.vimrc 文件中添加以下内容:
****** set number
****** 保存文件后,每次打开 Vim 时都会自动显示行号。
****** 关闭行号显示,可以使用 :set nonumber 或者简写为 :set nonu。 若要在 Vim 配置中关闭行号,则将 set number 更改为 set nonumber 在 ~/.vimrc 文件中

 浙公网安备 33010602011771号