均值高斯低通滤波的算法实现


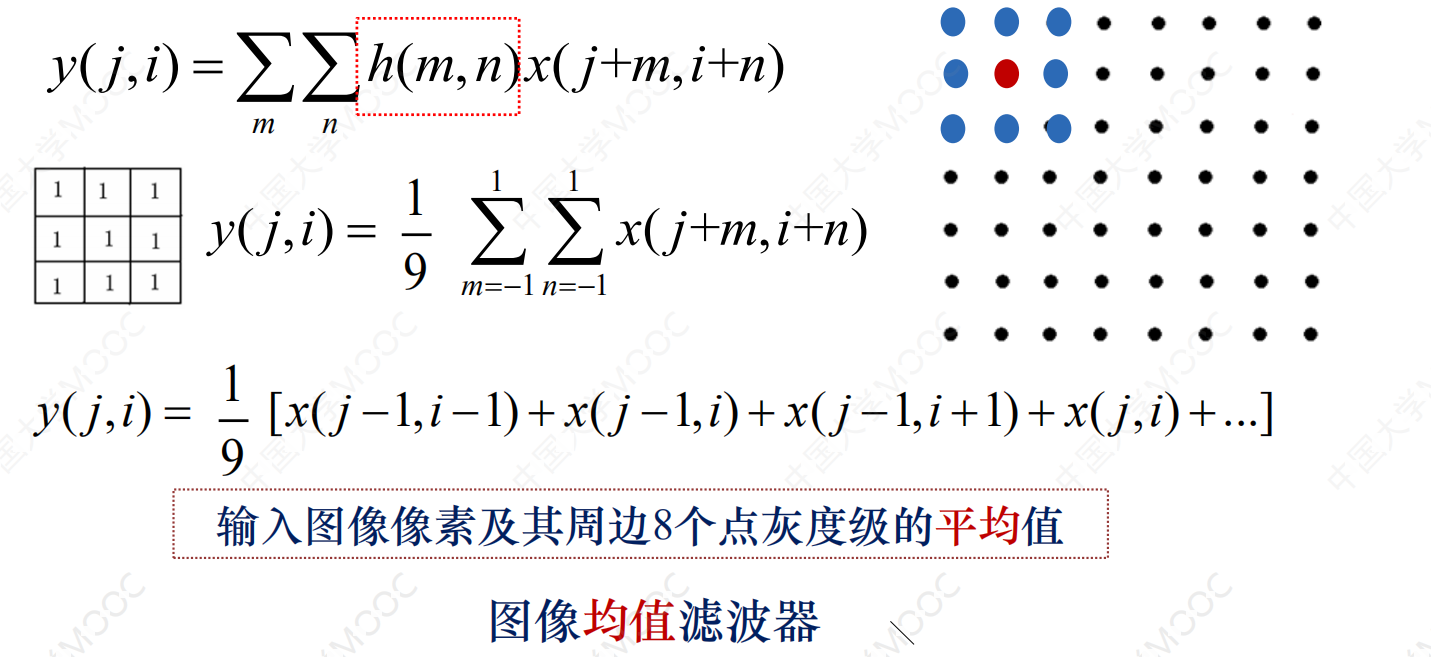
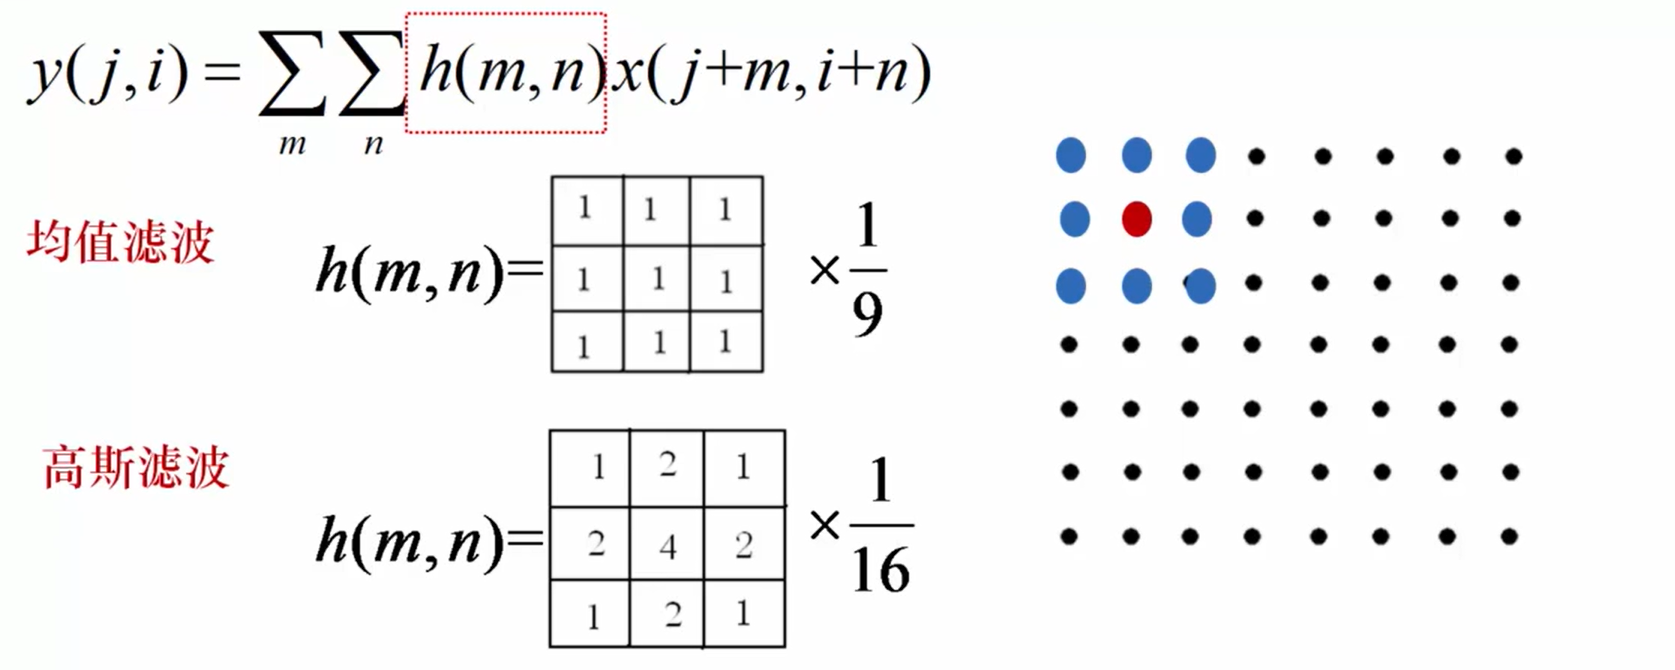
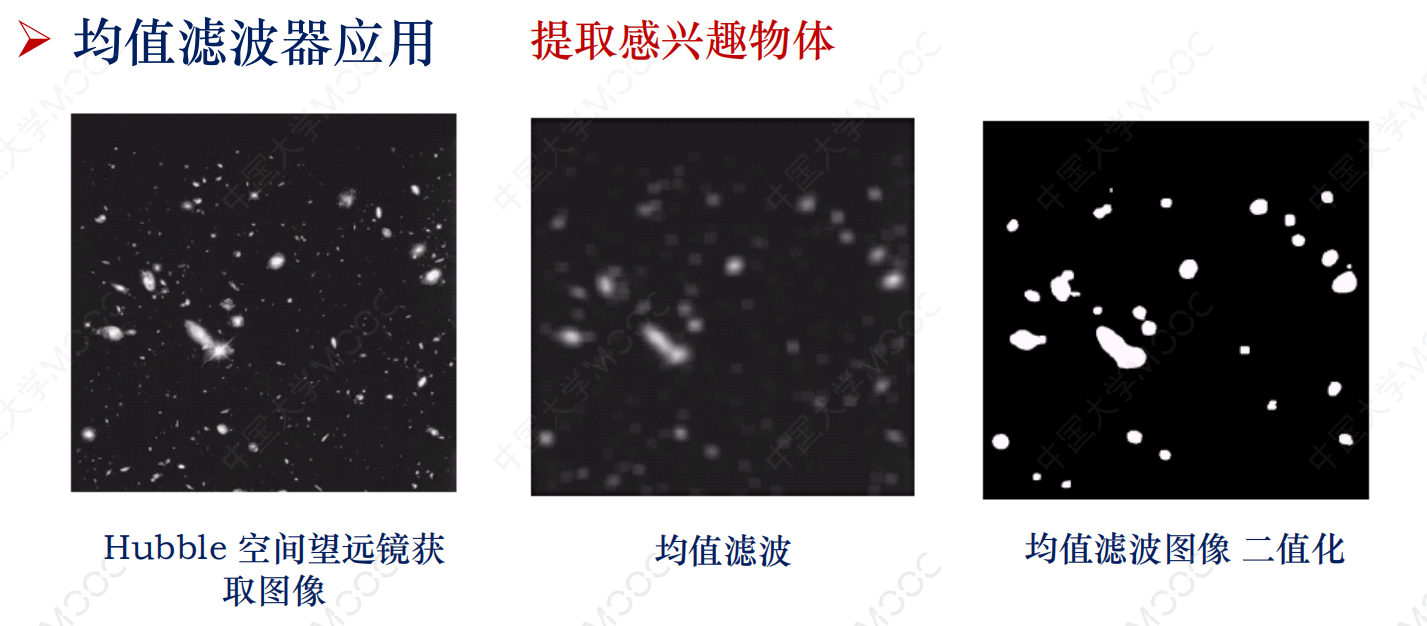
线性滤波可以说是图像处理最基本的方法,它可以允许我们对图像进行处理,产生很多不同的效果。做法很简单。首先,我们有一个二维的滤波器矩阵(有个高大上的名字叫卷积核)和一个要处理的二维图像。然后,对于图像的每一个像素点,计算它的邻域像素和滤波器矩阵的对应元素的乘积,然后加起来,作为该像素位置的值。这样就完成了滤波过程。上图中的h(m,n)就是二维滤波器矩阵,也叫做卷积核,(i,j)表示图像的空间位置。

【转】图像处理算法其实都很简单
using System;
using System.Collections.Generic;
using System.ComponentModel;
using System.Data;
using System.Drawing;
using System.Drawing.Imaging;
using System.IO;
using System.Linq;
using System.Runtime.InteropServices;
using System.Text;
using System.Windows.Forms;

namespace ImageProcessingPlatform
{
    public partial class FrmMain : Form
    {
        byte[] SourceImage;
        int width;
        int height;


        public FrmMain()
        {
            InitializeComponent();
        }

        private void FrmMain_Load(object sender, EventArgs e)
        {
            Bitmap bmp = new Bitmap("E:\\过程3\\0.bmp");
            width = bmp.Width;
            height = bmp.Height;
            SourceImage = getByteStreamFromBitmap(width, height,1, bmp);
            this.pb_SourceImage.Image = bmp;
        }

        /// <summary>
        /// 将Bitmap转换为字节数组
        /// </summary>
        /// <param name="width"></param>
        /// <param name="height"></param>
        /// <param name="channel"></param>
        /// <param name="img"></param>
        /// <returns></returns>
        public static byte[] getByteStreamFromBitmap(int width, int height, int channel, Bitmap img)
        {
            byte[] bytes = new byte[width * height * channel];
            BitmapData im = img.LockBits(new Rectangle(0, 0, width, height), ImageLockMode.WriteOnly, img.PixelFormat);
            int stride = im.Stride;
            int offset = stride - width * channel;
            int length = stride * height;
            byte[] temp = new byte[stride * height];
            Marshal.Copy(im.Scan0, temp, 0, temp.Length);
            img.UnlockBits(im);
            int posreal = 0;
            int posscan = 0;
            for (int c = 0; c < height; c++)
            {
                for (int d = 0; d < width * channel; d++)
                {
                    bytes[posreal++] = temp[posscan++];
                }
                posscan += offset;
            }
            return bytes;
        }


        /// <summary>
        /// 将一个字节数组转换为8bit灰度位图
        /// </summary>
        /// <param name="rawValues">显示字节数组</param>
        /// <param name="width">图像宽度</param>
        /// <param name="height">图像高度</param>
        /// <returns>位图</returns>
        public static Bitmap ToGrayBitmap(byte[] rawValues, int width, int height)
        {
            //申请目标位图的变量,并将其内存区域锁定
            Bitmap bmp = new Bitmap(width, height, PixelFormat.Format8bppIndexed);
            BitmapData bmpData = bmp.LockBits(new Rectangle(0, 0, width, height),
            ImageLockMode.WriteOnly, PixelFormat.Format8bppIndexed);

            //获取图像参数
            int stride = bmpData.Stride;  // 扫描线的宽度
            int offset = stride - width;  // 显示宽度与扫描线宽度的间隙
            IntPtr iptr = bmpData.Scan0;  // 获取bmpData的内存起始位置
            int scanBytes = stride * height;// 用stride宽度,表示这是内存区域的大小

            //下面把原始的显示大小字节数组转换为内存中实际存放的字节数组
            int posScan = 0, posReal = 0;// 分别设置两个位置指针,指向源数组和目标数组
            byte[] pixelValues = new byte[scanBytes];  //为目标数组分配内存

            for (int x = 0; x < height; x++)
            {
                //下面的循环节是模拟行扫描
                for (int y = 0; y < width; y++)
                {
                    pixelValues[posScan++] = rawValues[posReal++];
                }
                posScan += offset;  //行扫描结束,要将目标位置指针移过那段“间隙”
            }

            //用Marshal的Copy方法,将刚才得到的内存字节数组复制到BitmapData中
            System.Runtime.InteropServices.Marshal.Copy(pixelValues, 0, iptr, scanBytes);
            bmp.UnlockBits(bmpData);  // 解锁内存区域

            //下面的代码是为了修改生成位图的索引表,从伪彩修改为灰度
            ColorPalette tempPalette;
            using (Bitmap tempBmp = new Bitmap(1, 1, PixelFormat.Format8bppIndexed))
            {
                tempPalette = tempBmp.Palette;
            }
            for (int i = 0; i < 256; i++)
            {
                tempPalette.Entries[i] = Color.FromArgb(i, i, i);
            }

            bmp.Palette = tempPalette;

            //算法到此结束,返回结果
            return bmp;
        }

        //均值滤波
        private void button1_Click(object sender, EventArgs e)
        {
            byte[] OutImage = meanFilter(SourceImage, width, height);
            this.BeginInvoke(new Action(()=>
            {
                this.pb_ResultImage.Image = ToGrayBitmap(OutImage, width, height);
            }));
        }


        //高斯滤波
        private void button2_Click(object sender, EventArgs e)
        {
            byte[] OutImage = GaussFilter(SourceImage, width, height);
            this.BeginInvoke(new Action(() =>
            {
                this.pb_ResultImage.Image = ToGrayBitmap(OutImage, width, height);
            }));
        }

        #region 高斯滤波
        private byte[] GaussFilter(byte[] SourceImage, int width, int height)
        {
            byte[] OutImage = new byte[width * height];
            //中心点的3*3邻域
            byte[] block = new byte[9];
            int[] smth = new int[9];
            int value;
            smth[0] = 1;
            smth[1] = 2;
            smth[2] = 1;
            smth[3] = 2;
            smth[4] = 4;
            smth[5] = 2;
            smth[6] = 1;
            smth[7] = 2;
            smth[8] = 1;
            for (int row = 0; row < height; row++)
            {
                for (int column = 0; column < width; column++)
                {
                    if (row == 0 || column == 0 || row == height - 1 || column == width - 1)
                    {
                        OutImage[row * width + column] = 0;
                    }
                    else
                    {
                        //中心点的3*3领域
                        for (int m = -1; m < 2; m++)
                        {
                            for (int n = -1; n < 2; n++)
                            {
                                block[(m + 1) * 3 + n + 1] = SourceImage[(row + m) * width + column + n];
                            }
                        }
                        value = GaussConvolution(smth, block);
                        OutImage[row * width + column] = (byte)(value / 16);
                    }
                }
            }
            return OutImage;
        }

        //高斯滤波卷积过程
        private int GaussConvolution(int[] smth, byte[] block)
        {
            int value = 0;
            for (int i = 0; i < 3; i++)
            {
                for (int j = 0; j < 3; j++)
                {
                    value += smth[i * 3 + j] * block[i * 3 + j];
                }
            }
            return value;
        }

        #endregion

        #region 均值滤波
        private byte[] meanFilter(byte[] SourceImage, int width, int height)
        {
            byte[] OutImage = new byte[width * height];
            //中心点的3*3邻域
            byte[] block = new byte[9];
            int[] smth = new int[9];
            int value;
            for (int k = 0; k < 9; k++)
            {
                smth[k] = 1;
            }
            for (int row = 0; row < height; row++)
            {
                for (int column = 0; column < width; column++)
                {
                    if (row == 0 || column == 0 || row == height - 1 || column == width - 1)
                    {
                        OutImage[row * width + column] = 0;
                    }
                    else
                    {
                        //中心点的3*3领域
                        for (int m = -1; m < 2; m++)
                        {
                            for (int n = -1; n < 2; n++)
                            {
                                block[(m + 1) * 3 + n + 1] = SourceImage[(row + m) * width + column + n];
                            }
                        }
                        value = MeanConvolution(smth, block);
                        OutImage[row * width + column] = (byte)(value / 9);
                    }
                }
            }
            return OutImage;
        }

        //均值滤波卷积过程
        private int MeanConvolution(int[] smth, byte[] block)
        {
            int value = 0;
            for (int i = 0; i < 3; i++)
            {
                for (int j = 0; j < 3; j++)
                {
                    value += smth[i * 3 + j] * block[i * 3 + j];
                }
            }
            return value;
        }

        #endregion
    }
}
4556


【推荐】国内首个AI IDE,深度理解中文开发场景,立即下载体验Trae
【推荐】编程新体验,更懂你的AI,立即体验豆包MarsCode编程助手
【推荐】抖音旗下AI助手豆包,你的智能百科全书,全免费不限次数
【推荐】轻量又高性能的 SSH 工具 IShell:AI 加持,快人一步
· AI与.NET技术实操系列:基于图像分类模型对图像进行分类
· go语言实现终端里的倒计时
· 如何编写易于单元测试的代码
· 10年+ .NET Coder 心语,封装的思维:从隐藏、稳定开始理解其本质意义
· .NET Core 中如何实现缓存的预热?
· 25岁的心里话
· 闲置电脑爆改个人服务器(超详细) #公网映射 #Vmware虚拟网络编辑器
· 零经验选手,Compose 一天开发一款小游戏!
· 因为Apifox不支持离线,我果断选择了Apipost!
· 通过 API 将Deepseek响应流式内容输出到前端