

java-nio
javanio可以替换传统的io,对于java 的nio理解,可以联想到io。但是他们也有不一样的地方。
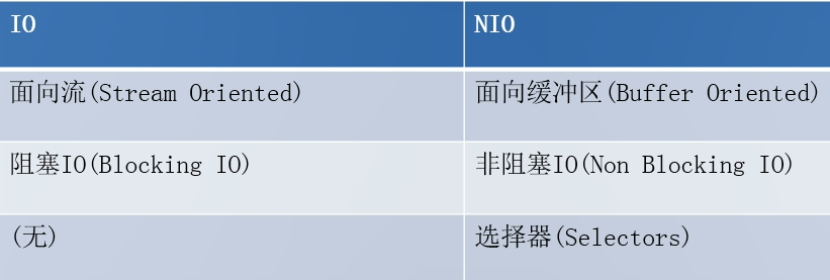
1.传统io和nio区别:
2.Buffer 中的重要概念:
Ø 容量 (capacity) : 表示 Buffer 最大数据容量,缓冲区容量不能为负,并且创建后不能更改。 缓冲区其实就是数据组,因为是数组,所以数据容量一旦固定就不能修改了。
Ø 限制 (limit): 第一个不应该读取或写入的数据的索引,即位于 limit 后的数据不可读写。缓冲区的限制不能为负,并且不能大于其容量。
Ø 位置 (position): 下一个要读取或写入的数据的索引。缓冲区的位置不能为负,并且不能大于其限制
Ø 标记 (mark)与重置 (reset): 标记是一个索引,通过 Buffer 中的 mark() 方法指定 Buffer 中一个特定的 position,之后可以通过调用 reset() 方法恢复到这个 position。
标记、 位置、 限制、 容量遵守以下不变式: 0 <= mark <= position <= limit <= capacity
注意:mark初始化为-1,表示没有标记过
3.来段代码理解一下
package com.nio.nio;

import java.nio.ByteBuffer;

import org.junit.Test;

/**
 * 一、缓冲区(Buffer):在java NIO中负责数据的存取。缓冲区就是数据。用于存储不同数据类型的数据
 *
 * 跟局数据类型的不同(boolean除外,其他7种基本类型全有),提供相应类型的缓冲区:
 * ByteBuffer
 * CharBuffer
 * ShortBuffer
 * IntBuffer
 * LongBuffer
 * FloatBuffer
 * DoubleBuffer
 *
 * 上述缓冲区的管理方式几乎一致,通过allocate()获取缓冲区
 * 最常用的是ByteBuffer,因为无论磁盘还是网络传输的都是Byte。
 *
 * 有了缓冲区,接下来要往缓冲区存取数据
 *
 * 二、缓冲区存取数据的两个核心方法:
 * put():存入数据到缓冲区中
 * get():获取缓冲区中的数据
 *
 * 要想对缓冲区的数据进行正确的存取的话,必须姚先了解几个缓冲区的核心属性
 *
 *
 * 三、缓冲区中的四个核心属性:
 * capacity:容量,表示缓冲区中最大存储数据的容量。一旦声明不能改变。(因为缓冲区就是数组,数组大小不可改变)
 * limit:界限,表示缓冲区中可以操作数据的大小。(limit后面的数据不能进行读写)
 * position:位置,表示缓冲区正在操作数据的位置。
 *
 * position <= limit <= capacity
 *
 *
 * mark:标记,表示记录当前position的位置。可以用过reset()恢复到mark的位置。
 *
 * 0 <= mark <= position <= limit <= capacity
 *
 * mark初始化为-1,表示没有标记过
 *
 *
 * @author HappyBks
 *
 */
public class TestBuffer {


    @Test
    public void test1(){
        //1、分配一个是指定大小的缓冲区
        ByteBuffer buf=ByteBuffer.allocate(1024);//指定缓冲区大小capacity为1024
        printBufferStatus(buf, "allocate()");

        //2、利用put()方法存入数据到缓冲区中
        final String dataStr="abcde";
        buf.put(dataStr.getBytes());
        printBufferStatus(buf, "put()");


        //3、切换读取数据模式
        buf.flip();
        printBufferStatus(buf, "flip()");

        //4、利用get()读取缓冲区中的数据
        byte[] dst=new byte[buf.limit()];
        buf.get(dst);
        System.out.println(new String(dst, 0 , dst.length));
        printBufferStatus(buf, "get()");


        //5、调用rewind(),恢复读模式到读之前的初始状态,用于可重复再读一次
        buf.rewind();
        printBufferStatus(buf, "rewind()");

        //6、clear()清空缓冲区,回到allocate()申请缓冲区的最初状态。
        //但是请注意,这个恢复到最初状态,指定是buffer的几个核心属性恢复到最初状态,
        //里面的数据依然还在,只不过这些数据处于“被遗忘”状态。
        //所谓被遗忘状态,是指buffer的几个指针都恢复到了初始位置,里面有几个数据,从哪读到哪,已经都不知道了。
        buf.clear();
        printBufferStatus(buf, "clear()");
        //尝试读取被clear()清空之后的缓冲区,数据依然在。(因为clear之后,我们无法之后原来有几个数据,所以读一个)
        System.out.println("clear()之后试着get()一个byte: "+(char)buf.get());

    }

    private void printBufferStatus(ByteBuffer buf, String info) {
        System.out.println("---------"+info+"----------");
        System.out.println("position: "+buf.position());
        System.out.println("limit: "+buf.limit());
        System.out.println("capacity: "+buf.capacity());
        System.out.println();
    }


    @Test
    public void test2(){
        final String dataStr="abcde";
        ByteBuffer buf=ByteBuffer.allocate(1024);
        buf.put(dataStr.getBytes());
        buf.flip();
        byte[] dst=new byte[buf.limit()];
        buf.get(dst, 0, 2);
        System.out.println("get(dst, 0, 2): "+new String(dst, 0, 2));
        System.out.println("get(dst, 0, 2) position: "+buf.position());

        //mark():标记
        buf.mark();
        System.out.println("mark() position: "+buf.position());


        buf.get(dst, 2, 2);
        System.out.println("get(dst, 2, 2): "+new String(dst, 2, 2));
        System.out.println("get(dst, 2, 2) position: "+buf.position());

        //reset():恢复到mark的位置
        buf.reset();
        System.out.println("reset() position: "+buf.position());

        //判断缓冲区中是否还有剩余数据
        if(buf.hasRemaining()){
            //获取缓冲区中农剩余的可以操作的数据量
            System.out.println("buf.remaining(): "+buf.remaining());
        }

    }
}
第一个例子演示了NIO的Byte缓冲区(其他数据类型的缓冲区操作方式大同小异)申请、写入、切换读模式、读取、可重复读、清空几个基本操作的使用方法,以及在这每个操作阶段缓冲区几个核心属性capacity、limit、position的变化。
第二个例子演示了读取时,如何标记特定位置、之后重置回到改位置重新读取、以及判断读取是否还有剩余、获知还剩多少未读的方法,以及每个操作阶段缓冲区几个核心属性position的变化。
4.直接缓存区和非直接缓存区:
看下一章直接缓冲区和非直接缓冲区的区别
5.通道概念
6.选择器
7.网络nio
ackage com.nio.nio;

import java.io.IOException;
import java.net.InetSocketAddress;
import java.nio.ByteBuffer;
import java.nio.channels.FileChannel;
import java.nio.channels.ServerSocketChannel;
import java.nio.channels.SocketChannel;
import java.nio.file.Paths;
import java.nio.file.StandardOpenOption;

import org.junit.Test;

/**
 *
 * 一、使用NIO完成网络通信的三个核心:
 * 1. 通道(Channel):负责连接
 *     java.nio.channels.Channel
 *         |-- SelectableChannel
 *             |-- SocketChannel
 *             |-- ServerSocketChannel
 *             |-- DatagramChannel
 *
 *             |-- Pipe.SinkChannel
 *             |-- Pipe.SourceChannel
 * (注意:FileChannel不能使用非阻塞模式!!!选择其主要监控网络Channel)
 *
 * 2. 缓冲区(Buffer):负责数据的存取
 * 3. 选择器(Selector):是SelectableChannel的多路复用器。用于监控SelectableChannel的IO状况
 *
 *
 */
public class TestBlockingNIO {

    //客户端
    @Test
    public void client() throws IOException{
        //1、获取通道(open这种方法是jdk1.7之后才引入的)
        SocketChannel socketChannel = SocketChannel.open(new InetSocketAddress("127.0.0.1", 8888));

        //2、分配指定大小的缓冲区
        ByteBuffer buf=ByteBuffer.allocate(1024);

        //3、从本地读取文件,并发送到服务端
        FileChannel inFileChannel=FileChannel.open(Paths.get("D:/Test/NIO/1.jpg"), StandardOpenOption.READ);
        while(inFileChannel.read(buf)!=-1){
            buf.flip();
            socketChannel.write(buf);
            buf.clear();
        }

        //4、关闭通道
        inFileChannel.close();
        socketChannel.close();
    }

    //服务端
    @Test
    public void server() throws IOException{
        //1、获取端口
        ServerSocketChannel serverSocketChannel = ServerSocketChannel.open();

        //2、绑定连接
        serverSocketChannel.bind(new InetSocketAddress(8888));

        //3、获取客户端连接的通道
        SocketChannel socketChannel = serverSocketChannel.accept();

        //4、接收客户端的数据,保存到本地。(提到本地,就要弄个FileChannel)
        FileChannel outFileChannel = FileChannel.open(Paths.get("D:/Test/NIO/2.jpg"), StandardOpenOption.WRITE,StandardOpenOption.CREATE);
        ByteBuffer buf=ByteBuffer.allocate(1024);
        while(socketChannel.read(buf)!=-1){
            buf.flip();
            outFileChannel.write(buf);
            buf.clear();
        }

        socketChannel.close();
        outFileChannel.close();
        serverSocketChannel.close();

    }
}
package com.nio.nio;

import java.io.IOException;
import java.net.InetSocketAddress;
import java.nio.ByteBuffer;
import java.nio.channels.FileChannel;
import java.nio.channels.ServerSocketChannel;
import java.nio.channels.SocketChannel;
import java.nio.file.Paths;
import java.nio.file.StandardOpenOption;

import org.junit.Test;

/**
 *
 * 一、使用NIO完成网络通信的三个核心:
 * 1. 通道(Channel):负责连接
 *     java.nio.channels.Channel
 *         |-- SelectableChannel
 *             |-- SocketChannel
 *             |-- ServerSocketChannel
 *             |-- DatagramChannel
 *
 *             |-- Pipe.SinkChannel
 *             |-- Pipe.SourceChannel
 * (注意:FileChannel不能使用非阻塞模式!!!选择其主要监控网络Channel)
 *
 * 2. 缓冲区(Buffer):负责数据的存取
 * 3. 选择器(Selector):是SelectableChannel的多路复用器。用于监控SelectableChannel的IO状况
 *
 *
 */
public class TestBlockingNIO {

    //客户端
    @Test
    public void client() throws IOException{
        //1、获取通道(open这种方法是jdk1.7之后才引入的)
        SocketChannel socketChannel = SocketChannel.open(new InetSocketAddress("127.0.0.1", 8888));

        //2、分配指定大小的缓冲区
        ByteBuffer buf=ByteBuffer.allocate(1024);

        //3、从本地读取文件,并发送到服务端
        FileChannel inFileChannel=FileChannel.open(Paths.get("D:/Test/NIO/1.jpg"), StandardOpenOption.READ);
        while(inFileChannel.read(buf)!=-1){
            buf.flip();
            socketChannel.write(buf);
            buf.clear();
        }
/*
        //在阻塞IO下,如果关闭socketChannel,那么服务端不知道客户端是否已经把所有数据发完,所以会一直阻塞。
        socketChannel.shutdownOutput();
        //另一种方法就是把这个线程切换成非阻塞模式
        */

        //接收服务端反馈
        int len = 0;
        while((len = socketChannel.read(buf)) !=-1){
            buf.flip();
            System.out.println(new String(buf.array(),0,len));
        }

        //4、关闭通道
        inFileChannel.close();
        socketChannel.close();
    }

    //服务端
    @Test
    public void server() throws IOException{
        //1、获取端口
        ServerSocketChannel serverSocketChannel = ServerSocketChannel.open();

        //2、绑定连接
        serverSocketChannel.bind(new InetSocketAddress(8888));

        //3、获取客户端连接的通道
        SocketChannel socketChannel = serverSocketChannel.accept();

        //4、接收客户端的数据,保存到本地。(提到本地,就要弄个FileChannel)
        FileChannel outFileChannel = FileChannel.open(Paths.get("D:/Test/NIO/2.jpg"), StandardOpenOption.WRITE,StandardOpenOption.CREATE);
        ByteBuffer buf=ByteBuffer.allocate(1024);
        while(socketChannel.read(buf)!=-1){
            buf.flip();
            outFileChannel.write(buf);
            buf.clear();
        }

        //发送反馈给客户端
        buf.put("服务端接收数据成功!".getBytes());
        buf.flip();
        socketChannel.write(buf);

        socketChannel.close();
        outFileChannel.close();
        serverSocketChannel.close();

    }
}
public class TestBlockingNIO {

    //客户端
    @Test
    public void client() throws IOException{
        //1、获取通道(open这种方法是jdk1.7之后才引入的)
        SocketChannel socketChannel = SocketChannel.open(new InetSocketAddress("127.0.0.1", 8888));

        //2、分配指定大小的缓冲区
        ByteBuffer buf=ByteBuffer.allocate(1024);

        //3、从本地读取文件,并发送到服务端
        FileChannel inFileChannel=FileChannel.open(Paths.get("D:/Test/NIO/1.jpg"), StandardOpenOption.READ);
        while(inFileChannel.read(buf)!=-1){
            buf.flip();
            socketChannel.write(buf);
            buf.clear();
        }

        //在阻塞IO下,如果关闭socketChannel,那么服务端不知道客户端是否已经把所有数据发完,所以会一直阻塞。
        socketChannel.shutdownOutput();
        //另一种方法就是把这个线程切换成非阻塞模式


        //接收服务端反馈
        int len = 0;
        while((len = socketChannel.read(buf)) !=-1){
            buf.flip();
            System.out.println(new String(buf.array(),0,len));
        }

        //4、关闭通道
        inFileChannel.close();
        socketChannel.close();
    }

    //服务端
    @Test
    public void server() throws IOException{
        //1、获取端口
        ServerSocketChannel serverSocketChannel = ServerSocketChannel.open();

        //2、绑定连接
        serverSocketChannel.bind(new InetSocketAddress(8888));

        //3、获取客户端连接的通道
        SocketChannel socketChannel = serverSocketChannel.accept();

        //4、接收客户端的数据,保存到本地。(提到本地,就要弄个FileChannel)
        FileChannel outFileChannel = FileChannel.open(Paths.get("D:/Test/NIO/2.jpg"), StandardOpenOption.WRITE,StandardOpenOption.CREATE);
        ByteBuffer buf=ByteBuffer.allocate(1024);
        while(socketChannel.read(buf)!=-1){
            buf.flip();
            outFileChannel.write(buf);
            buf.clear();
        }

        //发送反馈给客户端
        buf.put("服务端接收数据成功!".getBytes());
        buf.flip();
        socketChannel.write(buf);

        socketChannel.close();
        outFileChannel.close();
        serverSocketChannel.close();

    }
}
package com.nio.nio;

import java.io.IOException;
import java.net.InetSocketAddress;
import java.nio.ByteBuffer;
import java.nio.channels.SelectionKey;
import java.nio.channels.Selector;
import java.nio.channels.ServerSocketChannel;
import java.nio.channels.SocketChannel;
import java.util.Date;
import java.util.Iterator;

import org.junit.Test;

public class TestNonBlockingNIO {

    //客户端
    @Test
    public  void client() throws IOException{
        //1、获取通道
        SocketChannel socketChannel = SocketChannel.open(new InetSocketAddress("127.0.0.1",8888));
        //2、切换非阻塞模式
        socketChannel.configureBlocking(false);

        //3、分配指定大小的缓冲区
        ByteBuffer buf=ByteBuffer.allocate(1024);

        //4、发送数据服务器
        buf.put(new Date().toString().getBytes());
        buf.flip();
        socketChannel.write(buf);
        buf.clear();

        //5、关闭通道
        socketChannel.close();
    }

    //服务端
    @Test
    public  void server() throws IOException{
        //1、获取通道
        ServerSocketChannel serverSocketChannel = ServerSocketChannel.open();
        //2、切换非阻塞模式
        serverSocketChannel.configureBlocking(false);

        //3、绑定连接
        serverSocketChannel.bind(new InetSocketAddress(8888));

        //4、获取选择器
        Selector selector = Selector.open();

        //5、将通道注册到选择器上(第二个选项参数叫做选择键,用于告诉选择器需要监控这个通道的什么状态或者说什么事件(读、写、连接、接受))
        //选择键是整型值,如果需要监控该通道的多个状态或事件,可以将多个选择键用位运算符“或”“|”来连接
        //这里服务端首先要监听客户端的接受状态
        serverSocketChannel.register(selector, SelectionKey.OP_ACCEPT);

        //6、轮询式地获取选择器上已经“准备就绪”的事件
        while(selector.select() > 0){

            //7、获取当前选择中所有注册的“选择键(已就绪的监听事件)”
            Iterator<SelectionKey> iterator = selector.selectedKeys().iterator();


            while(iterator.hasNext()){
                //8、获取准备“就绪”的是事件
                SelectionKey sk=iterator.next();

                //9、判断是什么事件准备就绪
                if(sk.isAcceptable()){
                    //10、若接受就绪,获取客户端连接
                    SocketChannel socketChannel = serverSocketChannel.accept();

                    //11、客户端连接socketChannel也需要切换非阻塞模式
                    socketChannel.configureBlocking(false);

                    //12、将该通道注册到选择器上,监控客户端socketChannel的读就绪事件
                    socketChannel.register(selector, SelectionKey.OP_READ);
                }
                else if(sk.isReadable()){
                    //13、获取当前选择器上“读就绪”状态的通道
                    SocketChannel socketChannel = (SocketChannel) sk.channel();

                    //14、读取数据
                    ByteBuffer buf=ByteBuffer.allocate(1024);

                    int len=0;
                    while((len=socketChannel.read(buf))>0){
                        buf.flip();
                        System.out.println(new String(buf.array(),0,len));
                        buf.clear();
                    }
                }

                //15、取消选择键SelectionKey
                iterator.remove();
            }

        }


    }
}
8.udpnoi
9.管道
