React Native 快速上手
react native
储备知识
扎实的JS基础+React相关知识
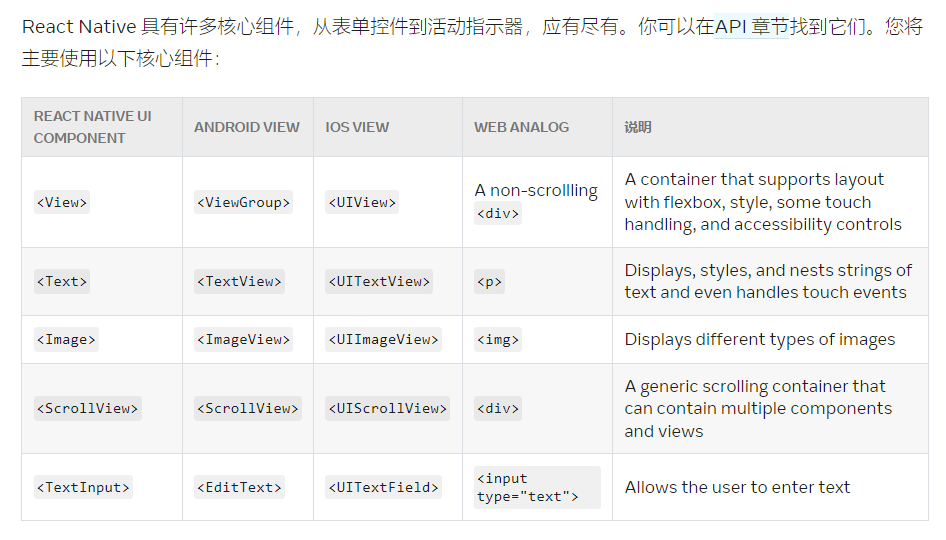
核心组件

创建项目:
npm uninstall -g react-native-cli @react-native-community/cli
npx react-native init AwesomeProject
使用示例
import React from 'react';
import { View, Text, Image, ScrollView, TextInput } from 'react-native';
const App = () => {
  return (
    <ScrollView>
      <Text>Some text</Text>
      <View>
        <Text>Some more text</Text>
        <Image
          source={{
            uri: 'https://reactnative.dev/docs/assets/p_cat2.png',
          }}
          style={{ width: 200, height: 200 }}
        />
      </View>
      <TextInput
        style={{
          height: 40,
          borderColor: 'gray',
          borderWidth: 1
        }}
        defaultValue="You can type in me"
      />
    </ScrollView>
  );
}
export default App;
组件使用
文本组件
import React, { useState } from 'react';
import { Text, TextInput, View } from 'react-native';

const PizzaTranslator = () => {
  const [text, setText] = useState('');
  return (
    <View style={{padding: 10}}>
      <TextInput
        style={{height: 40}}
        placeholder="Type here to translate!"
        onChangeText={text => setText(text)}
        defaultValue={text}
      />
      <Text style={{padding: 10, fontSize: 42}}>
        {text.split(' ').map((word) => word && '🍕').join(' ')}
      </Text>
    </View>
  );
}

export default PizzaTranslator;
滚动视图
import React from 'react';
import { Image, ScrollView, Text } from 'react-native';

const logo = {
  uri: 'https://reactnative.dev/img/tiny_logo.png',
  width: 64,
  height: 64
};

export default App = () => (
  <ScrollView>
    <Text style={{ fontSize: 96 }}>Scroll me plz</Text>
    <Image source={logo} />
    <Image source={logo} />
    <Image source={logo} />
    <Image source={logo} />
    <Image source={logo} />
    <Text style={{ fontSize: 96 }}>If you like</Text>
    <Image source={logo} />
    <Image source={logo} />
    <Image source={logo} />
    <Image source={logo} />
    <Image source={logo} />
    <Text style={{ fontSize: 96 }}>Scrolling down</Text>
    <Image source={logo} />
    <Image source={logo} />
    <Image source={logo} />
    <Image source={logo} />
    <Image source={logo} />
    <Text style={{ fontSize: 96 }}>What's the best</Text>
    <Image source={logo} />
    <Image source={logo} />
    <Image source={logo} />
    <Image source={logo} />
    <Image source={logo} />
    <Text style={{ fontSize: 96 }}>Framework around?</Text>
    <Image source={logo} />
    <Image source={logo} />
    <Image source={logo} />
    <Image source={logo} />
    <Image source={logo} />
    <Text style={{ fontSize: 80 }}>React Native</Text>
  </ScrollView>
);
长列表的使用
fast List
FlatList更适于长列表数据,且元素个数可以增删。和ScrollView不同的是,FlatList并不立即渲染所有元素,而是优先渲染屏幕上可见的元素。
sectionList
如果要渲染的是一组需要分组的数据,也许还带有分组标签的,那么SectionList将是个不错的选择
特定平台代码
Platform模块
如果只有代码中的一小部分需要检测当前平台,推荐使用Platform模块
import {Platform, StyleSheet} from 'react-native';

const styles = StyleSheet.create({
  height: Platform.OS === 'ios' ? 200 : 100,
});
检测安卓版本
在 Android 上,Version属性是一个数字,表示 Android 的 api level:
import {Platform} from 'react-native';

if (Platform.Version === 25) {
  console.log('Running on Nougat!');
}
检测IOS版本
在 iOS 上,Version属性是-[UIDevice systemVersion]的返回值,具体形式为一个表示当前系统版本的字符串。比如可能是"10.3"。
import {Platform} from 'react-native';

const majorVersionIOS = parseInt(Platform.Version, 10);
if (majorVersionIOS <= 9) {
  console.log('Work around a change in behavior');
}
特定平台后缀
当不同平台的代码逻辑较为复杂时,最好是放到不同的文件里,这时候我们可以使用特定平台后缀。React Native 会检测某个文件是否具有.ios.或是.android.的后缀,然后根据当前运行的平台自动加载正确对应的文件。
比如你可以在项目中创建下面这样的组件:
BigButton.ios.js
BigButton.android.js
然后去掉平台后缀直接引用:
import BigButton from './BigButton';
React Native 会根据运行平台的不同自动引入正确对应的组件。
如果你还希望在 web 端复用 React Native 的代码,那么还可以使用.native.js的后缀。此时 iOS 和 Android 会使用BigButton.native.js文件,而 web 端会使用BigButton.js。(注意目前官方并没有直接提供 web 端的支持,请在社区搜索第三方方案)。
比如在你的项目中存在如下的两个文件:
Container.js # 由 Webpack, Rollup 或者其他打包工具打包的文件
Container.native.js # 由 React Native 自带打包工具(Metro) 为ios和android 打包的文件
在引用时并不需要添加.native.后缀:
import Container from './Container';
提示: 为避免在构建后的 Web 生产环境的代码中出现多余代码,要记得在你的 Web 打包工具中配置忽略.native.js结尾的文件, 这样可以减少打包后文件的大小。

