Python-初见-高级篇
推荐阅读:https://www.cnblogs.com/zwtblog/tag/Python/
正则表达式
主要是 re 模块:
# public symbols
__all__ = [
    "match", "fullmatch", "search", "sub", "subn", "split",
    "findall", "finditer", "compile", "purge", "template", "escape",
    "error", "Pattern", "Match", "A", "I", "L", "M", "S", "X", "U",
    "ASCII", "IGNORECASE", "LOCALE", "MULTILINE", "DOTALL", "VERBOSE",
    "UNICODE",
]
CGI
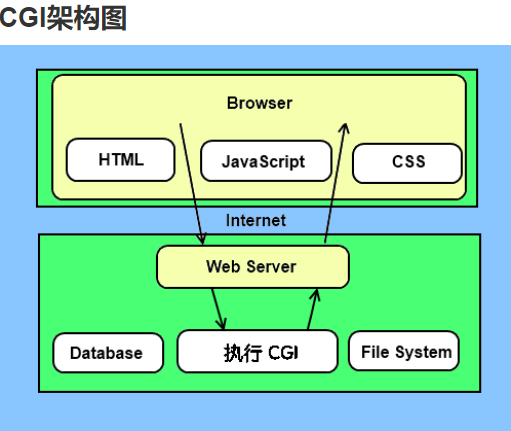
CGI 目前由NCSA维护,NCSA定义CGI如下:
CGI(Common Gateway Interface),通用网关接口,它是一段程序,运行在服务器上如:HTTP服务器,提供同客户端HTML页面的接口。

MySQL
mysql-connector 是 MySQL 官方提供的驱动器。
我们可以使用 pip 命令来安装 mysql-connector:
python -m pip install mysql-connector
使用以下代码测试 mysql-connector 是否安装成功:
demo_mysql_test.py:
import mysql.connector
PyCharm连接MySql数据库:Plugins 下载 Database Navigator ,插件激活登录即可。
pip,我这里没有配置环境变量,路径:C:\Users\用户\AppData\Local\Programs\Python\Python39\Scripts,里面使用pip。默认下载路径:C:\Users\用户\AppData\Local\pip\cache
加速pip
Windows下需要在user的目录中创建一个pip文件夹,然后在这pip文件夹下创建一个pip.ini,比如我的路径是:C:\Users\用户\pip。然后编辑pip.ini文件:
[global]
index-url = https://pypi.tuna.tsinghua.edu.cn/simple
[install]
trusted-host = https://pypi.tuna.tsinghua.edu.cn
PyMySQL
PyMySQL 是在 Python3.x 版本中用于连接 MySQL 服务器的一个库,Python2 中则使用 mysqldb。
PyMySQL 遵循 Python 数据库 API v2.0 规范,并包含了 pure-Python MySQL 客户端库。
pip3 install PyMySQL
网络编程
Python 提供了两个级别访问的网络服务。:
- 低级别的网络服务支持基本的 Socket,它提供了标准的 BSD Sockets API,可以访问底层操作系统Socket接口的全部方法。
- 高级别的网络服务模块 SocketServer, 它提供了服务器中心类,可以简化网络服务器的开发。
socket()函数
Python 中,我们用 socket() 函数来创建套接字,语法格式如下:
socket.socket([family[, type[, proto]]])
参数
- family: 套接字家族可以是 AF_UNIX 或者 AF_INET
- type: 套接字类型可以根据是面向连接的还是非连接分为
SOCK_STREAM或SOCK_DGRAM - protocol: 一般不填默认为0
多线程
Python3 线程中常用的两个模块为:
- _thread
- threading(推荐使用)
thread 模块已被废弃。用户可以使用 threading 模块代替。
所以,在 Python3 中不能再使用"thread" 模块。为了兼容性,Python3 将 thread 重命名为 "_thread"。
Python中使用线程有两种方式:函数 或者 用类来包装线程对象。
函数式:调用 _thread 模块中的 start_new_thread() 函数来产生新线程。
语法如下:
_thread.start_new_thread ( function, args[, kwargs] )
参数说明:
- function - 线程函数。
- args - 传递给线程函数的参数,他必须是个tuple类型。
- kwargs - 可选参数。
import _thread
import time


# 为线程定义一个函数
def print_time(threadName, delay):
    count = 0
    while count < 5:
        time.sleep(delay)
        count += 1
        print("%s: %s" % (threadName, time.ctime(time.time())))


# 创建两个线程
try:
    _thread.start_new_thread(print_time, ("Thread-1", 1,))
    _thread.start_new_thread(print_time, ("Thread-2", 2,))
except:
    print("Error: 无法启动线程")

while 1:
    pass
使用 threading 模块创建线程
我们可以通过直接从 threading.Thread 继承创建一个新的子类,并实例化后调用 start() 方法启动新线程,
即它调用了线程的 run() 方法:
import threading
import time

exitFlag = 0


class myThread(threading.Thread):
    def __init__(self, threadID, name, delay):
        threading.Thread.__init__(self)
        self.threadID = threadID
        self.name = name
        self.delay = delay

    def run(self):
        print("开始线程:" + self.name)
        print_time(self.name, self.delay, 5)
        print("退出线程:" + self.name)


def print_time(threadName, delay, counter):
    while counter:
        if exitFlag:
            threadName.exit()
        time.sleep(delay)
        print("%s: %s" % (threadName, time.ctime(time.time())))
        counter -= 1


# 创建新线程
thread1 = myThread(1, "Thread-1", 1)
thread2 = myThread(2, "Thread-2", 2)

# 开启新线程
thread1.start()
thread2.start()
thread1.join()
thread2.join()
print("退出主线程")
线程同步
如果多个线程共同对某个数据修改,则可能出现不可预料的结果,为了保证数据的正确性,需要对多个线程进行同步。
使用 Thread 对象的 Lock 和 Rlock 可以实现简单的线程同步,
这两个对象都有 acquire 方法和 release 方法,
对于那些需要每次只允许一个线程操作的数据,可以将其操作放到 acquire 和 release 方法之间。
如下:
import threading
import time


class myThread(threading.Thread):
    def __init__(self, threadID, name, delay):
        threading.Thread.__init__(self)
        self.threadID = threadID
        self.name = name
        self.delay = delay

    def run(self):
        print("开启线程: " + self.name)
        # 获取锁,用于线程同步
        threadLock.acquire()
        print_time(self.name, self.delay, 3)
        # 释放锁,开启下一个线程
        threadLock.release()


def print_time(threadName, delay, counter):
    while counter:
        time.sleep(delay)
        print("%s: %s" % (threadName, time.ctime(time.time())))
        counter -= 1


threadLock = threading.Lock()
threads = []

# 创建新线程
thread1 = myThread(1, "Thread-1", 1)
thread2 = myThread(2, "Thread-2", 2)

# 开启新线程
thread1.start()
thread2.start()

# 添加线程到线程列表
threads.append(thread1)
threads.append(thread2)

# 等待所有线程完成
for t in threads:
    t.join()
print("退出主线程")
线程优先级
Python 的 Queue 模块中提供了同步的、线程安全的队列类,包括FIFO(先入先出)队列Queue,LIFO(后入先出)队列LifoQueue,和优先级队列 PriorityQueue。
这些队列都实现了锁原语,能够在多线程中直接使用,可以使用队列来实现线程间的同步。
JSON
Python3 中可以使用 json 模块来对 JSON 数据进行编解码,它包含了两个函数:
- json.dumps(): 对数据进行编码。
- json.loads(): 对数据进行解码。
Python 编码为 JSON 类型转换对应表:
| Python | JSON |
|---|---|
| dict | object |
| list, tuple | array |
| str | string |
| int, float, int- & float-derived Enums | number |
| True | true |
| False | false |
| None | null |


【推荐】国内首个AI IDE,深度理解中文开发场景,立即下载体验Trae
【推荐】编程新体验,更懂你的AI,立即体验豆包MarsCode编程助手
【推荐】抖音旗下AI助手豆包,你的智能百科全书,全免费不限次数
【推荐】轻量又高性能的 SSH 工具 IShell:AI 加持,快人一步
· 没有Manus邀请码?试试免邀请码的MGX或者开源的OpenManus吧
· 无需6万激活码!GitHub神秘组织3小时极速复刻Manus,手把手教你使用OpenManus搭建本
· C#/.NET/.NET Core优秀项目和框架2025年2月简报
· DeepSeek在M芯片Mac上本地化部署
· 葡萄城 AI 搜索升级:DeepSeek 加持,客户体验更智能