js作业合集
14-根据数组渲染京东商品列表
<!DOCTYPE html>
<html lang="en">
<head>
<meta charset="UTF-8">
<title>Document</title>
</head>
<style>
li{
list-style-type: none;
padding: 0;
margin: 0;
width: 200px;
height: 260px;
border: 1px solid #000;
text-align: center;
float:left;
margin: 10px;
}
li img{
width: 140px;
height: 140px;
}
li p{
overflow: hidden;
text-overflow: ellipsis;
white-space:nowrap;
width: 150px;
margin:0 auto;
}
</style>
<body>
</body>
<script>
// 虽然数组中可以存放各种不同的数据,但是通常我们在项目中,会给数组中存放相同类型的数据
// 共有4个商品,且4个商品的数据都是一样的,所以将4个商品的数据存放在数组中
var arr = [
// 每个商品都包含3个东西,这3个东西都是不一样的:图片链接、名称、价格,为了更好的能分辨清楚这3个东西,就将每个商品的数据,作为一个对象
{
goodsImg: 'https://img30.360buyimg.com/seckillcms/s280x280_jfs/t1/126365/21/24434/63006/622af7b6E6808ac6d/ce21176f2d23014b.jpg.webp',
goodsName: '多莱米(Doremi) 无线蓝牙耳机半入耳超薄迷你隐形健身运动音乐游戏适用于oppo华为vivo苹果 黑色 轻薄贴耳 睡躺可戴',
goodsPrice: '83.00'
},
{
goodsImg: 'https://img12.360buyimg.com/seckillcms/s280x280_jfs/t1/209493/25/10274/137859/619c90e6Ea0593ce4/6ceaab5d094f4008.jpg.webp',
goodsName: '朵唯(DOOV)D13 Pro 4G老人手机 移动联通电信全网通 大图标大字老年机 百元学生手机 32GB拍照手机 青空蓝',
goodsPrice: '479.00'
},
{
goodsImg: 'https://img10.360buyimg.com/seckillcms/s280x280_jfs/t1/214381/37/14975/192879/622dc5d9E21737376/d4ef53fed054372d.jpg.webp',
goodsName: '【男童鞋】安踏儿童运动鞋男童跑鞋网面透气中大童男鞋2022年春季新品官网旗舰休闲鞋青少年学生童鞋 【透气网面】深藏青/阳光橙/安踏白 36码/内长23cm',
goodsPrice: '129.00'
}
]
console.log(arr);
// 每个商品都是一个列表项,应该每个商品信息都使用li标签
for(var i=0; i<arr.length; i++) {
document.write('<li>');
// arr[0] 获取到数组中第一个对象
var goods = arr[i]
// 对象中获取图片路径,使用goods.goodsImg获取,获取到的图片路径赋值给imgPath变量
var imgPath = goods.goodsImg
document.write('<img src="' + imgPath + '" />');
document.write('<p>'+goods.goodsName+'</p>');
document.write('<span>'+goods.goodsPrice+'</span>');
document.write('</li>');
}
</script>
</html>
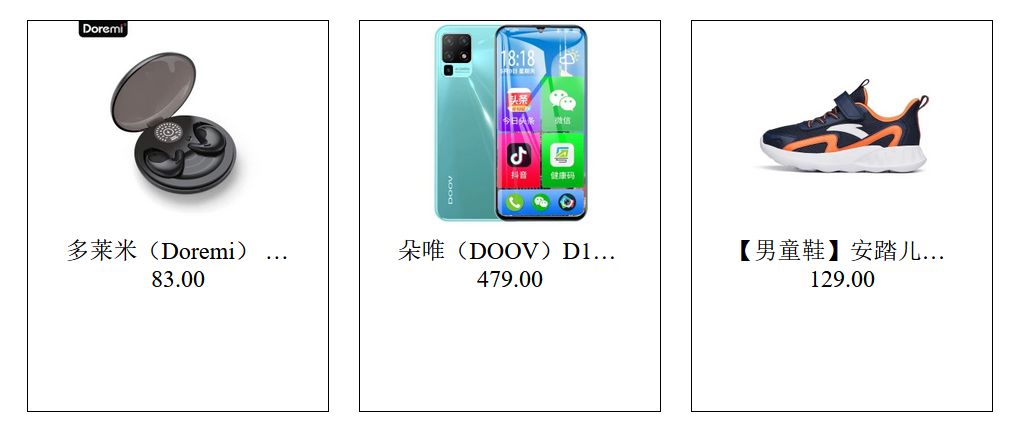
页面效果
将'I Love You'转换成'You Love I'

将'i love you'这个字符串转成'You Love I'
思路:先将每个单词的首字母大写,然后再进行上面步骤
1.将每个单词获取到 - 将字符串转成数组
2.将每个单词首字母大写 - 数组中的每个元素就可以进行首字母大写
3.将首字母打的获取到转大写,跟单词后面的字符拼接在一起
*/
// var str = 'i love you'
// 将字符串转成数组
// var arr = str.split(' ')
// console.log(arr);
// 每个单词都需要首字母大写 - 遍历数组
// var brr = []
// arr.forEach(function(v) {
// // v就是遍历出来的每个元素
// // console.log(v);
// // 将v的第一个字符获取到并转大写
// // console.log(v[0])
// var firstWord = v[0].toUpperCase()
// // console.log(firstWord);
// // 要跟后面的字符拼接 - 获取到首字母后面的所有字符 - 截取字符串
// var otherWords = v.slice(1)
// // console.log(otherWords);
// // 拼接
// var newWord = firstWord + otherWords
// // console.log(newWord);
// // 将所有新单词放在brr中
// brr.push(newWord)
// })
// console.log(arr);
// console.log(brr);
// var brr = arr.map(function(v) {
// var firstWord = v[0].toUpperCase()
// var otherWords = v.slice(1)
// return firstWord + otherWords
// })
// // console.log(brr);
// var str1 = brr.reverse().join(' ')
// console.log(str1);
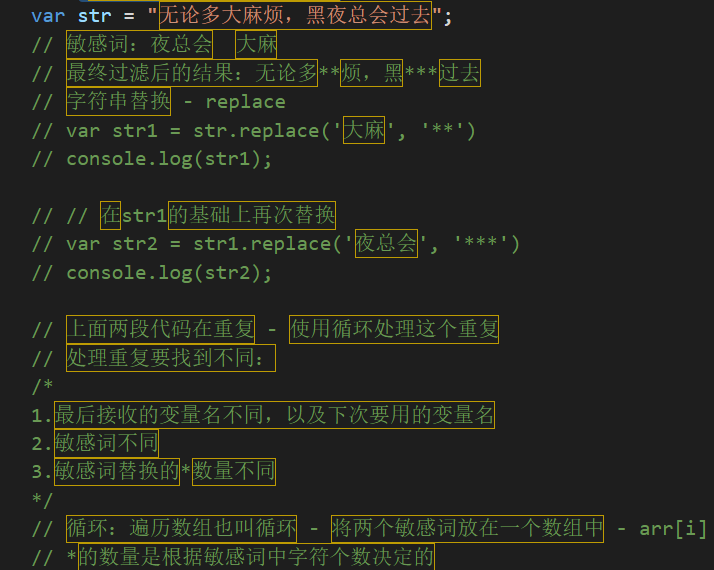
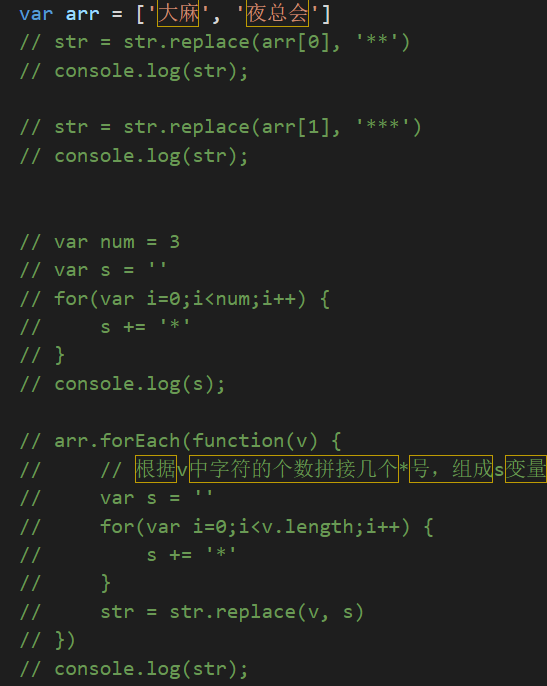
过滤下面字符串中的敏感词
字符串去重复
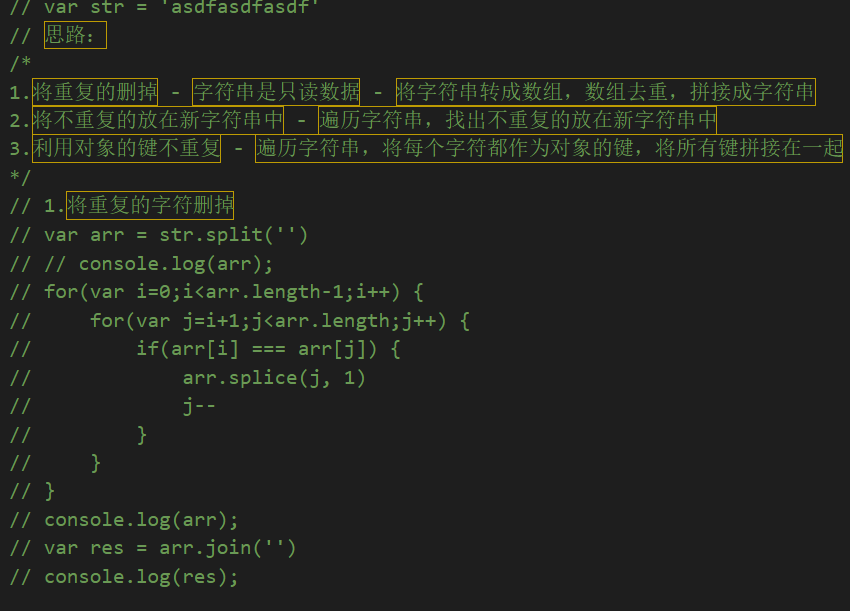
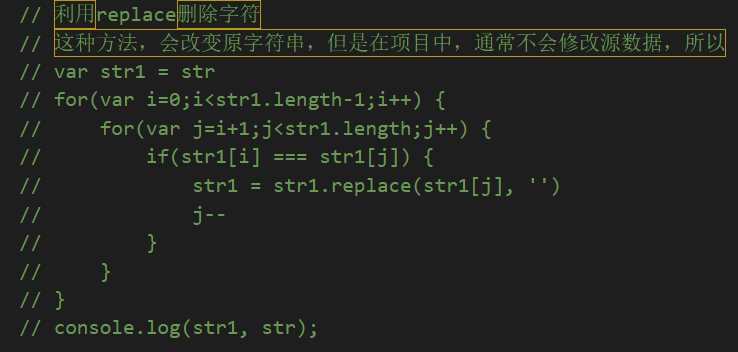
// 将不重复的放在新字符串中
// var str = 'asdfasdfasdf'
// var str1 = str[0] // as
// for(var i=1; i<str.length; i++) {
// var a = true
// // 小循环在判断str[i]在不在str1中 - indexOf 在字符串中找元素第一次出现的下标,如果找到了,返回下标,找不到返回-1 - 可以利用这个方法判断某个字符是否在字符串中
// var index = str1.indexOf(str[i])
// if(index < 0) {
// str1 += str[i]
// }
// // for(var j=0; j<str1.length; j++) {
// // if(str[i] === str1[j]) {
// // a = false
// // break
// // } else {
// // // 遍历了一个源字符串中的字符,跟str1中的第一个字符不相等,但是我们判断的是这个字符在不在str1中,应该将str1中所有字符都跟当前字符去比较,不能肯定这个字符就不在str1中
// // }
// // }
// // // 当小循环结束了,都没有一次是break,才能肯定这个字符他不在str1中
// // // 判断上面的循环是否完整的执行结束了,而不是中间被break了
// // // if(j === str1.length) {
// // // str1 += str[i]
// // // }
// // if(a) {
// // str1 += str[i]
// // }
// }
// console.log(str1);
// for(var i=1; i<100; i++) {
// if(i === 5) {
// break
// }
// }
// 如何判断上面循环是否完整执行结束了
// 当循环完整结束后,这里输出i是100
// 如果被break了,这里输出i是5
利用对象的键不重复
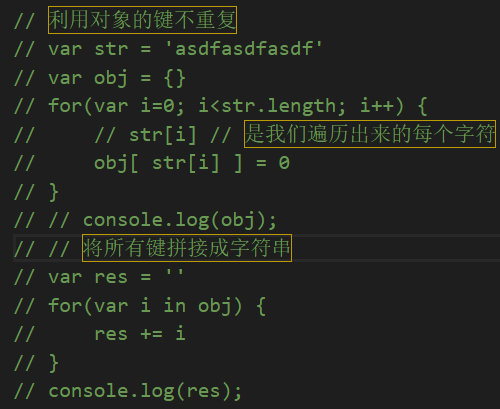
统计字符串中每个字符的个数
// 思路:
/*
1.统计一个字符的个数
2.遍历字符串统计每个
*/
// var str = 'asdfasdfasdfasdefasdfss'
// 统计a的个数 - 遍历字符串,每个字符跟当前字符比较是否一样,一样了计数器++
// var k = 0
// for(var i=0; i<str.length; i++) {
// if(str[i] === 's') {
// k++
// }
// }
// console.log(k);
// 遍历字符串,每个字符的个数统计
// for(var j=0; j<str.length; j++) {
// // 统计str[j]他出现的个数 - str[j]中有重复的字符,会有很多重复的统计
// var k = 0
// for(var i=0; i<str.length; i++) {
// if(str[i] === str[j]) {
// k++
// }
// }
// console.log(str[j] + '字符出现了' + k + '次');
// }
// 因为外面的循环,会遍历所有字符,会有重复的字符,统计结果中有很多重复的结果
// 解决:先对str去重,然后外面的循环使用去重后的字符串遍历
// 去重
// var str1 = ''
// for(var i=1; i<str.length; i++) {
// var index = str1.indexOf(str[i])
// if(index < 0) {
// str1 += str[i]
// }
// }
// // console.log(str1);
// // 统计
// for(var j=0; j<str1.length; j++) {
// var k = 0
// for(var i=0; i<str.length; i++) {
// if(str[i] === str1[j]) {
// k++
// }
// }
// console.log(str1[j] + '字符出现了' + k + '次');
// }
// 利用对象键唯一的特性统计
// var str = 'asdfasdfasdfasdefasdfss'
// 将所有字符都作为对象的键
// var obj = {}
// for(var i=0; i<str.length; i++) {
// // 默认对象中全是每个字符,每个字符的次数默认0
// obj[ str[i] ] = 0
// }
// for(var i=0; i<str.length; i++) {
// // 每个字符都让自己的键对应的值+1
// obj[ str[i] ] = obj[ str[i] ] + 1
// }
// console.log(obj);
// for(var i=0; i<str.length; i++) {
// // 判断对象中是否有当前字符这个键
// if(obj[ str[i] ]) {
// // 如果有了,就让原来的值+1再重新赋值给当前这个键
// obj[str[i]] = obj[str[i]]+1
// } else {
// // 如果不存在,就是第一次统计到,给次数赋值为1
// obj[str[i]] = 1
// }
// }
// console.log(obj);
// for(var i=0; i<str.length; i++) {
// // 判断对象中是否有当前字符这个键
// // if(obj[ str[i] ]) {
// // // 如果有了,就让原来的值+1再重新赋值给当前这个键
// // // obj[str[i]] = obj[str[i]]+1
// // obj[str[i]]++
// // } else {
// // // 如果不存在,就是第一次统计到,给次数赋值为1
// // obj[str[i]] = 1
// // }
// obj[str[i]] = obj[str[i]] ? ++obj[str[i]] : 1
// }
// console.log(obj);
// var str = 'asdfasdfasdfasdefasdfss'
// // 1.去重
// var str1 = ''
// for(var i=1; i<str.length; i++) {
// var index = str1.indexOf(str[i])
// if(index < 0) {
// str1 += str[i]
// }
// }
// // console.log(str1);
// // // str1 = 'asdfe'
// // // 2.统计中的每个字符在str中的出现次数 - 利用indexOf
// // // 遍历str1
// // for(var i=0; i<str1.length; i++) {
// // // str1[i]就是我们要统计的字符
// // // 定义计数器
// // var k = 0
// // // 在str中找当前这个字符在str中第一次出现的下标
// // // var index = str.indexOf(str1[i])
// // // // 在str中找到了
// // // if(index >= 0) {
// // // k++
// // // }
// // // 第二次继续查找
// // // var index = str.indexOf(str1[i], index+1)
// // // if(index >= 0) {
// // // k++
// // // }
// // // 每次找的过程,其实就是重复 - 用循环处理重复
// // // 不确定要循环多少次,使用while更好一点
// // // 定义初始下标
// var startIndex = 0
// while(true) {
// var index = str.indexOf(str1[i], startIndex)
// if(index >= 0) {
// k++
// // 下次开始找的下标,是当前找到的下标+1
// startIndex = index+1
// } else {
// break
// }
// }
// // 输出结果
// console.log( str1[i] + '出现了'+k+'次');
// }
// for(var i=0;i<str1.length;i++) {
// var k = 0
// var index = 0
// while(index >= 0) {
// index = str.indexOf(str1[i], index)
// if(index >= 0) {
// k++
// index++
// }
// }
// console.log( str1[i] + '出现了'+k+'次');
// }
// var str = 'asdfasdfasdfasdefasdfss'
// var str1 = 'asdfe'
// 先找str1中的a字符,在str中出现的次数
// 计数器 k = 0
/*
var index = str.indexOf('a', 0)
index = 0
如果index>=0,找到了,继续找
k++
下次再找
var index = str.indexOf('a', 1)
index = 4
如果index>=0,找到了,继续向后找
k++
下次找
var index = str.indexOf('a', 5)
index = 8
如果index>=0,找到了,继续向后找
k++
下次找
var index = str.indexOf('a', 9)
index = 12
如果index>=0,找到了,继续向后找
k++
下次找
var index = str.indexOf('a', 13)
index = 17
如果index>=0,找到了,继续向后找
k++
下次找
var index = str.indexOf('a', 13)
index = -1
如果index>=0,没有找到,a字符就找完了
*/
密码格式要求:长度6~16位,必须同时包含数字、大写字母、小写字母组成
// var password = 'asdjfhkj1321'
/*
1.验证长度:字符串.length
2.同时包含3样:
(1)验证是否包含了数字
(2)验证是否包含了小写
(3)验证是否包含了大写
3.判断是否前面3个小验证同时成立了
*/
// if(password.length >= 6 && password.length <= 16) {
// // 长度满足要求
// // 同时包含3样
// // 验证是否包含了数字
// // 如何判断字符串中是否包含了数字? - 每个字符都判断是否是数字 - isNaN - 阿斯克码:48-57,将每个字符都转成阿斯克码判断是否在48-57范围内
// // 定义一个初始值
// var shuzi = 0
// // 每个都要判断,就需要遍历字符串
// for(var i=0; i<password.length; i++) {
// // 获取每个字符对应的阿斯克码
// var code = password.charCodeAt(i)
// // 每个字符的阿斯克码是否是数字,如果是数字,就没有必要继续判断了
// if(code>=48 && code<=57) {
// shuzi = 1
// console.log('包含了数字');
// break
// } else {
// // 1个字符不是数字 - 并不能说整个字符串中没有包含数字
// }
// }
// // 等循环结束以后才能知道是否没有包含数字
// if(i === password.length) {
// console.log('没有包含数字');
// }
// var daxie = 0
// for(var i=0; i<password.length; i++) {
// // 获取每个字符对应的阿斯克码
// var code = password.charCodeAt(i)
// // 每个字符的阿斯克码是否是数字,如果是数字,就没有必要继续判断了
// if(code>=65 && code<=90) {
// daxie = 1
// console.log('包含了大写');
// break
// } else {
// // 1个字符不是数字 - 并不能说整个字符串中没有包含数字
// }
// }
// // 等循环结束以后才能知道是否没有包含数字
// if(i === password.length) {
// console.log('没有包含大写');
// }
// var xiaoxie = 0
// for(var i=0; i<password.length; i++) {
// // 获取每个字符对应的阿斯克码
// var code = password.charCodeAt(i)
// // 每个字符的阿斯克码是否是数字,如果是数字,就没有必要继续判断了
// if(code>=97 && code<=122) {
// xiaoxie = 1
// console.log('包含了小写');
// break
// } else {
// // 1个字符不是数字 - 并不能说整个字符串中没有包含数字
// }
// }
// // 等循环结束以后才能知道是否没有包含数字
// if(i === password.length) {
// console.log('没有包含小写');
// }
// // 判断3个变量是否都是1
// if(shuzi===1 && daxie===1 && xiaoxie===1) {
// console.log('符合要求');
// } else {
// console.log('不符合要求');
// }
// } else {
// console.log('长度不够');
// }
var password = 'asdjfhASDFkj1321'
if(password.length >= 6 && password.length <= 16) {
var shuzi = 0
// for(var i=0; i<password.length; i++) {
// var code = password.charCodeAt(i)
// if(code>=48 && code<=57) {
// shuzi = 1
// break
// }
// }
var daxie = 0
// for(var i=0; i<password.length; i++) {
// var code = password.charCodeAt(i)
// if(code>=65 && code<=90) {
// daxie = 1
// break
// }
// }
var xiaoxie = 0
// for(var i=0; i<password.length; i++) {
// var code = password.charCodeAt(i)
// if(code>=97 && code<=122) {
// xiaoxie = 1
// break
// }
// }
// 将3个循环中的单分支判断放在1个循环 - 3个循环一毛一样,且获取阿斯克码的代码也是一样的,3个循环中不一样的代码就是单分支判断不一样
for(var i=0; i<password.length; i++) {
var code = password.charCodeAt(i)
if(code>=48 && code<=57) {
shuzi = 1
continue
}
if(code>=65 && code<=90) {
daxie = 1
continue
}
if(code>=97 && code<=122) {
xiaoxie = 1
continue
}
}
if(shuzi===1 && daxie===1 && xiaoxie===1) {
console.log('符合要求');
} else {
console.log('不符合要求');
}
} else {
console.log('长度不够');
}
// for(var i=1; i<=100; i++) {
// if(i%3 === 0) {
// console.log(i);
// }
// if(i%5 === 0) {
// console.log(i);
// }
// }
// for(var i=1; i<=100; i++) {
// if(i%5 === 0) {
// console.log(i);
// }
// }
请根据控制台输入的特定日期格式拆分日期 如:请输入一个日期(格式如:XX月XX日XX年) 经过处理得到:XX年XX月XX日
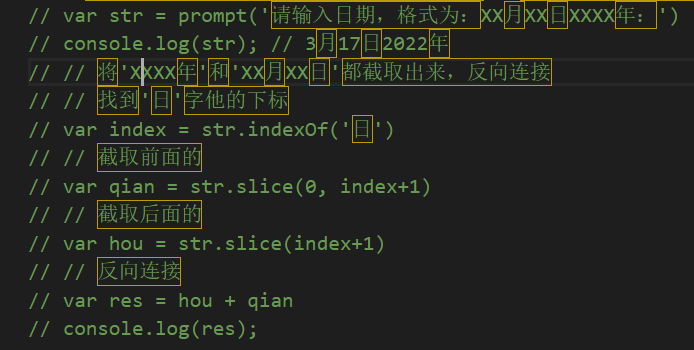
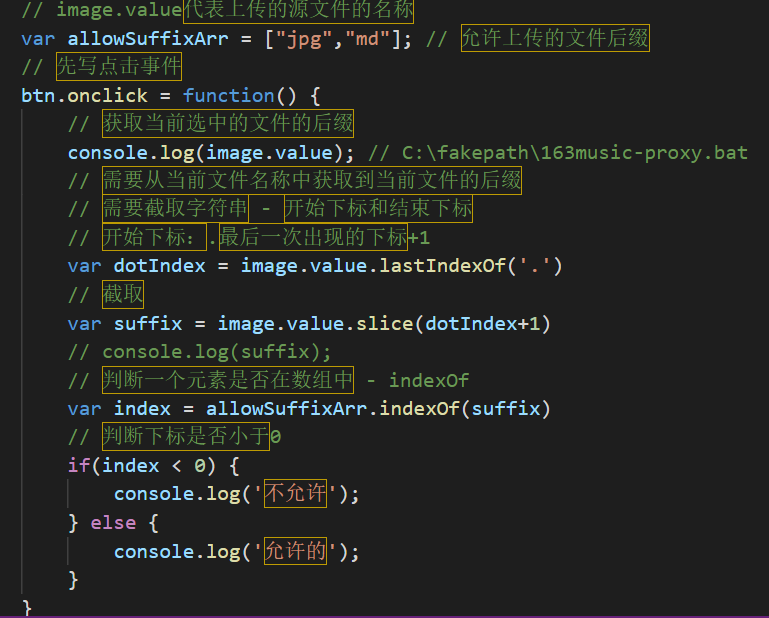
限制文件后缀
获取随机颜色
编写一个函数,获得一个十六进制的随机颜色的字符串(例如:#20CD4F或rgb(20,23,49))
颜色有3种表现形式:
1.英文单词
2.rgb - rgb(0~255的随机数, 0~255的随机数, 0~255的随机数)
3.16进制 - #0~255的随机数转成16进制 + 0~255的随机数转成16进制 +0~255的随机数转成16进制
rgb的随机颜色值
var num1 = getRandom(0, 256)
console.log(num1);
var num2 = getRandom(0, 256)
console.log(num2);
var num3 = getRandom(0, 256)
console.log(num3);
// css的值,在js中都是以字符串形式表现的
var res = 'rgb(' + num1 + ',' + num2 + ',' + num3 + ')'
console.log(res);
小demo:点击div让div更换随机背景颜色
box.onclick = function() {
var num1 = getRandom(0, 256)
console.log(num1);
var num2 = getRandom(0, 256)
console.log(num2);
var num3 = getRandom(0, 256)
console.log(num3);
// css的值,在js中都是以字符串形式表现的
var res = 'rgb(' + num1 + ',' + num2 + ',' + num3 + ')'
console.log(res);
box.style.backgroundColor = res
}
重复代码简化
var arr = []
for(var i=0; i<3; i++) {
var num = getRandom(0, 256)
arr.push(num)
}
console.log(arr);
var str = arr.join()
console.log(str);
var res = 'rgb(' + str + ')'
box.onclick = function() {
var arr = []
for(var i=0; i<3; i++) {
var num = getRandom(0, 256)
arr.push(num)
}
console.log(arr);
var str = arr.join()
console.log(str);
var res = 'rgb(' + str + ')'
box.style.backgroundColor = res
}
16进制颜色值
var res = '#'
for(var i=0; i<3; i++) {
var num = getRandom(0, 256)
// 转成16进制
num = num.toString(16)
// 将每个num都拼接在一起
res += num
}
console.log(res);
box.onclick = function() {
var res = '#'
for(var i=0; i<3; i++) {
var num = getRandom(0, 256)
// 转成16进制
num = num.toString(16)
// console.log(num);
// 判断num是否是1位,如果是1位前面补0
num = num.length===1 ? '0' + num : num
// 将每个num都拼接在一起
res += num
}
console.log(res);
// 瑕疵:16进制颜色值必须是6位,少于6位是无法使用的
box.style.backgroundColor = res
}
封装一个随机颜色值的函数
function getColor(hex) {
// hex是布尔值,如果是true,就用16进制的颜色值,如果hex是false或不传,就使用rgb的颜色值
// 判断hex是true还是没有传递
if(hex) {
// 16进制颜色值的获取
var color = '#'
for(var i=0; i<3; i++) {
var num = getRandom(0, 256)
num = num.toString(16)
num = num.length === 1 ? '0' + num : num
color += num
}
return color
} else {
// rgb颜色值的获取
var arr = []
for(var i=0; i<3; i++) {
var num = getRandom(0, 256)
arr.push(num)
}
var str = arr.join()
return 'rgb(' + str + ')'
}
}
function getColor(hex) {
var arr = []
var str = '#'
for(var i=0; i<3; i++) {
var num = getRandom(0, 256)
arr.push(num)
num = num.toString(16)
num = num.length === 1 ? '0' + num : num
str += num
}
if(hex) {
return str
}
return 'rgb(' + arr.join() + ')'
}
box.onclick = function() {
var color = getColor(true)
console.log(color);
box.style.backgroundColor = color
}
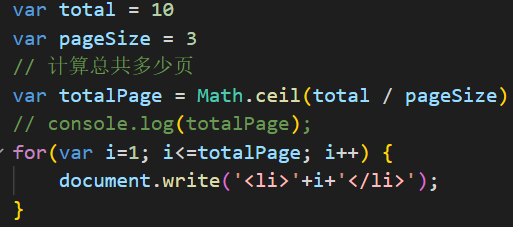
已知内容条数,和每页展示的条数,编程输出所有页码
获取具体时间
// 从时间日期对象中获取具体的时间
var date = new Date()
console.log(date);
// 获取年份 - 对象.getFullYear()
var year = date.getFullYear()
console.log(year);
// 获取月份 - 对象.getMonth() - 在对象中,使用0~11来描述1~12月
var month = date.getMonth() + 1 // 因为获取到的月份会比实际月份小1,所以通常会+1
console.log(month);
// 获取日 - 对象.getDate()
var d = date.getDate() // 注意:千万不要使用date变量表示日
console.log(d);
// 获取星期 - 对象.getDay()
var day = date.getDay()
console.log(day);
// 获取时 - 对象.getHours()
var hour = date.getHours()
console.log(hour);
// 获取分 - 对象.getMinutes()
var minute = date.getMinutes()
console.log(minute);
// 获取秒 - 对象.getSeconds()
var second = date.getSeconds()
console.log(second);
// 获取毫秒 - 对象.getMilliseconds() - 1s === 1000ms
var mill = date.getMilliseconds()
console.log(mill);
// 获取时间戳:从1970年1月1日8点0分0秒到现在所走过的毫秒数来描述当前时间的
// 语法:对象.getTime()
var time = date.getTime()
console.log(time);
// 为什么要用时间戳来描述时间,很多情况下,我们需要对时间进行计算的,减法运算:
// 2022年10月1日 - 2022年3月18日
// 国庆的时间戳 - 当前的时间戳 = 毫秒差 - 转换成天数
/*
总结;
获取具体的时间日期:
getFullYear()
getMonth() + 1
getDate()
getDay()
getHours()
getMinutes()
getSeconds()
getMilliseconds()
getTime()
*/
设置时间// 通过时间日期对象设置时间
var date = new Date() // 获取到当前时间对象
console.log(date);
// 将这个对象变成另外一个时间的对象 - 设置这个时间
// 设置年份:对象.setFullYear(目标年份)
date.setFullYear(2023)
console.log(date);
// 设置月份:对象.setMonth(目标月份) - 0~11来描述1~12月
date.setMonth(4) // 参数是0~11,参数:比实际月份-1
console.log(date);
// 设置日:对象.setDate(目标日)
date.setDate(25)
console.log(date);
// 设置时:对象.setHours(目标时)
date.setHours(15)
console.log(date);
// 设置分:对象.setMinutes(目标分)
date.setMinutes(50)
console.log(date);
// 设置秒:对象.setSeconds(目标秒)
date.setSeconds(59)
console.log(date);
// 设置毫秒:对象.setMilliseconds(目标毫秒数)
date.setMilliseconds(500)
console.log(date);
// 通过设置具体的时间,时间日期对象就发生了变化 - 通过设置以后的对象获取具体的时间
console.log( date.getMilliseconds() );
// 设置时间戳:对象.setTime(时间戳) - 将当前这个对象的时间切换成指定时间戳的对象
date.setTime(0)
console.log(date);
/*
总结:
设置具体时间
setFullYear()
setMonth() - 参数要比实际的月份少1
setDate()
setHours()
setMinutes()
setSeconds()
setMilliseconds()
setTime()
注意:在设置时间中,没有设置星期几,因为星期几是根据年月日生成的,是不能被设置
*/
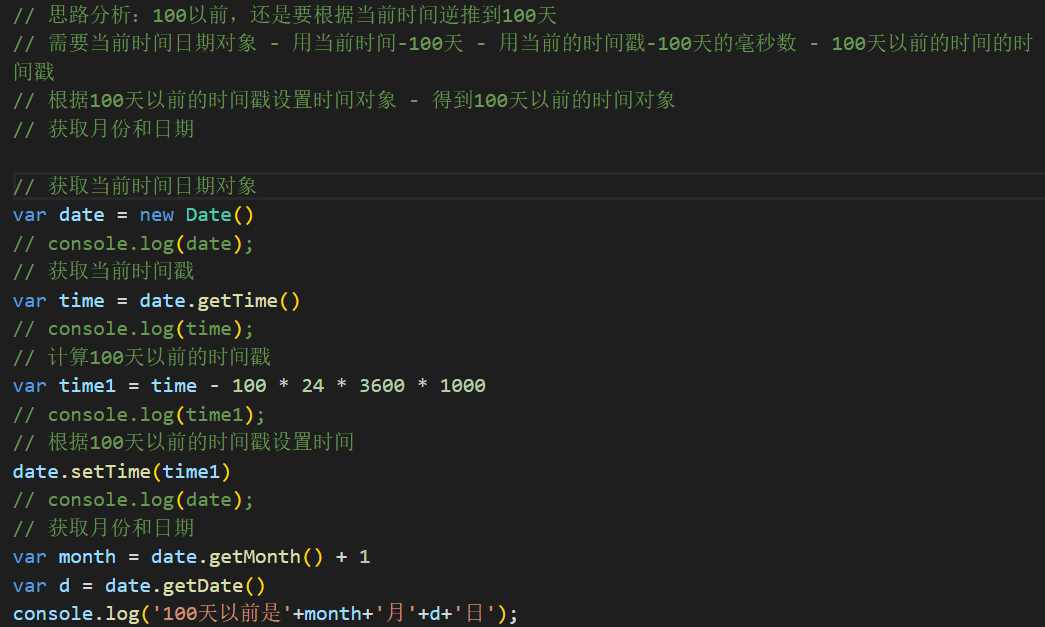
100天前是几月几号
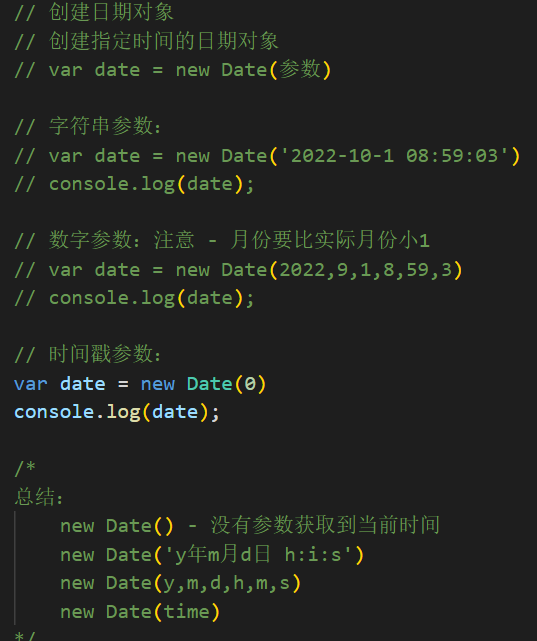
创建不同时间的日期对象
现在距离国庆还有多少天
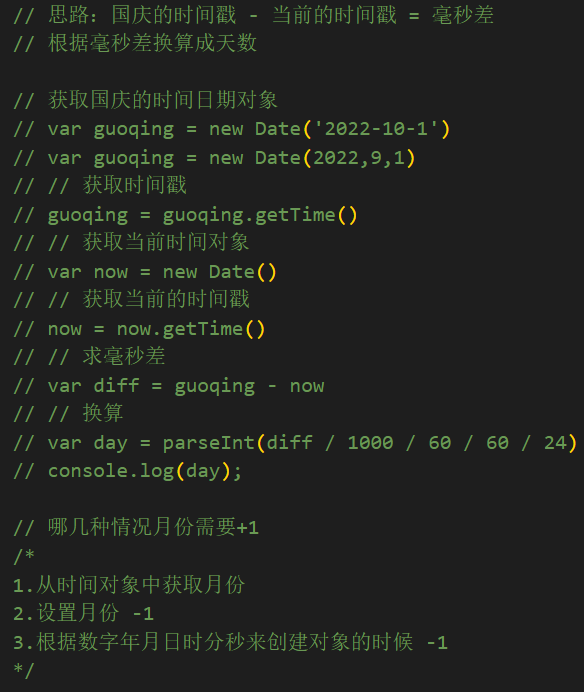
判断当前是否还能限时抢购,开始时间:"2019-8-1",结束时间:"2019-9-1"
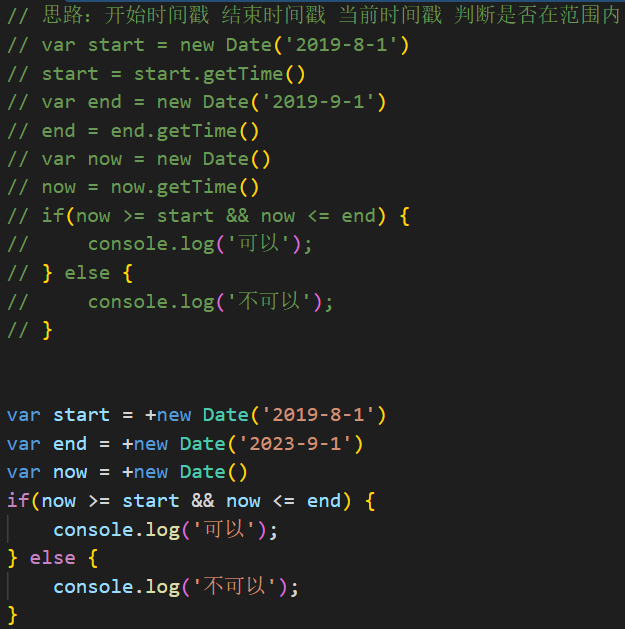
获取时间栈
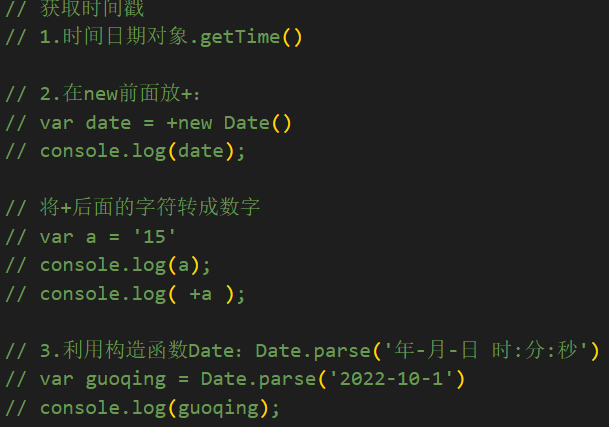
格式化输出时间
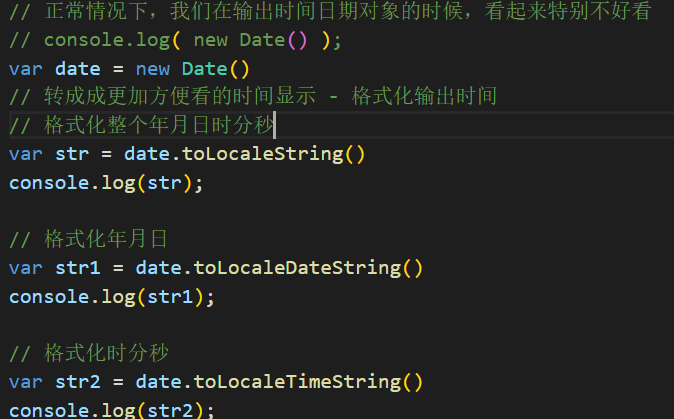
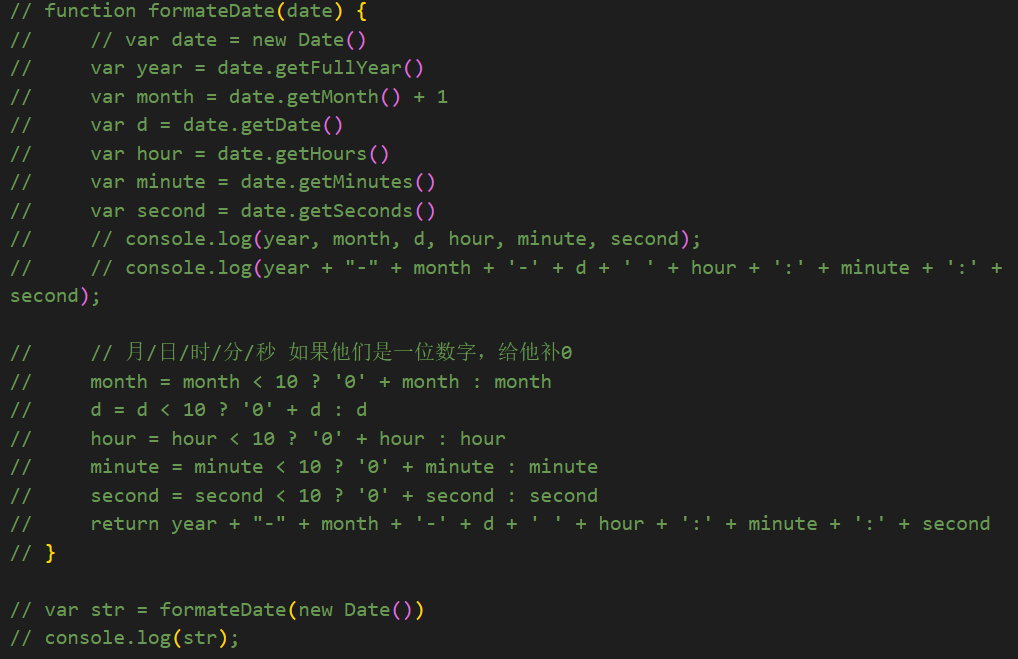
.编写函数,格式化当前时间为 "YYYY-MM-DD HH:ii:ss"
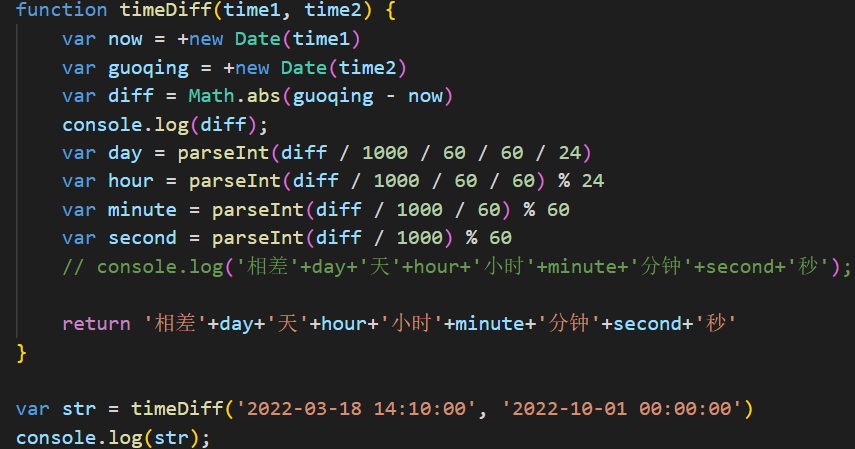
定义函数,要求传入两个时间节点,能返回两个时间节点之间相差多少天多少小时多少分钟多少秒
根据结构喝数据创建表格
<body>
<table border=1 width="500">
<thead>
<tr>
<th>序号</th>
<th>姓名</th>
<th>年龄</th>
<th>性别</th>
<th>成名绝技</th>
</tr>
</thead>
<tbody>
<!-- <tr>
<td>1</td>
<td>令狐冲</td>
<td>20</td>
<td>男</td>
<td>独孤九剑</td>
</tr>
<tr>
<td>2</td>
<td>东方不败</td>
<td>50</td>
<td>女</td>
<td>葵花宝典</td>
</tr> -->
</tbody>
</table>
</body>
<script>
var arr = [
{
name:"令狐冲",
age:20,
sex:"男",
skill:"独孤九剑"
},
{
name:"东方不败",
age:50,
sex:"女",
skill:"葵花宝典"
},
{
name:"任我行",
age:55,
sex:"男",
skill:"吸星大法"
}
];
// innerText和innerHTML赋的值只能是字符串
/*
思路:
需要在tbody中放3个tr,使用innerHTML
每个tr中的内容都是对应数组中每个对象的数据
第一个对象可以拼接成一个tr的内容
第二个对象可以凭借成第二个tr的内容
....
最终,需要将3个tr拼接成一个更大的字符串,放在innerHTML里面
先定义一个空字符串,拼接一次,再拼接一次,最后拼接一次
每次拼接,都需要对应每个对象中的数据,拼接3次,其实就是在遍历数组
循环遍历数组,每遍历一次拼接一次
*/
var str = ''
for(var i=0; i<arr.length; i++) {
var obj = arr[i]
// str += '<tr><td>'+(i+1)+'</td><td>'+obj.name+'</td><td>'+obj.age+'</td><td>'+obj.sex+'</td><td>'+obj.skill+'</td></tr>'
str += '<tr>'
str += '<td>'
str += i+1
str += '</td>'
str += '<td>'
str += obj.name
str += '</td>'
str += '<td>'
str += obj.age
str += '</td>'
str += '<td>'
str += obj.sex
str += '</td>'
str += '<td>'
str += obj.skill
str += '</td>'
str += '</tr>'
}
var tbody = document.querySelector('tbody');
tbody.innerHTML = str
<style>
td:last-child{
background-color: #abcdef;
}
</style>
<body>
<table border=1 width="500">
<thead>
<tr>
<th>序号</th>
<th>姓名</th>
<th>年龄</th>
<th>性别</th>
<th>成名绝技</th>
<th>操作</th>
</tr>
</thead>
<tbody>
</tbody>
</table>
</body>
<script>
var arr = [
{
name:"令狐冲",
age:20,
sex:"男",
skill:"独孤九剑"
},
{
name:"东方不败",
age:50,
sex:"女",
skill:"葵花宝典"
},
{
name:"任我行",
age:55,
sex:"男",
skill:"吸星大法"
}
];
loadHTML()
function loadHTML() {
var str = ''
for(var i=0; i<arr.length; i++) {
var obj = arr[i]
str += '<tr>'
str += '<td>'
str += i+1
str += '</td>'
str += '<td>'
str += obj.name
str += '</td>'
str += '<td>'
str += obj.age
str += '</td>'
str += '<td>'
str += obj.sex
str += '</td>'
str += '<td>'
str += obj.skill
str += '</td>'
str += '<td>'
str += '删除'
str += '</td>'
str += '</tr>'
}
var tbody = document.querySelector('tbody');
tbody.innerHTML = str
}
// // 获取删除的td
// var tds = document.querySelectorAll('td:last-child');
// console.log(tds);
// tds[0].onclick = function(){
// // 删除tr,没有学习标签删除,所以需要将数组中当前数据对应的对象删掉,然后根据新的数据重新创建表格 - 间接性的将tr删掉了
// arr.splice(0, 1)
// console.log(arr);
// loadHTML()
// // 重新获取td - 重新添加事件
// }
// tds[1].onclick = function(){
// arr.splice(1, 1)
// loadHTML()
// }
// tds[2].onclick = function(){
// arr.splice(2, 1)
// loadHTML()
// }
// 上面这个绑定事件的操作在重复 - 用循环处理重复
// for(var i=0; i<tds.length; i++) {
// tds[i].onclick = function() {
// // console.log(111); // 调试事件是否可用
// // arr.splice(i, 1)
// // console.log(arr); // 调试数组是否删除成功
// // 删除数组没有成功,能有问题的代码就是 变量i
// console.log(i); // 3
// // loadHTML()
// }
// }
// console.log(i); // 3
/*
当循环中添加了事件,事件中要获取每次循环对应的变量是获取不到的,原因如下:
当我们刷新页面,循环会执行结束,此时全局中的i是3
接下来,我们才会去点击,此时,在事件函数中,输出i
在事件函数中先找变量i是否被定义过,发现没有,然后去全局找,找到了,值是3
*/
// 在事件函数中,每次找i,都在全局,全局中的i我们是无法修改的 - 将每次的i,留在一个局部中,让事件函数处在这个局部中
addEvent()
function addEvent() {
// 获取删除的td
var tds = document.querySelectorAll('td:last-child');
for(var i=0; i<tds.length; i++) {
// function fn(i) {
// tds[i].onclick = function() {
// // console.log(i);
// arr.splice(i, 1)
// loadHTML()
// addEvent()
// }
// }
// fn(i)
(function(i) {
tds[i].onclick = function() {
// console.log(i);
arr.splice(i, 1)
loadHTML()
addEvent()
}
})(i)
}
}
// var i = 0
// function fn(i) {
// tds[i].onclick = function() {
// console.log(i);
// }
// }
// fn(i)
// i++
// function fn(i) {
// tds[i].onclick = function() {
// console.log(i);
// }
// }
// fn(i)
// i++
// function fn(i) {
// tds[i].onclick = function() {
// console.log(i);
// }
// }
// fn(i)
// i++
// 每次点击删除的td,都会,将数组操作完以后,重新加载表格 - 给tbody中重新放一个字符串内容 - 形成新的tr和td,新的td没有给绑定过事件,所以,删除一次以后,再次点击是无效的 - 我们需要在每次删除以后,都要重新获取td,重新添加事件
利用节点操作实现表格删除
<style>
td:last-child{
background-color: #abcdef;
}
</style>
<body>
<table border=1 width="500">
<thead>
<tr>
<th>序号</th>
<th>姓名</th>
<th>年龄</th>
<th>性别</th>
<th>成名绝技</th>
<th>操作</th>
</tr>
</thead>
<tbody>
</tbody>
</table>
</body>
<script>
var arr = [
{
name:"令狐冲",
age:20,
sex:"男",
skill:"独孤九剑"
},
{
name:"东方不败",
age:50,
sex:"女",
skill:"葵花宝典"
},
{
name:"任我行",
age:55,
sex:"男",
skill:"吸星大法"
}
];
var tbody = document.querySelector('tbody');
loadHTML()
function loadHTML() {
var str = ''
for(var i=0; i<arr.length; i++) {
var obj = arr[i]
var tr = document.createElement('tr')
tbody.appendChild(tr)
var td = document.createElement('td')
td.innerText = i+1
tr.appendChild(td)
for(var attribute in obj) {
var td = document.createElement('td')
td.innerText = obj[attribute]
tr.appendChild(td)
}
var td = document.createElement('td')
td.innerText = '删除'
tr.appendChild(td)
// str += '<tr>'
// str += '<td>'
// str += i+1
// str += '</td>'
// str += '<td>'
// str += obj.name
// str += '</td>'
// str += '<td>'
// str += obj.age
// str += '</td>'
// str += '<td>'
// str += obj.sex
// str += '</td>'
// str += '<td>'
// str += obj.skill
// str += '</td>'
// str += '<td>'
// str += '删除'
// str += '</td>'
// str += '</tr>'
}
// tbody.innerHTML = str
}
// 表格删除
var tds = document.querySelectorAll('td:last-child');
// 遍历给他们添加事件
for(var i=0; i<tds.length; i++) {
tds[i].onclick = function() {
// 删除当前td所属的tr
// tbody.removeChild(当前td所属的tr)
// tbody.removeChild(this.parentElement)
// console.log(this);
this.parentElement.parentElement.removeChild(this.parentElement)
}
}
广告弹出
<style>
.adver{
width: 300px;
height: 150px;
border: 1px solid #ccc;
background-color: pink;
position: absolute;
bottom: 0;
right: 0;
}
span{
position: absolute;
top: 0;
right: 10px;
}
</style>
<body>
<div class="adver">
<span>×</span>
</div>
</body>
<script>
var adver = document.querySelector('.adver');
// 延迟消失
// setTimeout(function() {
// // 消失 - 让div
// // display:none opacity:0 right: -300px
// adver.style.display = 'none'
// }, 2000)
var span = document.querySelector('span');
span.onclick = function() {
adver.style.display = 'none'
setTimeout(function() {
adver.style.display = 'block'
}, 2000)
}
// setInterval(function() {
// adver.style.display = 'block'
// console.log(1);
// }, 2000)
<!-- 从效果中可以看出:
需要在页面中有4个标签,其中分别放日时分秒,这4个数字不停在变化 - 每隔1s就变一次
需要在页面中放上着4个标签
-->
距离过年倒计时:<span>0</span> 天 <span>0</span> 时 <span>0</span> 分 <span>0</span> 秒
</body>
<script>
// 将过年的时间距离现在有多少天、时分秒计算出来 - 放进标签中去
var date = new Date()
var year = date.getFullYear()
var guonian = +new Date(year+1 + '-1-1')
console.log(guonian)
// date.setFullYear(date.getFullYear() + 1)
// 还需要设置月日时分秒
// var guonian = date.getTime()
var spans = document.querySelectorAll('span');
jisuan()
function jisuan() {
var now = +new Date()
var diff = guonian - now;
var arr = []
var day = parseInt(diff / 1000 / 60 / 60 / 24)
var hour = parseInt(diff / 1000 / 60 / 60)%24
var minute = parseInt(diff / 1000 / 60) % 60
var second = parseInt(diff / 1000) % 60
arr.push(day, hour, minute, second)
// spans[0].innerText = day
// spans[1].innerText = hour
// spans[2].innerText = minute
// spans[3].innerText = second
// spans[0].innerText = arr[0]
// spans[1].innerText = arr[1]
// spans[2].innerText = arr[2]
// spans[3].innerText = arr[3]
arr.forEach(function(v, i) {
spans[i].innerText = v
})
}
// 定时器会在1s后执行
setInterval(jisuan, 1000)
获取滚轮划过的距离
<div style="width: 20px;">
夜,结束了一天的喧嚣后安静下来,伴随着远处路灯那微弱的光。风,毫无预兆地席卷整片旷野,撩动人的思绪万千。星,遥遥地挂在天空之中,闪烁着它那微微星光,不如阳光般灿烂却如花儿般如痴如醉。
——题记
欲将沉醉换悲凉,清歌莫断肠。这混乱的尘世,究竟充斥了多少绝望和悲伤。你想去做一个勇敢的男子,为爱,为信仰,轰轰烈烈的奋斗一场。你周身充斥着无人可比的灵气和光芒。你有着与伟人比肩的才气和名声,你是那样高傲孤洁的男子。你的一寸狂心未说,已经几度黄昏雨。
曾经以为,相爱的人一定要相守,只有相守,情感才能长久。可是,此岸和彼岸只不过是空间的差距,却无法拉长心灵的距离。
</div>
</body>
<script>
// 滚动过的距离:
// 卷去的高度
// var t = document.documentElement.scrollTop
// console.log(t);
// 卷去的宽度
// var l = document.documentElement.scrollLeft
window.onscroll = function() {
// 有文档声明的写法
// var t = document.documentElement.scrollTop
// 没有文档声明的写法
// var t = document.body.scrollTop
// 不管什么情况都能获取到滚动过的距离
var t = document.documentElement.scrollTop || document.body.scrollTop
console.log(t);
if(t >= 800) {
document.body.style.backgroundColor = 'hotpink'
}
// var l = document.documentElement.scrollLeft
// console.log(l);
// if(l >= 4000) {
// document.body.style.backgroundColor = 'skyblue'
// }
}
顶部悬浮喝回到顶部的动画效果<style>
.top{
width: 100%;
height: 100px;
background-color: #abcdef;
display: none;
position: fixed;
top: 0;
left: 0;
}
.box{
width: 20px;
}
.totop{
position:fixed;
right: 50px;
bottom: 50px;
width: 50px;
height: 50px;
border: 1px solid #000;
text-align: center;
line-height: 25px;
display: none;
}
</style>
<body>
<div class="top">
这是顶部
</div>
<div class="box">
春雨像个多情的恋人,缠缠绵绵了一天一夜依然不肯离去。清晨的雾霭还没有散尽,窗外的风景依然笼罩在薄纱似的雨雾里,朦朦胧胧,似真似幻。郊外的山峦和建筑越发显得模糊,就像水墨画里的远景,淡到和阴雨绵绵的天空融为一体。
楼下院子里有一棵杏树,枝杈繁盛的树干已经长到了和三楼的窗户一样高。隔着玻璃仔细瞧,忽然发现枝头上已经掇满暗红色的花蕾,有的花蕾裂开了小口子,里面露出鲜艳的花瓣。还有个别性子急的,已经在雨中奋力绽放了,粉红色的花朵看似柔嫩脆弱,但一点儿也不畏惧料峭的春寒,急切地向世界展示着自己的美丽。
我忽然意识到现在已经三月中旬,马上临近春分了。往年这个时候早已按捺不住好奇的心情,约几个好友匆匆奔赴山野,踏青、看花儿、拍风景、挖野菜……忙得不亦乐乎。北方的春天来的晚,去的也慢,一直可以玩到四月下旬,采完最后一波香椿才肯作罢。
</div>
<div class="totop">回到<br> 顶部</div>
</body>
<script>
var topbox = document.querySelector('.top');
var totop = document.querySelector('.totop');
window.onscroll = function() {
var t = document.documentElement.scrollTop || document.body.scrollTop
if(t >= 1800) {
topbox.style.display = totop.style.display = 'block'
} else {
topbox.style.display = totop.style.display = 'none'
}
}
totop.onclick = function() {
var t = document.documentElement.scrollTop || document.body.scrollTop
var timer = setInterval(function() {
t -= 20
console.log(1);
if(t <= 0) {
clearInterval(timer)
}
document.documentElement.scrollTop = document.body.scrollTop = t
}, 20)
}
点击按钮切换图片
<body>
<button>按钮</button>
<br>
<img src="./images/1.webp" width="400" height="200">
</body>
<script src="./js/utils.js"></script>
<script>
// 获取按钮 - 添加点击事件
var btn = document.querySelector('button');
var img = document.querySelector('img');
// 全局定义初始数字
// var num = 1
var arr = ['./images/1.webp', './images/2.webp', './images/3.webp']
// 全局定义初始下标
var index = 0
btn.onclick = function() {
// 换图片 - 更换图片的路径
// 随机切换 - 需要从./images/1.webp ./images/2.webp ./images/3.webp中随机找一个路径放在img的src属性中
/*
思路1:发现所有的路径中只有数字不一样,从1~3之间获取一个随机数,然后拼接成一个路径
思路2:将这3个图片路径放在一个数组中,从数组中随机获取一个元素
*/
// var num = getRandom(1, 4)
// var imgPath = './images/'+num+'.webp'
// var arr = ['./images/1.webp', './images/2.webp', './images/3.webp']
// var index = getRandom(0, arr.length)
// var imgPath = arr[index]
// 按照顺序切换: 1.webp 2.webp 3.webp
// num++
// 判断num最大值
// if(num === 4) {
// num = 3
// // 1.不继续了
// return
// }
// 2.循环播放
// if(num === 4) {
// num = 1
// }
// var imgPath = './images/'+num+'.webp'
// 下标自增
index++
if(index === arr.length) {
index = 0
}
var imgPath = arr[index]
// 需要给img设置src属性
img.src = imgPath
}
</script>
网页换皮肤
<style>
.top{
width: 100%;
height: 0;
background-color: pink;
display: flex;
justify-content: space-around;
align-items: center;
overflow: hidden;
/* border: 10px solid #000; */
transition: height 1s;
}
.top img{
height: 120px;
width: 200px;
}
html,body{
padding: 0;
margin: 0;
}
</style>
<body>
<div class="top">
<img src="./images/1.webp" alt="">
<img src="./images/2.webp" alt="">
<img src="./images/3.webp" alt="">
</div>
<button>按钮</button>
</body>
<script>
// 获取所有的要操作的标签
var btn = document.querySelector('button');
var box = document.querySelector('.top');
var imgs = document.querySelectorAll('.top>img');
// 给按钮添加事件
btn.onclick = function() {
if(box.clientHeight > 0) {
// 收回
// 让div收回
// var timer = setInterval(function() {
// // 获取高度
// var h = box.clientHeight
// // 加大
// h -= 2
// // 判断最大值
// if(h <= 0) {
// h = 0
// clearInterval(timer)
// }
// // 设置高度样式 - 设置的高度,值是不包含边框的
// box.style.height = h + 'px'
// }, 20)
box.style.height = 0
} else {
// 设置定时器
// var timer = setInterval(function() {
// // 获取高度
// var h = box.clientHeight
// // 加大
// h += 2
// // 判断最大值
// if(h >= 150) {
// h = 150
// clearInterval(timer)
// }
// // 设置高度样式 - 设置的高度,值是不包含边框的
// box.style.height = h + 'px'
// }, 20)
box.style.height = 150 + 'px'
}
}
// 循环所有img标签并添加事件
for(var i=0; i<imgs.length; i++) {
imgs[i].onclick = function() {
// 给网页设置当前图片为背景
// 给网页设置背景 - 怎么设置?给body设置background-image样式
// 当前图片的路径怎么获取?
// console.log(this);
var imgPath = this.getAttribute('src')
// console.log(imgPath);
// document.body.style.backgroundImage = 'url(图片路径)'
// document.body.style.backgroundImage = 'url('+imgPath+')'
// document.body.style.backgroundRepeat = 'no-repeat'
// document.body.style.backgroundSize = '100% 100%'
// document.body.style.background = 'url('+imgPath+') no-repeat 0 0 / 100% 100%'
// document.body.style.width = '100%'
// document.body.style.height = '100%'
setStyle(document.body, {
width: '100%',
height: '100%',
background: 'url('+imgPath+') no-repeat 0 0 / 100% 100%'
})
document.documentElement.style.width = '100%'
document.documentElement.style.height = '100%'
// 让div收回
// var timer = setInterval(function() {
// // 获取高度
// var h = box.clientHeight
// // 加大
// h -= 2
// // 判断最大值
// if(h <= 0) {
// h = 0
// clearInterval(timer)
// }
// // 设置高度样式 - 设置的高度,值是不包含边框的
// box.style.height = h + 'px'
// }, 20)
box.style.height = 0 + 'px'
}
}
// 封装批量设置样式的函数
// document.body.style.background = 'url('+imgPath+') no-repeat 0 0 / 100% 100%'
// document.body.style.width = '100%'
// document.body.style.height = '100%'
function setStyle(element, obj) {
// var obj = {
// height: '100%',
// width: '100%',
// background: 'url('+imgPath+') no-repeat 0 0 / 100% 100%'
// }
for(var key in obj) {
element.style[key] = obj[key]
}
}
</script>
图片时钟
<!-- <div class="box">
<span>0</span>点
<span>0</span>分
<span>0</span>秒
</div> -->
<img src="./images/0.JPG" alt="">
<img src="./images/0.JPG" alt="">
<span><img src="./images/colon.JPG" alt=""></span>
<img src="./images/0.JPG" alt="">
<img src="./images/0.JPG" alt="">
<span><img src="./images/colon.JPG" alt=""></span>
<img src="./images/0.JPG" alt="">
<img src="./images/0.JPG" alt="">
</body>
<script>
// var spans = document.querySelectorAll('span');
// setInterval(function() {
// var date = new Date()
// var hour = date.getHours()
// var minute = date.getMinutes()
// var second = date.getSeconds()
// spans[0].innerText= hour
// spans[1].innerText= minute
// spans[2].innerText= second
// }, 1000)
// 每隔一秒就更换所有图片 - 根据当前时间
var imgs = document.querySelectorAll('body>img');
clock()
setInterval(clock, 1000)
function clock() {
var date = new Date()
var hour = date.getHours()
var minute = date.getMinutes()
var second = date.getSeconds()
hour = bu0(hour)
minute = bu0(minute)
second = bu0(second)
var str = hour + minute + second
console.log(hour, minute, second);
// imgs[0].src = './images/'+str[0]+'.JPG'
// imgs[1].src = './images/'+str[1]+'.JPG'
// imgs[2].src = './images/'+str[2]+'.JPG'
// imgs[3].src = './images/'+str[3]+'.JPG'
// imgs[4].src = './images/'+str[4]+'.JPG'
// imgs[5].src = './images/'+str[5]+'.JPG'
for(var i=0; i<imgs.length; i++) {
imgs[i].src = './images/'+str[i]+'.JPG'
}
}
function bu0(num) {
if(num < 10) {
return '0' + num
} else {
return '' + num
}
}
</script>
<style>
.box{
width: 300px;
height: 30px;
border: 1px solid #000;
}
.small{
width: 0px;
height: 30px;
background-color: hotpink;
}
</style>
<body>
<div class="box">
<div class="small"></div>
</div>
<button class="start">开始</button>
<button class="pause">暂停</button>
<button class="continue">继续</button>
<button class="stop">停止</button>
</body>
<script>
// 点击开始 - 让small的width慢慢加大
var startBtn = document.querySelector('.start');
var small = document.querySelector('.small');
var timer = null
// 规定,只有timer的值是null的时候才可以开启定时器
startBtn.onclick = function() {
// 获取宽
var w = small.clientWidth // 0
if(w > 0) {
return
}
timer = setInterval(function() {
// 加大
w += 2 // 2
// 限制最大值
if(w >= 300) {
w = 300
clearInterval(timer)
}
// 设置
small.style.width = w + 'px' // 宽度变成了2px
}, 20)
}
// 点击暂停,停止定时器
var pauseBtn = document.querySelector('.pause');
pauseBtn.onclick = function() {
clearInterval(timer)
timer = null
}
// 点击继续跟开始一样
var continueBtn = document.querySelector('.continue');
// 当按钮点击第一次的时候,给全局变量timer赋值一个定时器,当他还在继续运行的时候,有点击了第二次,此时,给全局变量timer赋值第二个定时器,此时,第一个定时器还在运行,当small到头的时候,停止定时器,拿timer变量去停止,timer变量代表第二个定时器,停止的是第二个,此时第一个定时器还在运行,停不下来了,找不到他的返回值。
continueBtn.onclick = function() {
// 每次开启定时器之前,先清除定时器 - 可以保证永远只有一个定时器在同时执行
// clearInterval(timer)
// if(!timer) {
// timer = setInterval(function() {
// // 获取宽
// var w = small.clientWidth
// // 加大
// w += 1
// // 限制最大值
// if(w >= 300) {
// w = 300
// clearInterval(timer)
// timer = null
// }
// // 设置
// small.style.width = w + 'px'
// console.log(1);
// }, 50)
// } else {
// return
// }
if(timer) {
return
}
timer = setInterval(function() {
// 获取宽
var w = small.clientWidth
// 加大
w += 1
// 限制最大值
if(w >= 300) {
w = 300
clearInterval(timer)
timer = null
}
// 设置
small.style.width = w + 'px'
console.log(1);
}, 50)
}
// 点击停止归零
var stopBtn = document.querySelector('.stop');
stopBtn.onclick = function() {
small.style.width = 0 + 'px'
clearInterval(timer)
timer = null
}
tab切换
<style>
*{
list-style-type: none;
padding: 0;
margin: 0;
}
.tab {
width: 500px;
height: 400px;
border: 3px solid #00f;
margin: 50px auto;
}
.tab ol li a img{
width: 500px;
height: 300px;
}
.tab ul{
display: flex;
justify-content: space-evenly;
align-items: center;
background-color: #ccc;
height: 100px;
}
.tab ul li{
width: 100px;
height: 50px;
background-color: hotpink;
text-align: center;
line-height: 50px;
font-size: 30px;
font-weight: bold;
}
.tab ol li{
display :none;
}
.tab ol li.active{
display: block;
}
.tab ul li.on{
background-color: #f00;
color: #fff;
}
</style>
<body>
<div class="tab">
<ul>
<li xiabiao=0 class="on">城市</li>
<li xiabiao=1>大树</li>
<li xiabiao=2>鲜花</li>
</ul>
<ol>
<li class="active">
<a href="">
<img src="./images/1.webp" alt="">
</a>
</li>
<li>
<a href="">
<img src="./images/2.webp" alt="">
</a>
</li>
<li>
<a href="">
<img src="./images/3.webp" alt="">
</a>
</li>
</ol>
</div>
</body>
<script>
// 获取ul下的li,绑定事件
var ulis = document.querySelectorAll('.tab ul li');
// for(var i=0; i<ulis.length; i++) {
// ulis[i].setAttribute('xiabiao', i)
// }
var olis = document.querySelectorAll('.tab ol li');
// for(var i=0; i<ulis.length; i++) {
// (function(i) {
// ulis[i].onclick = function() {
// // 先将所有li的on类名都去掉
// for(var j=0; j<ulis.length; j++) {
// ulis[j].className = ''
// }
// // 点击哪个li就给哪个li添加on类名
// this.className = 'on'
// // 将所有的active类名去掉
// for(var j=0; j<olis.length; j++) {
// olis[j].className = ''
// }
// // 找当前点击的li的下标
// console.log(i);
// // 给当前li对应的图片所在的li添加active类名
// olis[i].className = 'active'
// }
// })(i)
// }
var daiondeli = document.querySelector('.tab ul li.on');
var active = document.querySelector('.tab ol li.active');
// for(var i=0; i<ulis.length; i++) {
// (function(i) {
// ulis[i].onclick = function() {
// // 将带有on类名的li上面的类名on去掉就好
// daiondeli.className = ''
// // 点击哪个li就给哪个li添加on类名
// this.className = 'on'
// // 哪个li带有on类名,就把他存到daiondeli中
// daiondeli = this
// // 带有active 的类名去掉
// active.className = ''
// // 给当前li对应的图片所在的li添加active类名
// olis[i].className = 'active'
// // 谁带有active列名,就把他赋值给active变量
// active = olis[i]
// }
// })(i)
// }
// for(var i=0; i<ulis.length; i++) {
// ulis[i].xiabiao = i // 将自己的下标放在每个标签对象中
// ulis[i].onclick = function() {
// // 将带有on类名的li上面的类名on去掉就好
// daiondeli.className = ''
// // 点击哪个li就给哪个li添加on类名
// this.className = 'on'
// // 哪个li带有on类名,就把他存到daiondeli中
// daiondeli = this
// // 带有active 的类名去掉
// active.className = ''
// // 找到当前li的下标
// console.dir(this)
// var index = this.xiabiao
// // 给当前li对应的图片所在的li添加active类名
// olis[index].className = 'active'
// // 谁带有active列名,就把他赋值给active变量
// active = olis[index]
// }
// }
// for(var i=0; i<ulis.length; i++) {
// ulis[i].setAttribute('xiabiao', i)
// ulis[i].onclick = function() {
// // 将带有on类名的li上面的类名on去掉就好
// daiondeli.className = ''
// // 点击哪个li就给哪个li添加on类名
// this.className = 'on'
// // 哪个li带有on类名,就把他存到daiondeli中
// daiondeli = this
// // 带有active 的类名去掉
// active.className = ''
// // 找到当前li的下标
// console.log(this)
// var index = this.getAttribute('xiabiao')
// // 给当前li对应的图片所在的li添加active类名
// olis[index].className = 'active'
// // 谁带有active列名,就把他赋值给active变量
// active = olis[index]
// }
// }
</script>
隔行换色
<body>
<table border=1 width="500">
<thead>
<tr>
<th>序号</th>
<th>姓名</th>
<th>年龄</th>
<th>性别</th>
<th>成名绝技</th>
</tr>
</thead>
</table>
</body>
<script>
var arr = [
{
name:"令狐冲",
age:20,
sex:"男",
skill:"独孤九剑"
},
{
name:"东方不败",
age:50,
sex:"女",
skill:"葵花宝典"
},
{
name:"任我行",
age:55,
sex:"男",
skill:"吸星大法"
},
{
name:"乔峰",
age:30,
sex:"男",
skill:"降龙十八掌"
},
{
name:"张无忌",
age:19,
sex:"男",
skill:"九阳神功"
},
{
name:"段誉",
age:22,
sex:"男",
skill:"六脉神剑"
}
];
var tbody = document.createElement('tbody')
var table = document.querySelector('table');
table.appendChild(tbody)
var str = ''
arr.forEach(function(v, i) {
if(i%2) {
str += '<tr bgColor="pink">'
} else {
str += '<tr bgColor="skyblue">'
}
str += '<td>'+(i+1)+'<td>'
for(var key in v) {
str += '<td>'+v[key]+'<td>'
}
str += '</tr>'
})
tbody.innerHTML = str
</script>
简易计算器
<body>
<input type="text" name="num1">
<select>
<option value="0">请选择符号</option>
<option value="+">+</option>
<option value="-">-</option>
<option value="*">*</option>
<option value="/">/</option>
</select>
<input type="text" name="num2">
<button>=</button>
<input type="text" name="result">
</body>
<script>
var num1Input = document.querySelector('[name="num1"]');
var num2Input = document.querySelector('[name="num2"]');
var select = document.querySelector('select');
var btn = document.querySelector('button');
var resultInput = document.querySelector('[name="result"]');
// console.log(num1Input.value, num2Input.value);
// 一定要把获取数据的操作放在点击事件中
btn.onclick = function() {
// console.log(num1Input.value, num2Input.value);
// 运算 - 根据选择的符号 - 判断符号是什么
// console.log(select.value)
switch(select.value) {
case '+':
var res = num1Input.value-0 + num2Input.value*1
break;
case '-':
var res = num1Input.value - num2Input.value
break;
case '*':
var res = num1Input.value * num2Input.value
break;
case '/':
var res = num1Input.value / num2Input.value
break;
}
resultInput.value = res
}
</script>
简易年历
<style>
ul{
list-style-type: none;
padding: 0;
margin: 0;
display: grid;
grid-template-rows: 50px 50px 50px 50px;
grid-template-columns: 50px 50px 50px;
grid-row-gap: 5px;
grid-column-gap: 5px;
justify-content: center;
}
.box{
width: 200px;
background-color: #ccc;
padding: 10px 0 1px;
margin: 50px auto;
}
p{
padding: 0;
margin: 0;
}
ul li{
text-align: center;
background-color: #333;
color: #fff;
line-height: 24px;
}
.box .introduce{
margin: 18px;
background-color: #eee;
padding: 10px;
line-height: 24px;
color: #666;
}
li.active{
background-color: #fff;
color: hotpink;
border: 1px solid #000;
}
</style>
<body>
<div class="box">
<ul>
<li class="active">
<b>1</b>
<p>一月</p>
</li>
<li>
<b>2</b>
<p>二月</p>
</li>
<li>
<b>3</b>
<p>三月</p>
</li>
<li>
<b>4</b>
<p>四月</p>
</li>
<li>
<b>5</b>
<p>五月</p>
</li>
<li>
<b>6</b>
<p>六月</p>
</li>
<li>
<b>7</b>
<p>七月</p>
</li>
<li>
<b>8</b>
<p>八月</p>
</li>
<li>
<b>9</b>
<p>九月</p>
</li>
<li>
<b>10</b>
<p>十月</p>
</li>
<li>
<b>11</b>
<p>十一月</p>
</li>
<li>
<b>12</b>
<p>十二月</p>
</li>
</ul>
<div class="introduce">
<b>1月</b>
<p>元旦放假,新年快乐!</p>
</div>
</div>
</body>
<script>
var arr = [
{
title:"1月",
content:"元旦放假,新年快乐!"
},
{
title:"2月",
content:"没有情人的情人节怎么过?"
},
{
title:"3月",
content:"妇女节快乐!男人的节日在哪里?"
},
{
title:"4月",
content:"愚人节快乐!小心诈骗!"
},
{
title:"5月",
content:"五一小长假,去哪玩?"
},
{
title:"6月",
content:"祝自己儿童节快乐!"
},
{
title:"7月",
content:"建党节,庆祝祖国建党周年!"
},
{
title:"8月",
content:"建军节,愿祖国的军队更强大!"
},
{
title:"9月",
content:"教师节快乐,老师您辛苦了!"
},
{
title:"10月",
content:"国庆长假,回家看看!"
},
{
title:"11月",
content:"光棍节,你剁手了吗?"
},
{
title:"12月",
content:"圣诞节快乐,平安夜平安!"
},
];
// 将所有的li获取到
var lis = document.querySelectorAll('li');
var title = document.querySelector('.introduce b');
var content = document.querySelector('.introduce p');
for(var i=0; i<lis.length; i++) {
lis[i].index = i
lis[i].onmouseenter = function() {
// 将所有的active去掉
for(var j=0; j<lis.length; j++) {
lis[j].className = ''
}
this.className = 'active'
console.log(this.index);
var obj = arr[this.index]
title.innerText = obj.title
content.innerText = obj.content
}
}
</script>
QQ延迟提示框
<body>
<style>
.qq{
width: 280px;
height: 600px;
background-color: #fff;
border:1px solid #ccc;
box-shadow:2px 2px 1px #eee;
position: relative;
}
.avatar{
width: 60px;
height: 60px;
border-radius:50%;
box-shadow: 5px 0 5px #eee,-5px 0 5px #eee,0 5px 5px #eee,0 -5px 5px #eee;
position:absolute;
left:10px;
top:40px;
}
.info{
width: 280px;
height: 150px;
box-shadow: 2px 0 1px #ccc,-2px 0 1px #ccc,0 2px 1px #ccc,0 -2px 1px #ccc;
position:absolute;
right:-285px;
top:40px;
display:none;
}
</style>
<div class="qq">
<!-- 头像 -->
<div class="avatar"></div>
<!-- 个人资料提示框 -->
<div class="info"></div>
</div>
</body>
<script>
// 获取标签
var avatar = document.querySelector('.avatar');
var info = document.querySelector('.info');
// 鼠标移入事件
avatar.onmouseover = function() {
setTimeout(function() {
// 让info出现
info.style.display = 'block'
}, 500)
}
var timer
avatar.onmouseout = info.onmouseout = function() {
timer = setTimeout(function() {
// 让info隐藏
info.style.display = 'none'
}, 500)
}
info.onmouseover = function() {
clearTimeout(timer)
// 让info出现
info.style.display = 'block'
}
// info.onmouseout = function() {
// timer = setTimeout(function() {
// // 让info隐藏
// info.style.display = 'none'
// }, 500)
// }
</script>
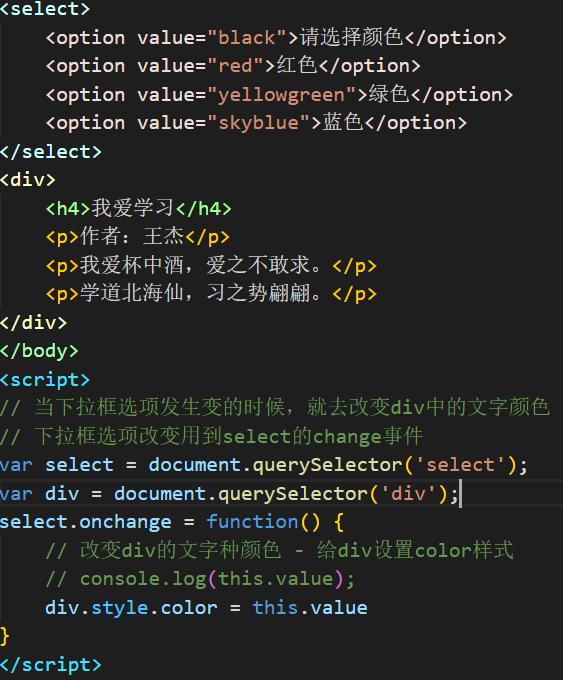
改变诗篇颜色
表格添加
<style>
body>form,body>table{
float:left;
}
body>table{
margin-right: 50px;
}
</style>
<body>
<table border=1 width="500">
<caption><h2>内容显示</h2></caption>
<thead>
<tr>
<th>姓名</th>
<th>年龄</th>
<th>性别</th>
</tr>
</thead>
<tbody></tbody>
</table>
<form action="">
<table>
<caption><h2>表格添加</h2></caption>
<tr>
<td>姓名:</td>
<td><input type="text" name="name"></td>
</tr>
<tr>
<td>年龄:</td>
<td><input type="text" name="age"></td>
</tr>
<tr>
<td>性别:</td>
<td>
<input type="radio" name="sex" value="男">男
<input type="radio" name="sex" value="女">女
</td>
</tr>
<tr>
<td></td>
<td><input type="button" value="添加"></td>
</tr>
</table>
</form>
</body>
<script>
// 获取按钮
var btn = document.querySelector('[type="button"]');
var tbody = document.querySelector('tbody');
// console.log(tbody);
btn.addEventListener('click', add)
function add() {
// 获取数据
var username = document.querySelector('[name="name"]').value;
var age = document.querySelector('[name="age"]').value;
var sexs = document.querySelectorAll('[name="sex"]');
// 通过输出每个单选框,发现被选中的单选框,他有一个对象的属性checked,选中的是true,没选中的是false - 通过遍历两个单选框,判断哪个的checked属性是true,要谁的value - 选中的value
for(var i=0; i<sexs.length; i++) {
if(sexs[i].checked) {
var sex = sexs[i].value
break
}
}
// console.log(sexs);
// console.log(sex);
// 通过数据组合一个tr放在tbody中
var str = ''
str += '<tr>'
str += '<td>'+username+'</td>'
str += '<td>'+age+'</td>'
str += '<td>'+sex+'</td>'
str += '</tr>'
tbody.innerHTML += str
// 将表单清空
document.querySelector('[name="name"]').value = '';
document.querySelector('[name="age"]').value = '';
// 通过单选框的checked属性可以知道哪个是选中的
sexs[0].checked = false
sexs[1].checked = false
}
</script>
模拟下拉表单
<style>
input{
width: 194px;
height: 30px;
border: 1px solid #000;
outline: none;
padding-left: 6px;
}
ul{
list-style: none;
padding: 0;
margin: 0;
width: 200px;
border: 1px solid #000;
cursor: pointer;
display: none;
}
li{
background-color: #eee;
margin: 2px 0;
padding-left: 6px;
}
</style>
<body>
<input type="text">
<ul></ul>
</body>
<script>
// 当文本框获取焦点的时候
var input = document.querySelector('input');
var arr = ['vue', 'react', 'angular']
var ul = document.querySelector('ul');
// 创建下拉菜单
arr.forEach(function(v) {
var li = document.createElement('li')
li.innerText = v
ul.appendChild(li)
})
input.addEventListener('focus', focus)
function focus() {
// 让ul显示
ul.style.display = 'block'
}
input.addEventListener('blur', blur)
function blur() {
// 让ul隐藏
setTimeout(function() {
ul.style.display = 'none'
}, 100)
}
// 遍历给所有li绑定事件
for(var i=0; i<ul.children.length; i++) {
ul.children[i].onclick = function() {
// 当点击一触发,就会触发失去焦点的事件,ul就隐藏了 - 需要让隐藏延迟执行
// console.log(this.innerText);
input.value = this.innerText
}
}
</script>
div在窗口中的拖拽
<style>
.box{
width: 100px;
height: 100px;
background-color: pink;
position: absolute;
left: 0;
top: 0;
}
</style>
<body>
<div class="box"></div>
</body>
<script>
// 拖拽:在div上按下鼠标,移动鼠标,移动过程中让div跟随鼠标移动
/*
分析:
给div绑定鼠标按下事件 - 在按下的事件中继续绑定移动事件
div移动:设置left和top - 给div设置定位
left和top的值是多少?获取鼠标位置,计算left和top
在鼠标按下时记录鼠标在div上的位置
left和top = 鼠标在浏览器中位置 - 一开始鼠标是div上的位置
*/
var box = document.querySelector('.box');
box.onmousedown = function() {
// 获取鼠标在div上按下的位置
var e = window.event;
// console.log(e);
var x1 = e.offsetX
var y1 = e.offsetY
// 绑定移动事件
document.onmousemove = function() {
// 获取鼠标在浏览器中的位置 - 每个事件都有自己独特的事件对象
// console.log(window.event);
var e = window.event;
var x2 = e.clientX
var y2 = e.clientY
// 计算left和top
var l = x2 - x1
var t = y2 - y1
if(l < 0) {
l = 0
}
if(t < 0) {
t = 0
}
if(t > document.documentElement.clientHeight - box.offsetHeight) {
t = document.documentElement.clientHeight - box.offsetHeight
}
if(l > document.documentElement.clientWidth - box.offsetWidth) {
l = document.documentElement.clientWidth - box.offsetWidth
}
// 设置div的left和top
box.style.left = l + 'px'
box.style.top = t + 'px'
}
}
// 拖拽行为一定要记得解绑mousemove事件
window.onmouseup = function() {
document.onmousemove = null
}
/*
总结:
绑定按下事件 - box
获取按下的为位置
绑定移动事件 - window
获取移动的位置
计算left和top = 移动位置 - 按下的位置
限制left和top的最大值和最小值
将left和top设置给div
绑定松开事件 - window
解绑mousemove事件 - window
*/
</script>
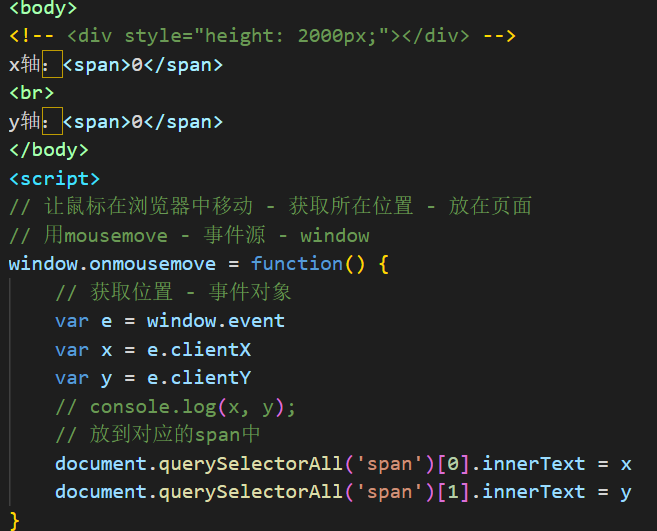
光标位置的实时显现
自定义键盘按键控制滚动条
<body>
<div style="width:100%;height:2000px;">
阿斯蒂芬
</div>
<!-- <button>按钮</button> -->
<!-- <input type="text"> -->
<!-- <select name="" id="">
<option value="">1</option>
<option value="">2</option>
</select> -->
</body>
<script>
// 本来空格和上下键能控制滚动条 - 不希望他们控制了 - 自己规定的键去控制
// 将空格和上下键的默认行为阻止 - 判断按键是否是自己规定的键 - 控制滚动条 - 给滚动过的距离赋值
// var box = document.querySelector('select');
// 键盘事件要给能获取焦点的元素绑定:window document 表单元素
// console.log(document);
// console.log(window);
window.onkeydown = function() {
// 判断是否是空格和上下键 - 阻止默认行为
var e = window.event
var keycode = e.keyCode || e.which
// if(keycode === 32 || keycode === 38 || keycode === 40) {
// return false
// } else {
// // 是否是自己规定的键 - a上 b下
// if(String.fromCharCode(keycode).toLowerCase() === 'a') {
// var t = document.documentElement.scrollTop || document.body.scrollTop
// t -= 10
// document.documentElement.scrollTop = document.body.scrollTop = t
// } else if(String.fromCharCode(keycode).toLowerCase() === 'b') {
// var t = document.documentElement.scrollTop || document.body.scrollTop
// t += 10
// document.documentElement.scrollTop = document.body.scrollTop = t
// } else {
// return false
// }
// }
// 是否是自己规定的键 - a上 b下
var t = document.documentElement.scrollTop || document.body.scrollTop
if(String.fromCharCode(keycode).toLowerCase() === 'a') {
t -= 10
} else if(String.fromCharCode(keycode).toLowerCase() === 'b') {
t += 10
} else {
return false
}
document.documentElement.scrollTop = document.body.scrollTop = t
}
</script>
可拖拽的进度条
<style>
.big{
width: 300px;
height: 30px;
border: 1px solid #000;
display:inline-block;
vertical-align: middle;
}
.small{
width: 0px;
height: 30px;
background-color: hotpink;
}
span{
margin-left: 20px;
}
</style>
<body>
<div class="big">
<div class="small"></div>
</div>
<span>0</span>
</body>
<script>
// 获取标签
var big = document.querySelector('.big');
var small = document.querySelector('.small');
var span = document.querySelector('span');
// 添加点击事件
big.onmousedown = function() {
// 获取鼠标在big上的位置
var x = window.event.offsetX
// 将这个数字设置给small的宽度
small.style.width = x + 'px'
// 计算
span.innerText = Math.ceil(x / big.clientWidth * 100)
// 移动
big.onmousemove = function() {
var x = window.event.offsetX
small.style.width = x + 'px'
span.innerText = Math.ceil(x / big.clientWidth * 100)
}
}
// 松开鼠标解绑移动事件
big.onmouseup = function() {
big.onmousemove = null
}
</script>
范围拖拽
<style>
.big{
width: 400px;
height: 400px;
background-color: pink;
margin: 50px auto;
position: relative;
}
.small{
width: 100px;
height: 100px;
background-color: #0f0;
position: absolute;
left: 0;
top: 0;
}
.box{
width: 300px;
height: 500px;
background-color: #00f;
}
</style>
<body>
<div class="box"></div>
<div class="big">
<div class="small"></div>
</div>
</body>
<script>
// 拖拽效果:给小div绑定按下事件,给大div绑定移动事件
// 获取鼠标位置,计算小div的left和top
// 给大div绑定松开事件,解绑大div的移动事件
var small = document.querySelector('.small');
var big = document.querySelector('.big');
small.onmousedown = function() {
// 获取鼠标在small上按下的位置
var x = window.event.offsetX
var y = window.event.offsetY
console.log(111, x, y);
// 给大div绑定移动事件
window.onmousemove = function() {
// 获取鼠标位置
// var x1 = window.event.offsetX
// var y1 = window.event.offsetY
// 以后做拖拽的时候,小心不要使用offset系列的值
var x1 = window.event.clientX
var y1 = window.event.clientY
// offsetX和offsetY,当鼠标在大div上的时候,offsetX和offsetY代表鼠标在大div上的位置,如果鼠标在小div上的时候,offsetX和offsetY就代表鼠标在小div上的位置
/*
offsetX和offsetY获取到的是鼠标相对事件源的位置,这是说当鼠标直接在事件源上的时候,如果鼠标不是直接在事件源上的,这个值会变成鼠标直接在哪个标签的位置
小div在闪烁,在大div上的位置和小div上的位置之间进行闪烁
*/
console.log(222, x1, y1);
var t1 = document.documentElement.scrollTop || document.body.scrollTop
var l = x1 - x - big.offsetLeft
// 大div距离浏览器顶部的距离 = 大div距离页面顶部的距离 - 滚动过的距离
// top值 = 鼠标在浏览器上的位置 - 鼠标在小div上的位置 - 大div距离浏览器顶部的距离
// var t = y1 - y - (big.offsetTop - t1)
var t = window.event.pageY - y - big.offsetTop
// pageY = clientY + 滚动过的高度
if(l < 0) {
l = 0
}
if(t < 0) {
t = 0
}
if(l > big.clientWidth - small.offsetWidth) {
l = big.clientWidth - small.offsetWidth
}
if(t > big.clientHeight - small.offsetHeight) {
t = big.clientHeight - small.offsetHeight
}
small.style.left = l + 'px'
small.style.top = t + 'px'
}
}
window.onmouseup = function() {
window.onmousemove = null
}
/*
总结:
1.offsetX和offsetY有问题
2.判断最大值的时候是否需要带边框
3.以后使用鼠标位置的时候,尽量使用pageX和pageY更严谨
*/
</script>
自定义右键菜单
<script>
// 自定义右键菜单:将默认菜单去掉,自己创建一个菜单并显示在浏览啊中
/*
阻止右击的默认行为 - 事件源window
创建ul>li*3
插入到body中
设置ul的left和top - 就是鼠标在浏览器中的位置
*/
var arr = ['vue', 'react', 'angular']
var ul = document.createElement('ul')
arr.forEach(function(v) {
var li = document.createElement('li')
li.innerText = v
ul.appendChild(li)
})
// 将ul添加到body中
document.body.appendChild(ul)
// console.log( document.querySelector('ul') );
// 使用事件委托给li绑定事件
// 要获取任意一个元素,必须是这个元素在浏览器中显示了
ul.onmouseover = function() {
// 把所有的li的背景设置为透明
// console.log(ul.children[0]);
for(var i=0; i<ul.children.length; i++) {
ul.children[i].style.backgroundColor = 'transparent'
}
// // 当li是谁 - 事件对象.target
// console.log( window.event.target );
// 目标元素可能是ul也可能是li,判断当前这个目标元素是li,才会添加背景
var tag = window.event.target
// console.log(tag.nodeName); // 标签节点的节点属性,值是一个大写的标签名
if(tag.nodeName === 'LI') {
tag.style.backgroundColor = '#ccc'
}
// window.event.target.style.backgroundColor = '#ccc'
}
ul.onclick = function() {
var tag = window.event.target
if(tag.nodeName === 'LI') {
alert(tag.innerText)
ul.style.display = 'none'
}
}
ul.style.display = 'none'
window.oncontextmenu = function() {
// 先获取鼠标在浏览器中点击的位置
var e = window.event;
var x = e.pageX;
var y = e.pageY
// console.log(222);
// 判断当鼠标点击的位置在浏览器宽度的百分之80,就让ul在鼠标左边显示
if(x > document.documentElement*.8) {
var l = x - 20 - 200
} else {
var l = x
}
if(x > document.documentElement.clientHeight*.8) {
var t = y - 20 - 100
} else {
var t = y
}
// 批量设置样式的函数
setStyle(ul, {
display: 'block',
listStyle: 'none',
padding: 0,
margin: 0,
width: '200px',
lineHeight: '30px',
border: '1px solid #000',
position: 'absolute',
left: l + 'px',
top: t + 'px'
})
return false
}
/*
总结:
*/
</script>
文字跟随光标
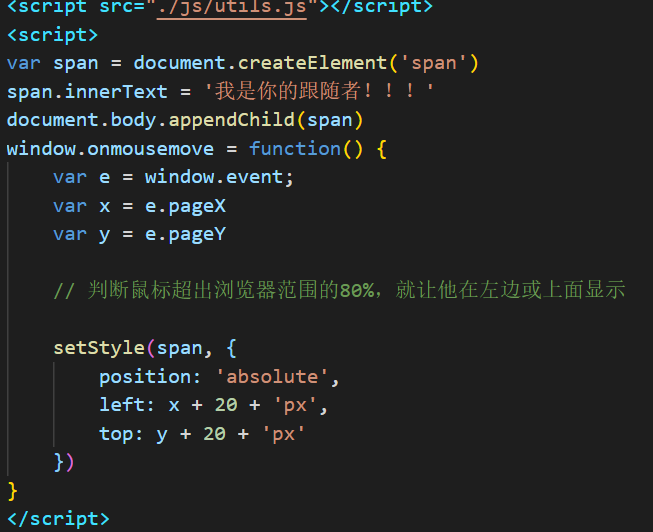
打字游戏
<button>开始</button>
得分: <b>0</b>分
</body>
<script src="./js/utils.js"></script>
<script>
// 打字游戏
/*
从浏览器顶端每隔一会就会有一个字符掉下来
敲键盘敲中了对应的某个字符,字符会消失
每隔一会 - 定时器 - 执行一个函数
一个字符 - 创建一个标签
创建标签
标签中放内容 - 随机内容 - 修饰样式
掉下来
定时器
获取当前top
加大
限制 - 如果超出了浏览器范围 GAME OVER - 将所有的小定时器和大定时器清除
设置top
键盘事件 - 事件类型keyup - 事件源window - 事件函数
获取键盘码 - 转成字符 - 跟当前页面中所有的字符对比
遍历当前页面中所有的标签,每个标签中的字符跟当前字符做比较 - 全等
如果true
将字符对应的定时器停止
让字符消失
false
什么也不做
*/
// 创建数组 - 用于创建好的所有span
var spanArr = []
// 定义一个开关 - 控制多次点击只有第一次才有效
var flag = true
document.querySelector('button').onclick = function() {
// 按钮被点击多次后,就会有多个定时器同时进行 - 叠加的效果
// 解决思路:
// 1.每次开始定时器之前先停止了原先的定时器
for(var i=0; i<spanArr.length; i++) {
clearInterval(spanArr[i].timerId)
}
// // 清除大定时器
clearInterval(timer)
// spanArr = []
// 从body中清除所有的span
for(var i=spanArr.length-1; i>=0; i--) {
document.body.removeChild(spanArr[i])
}
spanArr = []
// 2.定义开关去解决
if(!flag) {
return
}
flag = false
var timer = setInterval(function() {
// 创建标签
var span = document.createElement('span')
// 获取随机字母对应的阿斯克码
var code = getRandom(97, 123)
// 转换成字母
var word = String.fromCharCode(code)
// 放在标签中
span.innerText = word
// 随机left值
var l = getRandom(0, document.documentElement.clientWidth - 30)
// 修饰样式
setStyle(span, {
position: 'absolute',
width: '30px',
height: '30px',
borderRadius: '50%',
backgroundColor: '#00f',
textAlign: 'center',
lineHeight: '30px',
color: '#fff',
fontWeight: 'bold',
top: 0,
left: l + 'px'
})
document.body.appendChild(span)
// 将span放在spanArr中
spanArr.push(span)
// 让字符向下掉
// 将每个span对应的定时器放在span的属性上
span.timerId = setInterval(function() {
// 获取高度
var t = span.offsetTop
// 加大
t += 3
// 限制最大值
if(t > document.documentElement.clientHeight - 30) {
// game over
alert('GAME OVER')
// 清除所有小定时器
for(var i=0; i<spanArr.length; i++) {
clearInterval(spanArr[i].timerId)
}
// 清除大定时器
clearInterval(timer)
// 将开关打开
flag = true
}
// console.log(111);
// 设置样式
span.style.top = t + 'px'
}, 20)
// console.log(222);
}, 1000)
}
// 键盘事件
window.onkeyup = function() {
var e = window.event
var keycode = e.keyCode || e.which
var word = String.fromCharCode(keycode).toLowerCase()
// 遍历数组
for(var i=0; i<spanArr.length; i++) {
// 每个字符中的内容跟当前敲击的内容是否相等
if(spanArr[i].innerText === word) {
// 清除跟当前字符相等的span的定时器
clearInterval(spanArr[i].timerId)
// 从body中将span删除
document.body.removeChild(spanArr[i])
// 让分数+1
spanArr.splice(i, 1)
console.log(spanArr);
// 获取原来分数
var score = document.querySelector('b').innerText-0
// 分数+1
score++
// 放到b中
document.querySelector('b').innerText = score
break
}
}
// 从数组中删除这个span
// for(var i=spanArr.length-1; i>=0; i--) {
// spanArr.splice(i, 1)
// }
}
文件类型检测
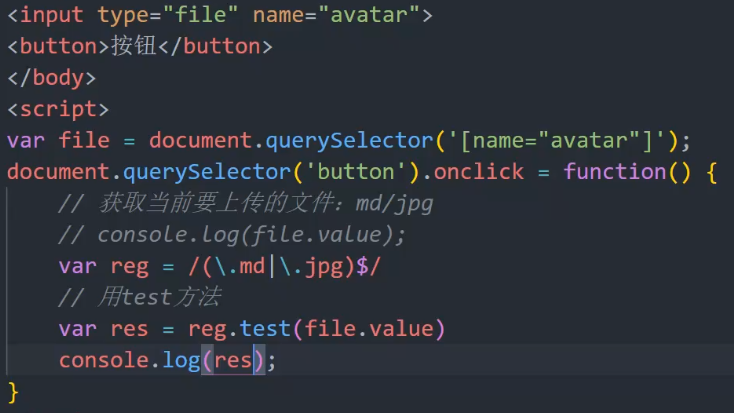
最后通过判断验证
字符串两段去除空白
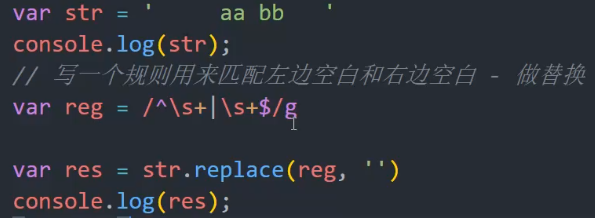
表单验证
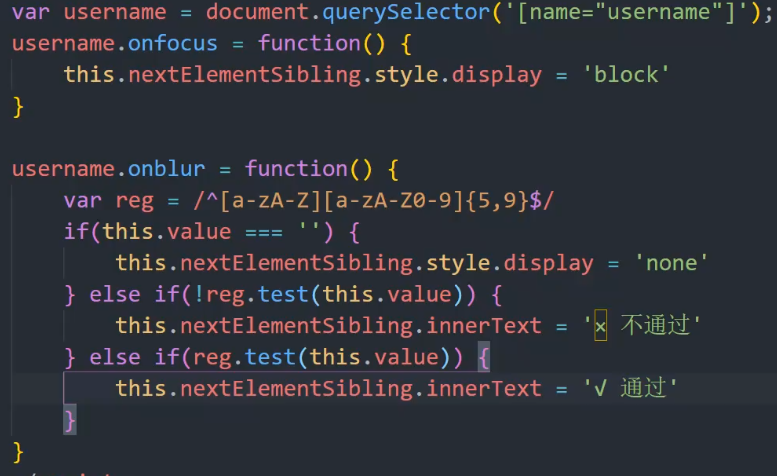
插件做轮播图
<style>
.swiper {
width: 600px;
height: 300px;
}
</style>
<body>
<div class="swiper">
<div class="swiper-wrapper">
<div class="swiper-slide" style="">Slide 1</div>
<div class="swiper-slide" style="">Slide 2</div>
<div class="swiper-slide" style="">Slide 3</div>
</div>
<!-- 如果需要分页器 -->
<div class="swiper-pagination"></div>
<!-- 如果需要导航按钮 -->
<div class="swiper-button-prev"></div>
<div class="swiper-button-next"></div>
<!-- 如果需要滚动条 -->
<!-- <div class="swiper-scrollbar"></div> -->
</div>
</body>
<script src="./js/swiper-bundle.min.js"></script>
<script>
// js插件:swiper - 专业做轮播图的
var mySwiper = new Swiper ('.swiper', {
direction: 'horizontal', // 垂直切换选项
loop: true, // 循环模式选项
autoplay: {
delay: 1000,
stopOnLastSlide: false,
disableOnInteraction: true,
},
// 如果需要分页器
pagination: {
el: '.swiper-pagination',
clickable :true,
},
// 如果需要前进后退按钮
navigation: {
nextEl: '.swiper-button-next',
prevEl: '.swiper-button-prev',
},
// 如果需要滚动条
scrollbar: {
el: '.swiper-scrollbar',
},
})
mySwiper.el.onmouseover=function(){
mySwiper.autoplay.stop();
}
mySwiper.el.onmouseleave=function(){
mySwiper.autoplay.start();
}
<!DOCTYPE html>
<html lang="en">
<head>
<meta charset="UTF-8">
<title>Document</title>
</head>
<body>
<table border=1 width="500">
<thead align="left">
<tr>
<th><input type="checkbox" name="selectAll">全选</th>
<th>商品名称</th>
</tr>
</thead>
<tbody>
<tr>
<td><input type="checkbox" name="selectOne"></td>
<td>鞋子</td>
</tr>
<tr>
<td><input type="checkbox" name="selectOne"></td>
<td>衬衫</td>
</tr>
<tr>
<td><input type="checkbox" name="selectOne"></td>
<td>裤子</td>
</tr>
<tr>
<td><input type="checkbox" name="selectOne"></td>
<td>袜子</td>
</tr>
<tr>
<td><input type="checkbox" name="selectOne"></td>
<td>内衣</td>
</tr>
</tbody>
<tfoot>
<tr>
<td><input type="checkbox" name="selectAll">全选</td>
</tr>
</tfoot>
</table>
</body>
<script>
// 获取两个全选
var selectAll = document.querySelectorAll('[name="selectAll"]');
// 获取所有单选
var selectOne = document.querySelectorAll('[name="selectOne"]');
// 点击事件
for(var i=0; i<selectAll.length; i++) {
selectAll[i].onclick = function() {
// 判断自己是否是选中状态 - 设置其他的单选
// console.log(this.checked);
// if(this.checked) {
// // 设置所有单选为true
// for(var j=0; j<selectOne.length; j++) {
// selectOne[j].checked = true
// }
// for(var j=0; j<selectAll.length; j++) {
// selectAll[j].checked = true
// }
// } else {
// for(var j=0; j<selectOne.length; j++) {
// selectOne[j].checked = false
// }
// for(var j=0; j<selectAll.length; j++) {
// selectAll[j].checked = false
// }
// }
for(var j=0; j<selectOne.length; j++) {
selectOne[j].checked = this.checked
}
for(var j=0; j<selectAll.length; j++) {
selectAll[j].checked = this.checked
}
}
}
// 单选
for(var i=0; i<selectOne.length; i++) {
selectOne[i].onclick = function() {
// 判断是否所有的单选都是选中状态 - 设置两个全选
var arr = [].slice.call(selectOne, 0) // 将伪数组转成数组
var bool = arr.every(v => v.checked) // 调用数组方法判断是否全部选中
// console.log(bool);
// 根据结果设置两个全选
for(var j=0; j<selectAll.length; j++) {
selectAll[j].checked = bool
}
}
}

深拷贝:

得到对象
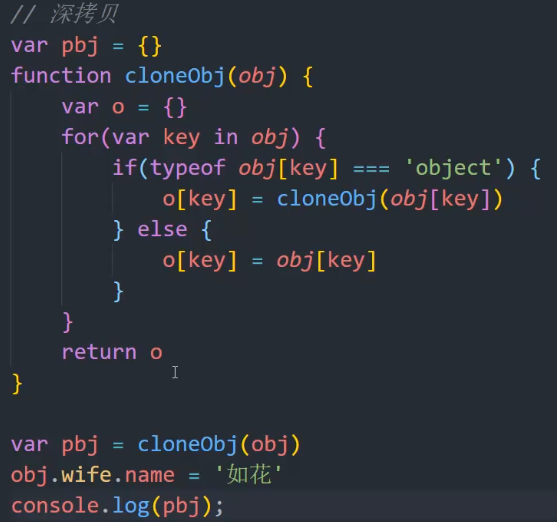
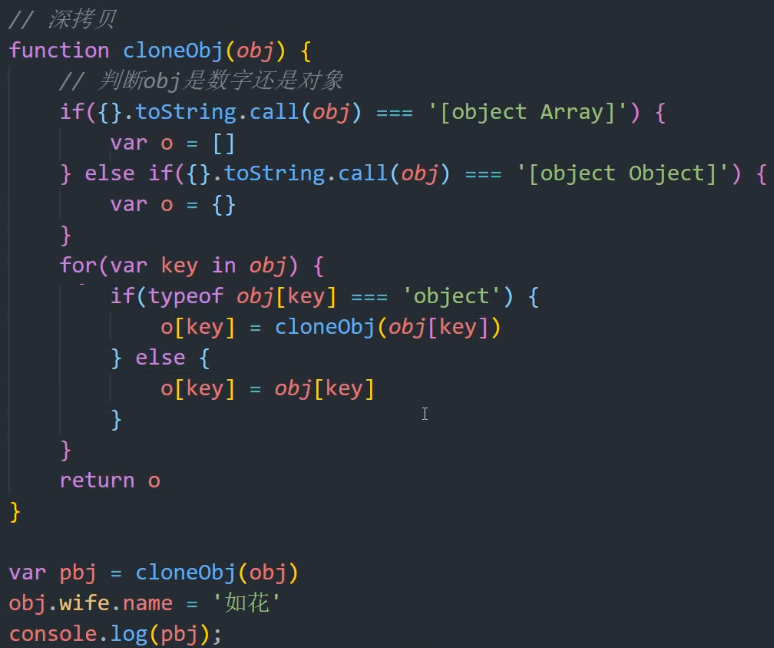
递归
