一、获取qq的smtp服务器的授权码
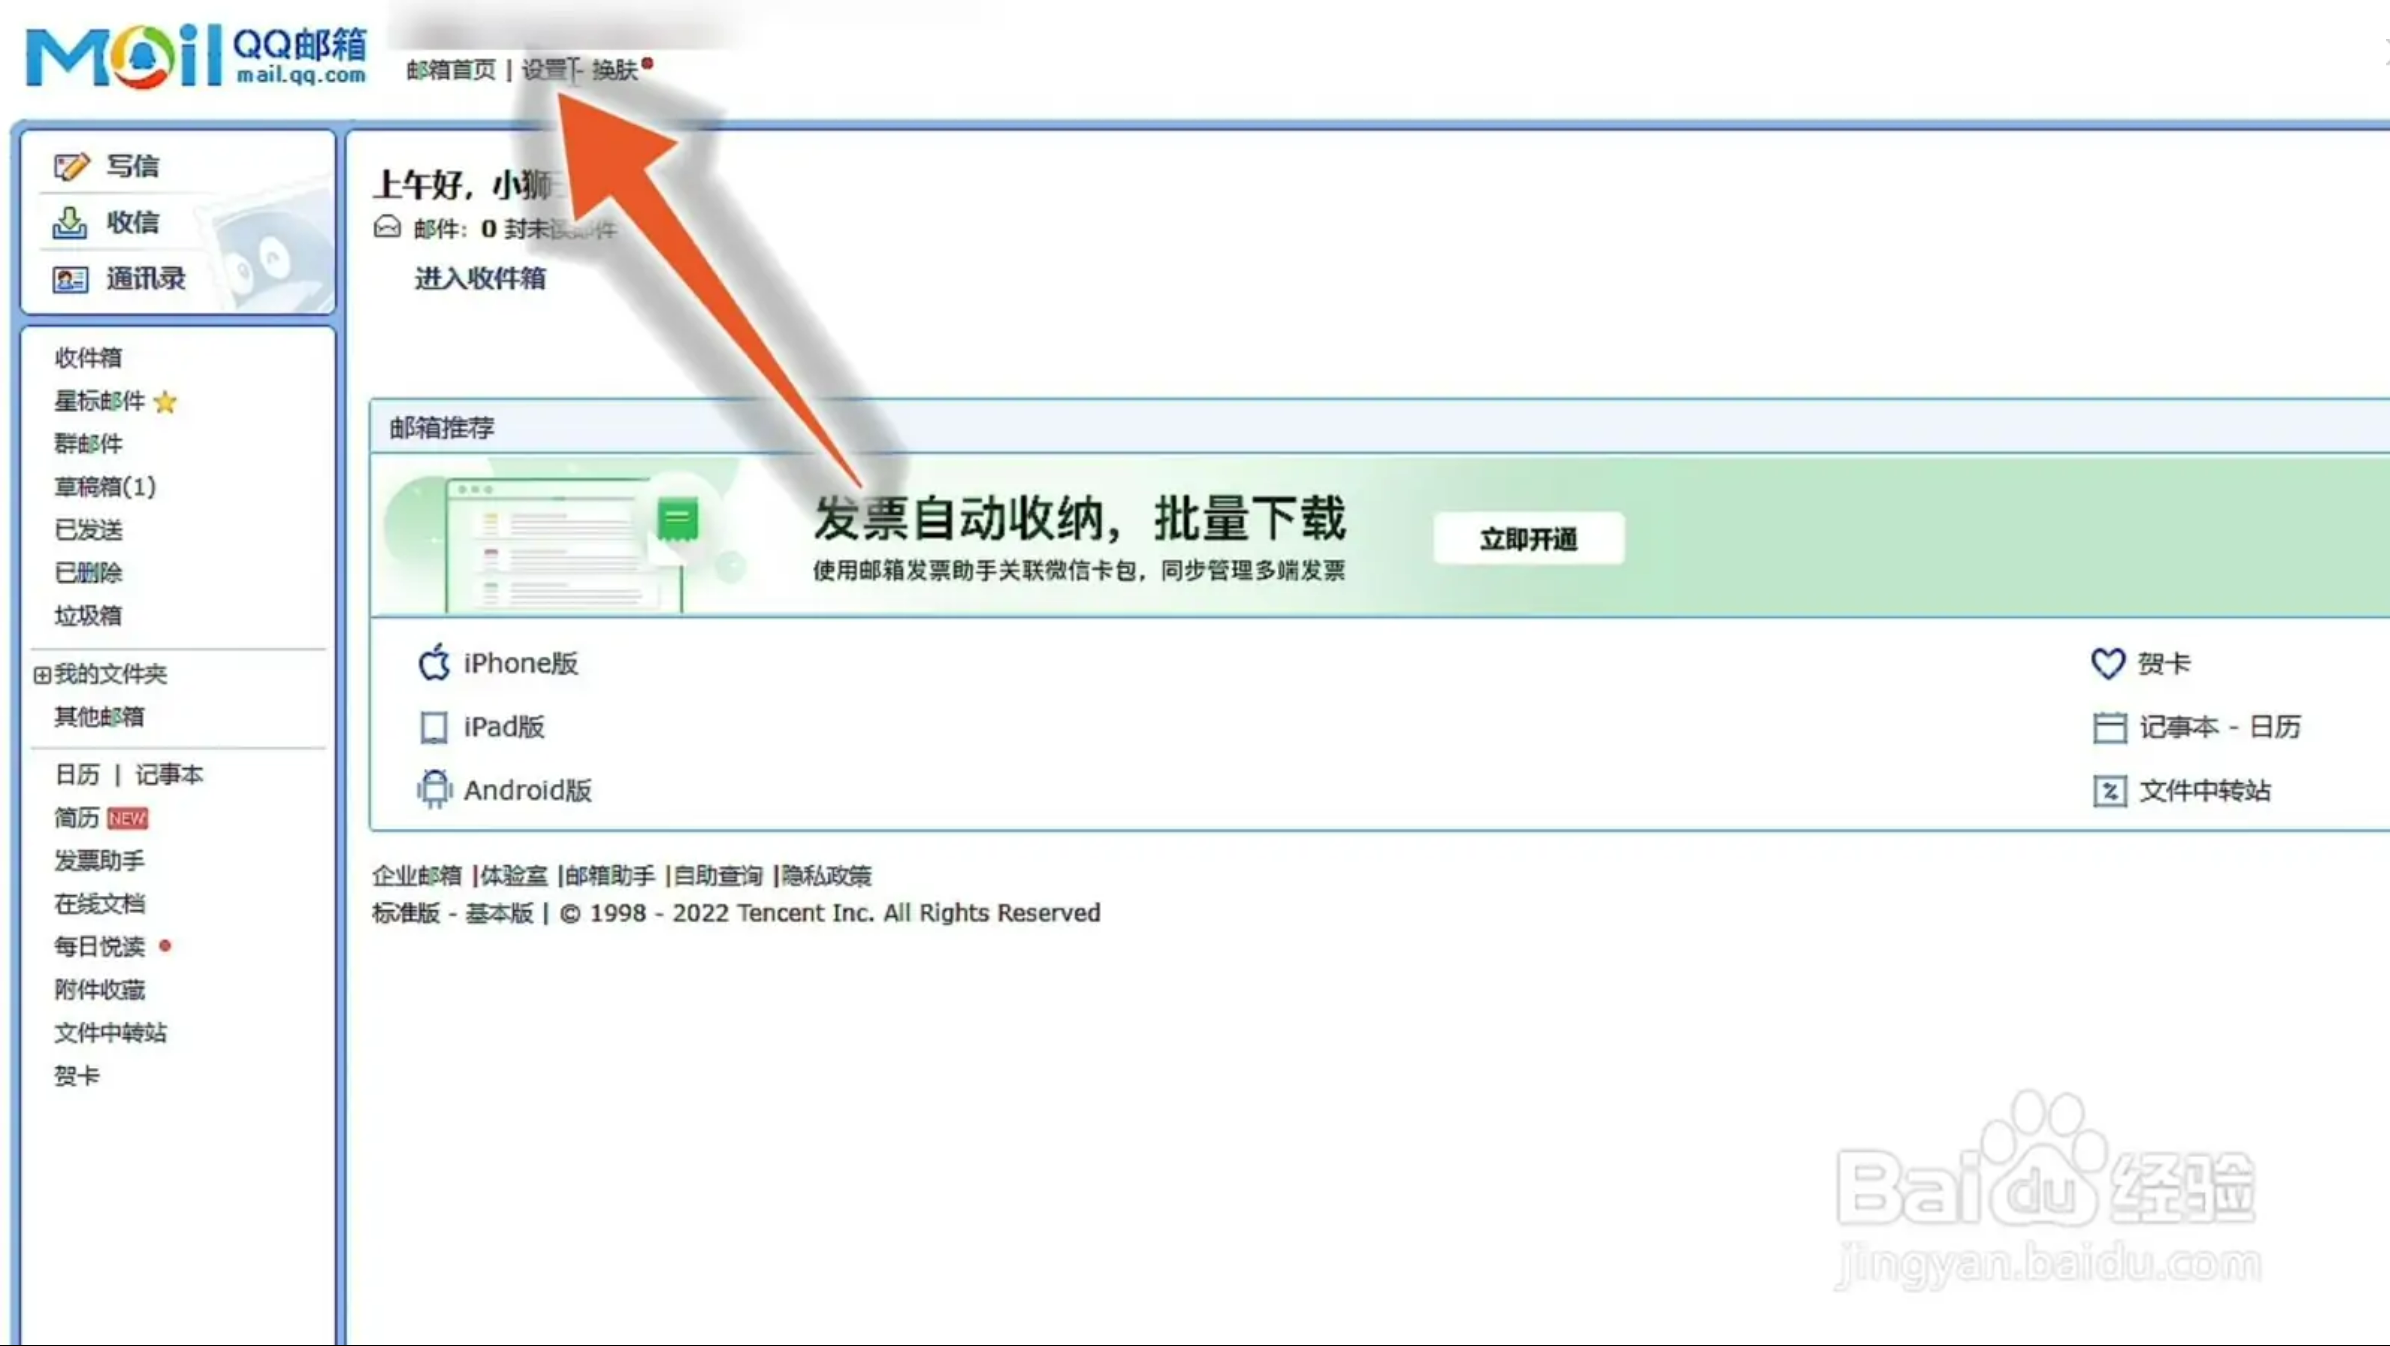
1、在QQ邮箱的网页版中,找到左上角的“设置”,点击它。

2、在设置界面里,找到“帐户”选项,点击它进入新界面。

3、在新界面中,找到POP3/SMTP服务,点击它右侧的开启。

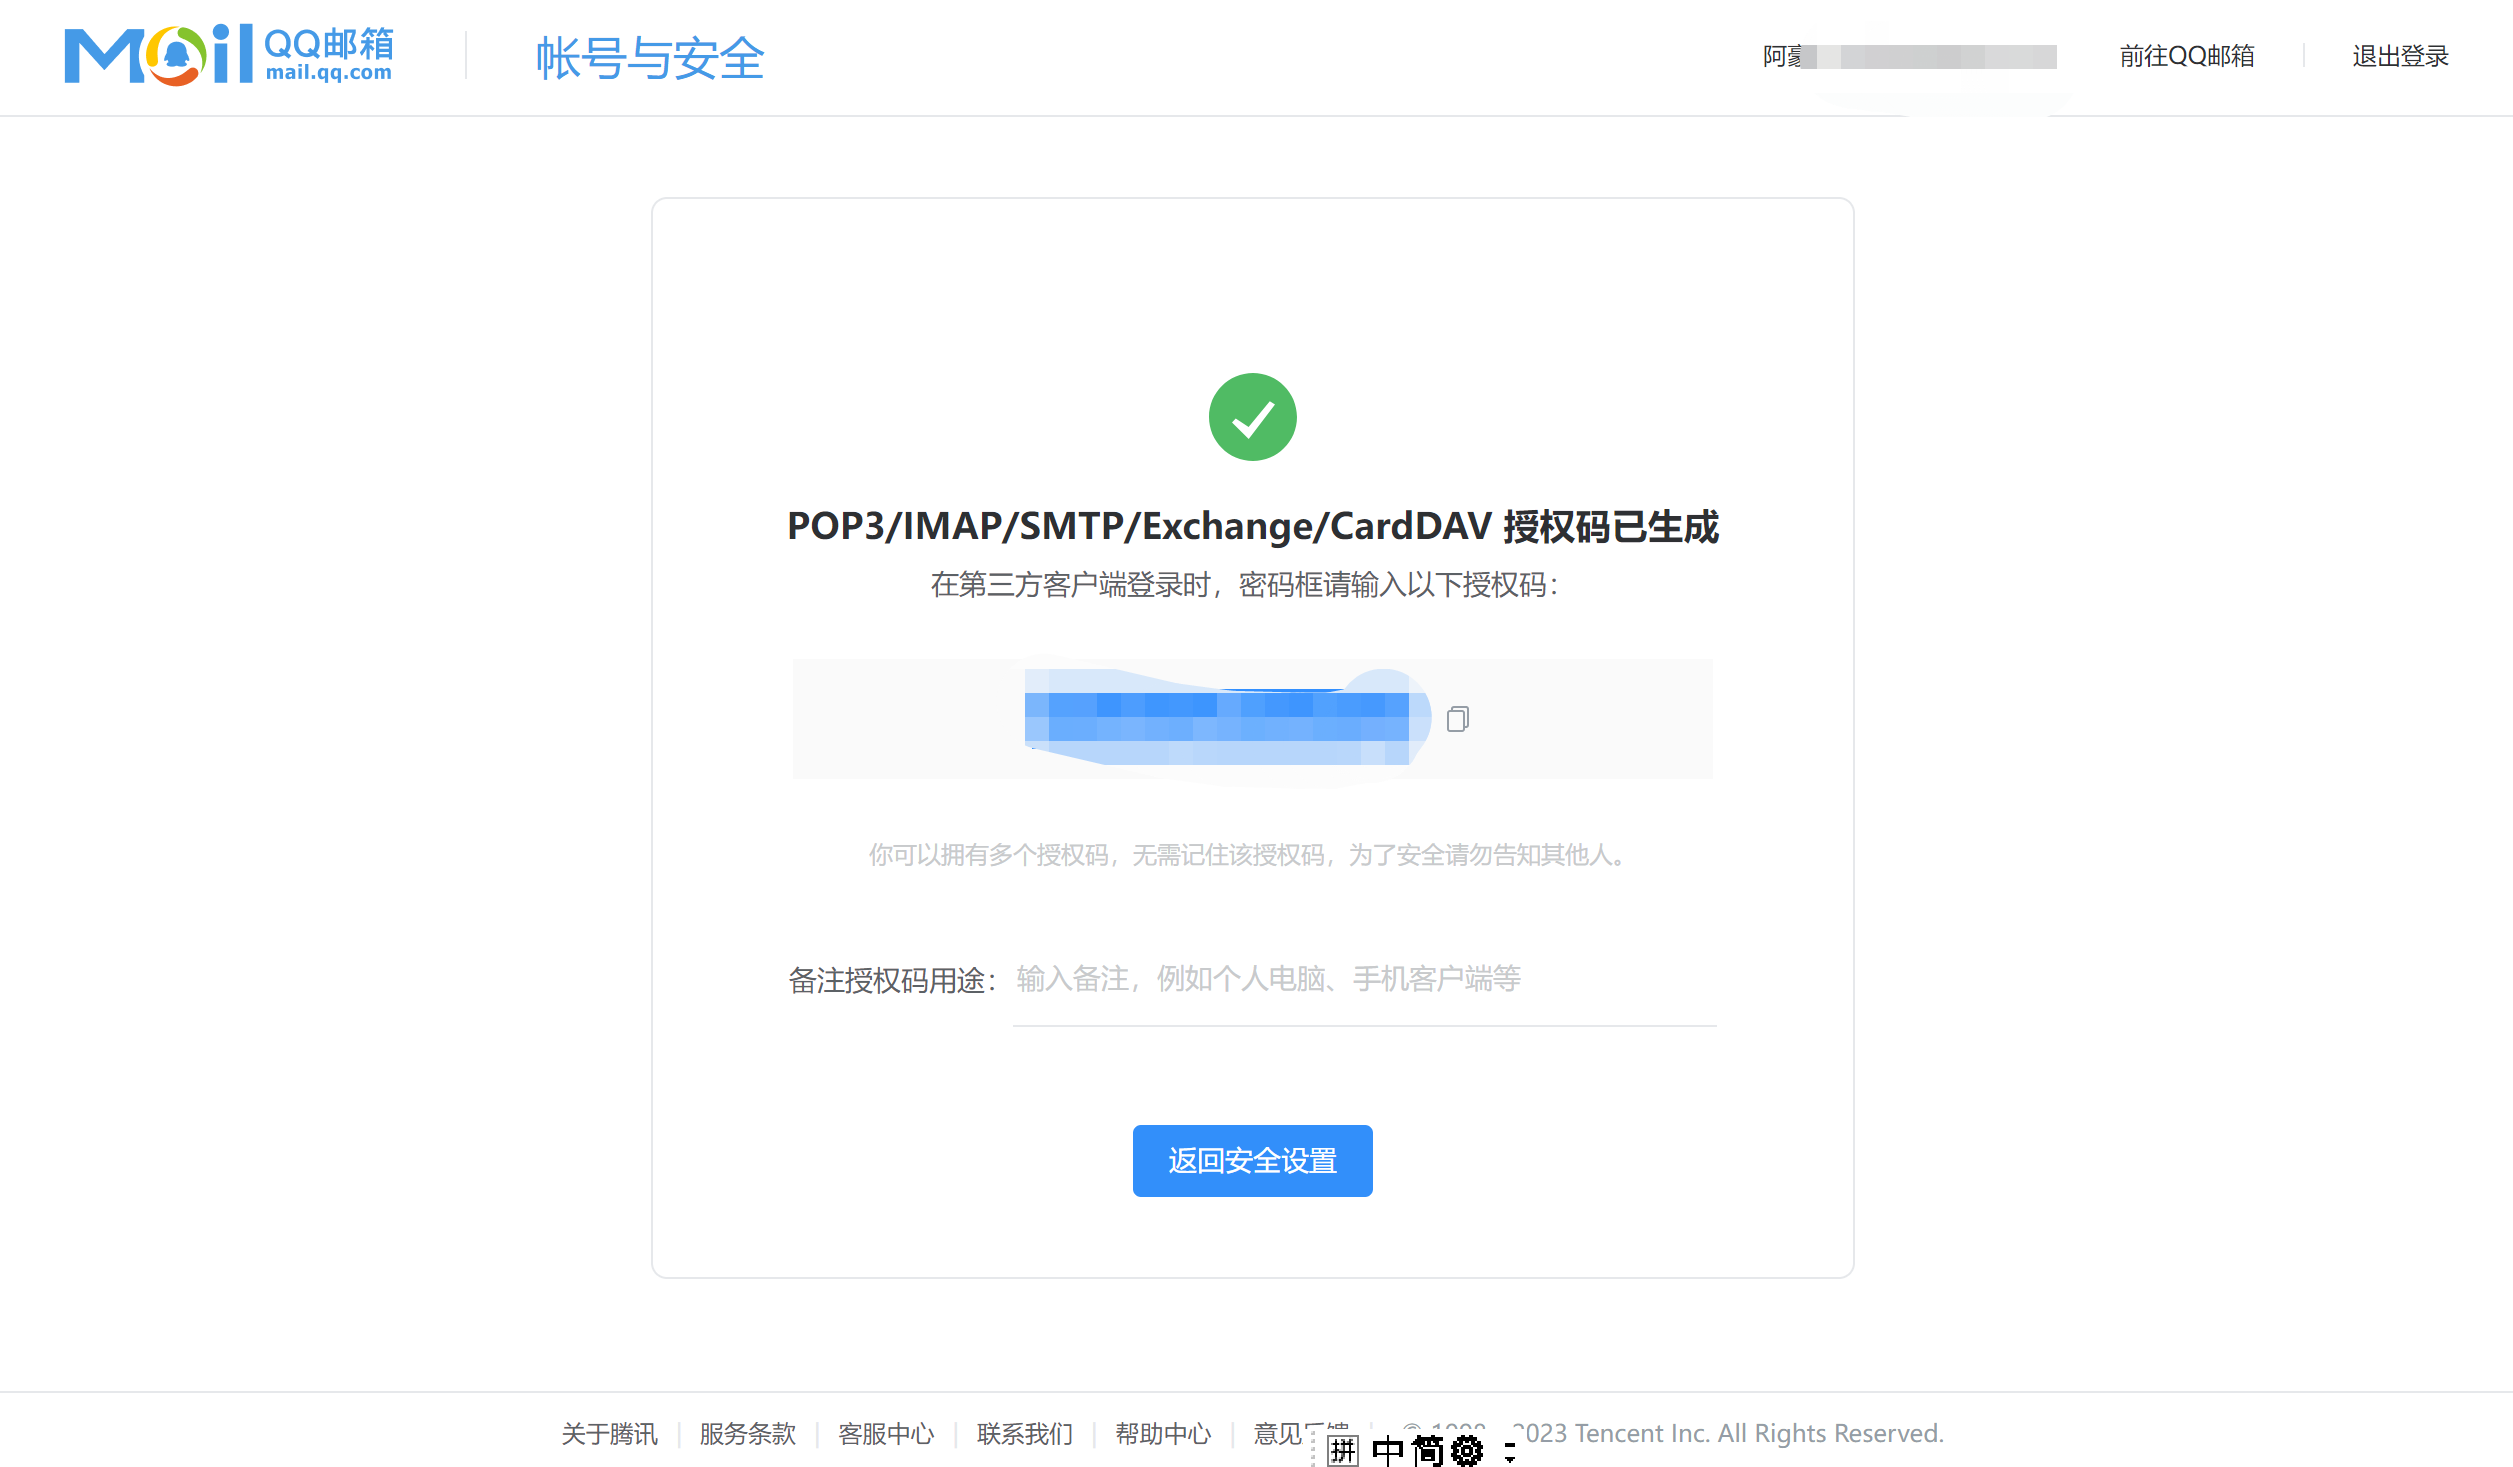
4、获取授权码

二、代码
import com.smtp;
io.open()
var smtp = com.smtp();
smtp.ssl = true;
smtp.from="xxx@qq.com" //发件人
smtp.to="xxx@qq.com" //收件人
smtp.server="smtp.qq.com" //邮件服务器
smtp.username="xxx" //qq邮箱用户名
smtp.password = "xxx" //qq邮箱授权码密码
smtp.subject=" 我是标题部分内容.. " //邮件标题
smtp.charset="utf-8" // 要设置字符集,否则中文乱码
smtp.html='<html><body>hello,你好</body></html>' //邮件内容
//smtp.addfile("附件路径") //一定要使用全路径
try{
    smtp.send();//发送邮件
    io.print("OK");
    execute("pause") //按任意键继续
}
catch(e){
    io.print("出错了,请正确设置smtp服务器登录信息,如密码等.",e)
    execute("pause")
    io.close();//关闭控制台
}
这样就能发送成功了。亲测有效。
发送附件
smtp.addfile("C:\Users\miracle\Desktop\新建文件夹\美女.png")
正文发送图片:
smtp.html = smtp.html + `<img src = "http://xxxx/img/login_bg.10020494.png"/>`
三、qq邮箱smtp服务器地址端口
1、QQ邮箱(mail.qq.com)
POP3服务器地址:pop.qq.com(端口:110)
SMTP服务器地址:smtp.qq.com(端口:25)
2、搜狐邮箱(sohu.com):
POP3服务器地址:pop3.sohu.com(端口:110)
SMTP服务器地址:smtp.sohu.com(端口:25)
3、HotMail邮箱(hotmail.com):
POP3服务器地址:pop.live.com(端口:995)
SMTP服务器地址:smtp.live.com(端口:587)
4、移动139邮箱:
POP3服务器地址:POP.139.com(端口:110)
SMTP服务器地址:SMTP.139.com(端口:25)
四、Java发送邮件
1、依赖
<dependency>
            <groupId>javax.mail</groupId>
            <artifactId>mail</artifactId>
            <version>1.4.7</version>
        </dependency>
2、工具类
import javax.mail.Authenticator;
import javax.mail.PasswordAuthentication;
import javax.mail.Session;
import java.util.Properties;

public class JavaMailUtils {
    public static Session createsession() {
        // SMTP服务器地址
        String smtp = "smtp.qq.com";

        // 邮箱账号和密码(授权密码)
        String userName = "xxx@qq.com";
        String password = "xxxx"; // qq邮箱授权码

        // SMTP服务器的连接信息
        Properties props = new Properties();
        props.put("mail.smtp.host", smtp); // SMTP主机号
        props.put("mail.smtp.port", "25"); // 主机端口号
        props.put("mail.smtp.auth", "true"); // 是否需要认证
//        props.put("mail.smtp.starttls.enable", "true"); // 启用TLS加密

        // 创建Session
        // 参数1:SMTP服务器的连接信息
        // 参数2:用户认证对象(Authenticator接口的匿名实现类)
        Session session = Session.getInstance(props, new Authenticator() {
            @Override
            protected PasswordAuthentication getPasswordAuthentication() {
                return new PasswordAuthentication(userName, password);
            }
        });
        // 开启调试模式
        session.setDebug(true);
        return session;
    }
}
3、测试类
import com.zwh.common.util.JavaMailUtils;
import javax.mail.MessagingException;
import javax.mail.Session;
import javax.mail.Transport;
import javax.mail.internet.InternetAddress;
import javax.mail.internet.MimeMessage;

public class emailDemo {
    public static void main(String[] args) {
        try {
            // 1.创建Session
            Session session = JavaMailUtils.createsession();

            // 2.创建邮件对象(Message抽象类的子类对象)
            MimeMessage msg = new MimeMessage(session); // 传入session
            msg.setFrom(new InternetAddress("xxx@qq.com")); // 发件人
            msg.setRecipient(MimeMessage.RecipientType.TO, new InternetAddress("xxx@qq.com")); // 收件人
//            msg.setRecipient(Message.RecipientType.CC, new InternetAddress("*********")); // 抄送人
            msg.setSubject("这是一封来自好友的邮件","utf-8"); // 标题
            msg.setText("日本排核污水了,没心情工作,以后还敢吃海鲜吗?","utf-8"); // 正文

            // 3.发送
            Transport.send(msg);

        } catch (MessagingException e) {
            e.printStackTrace();
        }
    }
}
发送成功,亲测有效!
五、发送正文带有"html"标签的邮件
可以在需要修改的内容前后加上html的修饰符进行修改。例:<b>世界</b> 可以让"世界"两个字加粗。
msg.setText("<b>世界</b>和平!","utf-8","html");
示例:
import com.zwh.common.util.JavaMailUtils;
import javax.mail.MessagingException;
import javax.mail.Session;
import javax.mail.Transport;
import javax.mail.internet.InternetAddress;
import javax.mail.internet.MimeMessage;

public class emailDemo {
    public static void main(String[] args) {
        try {
            // 1.创建Session
            Session session = JavaMailUtils.createsession();

            // 2.创建邮件对象(Message抽象类的子类对象)
            MimeMessage msg = new MimeMessage(session); // 传入session
            msg.setFrom(new InternetAddress("xxx@qq.com")); // 发件人
            msg.setRecipient(MimeMessage.RecipientType.TO, new InternetAddress("xxx@qq.com")); // 收件人
//            msg.setRecipient(Message.RecipientType.CC, new InternetAddress("*********")); // 抄送人
            msg.setSubject("这是一封来自好友的邮件","utf-8"); // 标题
//            msg.setText("愿世界和平!","utf-8"); // 正文
            // 邮件正文中包含有“html”标签(控制文本的格式)
            msg.setText("<b>世界</b>和平!","utf-8","html"); // 正文
            // 3.发送
            Transport.send(msg);

        } catch (MessagingException e) {
            e.printStackTrace();
        }
    }
}
六、发送带有附件的邮件
想发送带有附件的邮件,我们还要创建邮件内容"复合"对象
// 3.邮件内容"复合"对象
            Multipart multipart = new MimeMultipart();
            // 正文
            BodyPart textPart = new MimeBodyPart();
            // 参数1:正文内容
            // 参数2:内容类型;字符编码集
            textPart.setContent("<b>美女</b>,喜欢吗?", "text/html;charset=utf-8");
            // 附件
            BodyPart imagePart = new MimeBodyPart();
            imagePart.setFileName("美女.png"); // 设置附件文件的显示名称
            // 数据处理对象(读取附件文件从本地磁盘进行读取)
            imagePart.setDataHandler(
                    new DataHandler(
                            new ByteArrayDataSource(
                                    Files.readAllBytes(Paths.get("C:\\Users\\miracle\\Desktop\\新建文件夹\\美女.png")),
                                    "application/octet-stream")));
            // 添加至邮件内容
            multipart.addBodyPart(textPart); // 添加正文
            multipart.addBodyPart(imagePart); // 添加附件
            // 设置邮件内容
            msg.setContent(multipart);
如果我们需要抄送多个人一起发送时,可以选择通过创建一个InternetAddress[]数组把多个抄送人存入。
msg.setRecipients(Message.RecipientType.CC, new InternetAddress[] {
                    new InternetAddress("*********"),
                    new InternetAddress("*********"),
                    new InternetAddress("*********"),
            });
代码如下:
import com.zwh.common.util.JavaMailUtils;

import javax.activation.DataHandler;
import javax.mail.*;
import javax.mail.internet.InternetAddress;
import javax.mail.internet.MimeBodyPart;
import javax.mail.internet.MimeMessage;
import javax.mail.internet.MimeMultipart;
import javax.mail.util.ByteArrayDataSource;
import java.io.IOException;
import java.nio.file.Files;
import java.nio.file.Paths;

public class emailDemo {
    public static void main(String[] args) {
        try {
            // 1.创建Session
            Session session = JavaMailUtils.createsession();

            // 2.创建邮件对象(Message抽象类的子类对象)
            MimeMessage msg = new MimeMessage(session); // 传入session
            msg.setFrom(new InternetAddress("xxx@qq.com")); // 发件人
            msg.setRecipient(MimeMessage.RecipientType.TO, new InternetAddress("xxx@qq.com")); // 收件人
//            msg.setRecipient(Message.RecipientType.CC, new InternetAddress("*********")); // 抄送人
//            msg.setRecipients(Message.RecipientType.CC, new InternetAddress[] {
//                    new InternetAddress("*********"),
//                    new InternetAddress("*********"),
//                    new InternetAddress("*********"),
//            });
            msg.setSubject("送你一个妹子","utf-8"); // 标题
            // 3.邮件内容"复合"对象
            Multipart multipart = new MimeMultipart();
            // 正文
            BodyPart textPart = new MimeBodyPart();
            // 参数1:正文内容
            // 参数2:内容类型;字符编码集
            textPart.setContent("<b>美女</b>,喜欢吗?", "text/html;charset=utf-8");
            // 附件
            BodyPart imagePart = new MimeBodyPart();
            imagePart.setFileName("美女.png"); // 设置附件文件的显示名称
            // 数据处理对象(读取附件文件从本地磁盘进行读取)
            imagePart.setDataHandler(
                    new DataHandler(
                            new ByteArrayDataSource(
                                    Files.readAllBytes(Paths.get("C:\\Users\\miracle\\Desktop\\新建文件夹\\美女.png")),
                                    "application/octet-stream")));
            // 添加至邮件内容
            multipart.addBodyPart(textPart); // 添加正文
            multipart.addBodyPart(imagePart); // 添加附件
            // 设置邮件内容
            msg.setContent(multipart);
            // 3.发送
            Transport.send(msg);

        } catch (MessagingException e) {
            e.printStackTrace();
        } catch (IOException e) {
            e.printStackTrace();
        }
    }
}
七、发送正文带有内嵌的邮件
我们可以选择在邮件正文部分中用<img src=" cid=附属名">,附件名通过.setHeader("Content-ID", "<别名>")的方法设置。
public class Demo05 {
    public static void main(String[] args) {
        try {
            // 创建Session
            Session session = JavaMailUtils.createsession();

            // 创建邮件
            MimeMessage msg = new MimeMessage(session);
            msg.setFrom(new InternetAddress("*********"));
            msg.setRecipient(RecipientType.TO, new InternetAddress("*********"));
            msg.setRecipients(RecipientType.CC, new InternetAddress[] {
                    new InternetAddress("*********"),
                    new InternetAddress("*********"),
                    new InternetAddress("*********"),
            });
            msg.setSubject("爱永不凋零!","utf-8");

            // 邮件正文部分
            BodyPart textBodyPart = new MimeBodyPart();
            StringBuilder body = new StringBuilder();
            body.append("<h1>世界和平</h1>");
            body.append("<img src=\"cid:jue\"/>"); // 通过内容ID引用附件图片
            textBodyPart.setContent(body.toString(), "text/html;charset=utf-8");

            // 邮件附件部分
            BodyPart imageBodyPart = new MimeBodyPart();
            imageBodyPart.setFileName("son.jpg"); // 读取名称
            imageBodyPart.setDataHandler( // 读取附件内容
                    new DataHandler(
                            new ByteArrayDataSource(
                                    Files.readAllBytes(Paths.get("D:\\net\\1.jpg")),
                                    "application/octet-stream")));
            imageBodyPart.setHeader("Content-ID", "<jue>");

            // 组合正文+附件
            Multipart multipart = new MimeMultipart();
            multipart.addBodyPart(textBodyPart); // 添加正文部分
            multipart.addBodyPart(imageBodyPart); // 添加附件部分

            // 设置邮件内容
            msg.setContent(multipart);

            // 发送
            Transport.send(msg);

        } catch (MessagingException | IOException e) {
            e.printStackTrace();
        }

    }
}

