一、获取request对象的四种方法
方法1、Controller中加参数来获取request
注意:只能在Controller中加入request参数。
一般,我们在Controller中加参数获取HttpServletRequest,如下所示:
@RestController
@RequestMapping("/gap")
public class PlantTraceController {
    @PostMapping("/plantTrace")
    public Result2 savePlantTraceInfo(@RequestBody JSONObject jsonObject, HttpServletRequest request) {
        String methodName = request.getHeader("methodName");
        ....
}
该方法实现的原理是,在Controller方法开始处理请求时,Spring会将request对象赋值到方法参数中。此时request对象是方法参数,相当于局部变量,毫无疑问是线程安全的。
Controller中获取request对象后,如果要在其他方法中(如service方法、工具类方法等)使用request对象,需要在调用这些方法时将request对象作为参数传入。
优缺点
这种方法的主要缺点是request对象写起来冗余太多,主要体现在两点:
1) 如果多个controller方法中都需要request对象,那么在每个方法中都需要添加一遍request参数
2) request对象的获取只能从controller开始,如果使用request对象的地方在函数调用层级比较深的地方,那么整个调用链上的所有方法都需要添加request参数
实际上,在整个请求处理的过程中,request对象是贯穿始终的;也就是说,除了定时器等特殊情况,request对象相当于线程内部的一个全局变量。而该方法,相当于将这个全局变量,传来传去。
方法2、自动注入来获取request
注意:只能在Bean中注入request
@Controller
public class TestController{
    @Autowired
    private HttpServletRequest request; //自动注入request
    @RequestMapping("/test")
    public void test() throws InterruptedException{
        //模拟程序执行了一段时间
        Thread.sleep(1000);
    }
}
优缺点
该方法的主要优点:
1) 注入不局限于Controller中:在方法1中,只能在Controller中加入request参数。而对于方法2,不仅可以在Controller中注入,还可以在任何Bean中注入,包括Service、Repository及普通的Bean。
2) 注入的对象不限于request:除了注入request对象,该方法还可以注入其他scope为request或session的对象,如response对象、session对象等;并保证线程安全。
3) 减少代码冗余:只需要在需要request对象的Bean中注入request对象,便可以在该Bean的各个方法中使用,与方法1相比大大减少了代码冗余。
但是,该方法也会存在代码冗余。考虑这样的场景:web系统中有很多controller,每个controller中都会使用request对象(这种场景实际上非常频繁),这时就需要写很多次注入request的代码;如果还需要注入response,代码就更繁琐了。下面说明自动注入方法的改进方法,并分析其线程安全性及优缺点。
方法3:基类中自动注入(推荐)
注意:只能在Bean中注入request
与方法2相比,将注入部分代码放入到了基类中。
基类代码:
public class BaseController {
    @Autowired
    protected HttpServletRequest request;
}
优缺点
与方法2相比,避免了在不同的Controller中重复注入request;但是考虑到java只允许继承一个基类,所以如果Controller需要继承其他类时,该方法便不再好用。
无论是方法2和方法3,都只能在Bean中注入request;如果其他方法(如工具类中static方法)需要使用request对象,则需要在调用这些方法时将request参数传递进去。下面介绍的方法4,则可以直接在诸如工具类中的static方法中使用request对象(当然在各种Bean中也可以使用)。
方法4:从RequestContextHolder中获取request
代码示例
@Controller
public class TestController {
    @RequestMapping("/test")
    public void test() throws InterruptedException {
        HttpServletRequest request = ((ServletRequestAttributes) (RequestContextHolder.currentRequestAttributes())).getRequest();
        // 模拟程序执行了一段时间
        Thread.sleep(1000);
    }
}
优缺点
优点:可以在非Bean中直接获取。缺点:如果使用的地方较多,代码非常繁琐;因此可以与其他方法配合使用。
二、RequestContextHolder详解
1、RequestContextHolder的使用
//两个方法在没有使用JSF的项目中是没有区别的
RequestAttributes requestAttributes = RequestContextHolder.currentRequestAttributes();
//RequestAttributes requestAttributes = RequestContextHolder.getRequestAttributes();

//从session里面获取对应的值
String name = (String) requestAttributes.getAttribute("name", RequestAttributes.SCOPE_SESSION);

//类型转换
ServletRequestAttributes servletRequestAttributes = (ServletRequestAttributes)requestAttributes;

//获取到Request对象
HttpServletRequest request = servletRequestAttributes.getRequest();
//获取到Response对象
HttpServletResponse response = servletRequestAttributes.getResponse();
//获取到Session对象
HttpSession session = request.getSession();
2、实现原理
先将request和response封装到ServletRequestAttributes。再将ServletRequestAttributes绑定到RequestContextHolder类的两个ThreadLocal中,从而通过ThreadLocal的get方法获取ServletRequestAttributes。
1、存储变量
RequestContextHolder这个类里面有两个ThreadLocal保存当前线程下的requestAttributes
private static final ThreadLocal<RequestAttributes> requestAttributesHolder = new NamedThreadLocal("Request attributes");
    private static final ThreadLocal<RequestAttributes> inheritableRequestAttributesHolder = new NamedInheritableThreadLocal("Request context");
2、获取
RequestContextHolder的getRequestAttributes()静态方法返回当前绑定到线程的RequestAttributes。
@Nullable
    public static RequestAttributes getRequestAttributes() {
        RequestAttributes attributes = (RequestAttributes)requestAttributesHolder.get();
        if (attributes == null) {
            attributes = (RequestAttributes)inheritableRequestAttributesHolder.get();
        }

        return attributes;
    }
3、存入
客户端发送get或者post等请求,会调用Servelt项相对应的方法,比如get请求,就会执行Servlet的doGet方法。
经过查看,DispatcherServelt类中并没有覆盖这几种方法,根据java多态的特性,如果子类没有此方法,那么就去直接父类找。
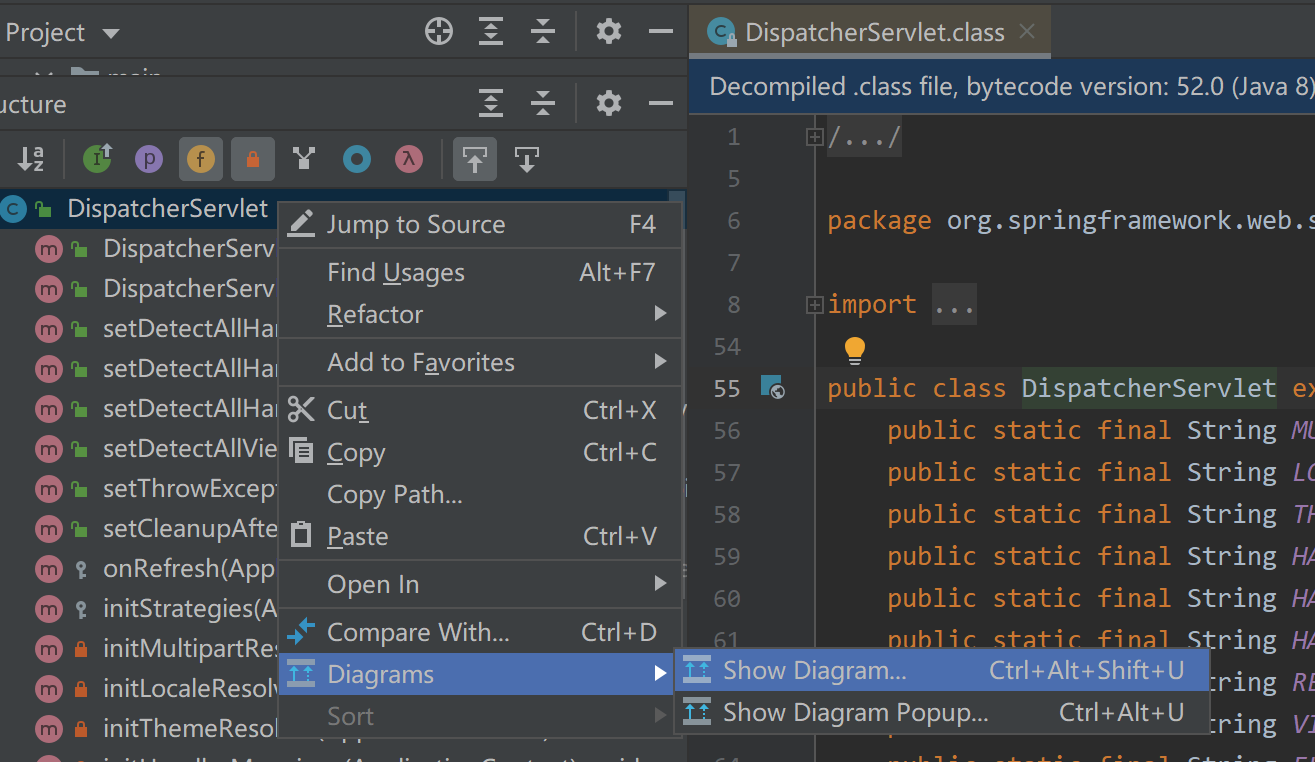
我们在IDEA中查看DispatcherServlet的继承关系

点击Show Diagram,弹框如下:

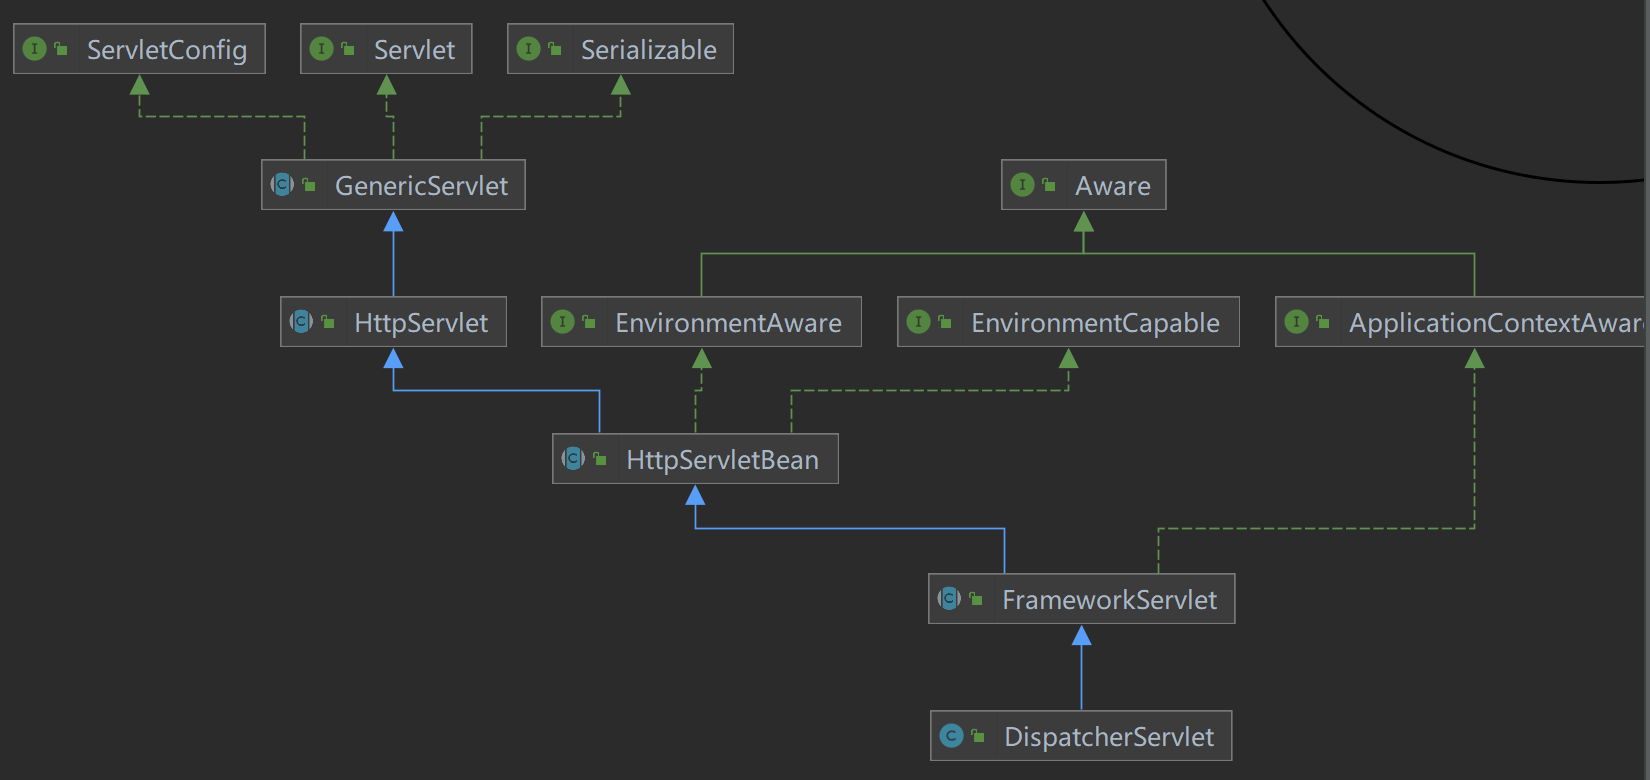
选中Java Classes,图解如下:

DispatcherServlet的父类为FrameworkServlet,然后在FrameworkServlet类中找到了处理这些请求的方法:
protected final void doGet(HttpServletRequest request, HttpServletResponse response) throws ServletException, IOException {
        this.processRequest(request, response);
    }

    protected final void doPost(HttpServletRequest request, HttpServletResponse response) throws ServletException, IOException {
        this.processRequest(request, response);
    }

    protected final void doPut(HttpServletRequest request, HttpServletResponse response) throws ServletException, IOException {
        this.processRequest(request, response);
    }

    protected final void doDelete(HttpServletRequest request, HttpServletResponse response) throws ServletException, IOException {
        this.processRequest(request, response);
    }
这些实现里面都有一个预处理方法processRequest(request, response)。所有的请求,方法里面都没有进行处理,而是统一委托给processRequest方法进行处理。FrameworkServlet的processRequest方法处理了所有请求,那么我们来看一下他的如何工作的:
protected final void processRequest(HttpServletRequest request, HttpServletResponse response) throws ServletException, IOException {
        long startTime = System.currentTimeMillis();
        Throwable failureCause = null;
        LocaleContext previousLocaleContext = LocaleContextHolder.getLocaleContext();
        LocaleContext localeContext = this.buildLocaleContext(request);
    // 获取当前线程绑定的RequestAttributes
        RequestAttributes previousAttributes = RequestContextHolder.getRequestAttributes();
    // 如果previousAttributes为null则根据request和response构建一个新的ServletRequestAttributes
        ServletRequestAttributes requestAttributes = this.buildRequestAttributes(request, response, previousAttributes);
        WebAsyncManager asyncManager = WebAsyncUtils.getAsyncManager(request);
        asyncManager.registerCallableInterceptor(FrameworkServlet.class.getName(), new FrameworkServlet.RequestBindingInterceptor());
     // 将requestAttributes绑定到ThreadLocal中
        this.initContextHolders(request, localeContext, requestAttributes);

        try {
            this.doService(request, response);
        } catch (IOException | ServletException var16) {
            failureCause = var16;
            throw var16;
        } catch (Throwable var17) {
            failureCause = var17;
            throw new NestedServletException("Request processing failed", var17);
        } finally {
            this.resetContextHolders(request, previousLocaleContext, previousAttributes);
            if (requestAttributes != null) {
                requestAttributes.requestCompleted();
            }

            this.logResult(request, response, (Throwable)failureCause, asyncManager);
            this.publishRequestHandledEvent(request, response, startTime, (Throwable)failureCause);
        }

    }
buildRequestAttributes方法
@Nullable
    protected ServletRequestAttributes buildRequestAttributes(HttpServletRequest request, @Nullable HttpServletResponse response, @Nullable RequestAttributes previousAttributes) {
        return previousAttributes != null && !(previousAttributes instanceof ServletRequestAttributes) ? null : new ServletRequestAttributes(request, response);
    }
initContextHolders(request, localeContext, requestAttributes)方法把新的RequestAttributes设置进LocalThread
private void initContextHolders(HttpServletRequest request, @Nullable LocaleContext localeContext, @Nullable RequestAttributes requestAttributes) {
        if (localeContext != null) {
            LocaleContextHolder.setLocaleContext(localeContext, this.threadContextInheritable);
        }

        if (requestAttributes != null) {
            RequestContextHolder.setRequestAttributes(requestAttributes, this.threadContextInheritable);
        }

    }
RequestContextHolder的setRequestAttributes方法
public static void setRequestAttributes(@Nullable RequestAttributes attributes, boolean inheritable) {
        if (attributes == null) {
            resetRequestAttributes();
        } else if (inheritable) {
            inheritableRequestAttributesHolder.set(attributes);
            requestAttributesHolder.remove();
        } else {
            requestAttributesHolder.set(attributes);
            inheritableRequestAttributesHolder.remove();
        }

    }
我们来看看这个doService方法,这个方法FreameworkServlet没有实现,是DispatcherServlet进行实现的。
protected void doService(HttpServletRequest request, HttpServletResponse response) throws Exception {
        this.logRequest(request);
        Map<String, Object> attributesSnapshot = null;
        if (WebUtils.isIncludeRequest(request)) {
            attributesSnapshot = new HashMap();
            Enumeration attrNames = request.getAttributeNames();

            label116:
            while(true) {
                String attrName;
                do {
                    if (!attrNames.hasMoreElements()) {
                        break label116;
                    }

                    attrName = (String)attrNames.nextElement();
                } while(!this.cleanupAfterInclude && !attrName.startsWith("org.springframework.web.servlet"));

                attributesSnapshot.put(attrName, request.getAttribute(attrName));
            }
        }

        request.setAttribute(WEB_APPLICATION_CONTEXT_ATTRIBUTE, this.getWebApplicationContext());
        request.setAttribute(LOCALE_RESOLVER_ATTRIBUTE, this.localeResolver);
        request.setAttribute(THEME_RESOLVER_ATTRIBUTE, this.themeResolver);
        request.setAttribute(THEME_SOURCE_ATTRIBUTE, this.getThemeSource());
        if (this.flashMapManager != null) {
            FlashMap inputFlashMap = this.flashMapManager.retrieveAndUpdate(request, response);
            if (inputFlashMap != null) {
                request.setAttribute(INPUT_FLASH_MAP_ATTRIBUTE, Collections.unmodifiableMap(inputFlashMap));
            }

            request.setAttribute(OUTPUT_FLASH_MAP_ATTRIBUTE, new FlashMap());
            request.setAttribute(FLASH_MAP_MANAGER_ATTRIBUTE, this.flashMapManager);
        }

        RequestPath previousRequestPath = null;
        if (this.parseRequestPath) {
            previousRequestPath = (RequestPath)request.getAttribute(ServletRequestPathUtils.PATH_ATTRIBUTE);
            ServletRequestPathUtils.parseAndCache(request);
        }

        try {
            this.doDispatch(request, response);
        } finally {
            if (!WebAsyncUtils.getAsyncManager(request).isConcurrentHandlingStarted() && attributesSnapshot != null) {
                this.restoreAttributesAfterInclude(request, attributesSnapshot);
            }

            if (this.parseRequestPath) {
                ServletRequestPathUtils.setParsedRequestPath(previousRequestPath, request);
            }

        }

    }
接着我们继续看doDispatch方法:此方法是实际处理请求的方法。
protected void doDispatch(HttpServletRequest request, HttpServletResponse response) throws Exception {
        HttpServletRequest processedRequest = request;
        HandlerExecutionChain mappedHandler = null;
        boolean multipartRequestParsed = false;
        WebAsyncManager asyncManager = WebAsyncUtils.getAsyncManager(request);

        try {
            try {
                ModelAndView mv = null;
                Object dispatchException = null;

                try {
            // 检查当前请求是不是一个MultipartHttpServletRequest(文件上传请求)
                    processedRequest = this.checkMultipart(request);
                    multipartRequestParsed = processedRequest != request;
                    mappedHandler = this.getHandler(processedRequest);
                    if (mappedHandler == null) {
                        this.noHandlerFound(processedRequest, response);
                        return;
                    }

                    HandlerAdapter ha = this.getHandlerAdapter(mappedHandler.getHandler());
                    String method = request.getMethod();
                    boolean isGet = HttpMethod.GET.matches(method);
                    if (isGet || HttpMethod.HEAD.matches(method)) {
                        long lastModified = ha.getLastModified(request, mappedHandler.getHandler());
                        if ((new ServletWebRequest(request, response)).checkNotModified(lastModified) && isGet) {
                            return;
                        }
                    }

                    if (!mappedHandler.applyPreHandle(processedRequest, response)) {
                        return;
                    }
            //
                    mv = ha.handle(processedRequest, response, mappedHandler.getHandler());
                    if (asyncManager.isConcurrentHandlingStarted()) {
                        return;
                    }

                    this.applyDefaultViewName(processedRequest, mv);
            // 执行所有的handler,就是执行我们所有的HandlerIntercepter实现类的方法,包括我们自定义的
                    mappedHandler.applyPostHandle(processedRequest, response, mv);
                } catch (Exception var20) {
                    dispatchException = var20;
                } catch (Throwable var21) {
                    dispatchException = new NestedServletException("Handler dispatch failed", var21);
                }

                this.processDispatchResult(processedRequest, response, mappedHandler, mv, (Exception)dispatchException);
            } catch (Exception var22) {
                this.triggerAfterCompletion(processedRequest, response, mappedHandler, var22);
            } catch (Throwable var23) {
                this.triggerAfterCompletion(processedRequest, response, mappedHandler, new NestedServletException("Handler processing failed", var23));
            }

        } finally {
            if (asyncManager.isConcurrentHandlingStarted()) {
                if (mappedHandler != null) {
                    mappedHandler.applyAfterConcurrentHandlingStarted(processedRequest, response);
                }
            } else if (multipartRequestParsed) {
                this.cleanupMultipart(processedRequest);
            }

        }
    }


