一、凯撒加密
1、介绍
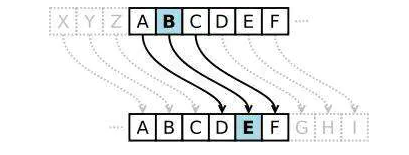
凯撒密码作为一种最为古老的对称加密体制,在古罗马的时候都已经很流行了,它的基本思想是:通过把字母移动一定的位数来实现加密和解密。明文中的所有字母都在字母表上向后(或向前)按照一个固定数目进行偏移后被替换成密文。例如当偏移量是3的时候,所有的字母A将被替换成D,B变成E,由此可见,位数就是凯撒密码加密和解密的密钥。
例如:字符串"ABC"的每个字符都右移3位则变成了“DEF”,解密的时候“DEF”的每个字符左移3位即能还原,如下图所示:

2、java代码
工具类
public class CaesarCipher {

    /**
     * 加密
     *
     * @param input 数据源(需要加密的数据)
     * @param key   秘钥,即偏移量
     * @return 返回加密后的数据
     */
    public static String encrypt(String input, int key) {

        char[] chars = input.toCharArray();

        for (int i = 0; i < chars.length; i++) {
            int ascii = chars[i];
            ascii = (ascii - '!' + key) % 94 + '!';
            char newChar = (char) ascii;
            chars[i] = newChar;
        }
        return new String(chars);
    }

    /**
     * 解密
     *
     * @param input 数据源(被加密后的数据)
     * @param key   秘钥,即偏移量
     * @return 返回解密后的数据
     */
    public static String decrypt(String input, int key) {
        //得到字符串里的每一个字符
        char[] array = input.toCharArray();

        for (int i = 0; i < array.length; ++i) {
            //字符转换成ASCII 码值
            int ascii = array[i];
            //恢复字符偏移,例如b->a
            ascii = (ascii - '~' - key) % 94 + '~';
            //ASCII 码值转换为char
            char newChar = (char) ascii;
            //替换原有字符
            array[i] = newChar;
            //以上4 行代码可以简写为一行
            //array[i] = (char) (array[i] - key);
        }
        //字符数组转换成String
        return new String(array);
    }
}
测试类
public class CaesarTest {
    public static void main(String[] args) {
        String str = "GYPTS";
        String encrypt = CaesarCipher.encrypt(str, 123);
        System.out.println(encrypt);

        String decrypt = CaesarCipher.decrypt(encrypt, 123);
        System.out.println(decrypt);
    }
}
结果:
dvmqp
GYPTS
二、凯撒密码的破解
凯撒密码是比较简单的密码,只是进行单表代换,实现起来也比较容易,破解起来也不难,是很不安全的密码。
1、暴力破解
在凯撒密码中,密钥就是字母平移的数字。由于字母表只有26个字母,因此加密用的密钥只有0到25共26种。(平移0个字母或者平移26个字母实际相当于没有加密)。
使用暴力破解就是将这25种可能性每种都检测一遍,其中就肯定存在正确的结果。
三、springboot中jasypt-spring-boot-starter的使用
在项目开发的过程中,经常会需要在配置文件中存储一些敏感的信息,如数据库的账号密码,支付相关信息,密钥等等,这些信息在开发的过程中一般是以明文的方式存储在配置文件中。这种方式的存储会存在非常大的安全隐患。jasypt能够很好的解决这一类的问题。
1、依赖
<!--jasypt加密-->
        <dependency>
            <groupId>com.github.ulisesbocchio</groupId>
            <artifactId>jasypt-spring-boot-starter</artifactId>
            <version>1.16</version>
        </dependency>
2、对数据库的用户名和密码进行加密
public class CaesarTest {
    public static void main(String[] args) {
        String username = "root";
        String password = "123456";
        String usernameEncrypt = CaesarCipher.encrypt(username, 123);
        String passwordEncrypt = CaesarCipher.encrypt(password, 123);
        System.out.println(usernameEncrypt);
        System.out.println(passwordEncrypt);
    }
}
加密后的结果如下:
1..3
NOPQRS
3、修改配置
配置文件中原来的数据库用户名和密码如下:
spring.datasource.url=jdbc:mysql://localhost:3306/zwh?serverTimezone=Hongkong&useUnicode=true&characterEncoding=utf8&useSSL=false&allowMultiQueries=true&allowPublicKeyRetrieval=true
spring.datasource.username=root
spring.datasource.password=123456
spring.datasource.driver-class-name=com.mysql.cj.jdbc.Driver
现修改如下:
spring.datasource.url=jdbc:mysql://localhost:3306/zwh?serverTimezone=Hongkong&useUnicode=true&characterEncoding=utf8&useSSL=false&allowMultiQueries=true&allowPublicKeyRetrieval=true
spring.datasource.username=ENC(1..3)
spring.datasource.password=ENC(NOPQRS)
spring.datasource.driver-class-name=com.mysql.cj.jdbc.Driver
注意:jasypt中密文需要放置在ENC()中。
4、自定义解密类
1)、解密类DefaultEncrypt
import org.jasypt.encryption.StringEncryptor;
import org.springframework.beans.factory.annotation.Value;
import org.springframework.context.annotation.Configuration;
import org.springframework.stereotype.Component;

@Configuration
@Component("desencrypt")
public class DefaultEncryptor implements StringEncryptor {

    @Value("${jasypt.encryptor.password}")
    private int password;

    /**
     * 加密方法
     *
     * @param s
     * @return
     */
    @Override
    public String encrypt(String s) {
        return s;
    }

    /**
     * 解密方法
     *
     * @param s
     * @return
     */
    @Override
    public String decrypt(String s) {

        /**
         * 凯撒解密
         */
        String decrypt = CaesarCipher.decrypt(s, password);
        return decrypt;
    }
}
这里说一下,这里只是重写了解密的方法,加密的方法并没有写。原因是在使用的过程中只使用了解密的功能。密文是在事先准备好的直接存放在配置文件中。
而且这里的自定义的加解密方式是完全可以不写的,jasypt中本身就提供了加解密的方法,我们完全可以忽略这块。但是自定义加解密方式可以提供安全性,即是别人拿到我们的密文,在不知道解密方法的情况下也是无用的。
5、配置文件中设置密钥与指定加密类
jasypt.encryptor.password=123
jasypt.encryptor.bean=desencrypt
注意:jasypt.encryptor.bean=desencrypt该属性指明了jasypt中使用的加解密类。
4、启动项目验证
项目在开始运行之后,读取配置文件ENC()中的数据,会自动使用jasypt中的加解密文件进行解密替换。
2022-06-07 21:37:38.307  INFO 15876 --- [  restartedMain] t.m.m.autoconfigure.MapperCacheDisabler  : Clear tk.mybatis.mapper.genid.GenIdUtil CACHE cache.
2022-06-07 21:37:38.307  INFO 15876 --- [  restartedMain] t.m.m.autoconfigure.MapperCacheDisabler  : Clear tk.mybatis.mapper.version.VersionUtil CACHE cache.
2022-06-07 21:37:38.307  INFO 15876 --- [  restartedMain] t.m.m.autoconfigure.MapperCacheDisabler  : Clear EntityHelper entityTableMap cache.
2022-06-07 21:37:38.564  INFO 15876 --- [  restartedMain] o.s.b.d.a.OptionalLiveReloadServer       : LiveReload server is running on port 35729
2022-06-07 21:37:38.607  INFO 15876 --- [  restartedMain] o.s.b.w.embedded.tomcat.TomcatWebServer  : Tomcat started on port(s): 8889 (http) with context path ''
2022-06-07 21:37:38.609  INFO 15876 --- [  restartedMain] com.zwh.MySpringBootApplication          : Started MySpringBootApplication in 3.341 seconds (JVM running for 4.604)
四、生产环境使用以下工具类进行加密
在SpringBoot中,通过jasypt可以进行加密解密. 这个是双向的, 且可以配置密钥.
1、加密和解密
import org.jasypt.util.text.BasicTextEncryptor;
import org.junit.Test;

public class UtilTests {
    @Test
    public void jasyptTest() {
        BasicTextEncryptor encryptor = new BasicTextEncryptor();
        // application.properties, jasypt.encryptor.password
        encryptor.setPassword("abc");
        // encrypt root
        System.out.println(encryptor.encrypt("root"));
        System.out.println(encryptor.encrypt("root"));
        System.out.println(encryptor.encrypt("root"));

        // decrypt, the result is root
        System.out.println(encryptor.decrypt("UP/yojB7ie3apnh3mLTU7w=="));
        System.out.println(encryptor.decrypt("ik9FE3GiYLiHwchiyHg9QQ=="));
        System.out.println(encryptor.decrypt("9Obo/jq9EqmTE0QZaJFYrw=="));
    }
}
可以看出, 每次生成的密码是不一样的, 但是通过密钥,可以解密成一样的明文.
2、在SpringBoot中配置jasypt
配置密钥
jasypt.encryptor.password:abc
3、将加密后的内容放在ENC()的括号中
spring.datasource.url: jdbc:mysql://127.0.0.1:3306/tmp?useSSL=false&useUnicode=true&characterEncoding=utf-8
spring.datasource.username: ENC(ik9FE3GiYLiHwchiyHg9QQ==)
spring.datasource.password: ENC(ik9FE3GiYLiHwchiyHg9QQ==)
spring.datasource.driver-class-name: com.mysql.jdbc.Driver
4、启动时配置密钥
java -jar -Djasypt.encryptor.password=abc xxx.jar


