一、搭建父工程和生产者子模块和消费者子模块
1、搭建父工程
添加依赖如下:
<parent>
        <groupId>org.springframework.boot</groupId>
        <artifactId>spring-boot-starter-parent</artifactId>
        <version>2.6.5.RELEASE</version>
        <relativePath/>
    </parent>
    <dependencies>
        <dependency>
            <groupId>org.springframework.boot</groupId>
            <artifactId>spring-boot-starter-web</artifactId>
        </dependency>
        <dependency>
            <groupId>org.springframework.boot</groupId>
            <artifactId>spring-boot-starter-test</artifactId>
            <scope>test</scope>
        </dependency>
    </dependencies>
2、添加生产者子模块
我们选择基于Spring-Rabbit去操作RabbitMQ。使用 spring-boot-starter-amqp会自动添加spring-rabbit依赖,如下:
<dependencies>
        <dependency>
            <groupId>org.springframework.boot</groupId>
            <artifactId>spring-boot-starter-amqp</artifactId>
        </dependency>
        <dependency>
            <groupId>org.springframework.boot</groupId>
            <artifactId>spring-boot-starter-logging</artifactId>
        </dependency>
    </dependencies>
3、添加消费者子模块
添加依赖
<dependencies>
        <dependency>
            <groupId>org.springframework.boot</groupId>
            <artifactId>spring-boot-starter-amqp</artifactId>
        </dependency>
        <dependency>
            <groupId>org.springframework.boot</groupId>
            <artifactId>spring-boot-starter-logging</artifactId>
        </dependency>
    </dependencies>
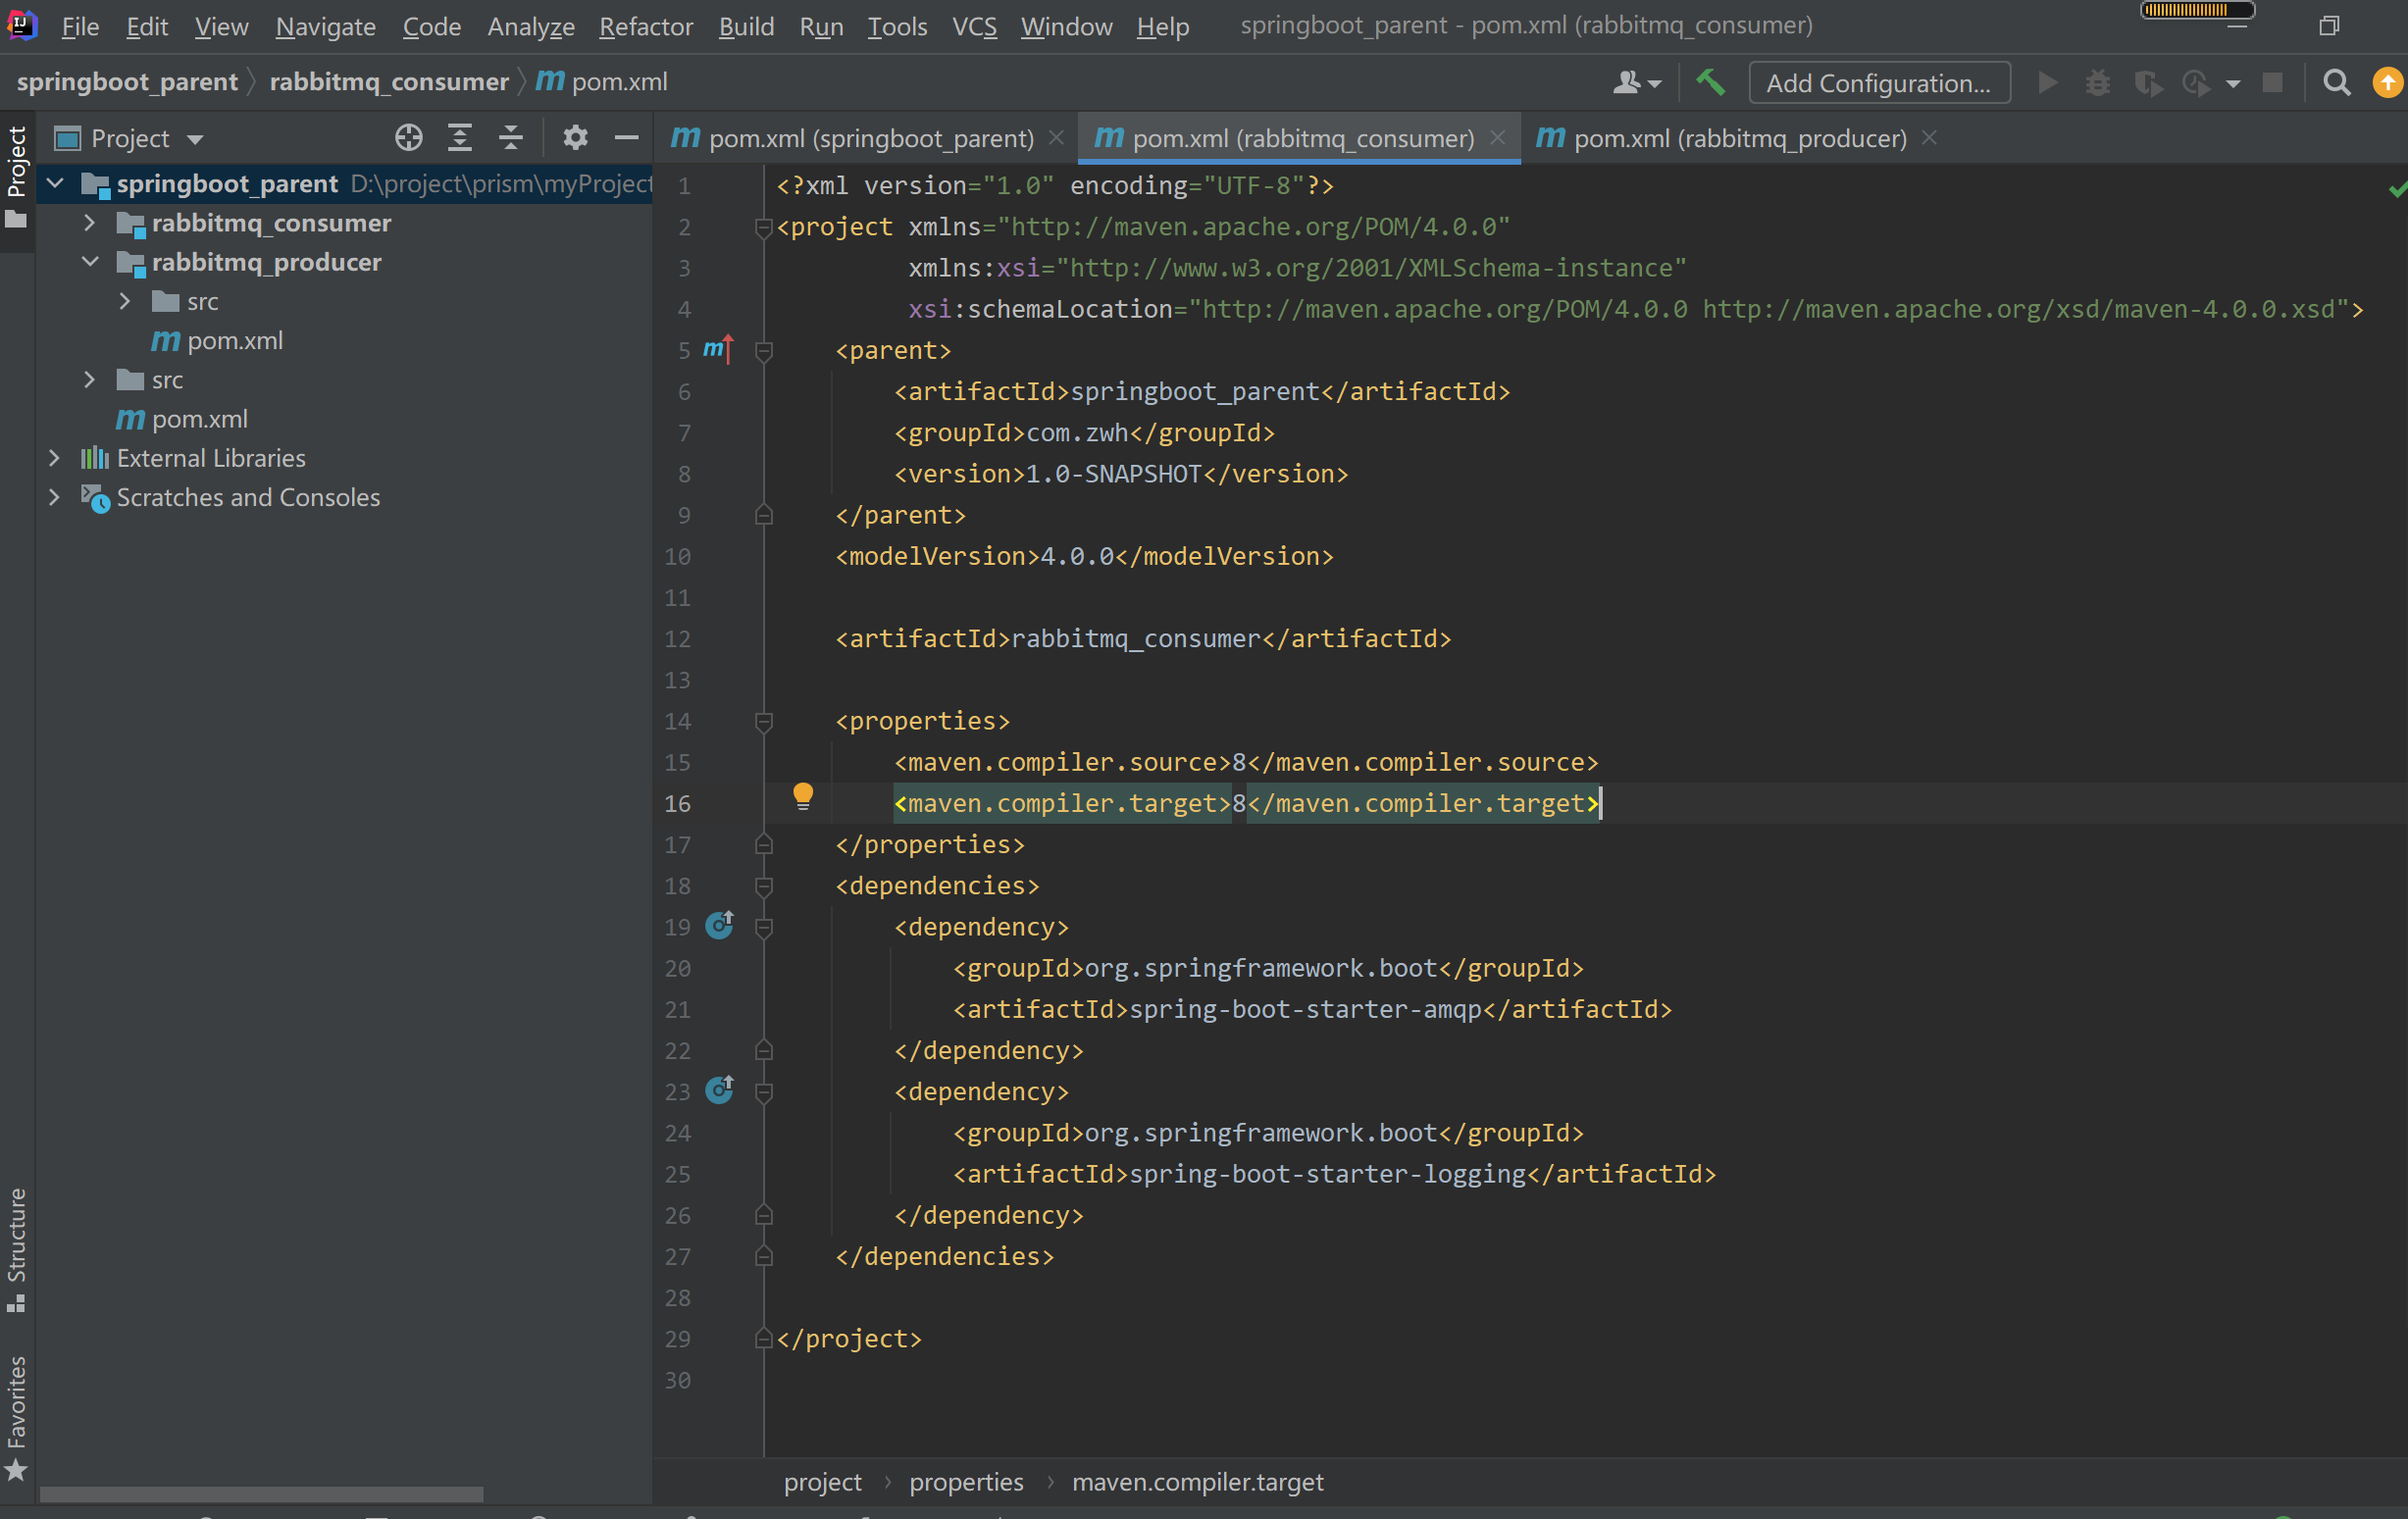
搭建完成后效果如下:
二、生产者
1、创建启动类
@SpringBootApplication
public class Application {
    public static void main(String[] args) {
        SpringApplication.run(Application.class);
    }
}
2、创建application.yml
server:
  port: 44000
spring:
  application:
    name: test‐rabbitmq‐producer
  rabbitmq:
    host: 127.0.0.1
    port: 5672
    username: guest
    password: guest
    virtual-host: /
3、定义RabbitConfig类,配置Exchange、Queue、及绑定交换机。
本例配置Topic交换机。
import org.springframework.amqp.core.*;
import org.springframework.beans.factory.annotation.Qualifier;
import org.springframework.context.annotation.Bean;
import org.springframework.context.annotation.Configuration;


/**
 * @author zhouwenhao
 * @date 2022/3/26
 * @dec 描述
 */
@Configuration
public class RabbitmqConfig {
    public static final String QUEUE_INFORM_EMAIL = "queue_inform_email";
    public static final String QUEUE_INFORM_SMS = "queue_inform_sms";
    public static final String EXCHANGE_TOPICS_INFORM="exchange_topics_inform";
    /**
      * 交换机配置
      * ExchangeBuilder提供了fanout、direct、topic、header交换机类型的配置
      * @return the exchange
      */
    @Bean(EXCHANGE_TOPICS_INFORM)
    public Exchange EXCHANGE_TOPICS_INFORM() {
      //durable(true)持久化,消息队列重启后交换机仍然存在
        return ExchangeBuilder.topicExchange(EXCHANGE_TOPICS_INFORM).durable(true).build();
    }
    //声明队列
    @Bean(QUEUE_INFORM_SMS)
    public Queue QUEUE_INFORM_SMS() {
        Queue queue = new Queue(QUEUE_INFORM_SMS);
        return queue;
    }
    //声明队列
    @Bean(QUEUE_INFORM_EMAIL)
    public Queue QUEUE_INFORM_EMAIL() {
        Queue queue = new Queue(QUEUE_INFORM_EMAIL);
        return queue;
    }
    /** channel.queueBind(INFORM_QUEUE_SMS,"inform_exchange_topic","inform.#.sms.#");
      * 绑定队列到交换机 .
      *
      * @param queue    the queue
      * @param exchange the exchange
      * @return the binding
      */
    @Bean
    public Binding BINDING_QUEUE_INFORM_SMS(@Qualifier(QUEUE_INFORM_SMS) Queue queue,
                                            @Qualifier(EXCHANGE_TOPICS_INFORM) Exchange exchange) {
        return BindingBuilder.bind(queue).to(exchange).with("inform.#.sms.#").noargs();
    }
    @Bean
    public Binding BINDING_QUEUE_INFORM_EMAIL(@Qualifier(QUEUE_INFORM_EMAIL) Queue queue,
                                              @Qualifier(EXCHANGE_TOPICS_INFORM) Exchange exchange) {
        return BindingBuilder.bind(queue).to(exchange).with("inform.#.email.#").noargs();
    }
}
4、在测试类中发送消息
使用RabbitTemplate发送消息
import com.zwh.config.RabbitmqConfig;
import org.junit.Test;
import org.junit.runner.RunWith;
import org.springframework.amqp.rabbit.core.RabbitTemplate;
import org.springframework.beans.factory.annotation.Autowired;
import org.springframework.boot.test.context.SpringBootTest;
import org.springframework.test.context.junit4.SpringRunner;

@SpringBootTest
@RunWith(SpringRunner.class)
public class Producer05_topics_springboot {
    @Autowired
    RabbitTemplate rabbitTemplate;
    @Test
    public void testSendByTopics(){
        for (int i=0;i<5;i++){
            String message = "sms email inform to user"+i;
            rabbitTemplate.convertAndSend(RabbitmqConfig.EXCHANGE_TOPICS_INFORM,"inform.sms.email",message);
            System.out.println("Send Message is:'" + message + "'");
        }
    }
}
三、消费者
1、创建启动类
@SpringBootApplication
public class Application {
    public static void main(String[] args) {
        SpringApplication.run(Application.class);
    }
}
2、编写配置文件
server:
  port: 44001
spring:
  application:
    name: test‐rabbitmq‐consumer
  rabbitmq:
    host: 127.0.0.1
    port: 5672
    username: guest
    password: guest
    virtual-host: /
3、定义RabbitConfig类,配置Exchange、Queue、及绑定交换机。
import org.springframework.amqp.core.*;
import org.springframework.beans.factory.annotation.Qualifier;
import org.springframework.context.annotation.Bean;
import org.springframework.context.annotation.Configuration;


/**
 * @author zhouwenhao
 * @date 2022/3/26
 * @dec 描述
 */
@Configuration
public class RabbitmqConfig {
    public static final String QUEUE_INFORM_EMAIL = "queue_inform_email";
    public static final String QUEUE_INFORM_SMS = "queue_inform_sms";
    public static final String EXCHANGE_TOPICS_INFORM="exchange_topics_inform";
    /**
      * 交换机配置
      * ExchangeBuilder提供了fanout、direct、topic、header交换机类型的配置
      * @return the exchange
      */
    @Bean(EXCHANGE_TOPICS_INFORM)
    public Exchange EXCHANGE_TOPICS_INFORM() {
      //durable(true)持久化,消息队列重启后交换机仍然存在
        return ExchangeBuilder.topicExchange(EXCHANGE_TOPICS_INFORM).durable(true).build();
    }
    //声明队列
    @Bean(QUEUE_INFORM_SMS)
    public Queue QUEUE_INFORM_SMS() {
        Queue queue = new Queue(QUEUE_INFORM_SMS);
        return queue;
    }
    //声明队列
    @Bean(QUEUE_INFORM_EMAIL)
    public Queue QUEUE_INFORM_EMAIL() {
        Queue queue = new Queue(QUEUE_INFORM_EMAIL);
        return queue;
    }
    /** channel.queueBind(INFORM_QUEUE_SMS,"inform_exchange_topic","inform.#.sms.#");
      * 绑定队列到交换机 .
      *
      * @param queue    the queue
      * @param exchange the exchange
      * @return the binding
      */
    @Bean
    public Binding BINDING_QUEUE_INFORM_SMS(@Qualifier(QUEUE_INFORM_SMS) Queue queue,
                                            @Qualifier(EXCHANGE_TOPICS_INFORM) Exchange exchange) {
        return BindingBuilder.bind(queue).to(exchange).with("inform.#.sms.#").noargs();
    }
    @Bean
    public Binding BINDING_QUEUE_INFORM_EMAIL(@Qualifier(QUEUE_INFORM_EMAIL) Queue queue,
                                              @Qualifier(EXCHANGE_TOPICS_INFORM) Exchange exchange) {
        return BindingBuilder.bind(queue).to(exchange).with("inform.#.email.#").noargs();
    }
}
4、使用@RabbitListener注解监听队列
import com.rabbitmq.client.Channel;
import com.zwh.config.RabbitmqConfig;
import org.springframework.amqp.core.Message;
import org.springframework.amqp.rabbit.annotation.RabbitListener;
import org.springframework.stereotype.Component;
@Component
public class ReceiveHandler {
    //监听email队列
    @RabbitListener(queues = {RabbitmqConfig.QUEUE_INFORM_EMAIL})
    public void receive_email(String msg,Message message,Channel channel){
        System.out.println(msg);
    }
    //监听sms队列
    @RabbitListener(queues = {RabbitmqConfig.QUEUE_INFORM_SMS})
    public void receive_sms(String msg,Message message,Channel channel){
        System.out.println(msg);
    }
}
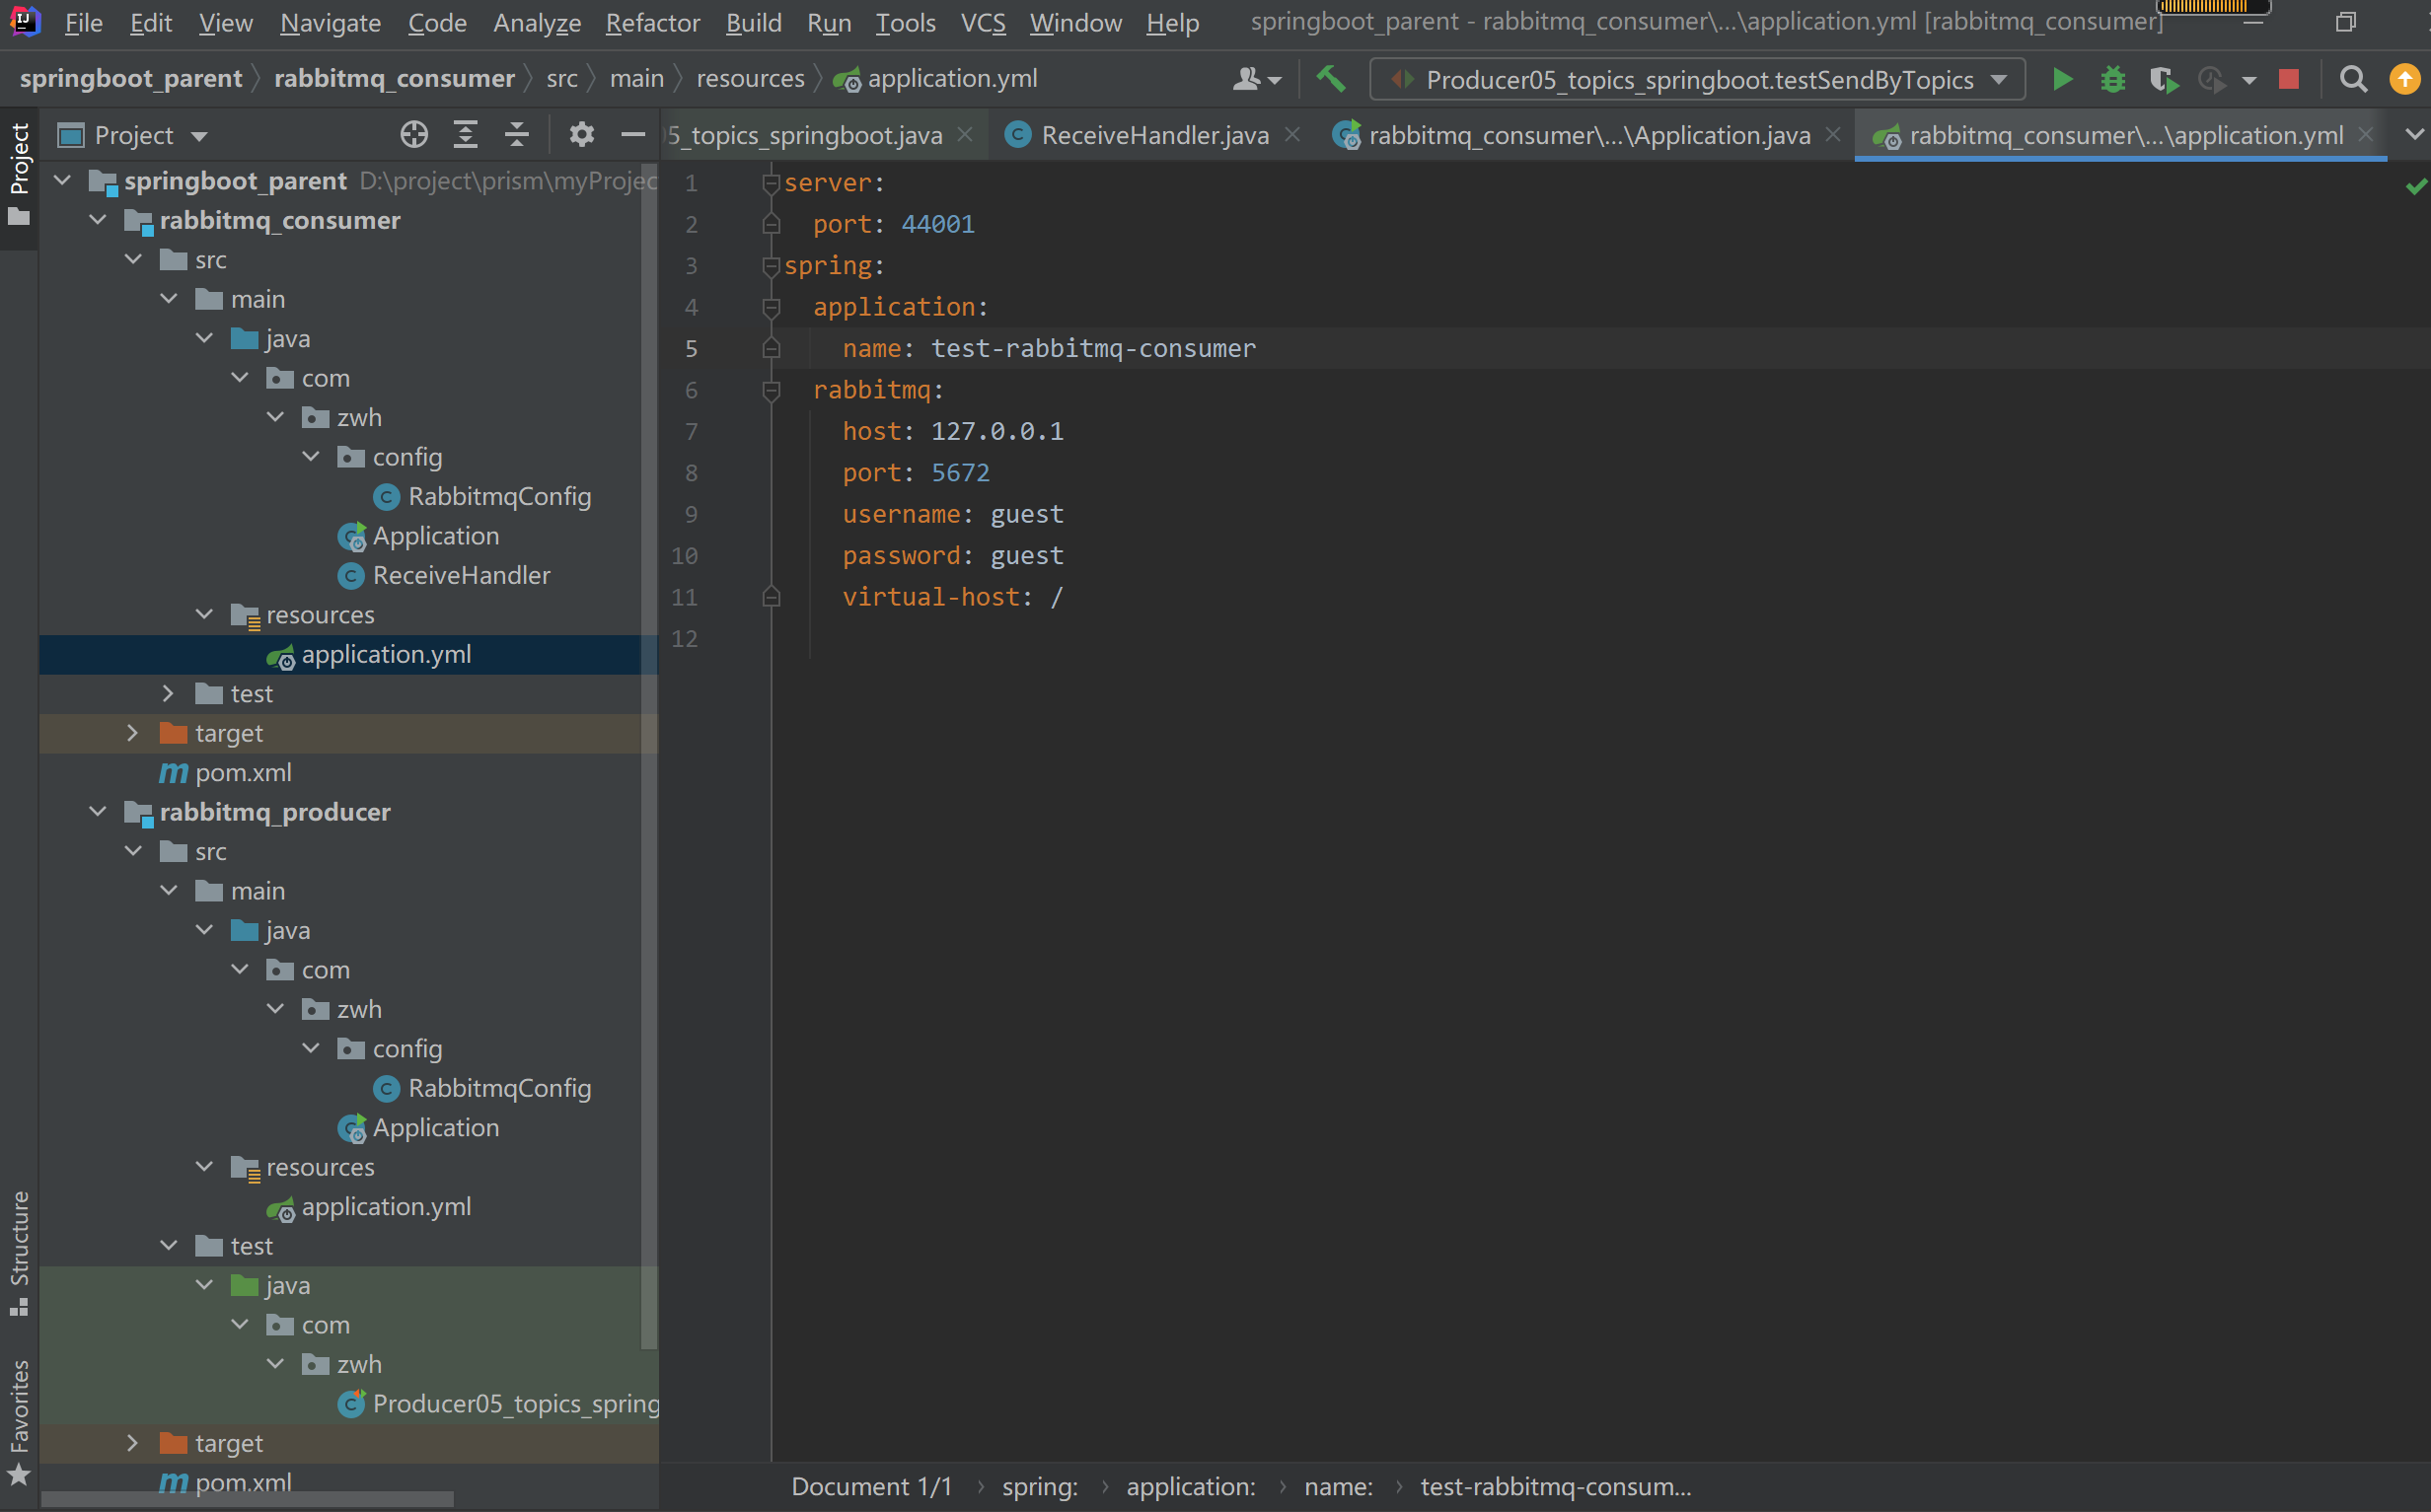
效果如下:
四、测试
启动生产者工程,发送消息,结果报错如下:
  .   ____          _            __ _ _
 /\\ / ___'_ __ _ _(_)_ __  __ _ \ \ \ \
( ( )\___ | '_ | '_| | '_ \/ _` | \ \ \ \
 \\/  ___)| |_)| | | | | || (_| |  ) ) ) )
  '  |____| .__|_| |_|_| |_\__, | / / / /
 =========|_|==============|___/=/_/_/_/
 :: Spring Boot ::        (v2.1.5.RELEASE)

2022-03-26 17:35:34.775  INFO 15236 --- [           main] com.zwh.Producer05_topics_springboot     : Starting Producer05_topics_springboot on LAPTOP-JRI45NVC with PID 15236 (started by miracle in D:\project\prism\myProject\springboot_parent\rabbitmq_producer)
2022-03-26 17:35:34.776  INFO 15236 --- [           main] com.zwh.Producer05_topics_springboot     : No active profile set, falling back to default profiles: default
2022-03-26 17:35:36.042  INFO 15236 --- [           main] o.s.s.concurrent.ThreadPoolTaskExecutor  : Initializing ExecutorService 'applicationTaskExecutor'
2022-03-26 17:35:36.811  INFO 15236 --- [           main] com.zwh.Producer05_topics_springboot     : Started Producer05_topics_springboot in 2.328 seconds (JVM running for 2.934)
2022-03-26 17:35:36.949  INFO 15236 --- [           main] o.s.a.r.c.CachingConnectionFactory       : Attempting to connect to: [127.0.0.1:5672]
2022-03-26 17:35:36.986  INFO 15236 --- [           main] o.s.a.r.c.CachingConnectionFactory       : Created new connection: rabbitConnectionFactory#6d4a65c6:0/SimpleConnection@31edeac [delegate=amqp://guest@127.0.0.1:5672/, localPort= 56434]
2022-03-26 17:35:37.004 ERROR 15236 --- [ 127.0.0.1:5672] o.s.a.r.c.CachingConnectionFactory       : Channel shutdown: channel error; protocol method: #method<channel.close>(reply-code=406, reply-text=PRECONDITION_FAILED - inequivalent arg 'durable' for exchange 'exchange_topics_inform' in vhost '/': received 'true' but current is 'false', class-id=40, method-id=10)
2022-03-26 17:35:38.022 ERROR 15236 --- [ 127.0.0.1:5672] o.s.a.r.c.CachingConnectionFactory       : Channel shutdown: channel error; protocol method: #method<channel.close>(reply-code=406, reply-text=PRECONDITION_FAILED - inequivalent arg 'durable' for exchange 'exchange_topics_inform' in vhost '/': received 'true' but current is 'false', class-id=40, method-id=10)
2022-03-26 17:35:40.041 ERROR 15236 --- [ 127.0.0.1:5672] o.s.a.r.c.CachingConnectionFactory       : Channel shutdown: channel error; protocol method: #method<channel.close>(reply-code=406, reply-text=PRECONDITION_FAILED - inequivalent arg 'durable' for exchange 'exchange_topics_inform' in vhost '/': received 'true' but current is 'false', class-id=40, method-id=10)
2022-03-26 17:35:44.056 ERROR 15236 --- [ 127.0.0.1:5672] o.s.a.r.c.CachingConnectionFactory       : Channel shutdown: channel error; protocol method: #method<channel.close>(reply-code=406, reply-text=PRECONDITION_FAILED - inequivalent arg 'durable' for exchange 'exchange_topics_inform' in vhost '/': received 'true' but current is 'false', class-id=40, method-id=10)
2022-03-26 17:35:49.076 ERROR 15236 --- [ 127.0.0.1:5672] o.s.a.r.c.CachingConnectionFactory       : Channel shutdown: channel error; protocol method: #method<channel.close>(reply-code=406, reply-text=PRECONDITION_FAILED - inequivalent arg 'durable' for exchange 'exchange_topics_inform' in vhost '/': received 'true' but current is 'false', class-id=40, method-id=10)

org.springframework.amqp.AmqpIOException: java.io.IOException

    at org.springframework.amqp.rabbit.support.RabbitExceptionTranslator.convertRabbitAccessException(RabbitExceptionTranslator.java:71)
    at org.springframework.amqp.rabbit.connection.RabbitAccessor.convertRabbitAccessException(RabbitAccessor.java:116)
    at org.springframework.amqp.rabbit.core.RabbitTemplate.doExecute(RabbitTemplate.java:2100)
    at org.springframework.amqp.rabbit.core.RabbitTemplate.execute(RabbitTemplate.java:2047)
    at org.springframework.amqp.rabbit.core.RabbitTemplate.execute(RabbitTemplate.java:2027)
    at org.springframework.amqp.rabbit.core.RabbitAdmin.initialize(RabbitAdmin.java:591)
    at org.springframework.amqp.rabbit.core.RabbitAdmin.lambda$null$10(RabbitAdmin.java:520)
    at org.springframework.retry.support.RetryTemplate.doExecute(RetryTemplate.java:287)
    at org.springframework.retry.support.RetryTemplate.execute(RetryTemplate.java:164)
    at org.springframework.amqp.rabbit.core.RabbitAdmin.lambda$afterPropertiesSet$11(RabbitAdmin.java:519)
    at org.springframework.amqp.rabbit.connection.CompositeConnectionListener.onCreate(CompositeConnectionListener.java:36)
    at org.springframework.amqp.rabbit.connection.CachingConnectionFactory.createConnection(CachingConnectionFactory.java:706)
    at org.springframework.amqp.rabbit.connection.ConnectionFactoryUtils.createConnection(ConnectionFactoryUtils.java:214)
    at org.springframework.amqp.rabbit.core.RabbitTemplate.doExecute(RabbitTemplate.java:2073)
    at org.springframework.amqp.rabbit.core.RabbitTemplate.execute(RabbitTemplate.java:2047)
    at org.springframework.amqp.rabbit.core.RabbitTemplate.send(RabbitTemplate.java:994)
    at org.springframework.amqp.rabbit.core.RabbitTemplate.convertAndSend(RabbitTemplate.java:1060)
    at org.springframework.amqp.rabbit.core.RabbitTemplate.convertAndSend(RabbitTemplate.java:1053)
    at com.zwh.Producer05_topics_springboot.testSendByTopics(Producer05_topics_springboot.java:25)
    at sun.reflect.NativeMethodAccessorImpl.invoke0(Native Method)
    at sun.reflect.NativeMethodAccessorImpl.invoke(NativeMethodAccessorImpl.java:62)
    at sun.reflect.DelegatingMethodAccessorImpl.invoke(DelegatingMethodAccessorImpl.java:43)
    at java.lang.reflect.Method.invoke(Method.java:498)
    at org.junit.runners.model.FrameworkMethod$1.runReflectiveCall(FrameworkMethod.java:50)
    at org.junit.internal.runners.model.ReflectiveCallable.run(ReflectiveCallable.java:12)
    at org.junit.runners.model.FrameworkMethod.invokeExplosively(FrameworkMethod.java:47)
    at org.junit.internal.runners.statements.InvokeMethod.evaluate(InvokeMethod.java:17)
    at org.springframework.test.context.junit4.statements.RunBeforeTestExecutionCallbacks.evaluate(RunBeforeTestExecutionCallbacks.java:74)
    at org.springframework.test.context.junit4.statements.RunAfterTestExecutionCallbacks.evaluate(RunAfterTestExecutionCallbacks.java:84)
    at org.springframework.test.context.junit4.statements.RunBeforeTestMethodCallbacks.evaluate(RunBeforeTestMethodCallbacks.java:75)
    at org.springframework.test.context.junit4.statements.RunAfterTestMethodCallbacks.evaluate(RunAfterTestMethodCallbacks.java:86)
    at org.springframework.test.context.junit4.statements.SpringRepeat.evaluate(SpringRepeat.java:84)
    at org.junit.runners.ParentRunner.runLeaf(ParentRunner.java:325)
    at org.springframework.test.context.junit4.SpringJUnit4ClassRunner.runChild(SpringJUnit4ClassRunner.java:251)
    at org.springframework.test.context.junit4.SpringJUnit4ClassRunner.runChild(SpringJUnit4ClassRunner.java:97)
    at org.junit.runners.ParentRunner$3.run(ParentRunner.java:290)
    at org.junit.runners.ParentRunner$1.schedule(ParentRunner.java:71)
    at org.junit.runners.ParentRunner.runChildren(ParentRunner.java:288)
    at org.junit.runners.ParentRunner.access$000(ParentRunner.java:58)
    at org.junit.runners.ParentRunner$2.evaluate(ParentRunner.java:268)
    at org.springframework.test.context.junit4.statements.RunBeforeTestClassCallbacks.evaluate(RunBeforeTestClassCallbacks.java:61)
    at org.springframework.test.context.junit4.statements.RunAfterTestClassCallbacks.evaluate(RunAfterTestClassCallbacks.java:70)
    at org.junit.runners.ParentRunner.run(ParentRunner.java:363)
    at org.springframework.test.context.junit4.SpringJUnit4ClassRunner.run(SpringJUnit4ClassRunner.java:190)
    at org.junit.runner.JUnitCore.run(JUnitCore.java:137)
    at com.intellij.junit4.JUnit4IdeaTestRunner.startRunnerWithArgs(JUnit4IdeaTestRunner.java:69)
    at com.intellij.rt.junit.IdeaTestRunner$Repeater.startRunnerWithArgs(IdeaTestRunner.java:33)
    at com.intellij.rt.junit.JUnitStarter.prepareStreamsAndStart(JUnitStarter.java:221)
    at com.intellij.rt.junit.JUnitStarter.main(JUnitStarter.java:54)
Caused by: java.io.IOException
    at com.rabbitmq.client.impl.AMQChannel.wrap(AMQChannel.java:126)
    at com.rabbitmq.client.impl.AMQChannel.wrap(AMQChannel.java:122)
    at com.rabbitmq.client.impl.AMQChannel.exnWrappingRpc(AMQChannel.java:144)
    at com.rabbitmq.client.impl.ChannelN.exchangeDeclare(ChannelN.java:777)
    at com.rabbitmq.client.impl.ChannelN.exchangeDeclare(ChannelN.java:52)
    at sun.reflect.NativeMethodAccessorImpl.invoke0(Native Method)
    at sun.reflect.NativeMethodAccessorImpl.invoke(NativeMethodAccessorImpl.java:62)
    at sun.reflect.DelegatingMethodAccessorImpl.invoke(DelegatingMethodAccessorImpl.java:43)
    at java.lang.reflect.Method.invoke(Method.java:498)
    at org.springframework.amqp.rabbit.connection.CachingConnectionFactory$CachedChannelInvocationHandler.invoke(CachingConnectionFactory.java:1140)
    at com.sun.proxy.$Proxy79.exchangeDeclare(Unknown Source)
    at org.springframework.amqp.rabbit.core.RabbitAdmin.declareExchanges(RabbitAdmin.java:689)
    at org.springframework.amqp.rabbit.core.RabbitAdmin.lambda$initialize$12(RabbitAdmin.java:592)
    at org.springframework.amqp.rabbit.core.RabbitTemplate.invokeAction(RabbitTemplate.java:2135)
    at org.springframework.amqp.rabbit.core.RabbitTemplate.doExecute(RabbitTemplate.java:2094)
    ... 46 more
Caused by: com.rabbitmq.client.ShutdownSignalException: channel error; protocol method: #method<channel.close>(reply-code=406, reply-text=PRECONDITION_FAILED - inequivalent arg 'durable' for exchange 'exchange_topics_inform' in vhost '/': received 'true' but current is 'false', class-id=40, method-id=10)
    at com.rabbitmq.utility.ValueOrException.getValue(ValueOrException.java:66)
    at com.rabbitmq.utility.BlockingValueOrException.uninterruptibleGetValue(BlockingValueOrException.java:36)
    at com.rabbitmq.client.impl.AMQChannel$BlockingRpcContinuation.getReply(AMQChannel.java:494)
    at com.rabbitmq.client.impl.AMQChannel.privateRpc(AMQChannel.java:288)
    at com.rabbitmq.client.impl.AMQChannel.exnWrappingRpc(AMQChannel.java:138)
    ... 58 more
Caused by: com.rabbitmq.client.ShutdownSignalException: channel error; protocol method: #method<channel.close>(reply-code=406, reply-text=PRECONDITION_FAILED - inequivalent arg 'durable' for exchange 'exchange_topics_inform' in vhost '/': received 'true' but current is 'false', class-id=40, method-id=10)
    at com.rabbitmq.client.impl.ChannelN.asyncShutdown(ChannelN.java:516)
    at com.rabbitmq.client.impl.ChannelN.processAsync(ChannelN.java:346)
    at com.rabbitmq.client.impl.AMQChannel.handleCompleteInboundCommand(AMQChannel.java:178)
    at com.rabbitmq.client.impl.AMQChannel.handleFrame(AMQChannel.java:111)
    at com.rabbitmq.client.impl.AMQConnection.readFrame(AMQConnection.java:670)
    at com.rabbitmq.client.impl.AMQConnection.access$300(AMQConnection.java:48)
    at com.rabbitmq.client.impl.AMQConnection$MainLoop.run(AMQConnection.java:597)
    at java.lang.Thread.run(Thread.java:748)

2022-03-26 17:35:49.100  INFO 15236 --- [       Thread-2] o.s.s.concurrent.ThreadPoolTaskExecutor  : Shutting down ExecutorService 'applicationTaskExecutor'

Process finished with exit code -1
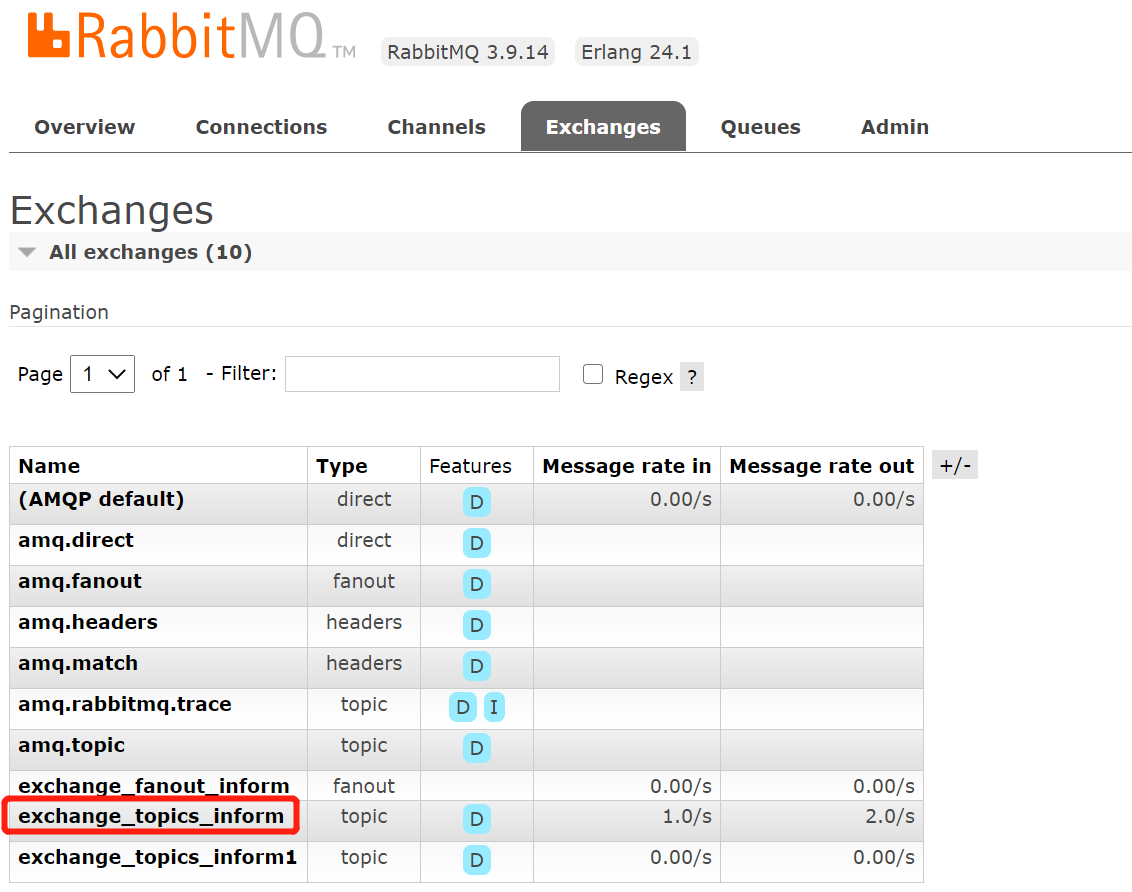
后来发现mq中已经存在一个同名的交换机,我们先删除,再发消息,结果如下:
  .   ____          _            __ _ _
 /\\ / ___'_ __ _ _(_)_ __  __ _ \ \ \ \
( ( )\___ | '_ | '_| | '_ \/ _` | \ \ \ \
 \\/  ___)| |_)| | | | | || (_| |  ) ) ) )
  '  |____| .__|_| |_|_| |_\__, | / / / /
 =========|_|==============|___/=/_/_/_/
 :: Spring Boot ::        (v2.1.5.RELEASE)

2022-03-26 18:01:58.627  INFO 15816 --- [           main] com.zwh.Producer05_topics_springboot     : Starting Producer05_topics_springboot on LAPTOP-JRI45NVC with PID 15816 (started by miracle in D:\project\prism\myProject\springboot_parent\rabbitmq_producer)
2022-03-26 18:01:58.628  INFO 15816 --- [           main] com.zwh.Producer05_topics_springboot     : No active profile set, falling back to default profiles: default
2022-03-26 18:01:59.691  INFO 15816 --- [           main] o.s.s.concurrent.ThreadPoolTaskExecutor  : Initializing ExecutorService 'applicationTaskExecutor'
2022-03-26 18:02:00.398  INFO 15816 --- [           main] com.zwh.Producer05_topics_springboot     : Started Producer05_topics_springboot in 1.995 seconds (JVM running for 2.56)
2022-03-26 18:02:00.515  INFO 15816 --- [           main] o.s.a.r.c.CachingConnectionFactory       : Attempting to connect to: [127.0.0.1:5672]
2022-03-26 18:02:00.549  INFO 15816 --- [           main] o.s.a.r.c.CachingConnectionFactory       : Created new connection: rabbitConnectionFactory#4d8126f:0/SimpleConnection@73545b80 [delegate=amqp://guest@127.0.0.1:5672/, localPort= 57343]
Send Message is:'sms email inform to user0'
Send Message is:'sms email inform to user1'
Send Message is:'sms email inform to user2'
Send Message is:'sms email inform to user3'
Send Message is:'sms email inform to user4'
2022-03-26 18:02:00.584  INFO 15816 --- [       Thread-2] o.s.s.concurrent.ThreadPoolTaskExecutor  : Shutting down ExecutorService 'applicationTaskExecutor'

Process finished with exit code 0
此时交换机如下:
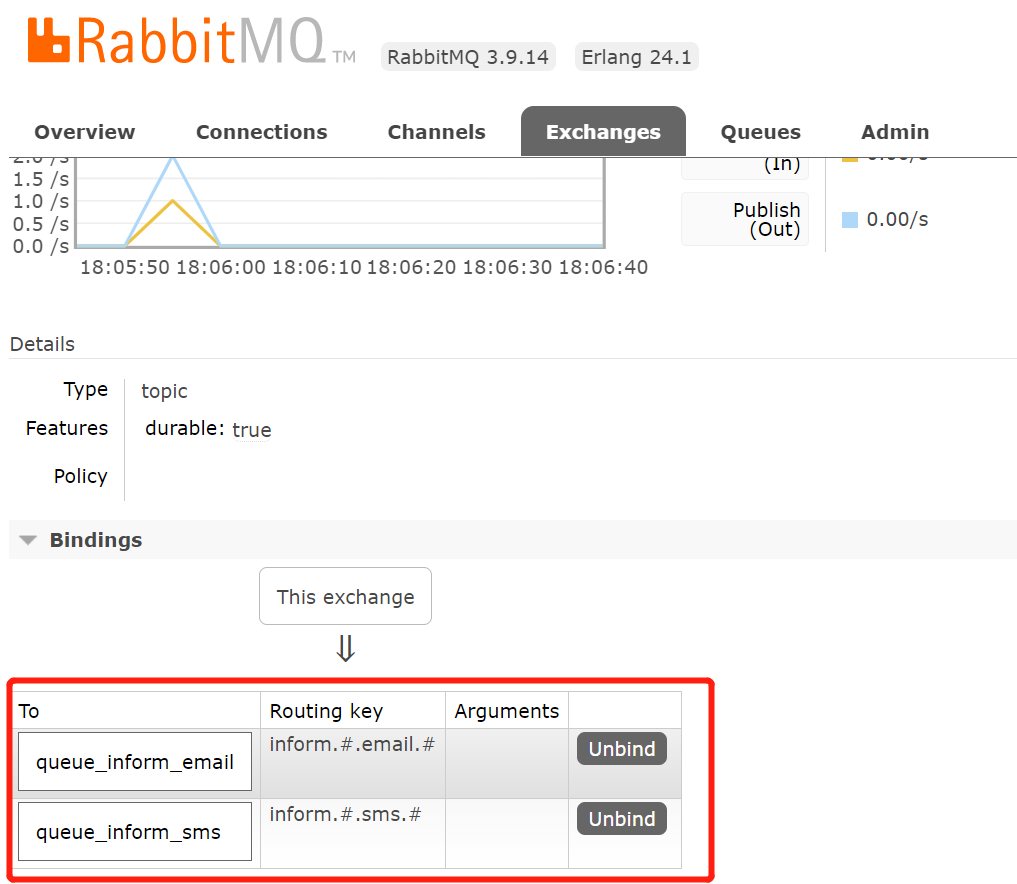
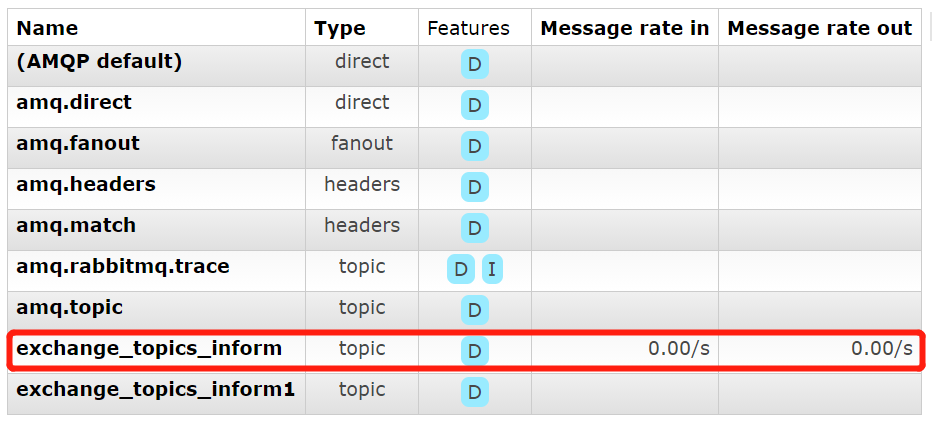
点击交换机,看到该交换机绑定两个队列
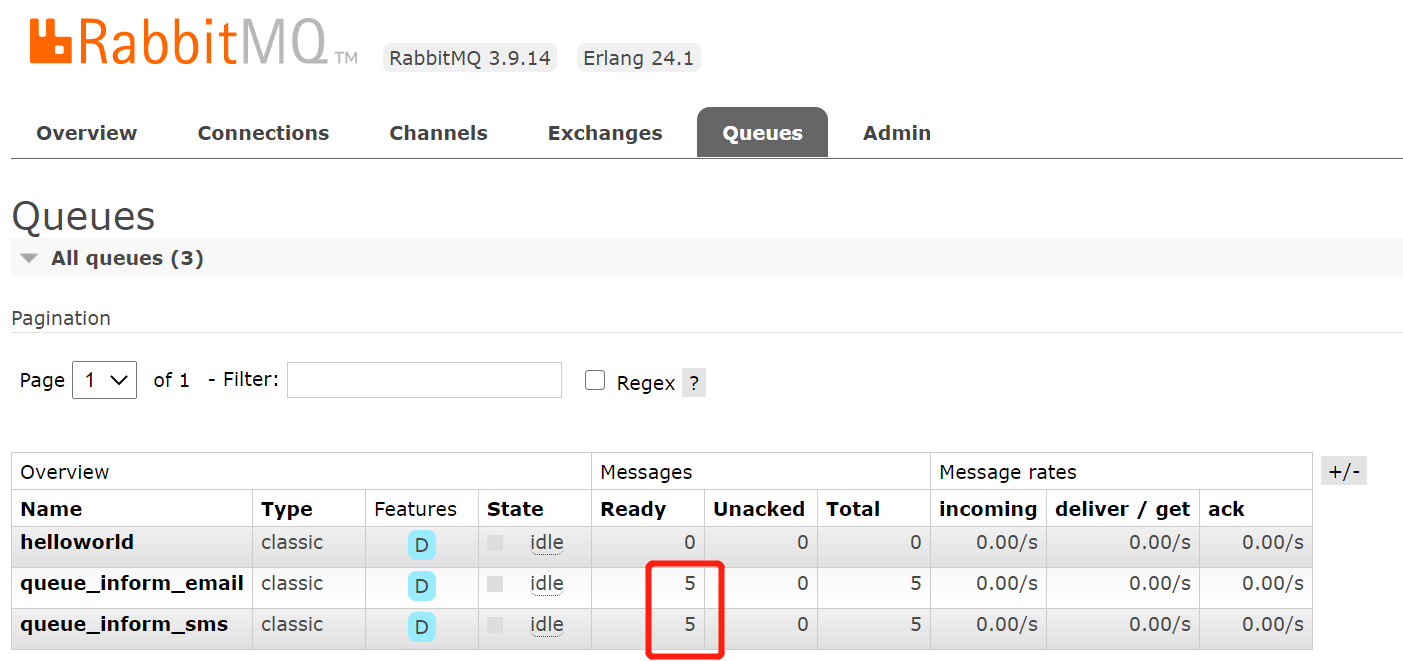
查看队列
启动消费工程,结果如下:
  .   ____          _            __ _ _
 /\\ / ___'_ __ _ _(_)_ __  __ _ \ \ \ \
( ( )\___ | '_ | '_| | '_ \/ _` | \ \ \ \
 \\/  ___)| |_)| | | | | || (_| |  ) ) ) )
  '  |____| .__|_| |_|_| |_\__, | / / / /
 =========|_|==============|___/=/_/_/_/
 :: Spring Boot ::        (v2.1.5.RELEASE)

2022-03-26 18:08:54.349  INFO 5680 --- [           main] com.zwh.Application                      : Starting Application on LAPTOP-JRI45NVC with PID 5680 (D:\project\prism\myProject\springboot_parent\rabbitmq_consumer\target\classes started by miracle in D:\project\prism\myProject\springboot_parent)
2022-03-26 18:08:54.351  INFO 5680 --- [           main] com.zwh.Application                      : No active profile set, falling back to default profiles: default
2022-03-26 18:08:54.934  INFO 5680 --- [           main] o.s.b.w.embedded.tomcat.TomcatWebServer  : Tomcat initialized with port(s): 44001 (http)
2022-03-26 18:08:54.946  INFO 5680 --- [           main] o.apache.catalina.core.StandardService   : Starting service [Tomcat]
2022-03-26 18:08:54.946  INFO 5680 --- [           main] org.apache.catalina.core.StandardEngine  : Starting Servlet engine: [Apache Tomcat/9.0.19]
2022-03-26 18:08:54.999  INFO 5680 --- [           main] o.a.c.c.C.[Tomcat].[localhost].[/]       : Initializing Spring embedded WebApplicationContext
2022-03-26 18:08:54.999  INFO 5680 --- [           main] o.s.web.context.ContextLoader            : Root WebApplicationContext: initialization completed in 628 ms
2022-03-26 18:08:55.124  INFO 5680 --- [           main] o.s.s.concurrent.ThreadPoolTaskExecutor  : Initializing ExecutorService 'applicationTaskExecutor'
2022-03-26 18:08:55.300  INFO 5680 --- [           main] o.s.a.r.c.CachingConnectionFactory       : Attempting to connect to: [127.0.0.1:5672]
2022-03-26 18:08:55.318  INFO 5680 --- [           main] o.s.a.r.c.CachingConnectionFactory       : Created new connection: rabbitConnectionFactory#40620d8e:0/SimpleConnection@41aaedaa [delegate=amqp://guest@127.0.0.1:5672/, localPort= 57478]
sms email inform to user0
sms email inform to user0
sms email inform to user1
sms email inform to user1
sms email inform to user2
sms email inform to user2
sms email inform to user3
sms email inform to user3
sms email inform to user4
sms email inform to user4
2022-03-26 18:08:55.376  INFO 5680 --- [           main] o.s.b.w.embedded.tomcat.TomcatWebServer  : Tomcat started on port(s): 44001 (http) with context path ''
2022-03-26 18:08:55.379  INFO 5680 --- [           main] com.zwh.Application                      : Started Application in 1.276 seconds (JVM running for 2.107)
五、消息确认机制
之前的文章我们已经介绍了 RabbitMQ 的基本使用,但是在默认情况下 RabbitMQ 并不能保证消息是否发送成功、以及是否被成功消费掉。消息在传递过程中存在丢失的可能。基于这样的现状,就有了消息的确认机制,来提高消息传递过程中的可靠性。
RabbitMQ 中,消息的确认机制包含以下两个方面:
- 消息发送确认,生产者发送消息的确认包含两部分:
1、生产者发送的消息是否成功到达交换机
2、消息是否成功的从交换机投放到目标队列 -
消息接收确认,消费者接收消息有三种不同的确认模式:
1、AcknowledgeMode.NONE:不确认,这是默认的模式,默认所有消息都被成功消费了,直接从队列删除消息。存在消息被消费过程中由于异常未被成功消费而掉丢失的风险。
2、AcknowledgeMode.AUTO:自动确认,根据消息被消费过程中是否发生异常来发送确认收到消息或拒绝消息的指令到 RabbitMQ 服务。这个确认时机开发人员是不可控的,同样存在消息丢失的风险。
3、AcknowledgeMode.MANUAL:手动确认,开发人员可以根据实际的业务,在合适的时机手动发送确认收到消息或拒绝消息指令到 RabbitMQ 服务,整个过程开发人是可控的。这种模式也是我们要重点介绍的。
1、添加消息确认机制需要的配置
在application.properties中添加连接 RabbitMQ 服务的配置,以及开启消息确认机制需要的配置:
生产者
server:
  port: 44000
spring:
  application:
    name: test‐rabbitmq‐producer
  rabbitmq:
    host: 127.0.0.1
    port: 5672
    username: guest
    password: guest
    virtual-host: /
    # 开启消息是否已经发送到交换机的确认机制
    publisher-confirm-type: correlated
    # 开启消息未成功投递到目标队列时将消息返回
    publisher-returns: true
springboot.rabbitmq.publisher-confirms 新版本已被弃用,现在使用 spring.rabbitmq.publisher-confirm-type = correlated 实现相同效果。在springboot2.2.0.RELEASE版本之前是amqp正式支持的属性,用来配置消息发送到交换器之后是否触发回调方法,在2.2.0及之后该属性过期使用spring.rabbitmq.publisher-confirm-type属性配置代替,用来配置更多的确认类型;如果该属性为true,则会触发confirm方法。
之前的配置如下:
#设置此属性配置可以确保消息成功发送到交换器
spring.rabbitmq.publisher-confirms=true
#可以确保消息在未被队列接收时返回
spring.rabbitmq.publisher-returns=true
消费者
server:
  port: 44001
spring:
  application:
    name: test‐rabbitmq‐consumer
  rabbitmq:
    host: 127.0.0.1
    port: 5672
    username: guest
    password: guest
   virtual-host: /
    # 设置消费者需要手动确认消息
    listener:
      simple:
        acknowledge-mode: manual
      direct:
        acknowledge-mode: manual
2、消息发送确认
消息发送确认的第一部分,是确认消息是否已经成功发送到交换机,我们需要实现RabbitTemplate.ConfirmCallback接口:
import org.springframework.amqp.rabbit.connection.CorrelationData;
import org.springframework.amqp.rabbit.core.RabbitTemplate;
import org.springframework.stereotype.Service;

/**
 * @author zhouwenhao
 * @date 2022/5/12
 * @dec 描述
 */
@Service
public class ConfirmCallbackService implements RabbitTemplate.ConfirmCallback {
    /**
     * @param correlationData
     * @param ack true 表示消息成功发送到交换机,false 则发送失败
     * @param cause 消息发送失败的原因
     */
    @Override
    public void confirm(CorrelationData correlationData, boolean ack, String cause) {
        if (ack) {
            System.out.println("消息已经发送到交换机!");
        } else {
            System.out.println("消息发送到交换机失败:" + cause);
        }
    }
}
消息无论是否成功到达交换机都会调用confirm方法。
消息发送确认的第二部分,就是消息是否成功的从交换机投放到目标队列,需要实现RabbitTemplate.ReturnsCallback接口:
import org.springframework.amqp.core.ReturnedMessage;
import org.springframework.amqp.rabbit.core.RabbitTemplate;
import org.springframework.stereotype.Service;

/**
 * @author zhouwenhao
 * @date 2022/5/12
 * @dec 描述
 */
@Service
public class ReturnCallbackService implements RabbitTemplate.ReturnsCallback {
    @Override
    public void returnedMessage(ReturnedMessage returned) {
        System.out.println("未成功投递到队列的消息:"+ returned.toString());
    }
}
returnedMessage方法只会在消息未成功投递到目标队列时被调用,ReturnedMessage就是投递失败的消息基本信息。
定义好了两种消息发送确认服务,接下来就是配置消息发送确认服务,可以放在 RabbitMQ 配置类里进行全局配置:
@Configuration
public class AckRabbitMQConfig {
    @Autowired
    RabbitTemplate rabbitTemplate;

    @Autowired
    ConfirmCallbackService confirmCallbackService;

    @Autowired
    ReturnCallbackService returnCallbackService;

    @PostConstruct
    public void init(){
        rabbitTemplate.setConfirmCallback(confirmCallbackService);
        rabbitTemplate.setReturnsCallback(returnCallbackService);
    }
    ......
    ......
}
也可以在发送消息时单独配置:
@SpringBootTest
@RunWith(SpringRunner.class)
public class Producer05_topics_springboot {
    @Autowired
    RabbitTemplate rabbitTemplate;
    @Autowired
    ConfirmCallbackService confirmCallbackService;
    @Autowired
    ReturnCallbackService returnCallbackService;
    @Test
    public void testSendByTopics(){
        for (int i=0;i<5;i++){
            String message = "sms email inform to user"+i;
            rabbitTemplate.setConfirmCallback(confirmCallbackService);
            rabbitTemplate.setReturnsCallback(returnCallbackService);
            rabbitTemplate.convertAndSend(RabbitmqConfig.EXCHANGE_TOPICS_INFORM,"inform.sms.email",message);
            System.out.println("Send Message is:'" + message + "'");
        }
    }
}
3、消息接收确认
消息接收确认的实现就相对简单一些:
修改RecieveHandler类如下:
import com.rabbitmq.client.Channel;
import com.zwh.config.RabbitmqConfig;
import org.springframework.amqp.core.Message;
import org.springframework.amqp.rabbit.annotation.RabbitListener;
import org.springframework.stereotype.Component;

import java.io.IOException;

@Component
public class ReceiveHandler {
    //监听email队列
    @RabbitListener(queues = {RabbitmqConfig.QUEUE_INFORM_EMAIL})
    public void receive_email(String msg,Message message,Channel channel){
        try {
            // 确认收到消息
            channel.basicAck(message.getMessageProperties().getDeliveryTag(),false);
            System.out.println("消费者确认收到消息:" + msg);
        } catch (Exception e) {
            try {
                // 拒绝消息
                channel.basicNack(message.getMessageProperties().getDeliveryTag(), false, false);
                System.out.println("消费者拒绝消息:" + msg);
            } catch (IOException ioException) {
                ioException.printStackTrace();
            }
        }
    }
    //监听sms队列
    @RabbitListener(queues = {RabbitmqConfig.QUEUE_INFORM_SMS})
    public void receive_sms(String msg,Message message,Channel channel){
        try {
            // 确认收到消息
            channel.basicAck(message.getMessageProperties().getDeliveryTag(),false);
            System.out.println("消费者确认收到消息:" + msg);
        } catch (Exception e) {
            try {
                // 拒绝消息
                channel.basicNack(message.getMessageProperties().getDeliveryTag(), false, false);
                System.out.println("消费者拒绝消息:" + msg);
            } catch (IOException ioException) {
                ioException.printStackTrace();
            }
        }
    }
}
使用消息接收的手动确认模式时,接收消息的方法需要额外添加Channel、Message两个类型的参数。Channel就是信道,在学习 Java client 操作 RabbitMQ 时,就是用它来发送接收消息的,不了解的可以复习一下。Message是 RabbitMQ 封装的消息类,里边包含了消息体、消息序号、以及交换机、队列等一些相关的信息。这样我们就可以根据实际的业务需求,在适当的时机告诉 RabbitMQ 服务,消息已经成功消费,或者被拒绝消费。
这就涉及如下几个方法了:
- basicAck,确认收到消息,即消息消费成功,执行该方法后,消息会被从队列删除。该方法的参数含义如下:
1、deliveryTag:消息投递的序号,就是1、2、3、4这样的递增整数。
2、multiple:是否批量确认消息,false 表示只确认当前 deliveryTag 对应的消息,true 表示会确认小于当前 deliveryTag 但还未被确认的消息。 -
basicNack,拒绝消息,由于发生异常等原因,消息没有被成功消费。和 basicAck 方法相比多了一个参数:
1、requeue:true 表示被拒绝的消息会重新进入队列头部。 - basicReject,和 basicNack 方法的作用类似,但是少了 multiple 参数。
这里有两个问题需要注意:
1、如果拒绝消息时,设置requeue为true,由于消息会重新进入队列头部,接下来又会被消费者处理,这样很可能陷入死循环,耗尽服务器资源,很危险的。所以在设置requeue为true时,需要慎重考虑。
拒绝消息时一般都是由于发生异常、或者业务上的错误,导致消费流程不能正常进行下去,可以考虑将此时的消息发送到死信队列,后续再单独处理。具体怎么实现,后期会有专门的文章介绍,目前先了解即可。
2、如果开启了消息接收的手动确认模式,但是消费消息时却没有做任何消息确认成功或拒绝的应答操作,则对应的消息会变成Unacked状态:

如果消费者客户端不重启,则Unacked状态的消息会一直堆积,不会被删除,也不会被重新消费。如果消费者客户端重启,则消息会自动变为Ready状态,这样又会被重新消费一次。
四、测试
@SpringBootTest
@RunWith(SpringRunner.class)
public class Producer05_topics_springboot {
    @Autowired
    RabbitTemplate rabbitTemplate;
    @Autowired
    ConfirmCallbackService confirmCallbackService;
    @Autowired
    ReturnCallbackService returnCallbackService;
    @Test
    public void testSendByTopics(){
        for (int i=0;i<5;i++){
            String message = "sms email inform to user"+i;
            rabbitTemplate.setConfirmCallback(confirmCallbackService);
            rabbitTemplate.setReturnsCallback(returnCallbackService);
            rabbitTemplate.convertAndSend(RabbitmqConfig.EXCHANGE_TOPICS_INFORM,"inform.sms.email",message);
            System.out.println("Send Message is:'" + message + "'");
        }
    }
}
1、测试正常情况
1)、执行testSendTopics方法,效果如下:
Send Message is:'sms email inform to user0'
Send Message is:'sms email inform to user1'
Send Message is:'sms email inform to user2'
Send Message is:'sms email inform to user3'
Send Message is:'sms email inform to user4'
消息已经发送到交换机!
消息已经发送到交换机!
消息已经发送到交换机!
消息已经发送到交换机!
消息已经发送到交换机!
此时交换机如下:
队列如下:

Ready表示等待投递给消费者的消息数。
2)、启动消息消费者模块
结果如下:
消费者确认收到消息:sms email inform to user0
消费者确认收到消息:sms email inform to user0
消费者确认收到消息:sms email inform to user1
消费者确认收到消息:sms email inform to user1
消费者确认收到消息:sms email inform to user2
消费者确认收到消息:sms email inform to user2
消费者确认收到消息:sms email inform to user3
消费者确认收到消息:sms email inform to user3
消费者确认收到消息:sms email inform to user4
消费者确认收到消息:sms email inform to user4
此时,队列如下所示:

2、测试消息不能成功发送到交换机
要测试消息不能成功发送到交换机的情况,只需要发送消息时指定一个不存在的交换机即可。
修改代码如下所示:
@SpringBootTest
@RunWith(SpringRunner.class)
public class Producer05_topics_springboot {
    @Autowired
    RabbitTemplate rabbitTemplate;
    @Autowired
    ConfirmCallbackService confirmCallbackService;
    @Autowired
    ReturnCallbackService returnCallbackService;
    @Test
    public void testSendByTopics(){
        for (int i=0;i<5;i++){
            String message = "sms email inform to user"+i;
            rabbitTemplate.setConfirmCallback(confirmCallbackService);
            rabbitTemplate.setReturnsCallback(returnCallbackService);
            rabbitTemplate.convertAndSend("exchange_topics_inform1","inform.sms.email",message);
            System.out.println("Send Message is:'" + message + "'");
        }
    }
}
执行testSendTopics方法,效果如下:
2022-05-13 10:41:51.974 ERROR 15424 --- [ 127.0.0.1:5672] o.s.a.r.c.CachingConnectionFactory       : Shutdown Signal: channel error; protocol method: #method<channel.close>(reply-code=404, reply-text=NOT_FOUND - no exchange 'exchange_topics_inform1' in vhost '/', class-id=60, method-id=40)
消息发送到交换机失败:channel error; protocol method: #method<channel.close>(reply-code=404, reply-text=NOT_FOUND - no exchange 'exchange_topics_inform1' in vhost '/', class-id=60, method-id=40)
Send Message is:'sms email inform to user1'
消息发送到交换机失败:channel error; protocol method: #method<channel.close>(reply-code=404, reply-text=NOT_FOUND - no exchange 'exchange_topics_inform1' in vhost '/', class-id=60, method-id=40)
2022-05-13 10:41:51.977 ERROR 15424 --- [ 127.0.0.1:5672] o.s.a.r.c.CachingConnectionFactory       : Shutdown Signal: channel error; protocol method: #method<channel.close>(reply-code=404, reply-text=NOT_FOUND - no exchange 'exchange_topics_inform1' in vhost '/', class-id=60, method-id=40)
Send Message is:'sms email inform to user2'
消息发送到交换机失败:channel error; protocol method: #method<channel.close>(reply-code=404, reply-text=NOT_FOUND - no exchange 'exchange_topics_inform1' in vhost '/', class-id=60, method-id=40)
2022-05-13 10:41:51.980 ERROR 15424 --- [ 127.0.0.1:5672] o.s.a.r.c.CachingConnectionFactory       : Shutdown Signal: channel error; protocol method: #method<channel.close>(reply-code=404, reply-text=NOT_FOUND - no exchange 'exchange_topics_inform1' in vhost '/', class-id=60, method-id=40)
Send Message is:'sms email inform to user3'
消息发送到交换机失败:channel error; protocol method: #method<channel.close>(reply-code=404, reply-text=NOT_FOUND - no exchange 'exchange_topics_inform1' in vhost '/', class-id=60, method-id=40)
2022-05-13 10:41:51.983 ERROR 15424 --- [ 127.0.0.1:5672] o.s.a.r.c.CachingConnectionFactory       : Shutdown Signal: channel error; protocol method: #method<channel.close>(reply-code=404, reply-text=NOT_FOUND - no exchange 'exchange_topics_inform1' in vhost '/', class-id=60, method-id=40)
Send Message is:'sms email inform to user4'
消息发送到交换机失败:channel error; protocol method: #method<channel.close>(reply-code=404, reply-text=NOT_FOUND - no exchange 'exchange_topics_inform1' in vhost '/', class-id=60, method-id=40)
2022-05-13 10:41:51.984 ERROR 15424 --- [ 127.0.0.1:5672] o.s.a.r.c.CachingConnectionFactory       : Shutdown Signal: channel error; protocol method: #method<channel.close>(reply-code=404, reply-text=NOT_FOUND - no exchange 'exchange_topics_inform1' in vhost '/', class-id=60, method-id=40)
3、测试消息未成功投递到目标队列
RabbitTemplate.ReturnsCallback的returnedMessage方法只会在消息未成功投递到目标队列时被调用,所以要测试消息是否成功的从交换机投放到目标队列,可以注释掉交换机和队列绑定的代码,这样消息自然不能成功的从交换机投放到队列。我们采取注释掉交换机和队列绑定的代码的方式,执行testSendTopics方法:
未成功投递到队列的消息:ReturnedMessage [message=(Body:'sms email inform to user0' MessageProperties [headers={}, contentType=text/plain, contentEncoding=UTF-8, contentLength=0, receivedDeliveryMode=PERSISTENT, priority=0, deliveryTag=0]), replyCode=312, replyText=NO_ROUTE, exchange=exchange_topics_inform, routingKey=inform.sms.email]
消息已经发送到交换机!
Send Message is:'sms email inform to user1'
Send Message is:'sms email inform to user2'
未成功投递到队列的消息:ReturnedMessage [message=(Body:'sms email inform to user2' MessageProperties [headers={}, contentType=text/plain, contentEncoding=UTF-8, contentLength=0, receivedDeliveryMode=PERSISTENT, priority=0, deliveryTag=0]), replyCode=312, replyText=NO_ROUTE, exchange=exchange_topics_inform, routingKey=inform.sms.email]
未成功投递到队列的消息:ReturnedMessage [message=(Body:'sms email inform to user1' MessageProperties [headers={}, contentType=text/plain, contentEncoding=UTF-8, contentLength=0, receivedDeliveryMode=PERSISTENT, priority=0, deliveryTag=0]), replyCode=312, replyText=NO_ROUTE, exchange=exchange_topics_inform, routingKey=inform.sms.email]
消息已经发送到交换机!
消息已经发送到交换机!
Send Message is:'sms email inform to user3'
Send Message is:'sms email inform to user4'
消息已经发送到交换机!
未成功投递到队列的消息:ReturnedMessage [message=(Body:'sms email inform to user3' MessageProperties [headers={}, contentType=text/plain, contentEncoding=UTF-8, contentLength=0, receivedDeliveryMode=PERSISTENT, priority=0, deliveryTag=0]), replyCode=312, replyText=NO_ROUTE, exchange=exchange_topics_inform, routingKey=inform.sms.email]
消息已经发送到交换机!
未成功投递到队列的消息:ReturnedMessage [message=(Body:'sms email inform to user4' MessageProperties [headers={}, contentType=text/plain, contentEncoding=UTF-8, contentLength=0, receivedDeliveryMode=PERSISTENT, priority=0, deliveryTag=0]), replyCode=312, replyText=NO_ROUTE, exchange=exchange_topics_inform, routingKey=inform.sms.email]
4、测试消费者拒绝消息
修改代码如下:
@Component
public class ReceiveHandler {
    //监听email队列
    @RabbitListener(queues = {RabbitmqConfig.QUEUE_INFORM_EMAIL})
    public void receive_email(String msg,Message message,Channel channel){
        try {
             int i = 1/0;
            // 确认收到消息
            channel.basicAck(message.getMessageProperties().getDeliveryTag(),false);
            System.out.println("消费者确认收到消息:" + msg);
        } catch (Exception e) {
            try {
                // 拒绝消息
                channel.basicNack(message.getMessageProperties().getDeliveryTag(), false, false);
                System.out.println("消费者拒绝消息:" + msg);
            } catch (IOException ioException) {
                ioException.printStackTrace();
            }
        }
    }
    //监听sms队列
    @RabbitListener(queues = {RabbitmqConfig.QUEUE_INFORM_SMS})
    public void receive_sms(String msg,Message message,Channel channel){
        try {
            int i = 1/0;
            // 确认收到消息
            channel.basicAck(message.getMessageProperties().getDeliveryTag(),false);
            System.out.println("消费者确认收到消息:" + msg);
        } catch (Exception e) {
            try {
                // 拒绝消息
                channel.basicNack(message.getMessageProperties().getDeliveryTag(), false, false);
                System.out.println("消费者拒绝消息:" + msg);
            } catch (IOException ioException) {
                ioException.printStackTrace();
            }
        }
    }
}
先发送消息,执行testSendTopics方法:
Send Message is:'sms email inform to user0'
Send Message is:'sms email inform to user1'
Send Message is:'sms email inform to user2'
Send Message is:'sms email inform to user3'
Send Message is:'sms email inform to user4'
消息已经发送到交换机!
消息已经发送到交换机!
消息已经发送到交换机!
消息已经发送到交换机!
消息已经发送到交换机!

启动消费者:
消费者拒绝消息:sms email inform to user0
消费者拒绝消息:sms email inform to user0
消费者拒绝消息:sms email inform to user1
消费者拒绝消息:sms email inform to user1
消费者拒绝消息:sms email inform to user2
消费者拒绝消息:sms email inform to user2
消费者拒绝消息:sms email inform to user3
消费者拒绝消息:sms email inform to user3
消费者拒绝消息:sms email inform to user4
消费者拒绝消息:sms email inform to user4
此时消息队列如下:

由于requeue为false,表示被拒绝的消息会没有重新进入队列头部,不会被消费者处理,这样就不会因为陷入死循环而耗尽服务器资源。而是被删除。
六、死信队列
Dead Letter。死信,其实这是 RabbitMQ 中一种消息类型,和普通的消息在本质上没有什么区别,更多的是一种业务上的划分。如果队列中的消息出现以下情况之一,就会变成死信:channel.basicNack 或 channel.basicReject ,并设置requeue为false。(2)、如果给消息队列设置了消息的过期时间(x-message-ttl),或者发送消息时设置了当前消息的过期时间,当消息在队列中的存活时间大于过期时间时,就会变成死信。
(3)、如果给消息队列设置了最大容量(x-max-length),队列已经满了,后续再进来的消息会溢出,无法被队列接收就会变成死信。
如果不对死信做任何处理,则消息会被直接丢弃。一般死信都是那些在业务上未被正常处理的消息,我们可以考虑用一个队列来接收这些死信消息,接收死信消息的队列就是死信队列,它就是一个普通的消息队列,没有什么特殊的,只是我们在业务上赋予了它特殊的职责罢了,后期再根据实际情况处理死信队列中的消息即可。
1、创建死信队列、死信交换机,并完成绑定
创建一个死信队列、交换机,并完成绑定,这里的交换机也可以称作死信交换机,交换机的类型没有特殊的要求根据实际需求选择即可:
// 创建死信交换机
    @Bean
    public TopicExchange deadLetterExchange() {
        return new TopicExchange("dead.letter.exchange", true, false);
    }

    // 创建死信队列
    @Bean
    public Queue deadLetterQueue() {
        return new Queue("dead.letter.queue", true);
    }

    // 绑定队列和交换机
    @Bean
    Binding deadLetterBinding() {
        return BindingBuilder.bind(deadLetterQueue()).to(deadLetterExchange()).with("dead.letter");
    }
这里我们根据文章开头描述的,正常消息变成死信的几种场景分别来看死信队列的用法。
情况一、消息被拒绝
修改处理业务消息的队列:
//声明队列
    @Bean(QUEUE_INFORM_SMS)
    public Queue QUEUE_INFORM_SMS() {
        Map<String, Object> args = new HashMap<>();
        // 设置死信交换机
        args.put("x-dead-letter-exchange", "dead.letter.exchange");
        // 设置死信交换机绑定队列的routingKey
        args.put("x-dead-letter-routing-key", "dead.letter");
        Queue queue = new Queue(QUEUE_INFORM_SMS, true, false, false, args);
        return queue;
    }
    //声明队列
    @Bean(QUEUE_INFORM_EMAIL)
    public Queue QUEUE_INFORM_EMAIL() {
        Map<String, Object> args = new HashMap<>();
        // 设置死信交换机
        args.put("x-dead-letter-exchange", "dead.letter.exchange");
        // 设置死信交换机绑定队列的routingKey
        args.put("x-dead-letter-routing-key", "dead.letter");
        Queue queue = new Queue(QUEUE_INFORM_EMAIL, true, false, false, args);
        return queue;
    }
创建QUEUE_INFORM_SMS和QUEUE_INFORM_EMAIL队列时,我们给它配置了前边创建死信交换机、以及 routingKey,这样就完成了业务消息队列和死信队列的绑定,业务消息被拒绝后,就会进入死信队列。
注意,如果队列已经创建,之后再修改队列的配置参数,则不会生效,需要删除掉队列重新创建
接下来,创建消费者来消费QUEUE_INFORM_SMS和QUEUE_INFORM_EMAIL中的业务消息,为了突出效果,直接让消费者拒绝掉消息。
@Component
public class ReceiveHandler {
    //监听email队列
    @RabbitListener(queues = {RabbitmqConfig.QUEUE_INFORM_EMAIL})
    public void receive_email(String msg,Message message,Channel channel){
        try {
             int i = 1/0;
            // 确认收到消息
            channel.basicAck(message.getMessageProperties().getDeliveryTag(),false);
            System.out.println("消费者确认收到消息:" + msg);
        } catch (Exception e) {
            try {
                // 拒绝消息
                channel.basicNack(message.getMessageProperties().getDeliveryTag(), false, false);
                System.out.println("消费者拒绝消息:" + msg);
            } catch (IOException ioException) {
                ioException.printStackTrace();
            }
        }
    }
    //监听sms队列
    @RabbitListener(queues = {RabbitmqConfig.QUEUE_INFORM_SMS})
    public void receive_sms(String msg,Message message,Channel channel){
        try {
            int i = 1/0;
            // 确认收到消息
            channel.basicAck(message.getMessageProperties().getDeliveryTag(),false);
            System.out.println("消费者确认收到消息:" + msg);
        } catch (Exception e) {
            try {
                // 拒绝消息
                channel.basicNack(message.getMessageProperties().getDeliveryTag(), false, false);
                System.out.println("消费者拒绝消息:" + msg);
            } catch (IOException ioException) {
                ioException.printStackTrace();
            }
        }
    }
}
先发送消息:
Send Message is:'sms email inform to user0'
Send Message is:'sms email inform to user1'
Send Message is:'sms email inform to user2'
Send Message is:'sms email inform to user3'
消息已经发送到交换机!
消息已经发送到交换机!
消息已经发送到交换机!
消息已经发送到交换机!
Send Message is:'sms email inform to user4'
消息已经发送到交换机!

启动消费者
消费者拒绝消息:sms email inform to user0
消费者拒绝消息:sms email inform to user0
消费者拒绝消息:sms email inform to user1
消费者拒绝消息:sms email inform to user1
消费者拒绝消息:sms email inform to user2
消费者拒绝消息:sms email inform to user2
消费者拒绝消息:sms email inform to user3
消费者拒绝消息:sms email inform to user3
消费者拒绝消息:sms email inform to user4
消费者拒绝消息:sms email inform to user4
此时,消息被拒绝后进入死信队列:

情况二、消息过期
添加过期时间
//声明队列
    @Bean(QUEUE_INFORM_SMS)
    public Queue QUEUE_INFORM_SMS() {
        Map<String, Object> args = new HashMap<>();
        // 设置队列中消息的过期时间,单位毫秒
        args.put("x-message-ttl", 10000);
        // 设置死信交换机
        args.put("x-dead-letter-exchange", "dead.letter.exchange");
        // 设置死信交换机绑定队列的routingKey
        args.put("x-dead-letter-routing-key", "dead.letter");
        Queue queue = new Queue(QUEUE_INFORM_SMS, true, false, false, args);
        return queue;
    }
    //声明队列
    @Bean(QUEUE_INFORM_EMAIL)
    public Queue QUEUE_INFORM_EMAIL() {
        Map<String, Object> args = new HashMap<>();
        // 设置队列中消息的过期时间,单位毫秒
        args.put("x-message-ttl", 10000);
        // 设置死信交换机
        args.put("x-dead-letter-exchange", "dead.letter.exchange");
        // 设置死信交换机绑定队列的routingKey
        args.put("x-dead-letter-routing-key", "dead.letter");
        Queue queue = new Queue(QUEUE_INFORM_EMAIL, true, false, false, args);
        return queue;
    }
发送消息:
控制台打印如下:
Send Message is:'sms email inform to user0'
Send Message is:'sms email inform to user1'
Send Message is:'sms email inform to user2'
Send Message is:'sms email inform to user3'
消息已经发送到交换机!
消息已经发送到交换机!
消息已经发送到交换机!
消息已经发送到交换机!
Send Message is:'sms email inform to user4'
消息已经发送到交换机!
等待10秒后,消息会自动流入死信队列:


除了给队列设置消息的超时时间,也可以在发送消息时配置,有兴趣的可以自己尝试:
@SpringBootTest
@RunWith(SpringRunner.class)
public class Producer05_topics_springboot {
    @Autowired
    RabbitTemplate rabbitTemplate;
    @Autowired
    ConfirmCallbackService confirmCallbackService;
    @Autowired
    ReturnCallbackService returnCallbackService;
    @Test
    public void testSendByTopics(){
        for (int i=0;i<5;i++){
            MessagePostProcessor processor = new MessagePostProcessor() {
                @Override
                public Message postProcessMessage(Message message) throws AmqpException {
                    message.getMessageProperties().setExpiration("10000");
                    return message;
                }
            };
            String message = "sms email inform to user"+i;
            rabbitTemplate.setConfirmCallback(confirmCallbackService);
            rabbitTemplate.setReturnsCallback(returnCallbackService);
            rabbitTemplate.convertAndSend(RabbitmqConfig.EXCHANGE_TOPICS_INFORM,"inform.sms.email",message,processor);
            System.out.println("Send Message is:'" + message + "'");
        }
    }
}
发送消息:

10s钟之后,

情况三、消息溢出
由于消息队列满了,导致消息溢出而进入死信队列的场景也比较简单。设置队列的大小为10。
//声明队列
    @Bean(QUEUE_INFORM_SMS)
    public Queue QUEUE_INFORM_SMS() {
        Map<String, Object> args = new HashMap<>();
        // 设置消息队列的大小
        args.put("x-max-length", 10);
        // 设置队列中消息的过期时间,单位毫秒
//        args.put("x-message-ttl", 10000);
        // 设置死信交换机
        args.put("x-dead-letter-exchange", "dead.letter.exchange");
        // 设置死信交换机绑定队列的routingKey
        args.put("x-dead-letter-routing-key", "dead.letter");
        Queue queue = new Queue(QUEUE_INFORM_SMS, true, false, false, args);
        return queue;
    }
    //声明队列
    @Bean(QUEUE_INFORM_EMAIL)
    public Queue QUEUE_INFORM_EMAIL() {
        Map<String, Object> args = new HashMap<>();
        // 设置消息队列的大小
        args.put("x-max-length", 10);
        // 设置队列中消息的过期时间,单位毫秒
//        args.put("x-message-ttl", 10000);
        // 设置死信交换机
        args.put("x-dead-letter-exchange", "dead.letter.exchange");
        // 设置死信交换机绑定队列的routingKey
        args.put("x-dead-letter-routing-key", "dead.letter");
        Queue queue = new Queue(QUEUE_INFORM_EMAIL, true, false, false, args);
        return queue;
    }
发送三次,共发送三十条,前面两次,每个队列10条,第三次发送的消息都进入死信队列。

七、延时队列
上边描述的延时队列,其实是存在一些问题的,应付简单的场景还行,如果需要获得更加完善的功能体验,可以选择使用 RabbitMQ 提供的延时消息插件。下边我们分别了解两种实现方式。
设置过期时间1分钟
@Configuration
public class RabbitmqConfig {
    public static final String QUEUE_INFORM_EMAIL = "q-suyuan-integration_email";
    public static final String QUEUE_INFORM_SMS = "q-suyuan-integration-sms";
    public static final String EXCHANGE_TOPICS_INFORM="exchange_topics_inform";
    /**
      * 交换机配置
      * ExchangeBuilder提供了fanout、direct、topic、header交换机类型的配置
      * @return the exchange
      */
    @Bean(EXCHANGE_TOPICS_INFORM)
    public Exchange EXCHANGE_TOPICS_INFORM() {
      //durable(true)持久化,消息队列重启后交换机仍然存在
        return ExchangeBuilder.topicExchange(EXCHANGE_TOPICS_INFORM).durable(true).build();
    }
    //声明队列
    @Bean(QUEUE_INFORM_SMS)
    public Queue QUEUE_INFORM_SMS() {
        Map<String, Object> args = new HashMap<>();// 设置队列中消息的过期时间,单位毫秒
        args.put("x-message-ttl", 60000);
        // 设置死信交换机
        args.put("x-dead-letter-exchange", "dead.letter.exchange");
        // 设置死信交换机绑定队列的routingKey
        args.put("x-dead-letter-routing-key", "dead.letter");
        Queue queue = new Queue(QUEUE_INFORM_SMS, true, false, false, args);
        return queue;
    }
    //声明队列
    @Bean(QUEUE_INFORM_EMAIL)
    public Queue QUEUE_INFORM_EMAIL() {
        Map<String, Object> args = new HashMap<>();// 设置队列中消息的过期时间,单位毫秒
        args.put("x-message-ttl", 60000);
        // 设置死信交换机
        args.put("x-dead-letter-exchange", "dead.letter.exchange");
        // 设置死信交换机绑定队列的routingKey
        args.put("x-dead-letter-routing-key", "dead.letter");
        Queue queue = new Queue(QUEUE_INFORM_EMAIL, true, false, false, args);
        return queue;
    }

    // 创建死信交换机
    @Bean
    public TopicExchange deadLetterExchange() {
        return new TopicExchange("dead.letter.exchange", true, false);
    }

    // 创建死信队列
    @Bean
    public Queue deadLetterQueue() {
        return new Queue("dead.letter.queue", true);
    }

    // 绑定队列和交换机
    @Bean
    Binding deadLetterBinding() {
        return BindingBuilder.bind(deadLetterQueue()).to(deadLetterExchange()).with("dead.letter");
    }


    /** channel.queueBind(INFORM_QUEUE_SMS,"inform_exchange_topic","inform.#.sms.#");
      * 绑定队列到交换机 .
      *
      * @param queue    the queue
      * @param exchange the exchange
      * @return the binding
      */
    @Bean
    public Binding BINDING_QUEUE_INFORM_SMS(@Qualifier(QUEUE_INFORM_SMS) Queue queue,
                                            @Qualifier(EXCHANGE_TOPICS_INFORM) Exchange exchange) {
        return BindingBuilder.bind(queue).to(exchange).with("inform.#.sms.#").noargs();
    }
    @Bean
    public Binding BINDING_QUEUE_INFORM_EMAIL(@Qualifier(QUEUE_INFORM_EMAIL) Queue queue,
                                              @Qualifier(EXCHANGE_TOPICS_INFORM) Exchange exchange) {
        return BindingBuilder.bind(queue).to(exchange).with("inform.#.email.#").noargs();
    }

}
核心的内容就是上边的配置类了,接下来就是发送消息到业务消息队列,并只给死信队列指定消费者,这样发送的消息在正常业务队列过期后,最终会流入死信队列,进而被消费掉。消费者的代码很简单:
@Component
public class ReceiveHandler {
    @RabbitListener(queues = "dead.letter.queue")
    public void receive(String msg,Message message,Channel channel) {
        try {
            // 确认收到消息
            channel.basicAck(message.getMessageProperties().getDeliveryTag(),false);
            System.out.println("消费者确认收到消息:" + msg);
        } catch (Exception e) {
            try {
                // 拒绝消息
                channel.basicNack(message.getMessageProperties().getDeliveryTag(), false, false);
                System.out.println("消费者拒绝消息:" + msg);
            } catch (IOException ioException) {
                ioException.printStackTrace();
            }
        }
    }
}
发消息:
Send Message is:'sms email inform to user0'
Send Message is:'sms email inform to user1'
Send Message is:'sms email inform to user2'
Send Message is:'sms email inform to user3'
Send Message is:'sms email inform to user4'
消息已经发送到交换机!
消息已经发送到交换机!
消息已经发送到交换机!
消息已经发送到交换机!
消息已经发送到交换机!

待过期之后,启动消费者,

启动消费者

如果我们有其它不同时间的延时业务需求,就需要在配置类添加更多的和QUEUE_INFORM_SMS类似配置的过期消息队列,如果新的延时业务需求太多,新消息队列的数量将不可控。
发送两条消息:
@SpringBootTest
@RunWith(SpringRunner.class)
public class Producer05_topics_springboot {
    @Autowired
    RabbitTemplate rabbitTemplate;
    @Autowired
    ConfirmCallbackService confirmCallbackService;
    @Autowired
    ReturnCallbackService returnCallbackService;

    @Test
    public void testSendByTopics(){
        MessagePostProcessor processor = new MessagePostProcessor() {
            @Override
            public Message postProcessMessage(Message message) throws AmqpException {
                message.getMessageProperties().setExpiration("30000");
                return message;
            }
        };
        String message = "hello world";
        rabbitTemplate.setConfirmCallback(confirmCallbackService);
        rabbitTemplate.setReturnsCallback(returnCallbackService);
        rabbitTemplate.convertAndSend(RabbitmqConfig.EXCHANGE_TOPICS_INFORM,"inform.sms.email", message, processor);
        System.out.println("Send Message is:'" + message + "'");

        MessagePostProcessor processor2 = new MessagePostProcessor() {
            @Override
            public Message postProcessMessage(Message message) throws AmqpException {
                message.getMessageProperties().setExpiration("10000");
                return message;
            }
        };
        String message2 = "hello,rabbitmq";
        rabbitTemplate.setConfirmCallback(confirmCallbackService);
        rabbitTemplate.setReturnsCallback(returnCallbackService);
        rabbitTemplate.convertAndSend(RabbitmqConfig.EXCHANGE_TOPICS_INFORM,"inform.sms.email",message2,processor2);
        System.out.println("Send Message is:'" + message2 + "'");
    }
}
hello rabbitmq应该在10秒后先被消费,然而由于我们先发送的hello world消息设置的过期时间为30秒,导致hello rabbitmq被阻塞,直到30秒后陆续被消费掉。问题很明显了,后发送消息的过期时间必须大于大于前边已经发送消息的过期时间,这样才能保证延时队列正常工作,但实际使用中几乎不能保证的。RabbitmqConfig如下:
@Configuration
public class RabbitmqConfig {
    public static final String QUEUE_INFORM_EMAIL = "q-suyuan-integration_email";
    public static final String QUEUE_INFORM_SMS = "q-suyuan-integration-sms";
    public static final String EXCHANGE_TOPICS_INFORM="exchange_topics_inform";
    // 创建死信交换机
    @Bean
    public TopicExchange deadLetterExchange() {
        return new TopicExchange("dead.letter.exchange", true, false);
    }

    // 创建死信队列
    @Bean
    public Queue deadLetterQueue() {
        return new Queue("dead.letter.queue", true);
    }

    // 绑定队列和交换机
    @Bean
    Binding deadLetterBinding() {
        return BindingBuilder.bind(deadLetterQueue()).to(deadLetterExchange()).with("dead.letter");
    }
    /**
      * 交换机配置
      * ExchangeBuilder提供了fanout、direct、topic、header交换机类型的配置
      * @return the exchange
      */
    @Bean(EXCHANGE_TOPICS_INFORM)
    public Exchange EXCHANGE_TOPICS_INFORM() {
      //durable(true)持久化,消息队列重启后交换机仍然存在
        return ExchangeBuilder.topicExchange(EXCHANGE_TOPICS_INFORM).durable(true).build();
    }
    //声明队列
    @Bean(QUEUE_INFORM_SMS)
    public Queue QUEUE_INFORM_SMS() {
        Map<String, Object> args = new HashMap<>();
        // 设置消息队列的大小
//        args.put("x-max-length", 10);
        // 设置队列中消息的过期时间,单位毫秒
//        args.put("x-message-ttl", 60000);
        // 设置死信交换机
        args.put("x-dead-letter-exchange", "dead.letter.exchange");
        // 设置死信交换机绑定队列的routingKey
        args.put("x-dead-letter-routing-key", "dead.letter");
        Queue queue = new Queue(QUEUE_INFORM_SMS, true, false, false, args);
        return queue;
    }
    //声明队列
//    @Bean(QUEUE_INFORM_EMAIL)
//    public Queue QUEUE_INFORM_EMAIL() {
//        Map<String, Object> args = new HashMap<>();
//        // 设置消息队列的大小
////        args.put("x-max-length", 10);
//        // 设置队列中消息的过期时间,单位毫秒
////        args.put("x-message-ttl", 60000);
//        // 设置死信交换机
//        args.put("x-dead-letter-exchange", "dead.letter.exchange");
//        // 设置死信交换机绑定队列的routingKey
//        args.put("x-dead-letter-routing-key", "dead.letter");
//        Queue queue = new Queue(QUEUE_INFORM_EMAIL, true, false, false, args);
//        return queue;
//    }

    /** channel.queueBind(INFORM_QUEUE_SMS,"inform_exchange_topic","inform.#.sms.#");
      * 绑定队列到交换机 .
      *
      * @param queue    the queue
      * @param exchange the exchange
      * @return the binding
      */
    @Bean
    public Binding BINDING_QUEUE_INFORM_SMS(@Qualifier(QUEUE_INFORM_SMS) Queue queue,
                                            @Qualifier(EXCHANGE_TOPICS_INFORM) Exchange exchange) {
        return BindingBuilder.bind(queue).to(exchange).with("inform.#.sms.#").noargs();
    }
//    @Bean
//    public Binding BINDING_QUEUE_INFORM_EMAIL(@Qualifier(QUEUE_INFORM_EMAIL) Queue queue,
//                                              @Qualifier(EXCHANGE_TOPICS_INFORM) Exchange exchange) {
//        return BindingBuilder.bind(queue).to(exchange).with("inform.#.email.#").noargs();
//    }

}
先启动消费者
@Component
public class ReceiveHandler {
    @RabbitListener(queues = "dead.letter.queue")
    public void receive(String msg,Message message,Channel channel) {
        try {
            // 确认收到消息
            channel.basicAck(message.getMessageProperties().getDeliveryTag(),false);
            System.out.println("消费者确认收到消息:" + msg);
        } catch (Exception e) {
            try {
                // 拒绝消息
                channel.basicNack(message.getMessageProperties().getDeliveryTag(), false, false);
                System.out.println("消费者拒绝消息:" + msg);
            } catch (IOException ioException) {
                ioException.printStackTrace();
            }
        }
    }
}
后发送消息
Send Message is:'hello world'
Send Message is:'hello,rabbitmq'
消息已经发送到交换机!
消息已经发送到交换机!

消费者消费消息结果如下:
消费者确认收到消息:hello world
消费者确认收到消息:hello,rabbitmq
可以看到,我们简单实现的延时队列虽然可用,但还是存在问题的。使用 RabbitMQ 延时消息插件,就不存在这些问题了,可用性更高!
八、RabbitMQ 延时消息插件
RabbitMQ 默认是没有内置延时消息插件的,需要我们单独下载安装。下载地址入口:https://www.rabbitmq.com/community-plugins.html

点击Release
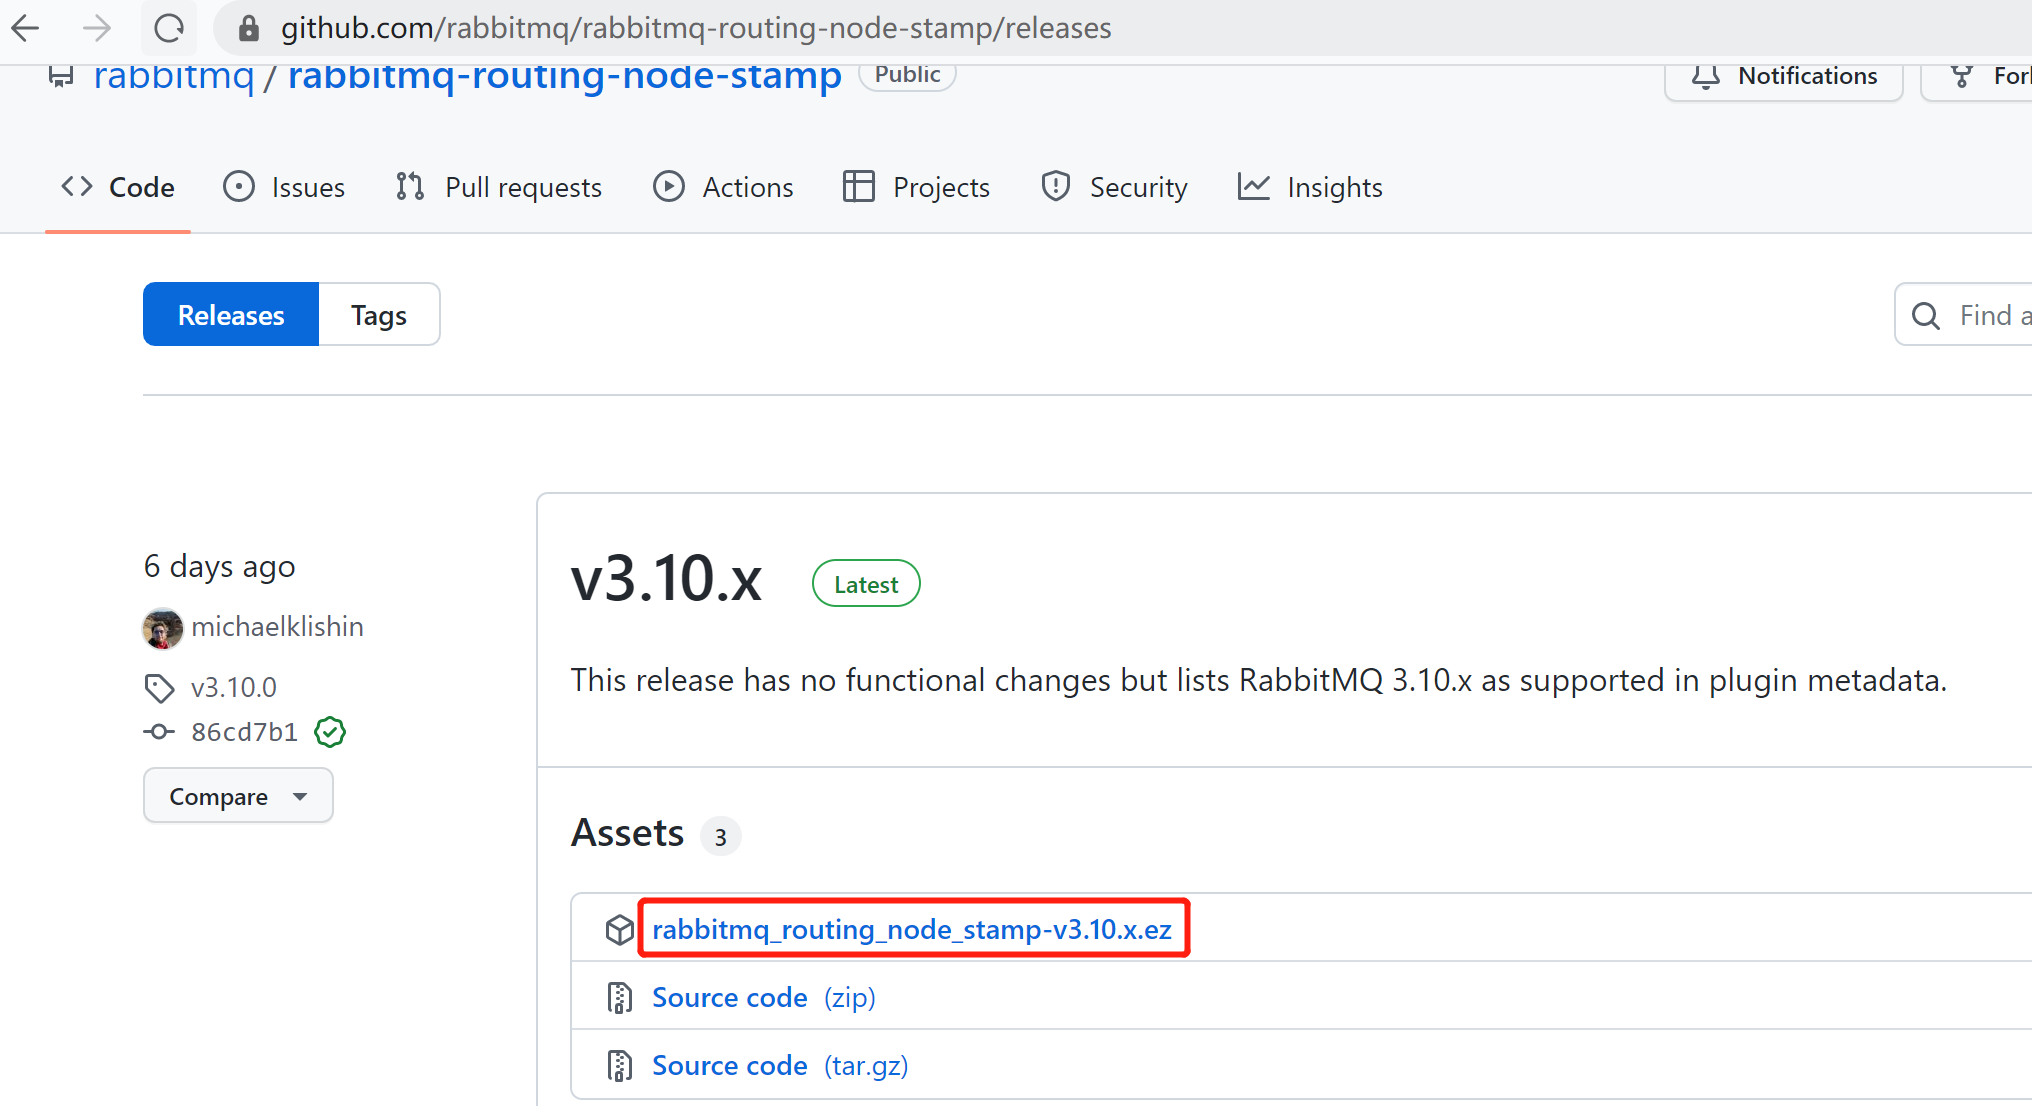
下载后的文件如下:

将下载好的插件放到 RabbitMQ 安装目录下的plugins目录,然后进入sbin目录,我安装的 Windows 版的 RabbitMQ,执行rabbitmq-plugins.bat enable rabbitmq_delayed_message_exchange命令来安装插件:
感谢您的阅读,如果您觉得阅读本文对您有帮助,请点一下“推荐”按钮。本文欢迎各位转载,但是转载文章之后必须在文章页面中给出作者和原文连接。


【推荐】国内首个AI IDE,深度理解中文开发场景,立即下载体验Trae
【推荐】编程新体验,更懂你的AI,立即体验豆包MarsCode编程助手
【推荐】抖音旗下AI助手豆包,你的智能百科全书,全免费不限次数
【推荐】轻量又高性能的 SSH 工具 IShell:AI 加持,快人一步
· Manus重磅发布:全球首款通用AI代理技术深度解析与实战指南
· 被坑几百块钱后,我竟然真的恢复了删除的微信聊天记录!
· 没有Manus邀请码?试试免邀请码的MGX或者开源的OpenManus吧
· 【自荐】一款简洁、开源的在线白板工具 Drawnix
· 园子的第一款AI主题卫衣上架——"HELLO! HOW CAN I ASSIST YOU TODAY
2021-03-26 uni-app:uCharts的使用步骤