一、雪花算法简介
我们采用的是开源的 twitter( 非官方中文惯称:推特.是国外的一个网站,是一个社交网络及微博客服务) 的 snowflake 算法。

1byte = 8bit
char 占用2字节, 16bit
int 占用4字节, 32bit
long 占用8字节, 64bit
double 占用8字节, 64bit
long类型,内存占8个字节,取值范围为-2的63次方~2的63次方-1 ,即从-9,223,372,036,854,775,808到 9,223,372,036,854,775,807之间的整数都可,即长度为19位。
二、工具类1
package util;

import java.lang.management.ManagementFactory;
import java.net.InetAddress;
import java.net.NetworkInterface;

/**
 * <p>名称:IdWorker.java</p>
 * <p>描述:分布式自增长ID</p>
 * <pre>
 *     Twitter的 Snowflake JAVA实现方案
 * </pre>
 * 核心代码为其IdWorker这个类实现,其原理结构如下,我分别用一个0表示一位,用—分割开部分的作用:
 * 1||0---0000000000 0000000000 0000000000 0000000000 0 --- 00000 ---00000 ---000000000000
 * 在上面的字符串中,第一位为未使用(实际上也可作为long的符号位),接下来的41位为毫秒级时间,
 * 然后5位datacenter标识位,5位机器ID(并不算标识符,实际是为线程标识),
 * 然后12位该毫秒内的当前毫秒内的计数,加起来刚好64位,为一个Long型。
 * 这样的好处是,整体上按照时间自增排序,并且整个分布式系统内不会产生ID碰撞(由datacenter和机器ID作区分),
 * 并且效率较高,经测试,snowflake每秒能够产生26万ID左右,完全满足需要。
 * <p>
 * 64位ID (42(毫秒)+5(机器ID)+5(业务编码)+12(重复累加))
 *
 * @author Polim
 */
public class IdWorker {
    // 时间起始标记点,作为基准,一般取系统的最近时间(一旦确定不能变动)
    private final static long twepoch = 1288834974657L;
    // 机器标识位数
    private final static long workerIdBits = 5L;
    // 数据中心标识位数
    private final static long datacenterIdBits = 5L;
    // 机器ID最大值
    private final static long maxWorkerId = -1L ^ (-1L << workerIdBits);
    // 数据中心ID最大值
    private final static long maxDatacenterId = -1L ^ (-1L << datacenterIdBits);
    // 毫秒内自增位
    private final static long sequenceBits = 12L;
    // 机器ID偏左移12位
    private final static long workerIdShift = sequenceBits;
    // 数据中心ID左移17位
    private final static long datacenterIdShift = sequenceBits + workerIdBits;
    // 时间毫秒左移22位
    private final static long timestampLeftShift = sequenceBits + workerIdBits + datacenterIdBits;

    private final static long sequenceMask = -1L ^ (-1L << sequenceBits);
    /* 上次生产id时间戳 */
    private static long lastTimestamp = -1L;
    // 0,并发控制
    private long sequence = 0L;

    private final long workerId;
    // 数据标识id部分
    private final long datacenterId;

    public IdWorker(){
        this.datacenterId = getDatacenterId(maxDatacenterId);
        this.workerId = getMaxWorkerId(datacenterId, maxWorkerId);
    }
    /**
     * @param workerId
     *            工作机器ID
     * @param datacenterId
     *            序列号
     */
    public IdWorker(long workerId, long datacenterId) {
        if (workerId > maxWorkerId || workerId < 0) {
            throw new IllegalArgumentException(String.format("worker Id can't be greater than %d or less than 0", maxWorkerId));
        }
        if (datacenterId > maxDatacenterId || datacenterId < 0) {
            throw new IllegalArgumentException(String.format("datacenter Id can't be greater than %d or less than 0", maxDatacenterId));
        }
        this.workerId = workerId;
        this.datacenterId = datacenterId;
    }
    /**
     * 获取下一个ID
     *
     * @return
     */
    public synchronized long nextId() {
        long timestamp = timeGen();
        if (timestamp < lastTimestamp) {
            throw new RuntimeException(String.format("Clock moved backwards.  Refusing to generate id for %d milliseconds", lastTimestamp - timestamp));
        }

        if (lastTimestamp == timestamp) {
            // 当前毫秒内,则+1
            sequence = (sequence + 1) & sequenceMask;
            if (sequence == 0) {
                // 当前毫秒内计数满了,则等待下一秒
                timestamp = tilNextMillis(lastTimestamp);
            }
        } else {
            sequence = 0L;
        }
        lastTimestamp = timestamp;
        // ID偏移组合生成最终的ID,并返回ID
        long nextId = ((timestamp - twepoch) << timestampLeftShift)
                | (datacenterId << datacenterIdShift)
                | (workerId << workerIdShift) | sequence;

        return nextId;
    }

    private long tilNextMillis(final long lastTimestamp) {
        long timestamp = this.timeGen();
        while (timestamp <= lastTimestamp) {
            timestamp = this.timeGen();
        }
        return timestamp;
    }

    private long timeGen() {
        return System.currentTimeMillis();
    }

    /**
     * <p>
     * 获取 maxWorkerId
     * </p>
     */
    protected static long getMaxWorkerId(long datacenterId, long maxWorkerId) {
        StringBuffer mpid = new StringBuffer();
        mpid.append(datacenterId);
        String name = ManagementFactory.getRuntimeMXBean().getName();
        if (!name.isEmpty()) {
         /*
          * GET jvmPid
          */
            mpid.append(name.split("@")[0]);
        }
      /*
       * MAC + PID 的 hashcode 获取16个低位
       */
        return (mpid.toString().hashCode() & 0xffff) % (maxWorkerId + 1);
    }

    /**
     * <p>
     * 数据标识id部分
     * </p>
     */
    protected static long getDatacenterId(long maxDatacenterId) {
        long id = 0L;
        try {
            InetAddress ip = InetAddress.getLocalHost();
            NetworkInterface network = NetworkInterface.getByInetAddress(ip);
            if (network == null) {
                id = 1L;
            } else {
                byte[] mac = network.getHardwareAddress();
                id = ((0x000000FF & (long) mac[mac.length - 1])
                        | (0x0000FF00 & (((long) mac[mac.length - 2]) << 8))) >> 6;
                id = id % (maxDatacenterId + 1);
            }
        } catch (Exception e) {
            System.out.println(" getDatacenterId: " + e.getMessage());
        }
        return id;
    }


}
使用:
1、创建bean对象
<bean id="idWorker" class="util.IdWorker">
2、注入bean对象
@Autowired
private IdWorker idWorker;
3、生成ID
long orderId = idWorker.nextId();
tborder.setOrderId(orderId);//订单 ID
三、工具类2:
package com.ljxx.common.util;

import java.security.NoSuchAlgorithmException;
import java.security.SecureRandom;

/**
 * 生成主键id
 */
public class SnowflakeManager {
    private static final long EPOCH_STAMP = 1262275200000L;
    private static final long SEQUENCE_BIT = 12L;
    private static final long MACHINE_BIT = 5L;
    private static final long DATA_CENTER_BIT = 5L;
    private static final long MAX_SEQUENCE_NUM = -1L ^ (-1L << SEQUENCE_BIT);
    private static final long MACHINE_LEFT = SEQUENCE_BIT;
    private static final long DATA_CENTER_LEFT = SEQUENCE_BIT + MACHINE_BIT;
    private static final long TIMESTAMP_LEFT = SEQUENCE_BIT + MACHINE_BIT + DATA_CENTER_BIT;
    private static final long MACHINE_ID = 1l;
    private static final long DATACENTER_ID = 1l;
    private static long sequence = 0L;
    private static long lastTimestamp = -1L;

    //异步获取下一个值
    private static synchronized long getNextValue(Long machineId, long dataCenterId) {
        try {
            String os = System.getProperty("os.name");
            SecureRandom secureRandom;
            if (os.toLowerCase().startsWith("win")) {
                // windows机器用
                secureRandom = SecureRandom.getInstanceStrong();
            } else {
                // linux机器用
                secureRandom = SecureRandom.getInstance("NativePRNGNonBlocking");
            }
            long currentTimeMillis = currentTimeMillis();
            //获取当前时间戳,如果当前时间戳小于上次时间戳,则时间戳获取出现异常
            if (currentTimeMillis < lastTimestamp) {
                throw new RuntimeException(String.format("Clock moved backwards. Refusing to generate id for %d milliseconds", (lastTimestamp - currentTimeMillis)));
            }
            //如果等于上次时间戳(同一毫秒内),则在序列号加一;否则序列号赋值为0,从0开始
            if (currentTimeMillis == lastTimestamp) {
                sequence = (sequence + 1) & MAX_SEQUENCE_NUM;
                if (sequence == 0) {
                    sequence = secureRandom.nextInt(Long.valueOf(SEQUENCE_BIT).intValue());
                    currentTimeMillis = tilNextMillis(lastTimestamp);
                }
            } else {
                sequence = secureRandom.nextInt(Long.valueOf(SEQUENCE_BIT).intValue());
            }
            lastTimestamp = currentTimeMillis;
            long nextId = ((currentTimeMillis - EPOCH_STAMP) << TIMESTAMP_LEFT)
                    | (dataCenterId << DATA_CENTER_LEFT)
                    | (machineId << MACHINE_LEFT)
                    | sequence;

            return nextId;
        } catch (NoSuchAlgorithmException e) {
            e.printStackTrace();
        }
        return -1;
    }

    //获取时间戳,并与上次时间戳比较
    private static long tilNextMillis(long lastTimestamp) {
        long currentTimeMillis = currentTimeMillis();
        while (currentTimeMillis <= lastTimestamp) {
            currentTimeMillis = currentTimeMillis();
        }
        return currentTimeMillis;
    }

    //获取系统时间戳
    private static long currentTimeMillis() {
        return System.currentTimeMillis();
    }

    public static synchronized long nextValue() {
        try {
            return getNextValue(MACHINE_ID, DATACENTER_ID);
        } catch (Exception e) {
            e.printStackTrace();
        }
        return 0l;
    }

    public static synchronized long nextValue(long machineId) {
        return getNextValue(machineId, DATACENTER_ID);
    }

    public static synchronized long nextValue(long machineId, long dataCenterId) {
        return getNextValue(machineId, dataCenterId);
    }

    public static synchronized long get() {
        return nextValue();
    }
}
使用:
long accessId = SnowflakeManager.nextValue();
四、xml文件中使用雪花算法
<insert id="batchDeal" parameterType="com.xxxx.VO.CodeReigstration">
    insert into table (id, code_prefix, goods_code, entity_id,upload_time)
    values
    <foreach collection="list" separator="," item="item">
      (
      ${@com.ljxx.common.util.SnowflakeManager@nextValue()},
      #{item.codePrefix,jdbcType=VARCHAR},
      #{item.goodsCode,jdbcType=VARCHAR},
      #{entityId},
      now()
      )
    </foreach>
    ON DUPLICATE KEY UPDATE `goods_code` = VALUES(`goods_code`)
  </insert>
五、xml文件中使用雪花算法
在mysql中设计表的时候,mysql官方推荐不要使用uuid或者不连续不重复的雪花id(long形且唯一),而是推荐连续自增的主键id,官方的推荐是auto_increment,那么为什么不建议采用uuid,使用uuid究竟有什么坏处?
要说明这个问题,我们首先来建立三张表,分别是user_auto_key,user_uuid,user_random_key,分别表示自动增长的主键,uuid作为主键,随机key作为主键,其它我们完全保持不变.根据控制变量法,我们只把每个表的主键使用不同的策略生成,而其他的字段完全一样,然后测试一下表的插入速度和查询速度:
注:这里的随机key其实是指用雪花算法算出来的前后不红唇苦连续不重复无规律的id:一串18位长度的long值
id自动生成表:
create table user_key_auto(
id int UNSIGNED not null auto_increment,
user_id BIGINT(64) not null DEFAULT 0,
user_name VARCHAR(64) not null DEFAULT '',
sex int not null,
address VARCHAR(255) not null DEFAULT '',
city VARCHAR(64) not null DEFAULT '',
email VARCHAR(64) not null DEFAULT '',
state int not null DEFAULT 0,
primary key(id),
key user_name_key(user_name)
)engine=INNODB
用户uuid表
create table user_uuid(
id VARCHAR(36) not null,
user_id BIGINT(64) not null DEFAULT 0,
user_name VARCHAR(64) not null DEFAULT '',
sex int not null,
address VARCHAR(255) not null DEFAULT '',
city VARCHAR(64) not null DEFAULT '',
email VARCHAR(64) not null DEFAULT '',
state int not null DEFAULT 0,
primary key(id),
key user_name_key(user_name)
)engine=INNODB
随机主键表:
create table user_random_key(
id BIGINT(64) not null DEFAULT 0,
user_id BIGINT(64) not null DEFAULT 0,
user_name VARCHAR(64) not null DEFAULT '',
sex int not null,
address VARCHAR(255) not null DEFAULT '',
city VARCHAR(64) not null DEFAULT '',
email VARCHAR(64) not null DEFAULT '',
state int not null DEFAULT 0,
primary key(id),
key user_name_key(user_name)
)engine=INNODB
使用spring的jdbcTemplate来实现增查测试:
技术框架:springboot+jdbcTemplate+junit+hutool,程序的原理就是连接自己的测试数据库,然后在相同的环境下写入同等数量的数据,来分析一下insert插入的时间来进行综合其效率,为了做到最真实的效果,所有的数据采用随机生成,比如名字、邮箱、地址都是随机生成。
package com.wyq.mysqldemo;
import cn.hutool.core.collection.CollectionUtil;
import com.wyq.mysqldemo.databaseobject.UserKeyAuto;
import com.wyq.mysqldemo.databaseobject.UserKeyRandom;
import com.wyq.mysqldemo.databaseobject.UserKeyUUID;
import com.wyq.mysqldemo.diffkeytest.AutoKeyTableService;
import com.wyq.mysqldemo.diffkeytest.RandomKeyTableService;
import com.wyq.mysqldemo.diffkeytest.UUIDKeyTableService;
import com.wyq.mysqldemo.util.JdbcTemplateService;
import org.junit.jupiter.api.Test;
import org.springframework.beans.factory.annotation.Autowired;
import org.springframework.boot.test.context.SpringBootTest;
import org.springframework.util.StopWatch;
import java.util.List;
@SpringBootTest
class MysqlDemoApplicationTests {

    @Autowired
    private JdbcTemplateService jdbcTemplateService;

    @Autowired
    private AutoKeyTableService autoKeyTableService;

    @Autowired
    private UUIDKeyTableService uuidKeyTableService;

    @Autowired
    private RandomKeyTableService randomKeyTableService;

    @Test
    void testDBTime() {

        StopWatch stopwatch = new StopWatch("执行sql时间消耗");

        /**
         * auto_increment key任务
         */
        final String insertSql = "INSERT INTO user_key_auto(user_id,user_name,sex,address,city,email,state) VALUES(?,?,?,?,?,?,?)";

        List<UserKeyAuto> insertData = autoKeyTableService.getInsertData();
        stopwatch.start("自动生成key表任务开始");
        long start1 = System.currentTimeMillis();
        if (CollectionUtil.isNotEmpty(insertData)) {
            boolean insertResult = jdbcTemplateService.insert(insertSql, insertData, false);
            System.out.println(insertResult);
        }
        long end1 = System.currentTimeMillis();
        System.out.println("auto key消耗的时间:" + (end1 - start1));

        stopwatch.stop();

        /**
         * uudID的key
         */
        final String insertSql2 = "INSERT INTO user_uuid(id,user_id,user_name,sex,address,city,email,state) VALUES(?,?,?,?,?,?,?,?)";

        List<UserKeyUUID> insertData2 = uuidKeyTableService.getInsertData();
        stopwatch.start("UUID的key表任务开始");
        long begin = System.currentTimeMillis();
        if (CollectionUtil.isNotEmpty(insertData)) {
            boolean insertResult = jdbcTemplateService.insert(insertSql2, insertData2, true);
            System.out.println(insertResult);
        }
        long over = System.currentTimeMillis();
        System.out.println("UUID key消耗的时间:" + (over - begin));

        stopwatch.stop();

        /**
         * 随机的long值key
         */
        final String insertSql3 = "INSERT INTO user_random_key(id,user_id,user_name,sex,address,city,email,state) VALUES(?,?,?,?,?,?,?,?)";
        List<UserKeyRandom> insertData3 = randomKeyTableService.getInsertData();
        stopwatch.start("随机的long值key表任务开始");
        Long start = System.currentTimeMillis();
        if (CollectionUtil.isNotEmpty(insertData)) {
            boolean insertResult = jdbcTemplateService.insert(insertSql3, insertData3, true);
            System.out.println(insertResult);
        }
        Long end = System.currentTimeMillis();
        System.out.println("随机key任务消耗时间:" + (end - start));
        stopwatch.stop();

        String result = stopwatch.prettyPrint();
        System.out.println(result);
    }
程序写入结果:
user_key_auto写入结果:

user_uuid表写入结果:

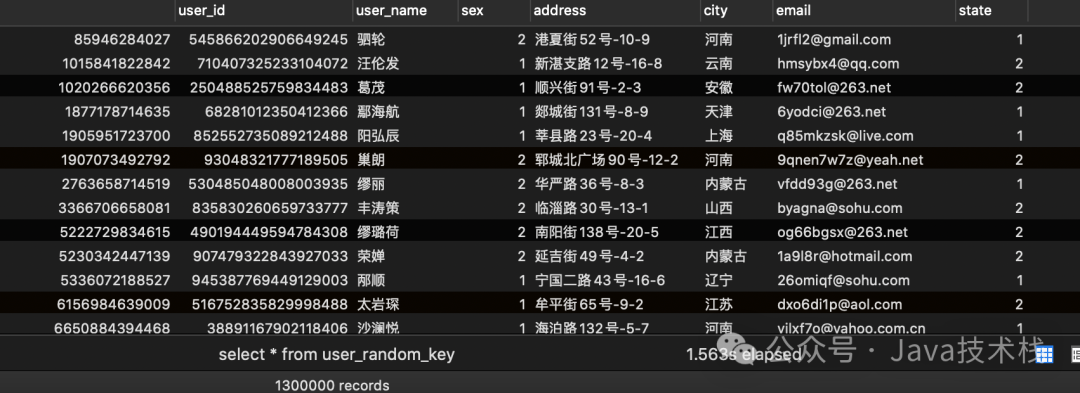
user_random_key写入结果:

效率测试结果

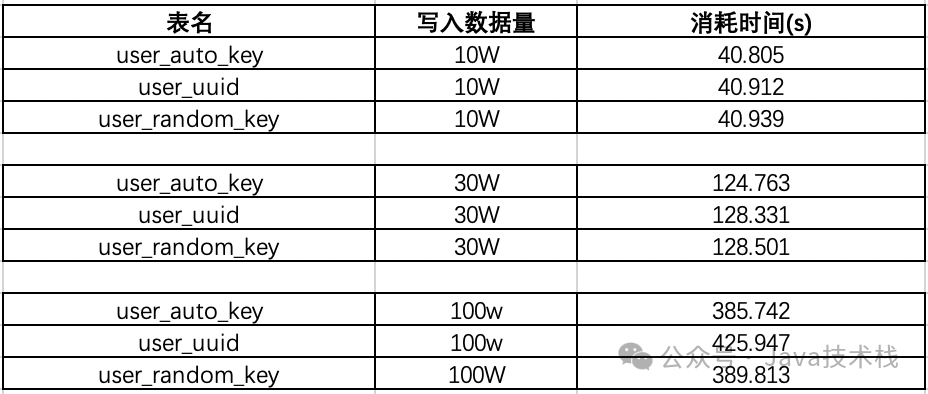
在已有数据量为130W的时候:我们再来测试一下插入10w数据,看看会有什么结果:

可以看出在数据量100W左右的时候,uuid的插入效率垫底,并且在后序增加了130W的数据,uudi的时间又直线下降。时间占用量总体可以打出的效率排名为:
auto_key>random_key>uuid
uuid的效率最低,在数据量较大的情况下,效率直线下滑。
那么为什么会出现这样的现象呢?带着疑问,我们来探讨一下这个问题:
使用uuid和自增id的索引结构对比
1、使用自增id的内部结构

自增的主键的值是顺序的,所以Innodb把每一条记录都存储在一条记录的后面。当达到页面的最大填充因子时候(innodb默认的最大填充因子是页大小的15/16,会留出1/16的空间留作以后的 修改):
①下一条记录就会写入新的页中,一旦数据按照这种顺序的方式加载,主键页就会近乎于顺序的记录填满,提升了页面的最大填充率,不会有页的浪费
②新插入的行一定会在原有的最大数据行下一行,mysql定位和寻址很快,不会为计算新行的位置而做出额外的消耗
③减少了页分裂和碎片的产生
2、使用uuid的索引内部结构

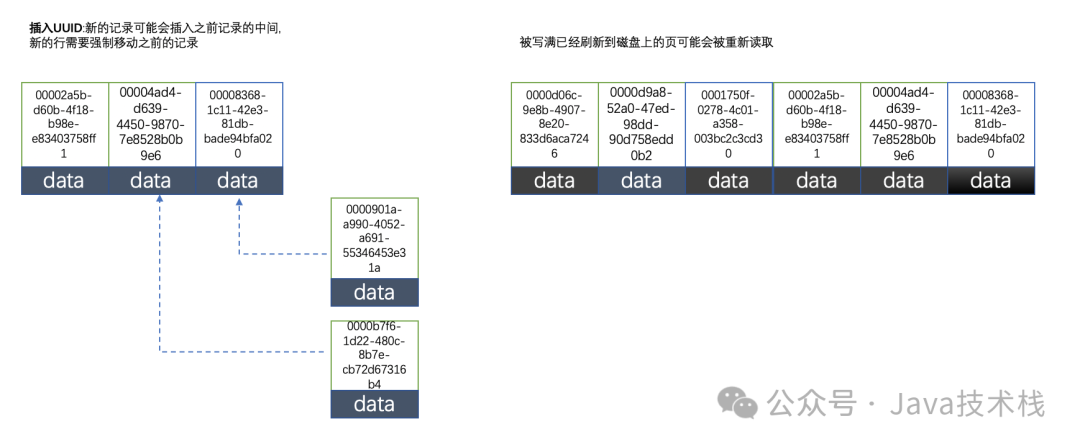
因为uuid相对顺序的自增id来说是毫无规律可言的,新行的值不一定要比之前的主键的值要大,所以innodb无法做到总是把新行插入到索引的最后,而是需要为新行寻找新的合适的位置从而来分配新的空间。这个过程需要做很多额外的操作,数据的毫无顺序会导致数据分布散乱,将会导致以下的问题:
①:写入的目标页很可能已经刷新到磁盘上并且从缓存上移除,或者还没有被加载到缓存中,innodb在插入之前不得不先找到并从磁盘读取目标页到内存中,这将导致大量的随机IO
②:因为写入是乱序的,innodb不得不频繁的做页分裂操作,以便为新的行分配空间,页分裂导致移动大量的数据,一次插入最少需要修改三个页以上
③:由于频繁的页分裂,页会变得稀疏并被不规则的填充,最终会导致数据会有碎片
在把随机值(uuid和雪花id)载入到聚簇索引(innodb默认的索引类型)以后,有时候会需要做一次OPTIMEIZE TABLE来重建表并优化页的填充,这将又需要一定的时间消耗。
结论:使用innodb应该尽可能的按主键的自增顺序插入,并且尽可能使用单调的增加的聚簇键的值来插入新行。
3、使用自增id的缺点
那么使用自增的id就完全没有坏处了吗?并不是,自增id也会存在以下几点问题:
①:别人一旦爬取你的数据库,就可以根据数据库的自增id获取到你的业务增长信息,很容易分析出你的经营情况
②:对于高并发的负载,innodb在按主键进行插入的时候会造成明显的锁争用,主键的上界会成为争抢的热点,因为所有的插入都发生在这里,并发插入会导致间隙锁竞争
③:Auto_Increment锁机制会造成自增锁的抢夺,有一定的性能损失
附:Auto_increment的锁争抢问题,如果要改善需要调优innodb_autoinc_lock_mode的配置
总结
本篇博客首先从开篇的提出问题,建表到使用jdbcTemplate去测试不同id的生成策略在大数据量的数据插入表现,然后分析了id的机制不同在mysql的索引结构以及优缺点,深入的解释了为何uuid和随机不重复id在数据插入中的性能损耗,详细的解释了这个问题。
在实际的开发中,还是根据mysql的官方推荐最好使用自增id,mysql博大精深,内部还有很多值得优化的点需要我们学习。


