一、多线程
1、多线程的创建
创建线程方式一:继承Thread类
public class Demo1CreateThread extends Thread {
    public static void main(String[] args) throws InterruptedException {
        System.out.println("-----多线程创建开始-----");
        // 1.创建一个线程
        CreateThread createThread1 = new CreateThread();
        CreateThread createThread2 = new CreateThread();
        // 2.开始执行线程 注意 开启线程不是调用run方法,而是start方法
        System.out.println("-----多线程创建启动-----");
        createThread1.start();
        createThread2.start();
        System.out.println("-----多线程创建结束-----");
    }
    static class CreateThread extends Thread {
        public void run() {
            String name = Thread.currentThread().getName();
            for (int i = 0; i < 5; i++) {
                System.out.println(name + "打印内容是:" + i);
            }
        }
    }
}
创建线程方式二:实现Runnable接口
public class Demo2CreateRunnable {
    public static void main(String[] args) {
        System.out.println("-----多线程创建开始-----");
        Thread thread1 = new Thread(createRunnable);
        Thread thread2 = new Thread(createRunnable);
        // 2.开始执行线程 注意 开启线程不是调用run方法,而是start方法
        System.out.println("-----多线程创建启动-----");
        thread1.start();
        thread2.start();
        System.out.println("-----多线程创建结束-----");
    }
    static class CreateRunnable implements Runnable {
        public void run() {
            String name = Thread.currentThread().getName();
            for (int i = 0; i < 5; i++) {
                System.out.println(name + "的内容:" + i);
            }
        }
    }
}
创建线程方式三:实现Callable接口
public class FutureCook {

    public static void main(String[] args) throws InterruptedException, ExecutionException {
        long startTime = System.currentTimeMillis();
        // 第一步 网购厨具
        Callable<Chuju> onlineShopping = new Callable<Chuju>() {

            @Override
            public Chuju call() throws Exception {
                System.out.println("第一步:下单");
                System.out.println("第一步:等待送货");
                Thread.sleep(5000);  // 模拟送货时间
                System.out.println("第一步:快递送到");
                return new Chuju();
            }

        };
        FutureTask<Chuju> task = new FutureTask<Chuju>(onlineShopping);
        new Thread(task).start();
        // 第二步 去超市购买食材
        Thread.sleep(2000);  // 模拟购买食材时间
        Shicai shicai = new Shicai();
        System.out.println("第二步:食材到位");
        // 第三步 用厨具烹饪食材
        if (!task.isDone()) {  // 联系快递员,询问是否到货
            System.out.println("第三步:厨具还没到,心情好就等着(心情不好就调用cancel方法取消订单)");
        }
        Chuju chuju = task.get();
        System.out.println("第三步:厨具到位,开始展现厨艺");
        cook(chuju, shicai);

        System.out.println("总共用时" + (System.currentTimeMillis() - startTime) + "ms");
    }

    //  用厨具烹饪食材
    static void cook(Chuju chuju, Shicai shicai) {}

    // 厨具类
    static class Chuju {}

    // 食材类
    static class Shicai {}

}
实现Runnable和实现Callable接口的方式基本相同,不过是后者执行call()方法有返回值,前者线程执行体run()方法无返回值,因此可以把这两种方式归为一种这种方式,与继承Thread类的方法之间的差别如下:
1、线程只是实现Runnable或实现Callable接口,还可以继承其他类。
2、这种方式下,多个线程可以共享一个target对象,非常适合多线程处理同一份资源的情形。
3、但是编程稍微复杂,如果需要访问当前线程,必须调用Thread.currentThread()方法。
4、继承Thread类的线程类不能再继承其他父类(Java单继承决定)。
注:一般推荐采用实现接口的方式来创建多线程.
2、线程同步
当我们使用多个线程访问同一资源的时候,且多个线程中对资源有写的操作,就容易出现线程安全问题。 要解决上述多线程并发访问一个资源的安全问题,Java中提供了同步机制(synchronized)来解决。
1、同步代码块
Object lock = new Object(); //创建锁
synchronized(lock){
    //可能会产生线程安全问题的代码
}
2、同步方法
//同步方法
public synchronized void method(){
    //可能会产生线程安全问题的代码
}
非静态同步方法使用的是 this锁
静态同步方法使用的是当前方法所在类的字节码对象。
3、Lock锁
Lock lock = new ReentrantLock();
lock.lock();
//需要同步操作的代码
lock.unlock();
New→Runnble→Blocked→waiting→timeWaiting→terminated
二、J.U.C线程池
线程是一个程序员一定会涉及到的概念,但是线程的创建和切换都是代价比较大的。所以,我们需要有一个好的方案能做到线程的复用,这就涉及到一个概念——线程池。合理的使用线程池能够带来3个很明显的好处:
1. 降低资源消耗:通过重用已经创建的线程来降低线程创建和销毁的消耗
2. 提高响应速度:任务到达时不需要等待线程创建就可以立即执行。
3. 提高线程的可管理性:线程池可以统一管理、分配、调优和监控。
java的线程池支持主要通过ThreadPoolExecutor来实现,我们使用的ExecutorService的各种线程池策略都是基于ThreadPoolExecutor实现的,所以ThreadPoolExecutor十分重要。要弄明白各种线程池策略,必须先弄明白ThreadPoolExecutor。
《阿里巴巴开发手册》中:
【强制】线程资源必须通过线程池提供,不允许在应用中自行显式创建线程。
说明:使用线程池的好处是减少在创建和销毁线程上所花的时间以及系统资源的开销,解决资源不足的问题。如果不使用线程池,有可能造成系统创建大量同类线程而导致消耗完内存或者“过度切换”的问题。
1、线程池状态
private final AtomicInteger ctl = new AtomicInteger(ctlOf(RUNNING, 0));
private static final int COUNT_BITS = Integer.SIZE - 3;
private static final int CAPACITY = (1 << COUNT_BITS) - 1;
// runState is stored in the high-order bits
private static final int RUNNING = -1 << COUNT_BITS;//对应的高3位值是111
private static final int SHUTDOWN = 0 << COUNT_BITS;//对应的高3位值是000
private static final int STOP = 1 << COUNT_BITS;//对应的高3位值是001
private static final int TIDYING = 2 << COUNT_BITS;//对应的高3位值是010
private static final int TERMINATED = 3 << COUNT_BITS;//对应的高3位值是011
// Packing and unpacking ctl
private static int runStateOf(int c) { return c & ~CAPACITY; }
private static int workerCountOf(int c) { return c & CAPACITY; }
private static int ctlOf(int rs, int wc) { return rs | wc; }
变量ctl定义为AtomicInteger ,记录了“线程池中的任务数量”和“线程池的状态”两个信息。共32位,其中高3位表示”线程池状态”,低29位表示”线程池中的任务数量”。
1、RUNNING:处于RUNNING状态的线程池能够接受新任务,以及对新添加的任务进行处理。
2、SHUTDOWN:处于SHUTDOWN状态的线程池不可以接受新任务,但是可以对已添加的任务进行处理。
3、STOP:处于STOP状态的线程池不接收新任务,不处理已添加的任务,并且会中断正在处理的任务。
4、TIDYING:当所有的任务已终止,ctl记录的”任务数量”为0,线程池会变为TIDYING状态。当线程池变为TIDYING状态时,会执行钩子函数terminated()。terminated()在ThreadPoolExecutor类中是空的,若用户想在线程池变为TIDYING时,进行相应的处理;可以通过重载terminated()函数来实现。
5、TERMINATED:线程池彻底终止的状态。
各个状态的转换如下:

2、创建线程池
(1)、创建线程池方式一:使用ThreadPoolExecutor创建线程池
我现在分析线程池参数最全的构造方法,了解其内部的参数意义
public ThreadPoolExecutor(int corePoolSize, int maximumPoolSize, long keepAliveTime, TimeUnit unit, BlockingQueue<Runnable> workQueue,
                ThreadFactory threadFactory, RejectedExecutionHandler handler) {
    if (corePoolSize < 0 || maximumPoolSize <= 0 || maximumPoolSize < corePoolSize || keepAliveTime < 0)
        throw new IllegalArgumentException();
    if (workQueue == null || threadFactory == null || handler == null)
        throw new NullPointerException();
    this.acc = System.getSecurityManager() == null ? null : AccessController.getContext();
    this.corePoolSize = corePoolSize;
    this.maximumPoolSize = maximumPoolSize;
    this.workQueue = workQueue;
    this.keepAliveTime = unit.toNanos(keepAliveTime);
    this.threadFactory = threadFactory;
    this.handler = handler;
}
1、corePoolSize
线程池中核心线程的数量(也称为线程池的基本大小)。当提交一个任务时,线程池会新建一个线程来执行任务,直到当前线程数等于corePoolSize。如果调用了线程池的prestartAllCoreThreads()方法,线程池会提前创建并启动所有基本线程。
2、maximumPoolSize
coolPoolSize和maximumPoolSize的关系:
首先corePoolSize肯定是 <= maximumPoolSize。
其他关系如下:
若当前线程池中线程数 < corePoolSize,则每来一个任务就创建一个线程去执行;
若当前线程池中线程数 >= corePoolSize,会尝试将任务添加到任务队列。如果添加成功,则任务会等待空闲线程将其取出并执行;
若队列已满,且当前线程池中线程数 < maximumPoolSize,创建新的线程;
若当前线程池中线程数 >= maximumPoolSize,则会采用拒绝策略(JDK提供了四种,下面会介绍到)。
注意:关系3是针对的有界队列(已设置任务队列的容量),无界队列永远都不会满,所以只有前2种关系。
3、keepAliveTime:当线程池线程数量超过corePoolSize时,多余的空闲线程会在多长时间内被销毁;
4、unit
5、workQueue 阻塞队列
ArrayBlockingQueue:基于数组结构的有界阻塞队列,FIFO。
LinkedBlockingQueue:基于链表结构的无界阻塞队列,FIFO。
PriorityBlockingQueue:具有优先级别的阻塞队列。
SynchronousQueue:不存储元素的阻塞队列,每个插入操作都必须等待一个移出操作。
参数workQueue是指提交但未执行的任务队列。若当前线程池中线程数>=corePoolSize时,就会尝试将任务添加到任务队列中。主要有以下几种:
SynchronousQueue:直接提交队列。SynchronousQueue没有容量,所以实际上提交的任务不会被添加到任务队列,总是将新任务提交给线程执行,如果没有空闲的线程,则尝试创建新的线程,如果线程数量已经达到最大值(maximumPoolSize),则执行拒绝策略。
LinkedBlockingQueue:无界的任务队列。当有新的任务来到时,若系统的线程数小于corePoolSize,线程池会创建新的线程执行任务;当系统的线程数量等于corePoolSize后,因为是无界的任务队列,总是能成功将任务添加到任务队列中,所以线程数量不再增加。若任务创建的速度远大于任务处理的速度,无界队列会快速增长,直到内存耗尽。
6、threadFactory
7、handler
RejectedExecutionHandler,线程池的拒绝策略(rejection-policy)。所谓拒绝策略,是指将任务添加到线程池中时,线程池拒绝该任务所采取的相应策略。当向线程池中提交任务时,如果此时线程池中的线程已经饱和了,而且阻塞队列也已经满了,则线程池会选择一种拒绝策略来处理该任务。
rejection-policy:当pool已经达到max size的时候,如何处理新任务。
线程池提供了四种拒绝策略:
AbortPolicy:直接抛出异常,阻止系统正常工作,默认策略;
CallerRunsPolicy:不在新线程中执行任务,而是用调用者所在的线程来执行任务;即调用主线程执行被拒绝的任务,这提供了一种简单的反馈控制机制,将降低新任务的提交速度。
DiscardOldestPolicy:丢弃阻塞队列中靠最前(即最早添加的)的任务,并执行当前任务;
DiscardPolicy:直接丢弃任务; 当然我们也可以实现自己的拒绝策略,例如记录日志等等,实现RejectedExecutionHandler接口即可。
@Configuration
@EnableAsync
public class TaskExecutePool {

    private int corePoolSize = 20;//线程池维护线程的最少数量

    private int maxPoolSize =20;//线程池维护线程的最大数量

    private int queueCapacity = 1000; //缓存队列

    private int keepAlive = 600;//允许的空闲时间


    @Bean
    public Executor myTaskAsyncPool() {
        ThreadPoolTaskExecutor executor = new ThreadPoolTaskExecutor();
        executor.setCorePoolSize(corePoolSize);
        executor.setMaxPoolSize(maxPoolSize);
        executor.setQueueCapacity(queueCapacity);
        executor.setKeepAliveSeconds(keepAlive);
        executor.setThreadNamePrefix("MyExecutor-");

        // rejection-policy:当pool已经达到max size的时候,如何处理新任务
        // CALLER_RUNS:不在新线程中执行任务,而是由调用者所在的线程来执行
        executor.setRejectedExecutionHandler(new ThreadPoolExecutor.CallerRunsPolicy());
        executor.initialize();
        return executor;
    }

}
《阿里巴巴开发手册》中:
【强制】线程池不允许使用 Executors 去创建,而是通过 ThreadPoolExecutor 的方式,这样的处理方式让写的同学更加明确线程池的运行规则,规避资源耗尽的风险。
说明: Executors 返回的线程池对象的弊端如下:
1) FixedThreadPool 和 SingleThreadPool :
允许的请求队列长度为 Integer.MAX_VALUE ,可能会堆积大量的请求,从而导致 OOM(outofMemery) 。
2) CachedThreadPool 和 ScheduledThreadPool :
允许的创建线程数量为 Integer.MAX_VALUE ,可能会创建大量的线程,从而导致 OOM 。
(2)、创建线程池方式二:通过工具类Executors来创建线程池(阿里禁止)
四种线程池:FixedThreadPool、SingleThreadExecutor、CachedThreadPool、ScheduledThreadPool
首先是静态方法newSingleThreadExecutor()、newFixedThreadPool(int nThreads)、newCachedThreadPool()。我们来看一下其源码实现:
public static ExecutorService newSingleThreadExecutor() {
        return new FinalizableDelegatedExecutorService
            (new ThreadPoolExecutor(1, 1,
                                    0L, TimeUnit.MILLISECONDS,
                                    new LinkedBlockingQueue<Runnable>()));
}

public static ExecutorService newFixedThreadPool(int nThreads) {
        return new ThreadPoolExecutor(nThreads, nThreads,
                                      0L, TimeUnit.MILLISECONDS,
                                      new LinkedBlockingQueue<Runnable>());
}

public static ExecutorService newCachedThreadPool() {
        return new ThreadPoolExecutor(0, Integer.MAX_VALUE,
                                      60L, TimeUnit.SECONDS,
                                      new SynchronousQueue<Runnable>());
}
通过查看源码我们知道上述三种静态方法的内部实现均使用了ThreadPoolExecutor类。难怪阿里爸爸会建议通过ThreadPoolExecutor的方式实现,原来Executors类的静态方法也是用的它,只不过帮我们配了一些参数而已。
FixedThreadPool (固定数量线程)
public static ExecutorService newFixedThreadPool(int nThreads) {
    return new ThreadPoolExecutor(nThreads, nThreads, 0L, TimeUnit.MILLISECONDS, new LinkedBlockingQueue<Runnable>());
}
LinkedBlockingQueue一共有三个构造器,分别是无参构造器、可以指定容量的构造器、可以传入一个容器的构造器。如果在创建实例的时候调用的是无参构造器,LinkedBlockingQueue的默认容量是Integer.MAX_VALUE,这样做很可能会导致队列还没有满,但是内存却已经满了的情况(内存溢出)。
public LinkedBlockingQueue();   //设置容量为Integer.MAX
public LinkedBlockingQueue(int capacity);  //设置指定容量
public LinkedBlockingQueue(Collection<? extends E> c);  //传入一个容器,如果调用该构造器,容量默认也是Integer.MAX_VALUE
创建线程池是指定LinkedBlockingQueue容量时如下:
public class ThreadDemo {
 public static void main(String[] args) {
  ExecutorService es = new ThreadPoolExecutor(1, 1, 0L, TimeUnit.MILLISECONDS,
    new LinkedBlockingQueue<Runnable>(10), Executors.defaultThreadFactory(),
    new ThreadPoolExecutor.DiscardPolicy());
 }
}
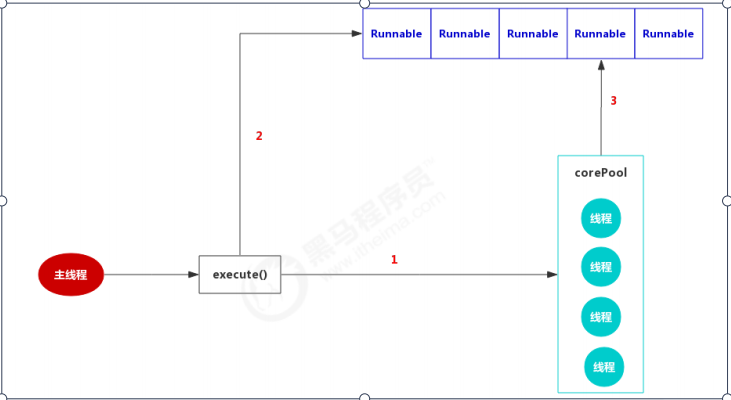
案例:三个线程执行5个任务
public class Demo9FixedThreadPoolCase {
    public static void main(String[] args) throws InterruptedException {
        ExecutorService exec = Executors.newFixedThreadPool(3);
        for (int i = 0; i < 5; i++) {
            exec.execute(new Demo());
            Thread.sleep(10);
        }
        exec.shutdown();
    }
    static class Demo implements Runnable {
        @Override
        public void run() {
            String name = Thread.currentThread().getName();
            for (int i = 0; i < 2; i++) {
                System.out.println(name + ":" + i);
            }
        }
    }
}
结果如下:
pool-1-thread-1:0
pool-1-thread-2:0
pool-1-thread-1:1
pool-1-thread-2:1
pool-1-thread-3:0
pool-1-thread-3:1
pool-1-thread-2:0
pool-1-thread-2:1
pool-1-thread-1:0
pool-1-thread-1:1
SingleThreadExecutor (单个线程)
public static ExecutorService newSingleThreadExecutor() {
    return new FinalizableDelegatedExecutorService (new ThreadPoolExecutor(1, 1, 0L, TimeUnit.MILLISECONDS, new LinkedBlockingQueue<Runnable>()));
}
作为单一worker线程的线程池,它把corePool和maximumPoolSize均被设置为1,和FixedThreadPool一样(由于没有设置任务队列的范围,故是无界队列)使用的是无界队列LinkedBlockingQueue,所以带来的影响和FixedThreadPool一样。
SingleThreadExecutor只会使用单个工作线程,它可以保证任务是按顺序执行的,任何时候都不会有多于一个的任务处于活动状态。注意,如果单个线程在执行过程中因为某些错误中止,新的线程会替代它执行后续线程。

public class Demo9SingleThreadPoolCase {
    static int count = 0;
    public static void main(String[] args) throws InterruptedException {
        ExecutorService exec = Executors.newSingleThreadExecutor();
        for (int i = 0; i < 10; i++) {
            exec.execute(new Demo());
            Thread.sleep(5);
        }
        exec.shutdown();
    }
    static class Demo implements Runnable {
        @Override
        public void run() {
            String name = Thread.currentThread().getName();
            for (int i = 0; i < 2; i++) {
                count++;
                System.out.println(name + ":" + count);
            }
        }
    }
}
结果如下:
pool-1-thread-1:1
pool-1-thread-1:2
pool-1-thread-1:3
pool-1-thread-1:4
pool-1-thread-1:5
pool-1-thread-1:6
pool-1-thread-1:7
pool-1-thread-1:8
pool-1-thread-1:9
pool-1-thread-1:10
pool-1-thread-1:11
pool-1-thread-1:12
pool-1-thread-1:13
pool-1-thread-1:14
pool-1-thread-1:15
pool-1-thread-1:16
pool-1-thread-1:17
pool-1-thread-1:18
pool-1-thread-1:19
pool-1-thread-1:20
CachedThreadPool
阿里禁止:允许的创建线程数量为 Integer.MAX_VALUE ,可能会创建大量的线程,从而导致 OOM。
public static ExecutorService newCachedThreadPool() {
    return new ThreadPoolExecutor(0, Integer.MAX_VALUE, 60L, TimeUnit.SECONDS, new SynchronousQueue<Runnable>());
}
它把corePool为0,maximumPoolSize为Integer.MAX_VALUE,这就意味着所有的任务一提交就会加入到阻塞队列中。因为线程池的基本大小设置为0,一般情况下线程池中没有程池,用的时候再创建。
但是这样就处理线程池会存在一个问题,如果主线程提交任务的速度远远大于CachedThreadPool的处理速度,则CachedThreadPool会不断地创建新线程来执行任务,这样有可能会导致系统耗尽CPU和内存资源,所以在使用该线程池是,一定要注意控制并发的任务数,否则创建大量的线程可能导致严重的性能问题。
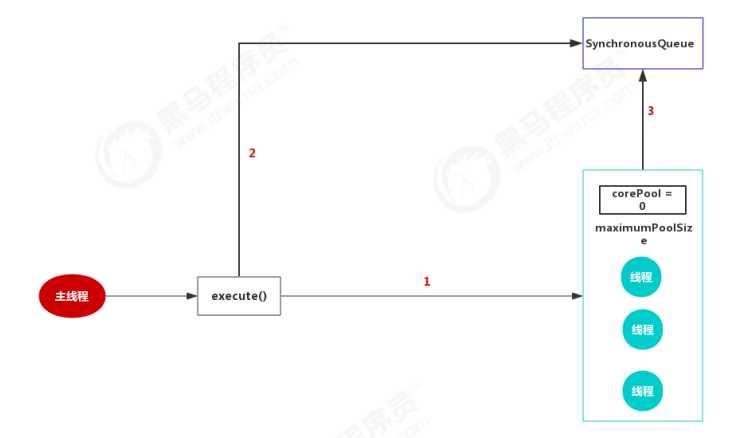
案例:
public class Demo9CachedThreadPoolCase {
    public static void main(String[] args) throws InterruptedException {
        ExecutorService exec = Executors.newCachedThreadPool();
        for (int i = 0; i < 10; i++) {
            exec.execute(new Demo());
            Thread.sleep(1);
        }
        exec.shutdown();
}
    static class Demo implements Runnable {
        @Override
        public void run() {
            String name = Thread.currentThread().getName();
            try {
                //修改睡眠时间,模拟线程执行需要花费的时间
                Thread.sleep(1);
                System.out.println(name + "执行完了");
            } catch (InterruptedException e) {
                e.printStackTrace();
            }
        }
    }
}
结果如下:
pool-1-thread-1执行完了
pool-1-thread-6执行完了
pool-1-thread-9执行完了
pool-1-thread-8执行完了
pool-1-thread-5执行完了
pool-1-thread-3执行完了
pool-1-thread-2执行完了
pool-1-thread-10执行完了
pool-1-thread-4执行完了
pool-1-thread-7执行完了
ScheduledThreadPool
阿里禁止:允许的创建线程数量为 Integer.MAX_VALUE ,可能会创建大量的线程,从而导致 OOM。
Timer与TimerTask虽然可以实现线程的周期和延迟调度,但是Timer与TimerTask存在一些问题:
1、Timer在执行定时任务时只会创建一个线程,所以如果存在多个任务,且任务时间过长,超过了两个任务的间隔时间,会发生一些缺陷。
2、如果TimerTask抛出RuntimeException,Timer会停止所有任务的运行。
3、Timer执行周期任务时依赖系统时间,如果当前系统时间发生变化会出现一些执行上的变化
为了解决这些问题,我们一般都是推荐ScheduledThreadPoolExecutor来实现。
ScheduledThreadPoolExecutor,继承ThreadPoolExecutor且实现了ScheduledExecutorService接口,它就相当于提供了“延迟”和“周期执行”功能的ThreadPoolExecutor。
ScheduledThreadPoolExecutor,它可另行安排在给定的延迟后运行命令,或者定期执行命令。需要多个辅助线程时,或者要求 ThreadPoolExecutor 具有额外的灵活性或功能时,此类要优于Timer。
提供了四种构造方法:
public ScheduledThreadPoolExecutor(int corePoolSize) {
    super(corePoolSize, Integer.MAX_VALUE, 0, NANOSECONDS, new DelayedWorkQueue());
}
public ScheduledThreadPoolExecutor(int corePoolSize, ThreadFactory threadFactory) {
    super(corePoolSize, Integer.MAX_VALUE, 0, NANOSECONDS, new DelayedWorkQueue(), threadFactory);
}
public ScheduledThreadPoolExecutor(int corePoolSize, RejectedExecutionHandler handler) {
    super(corePoolSize, Integer.MAX_VALUE, 0, NANOSECONDS, new DelayedWorkQueue(), handler);
}
public ScheduledThreadPoolExecutor(int corePoolSize, ThreadFactory threadFactory, RejectedExecutionHandler handler) {
    super(corePoolSize, Integer.MAX_VALUE, 0, NANOSECONDS, new DelayedWorkQueue(), threadFactory, handler);
}
在ScheduledThreadPoolExecutor的构造函数中,我们发现它都是利用ThreadLocalExecutor来构造的,唯一变动的地方就在于它所使用的阻塞队列变成了DelayedWorkQueue。
DelayedWorkQueue为ScheduledThreadPoolExecutor中的内部类,类似于延时队列和优先级队列。在执行定时任务的时候,每个任务的执行时间都不同,所以DelayedWorkQueue的工作就是按照执行时间的升序来排列,执行时间距离当前时间越近的任务在队列的前面,这样就可以保证每次出队的任务都是当前队列中执行时间最靠前的。
public class Demo9ScheduledThreadPool {
    public static void main(String[] args) throws InterruptedException {
        ScheduledExecutorService scheduledThreadPool = Executors.newScheduledThreadPool(2);
        System.out.println("程序开始:" + new Date());
        // 第二个参数是延迟多久执行
        scheduledThreadPool.schedule(new Task(), 0, TimeUnit.SECONDS);
        scheduledThreadPool.schedule(new Task(), 1, TimeUnit.SECONDS);
        scheduledThreadPool.schedule(new Task(), 5, TimeUnit.SECONDS);
        Thread.sleep(5000);
        // 关闭线程池
        scheduledThreadPool.shutdown();
    }
    static class Task implements Runnable {
        @Override
        public void run() {
            try {
                String name = Thread.currentThread().getName();
                System.out.println(name + ", 开始:" + new Date());
                Thread.sleep(1000);
                System.out.println(name + ", 结束:" + new Date());
            } catch (InterruptedException e) {
                e.printStackTrace();
            }
        }
    }
}
结果如下:
程序开始:Mon Feb 07 12:09:28 CST 2022
pool-1-thread-1, 开始:Mon Feb 07 12:09:28 CST 2022
pool-1-thread-2, 开始:Mon Feb 07 12:09:29 CST 2022
pool-1-thread-1, 结束:Mon Feb 07 12:09:29 CST 2022
pool-1-thread-2, 结束:Mon Feb 07 12:09:30 CST 2022
pool-1-thread-1, 开始:Mon Feb 07 12:09:33 CST 2022
pool-1-thread-1, 结束:Mon Feb 07 12:09:34 CST 2022
在采用三种方式之前,我们先来观察一下使用同步的方式实现的结果:
1、创建maven的jar工程,引入依赖
<parent>
        <groupId>org.springframework.boot</groupId>
        <artifactId>spring-boot-starter-parent</artifactId>
        <version>2.1.0.RELEASE</version>
        <relativePath/> <!-- lookup parent from repository -->
    </parent>
    <dependencies>
        <!-- SpringBoot 容器 -->
        <dependency>
            <groupId>org.springframework.boot</groupId>
            <artifactId>spring-boot-starter-web</artifactId>
        </dependency>
    </dependencies>
2、创建启动类
@SpringBootApplication
public class Application {
    public static void main(String[] args) {
        SpringApplication.run(Application.class, args);
    }
}
3、编写Controller
@Controller
public class TestController {
    @Autowired
    private TestAsyncService service;
    /**
     * 使用传统方式测试
     */
    @GetMapping("/test")
    public String test() {
        System.out.println("获取主线程名称:" + Thread.currentThread().getName());
        service.serviceTest();
        System.out.println("执行成功,返回结果");
        return "ok";
    }
}
4、编写service
@Service
public class TestAsyncService {
    public void serviceTest() {
        // 这里执行实际的业务逻辑,在这里我们就是用一个简单的遍历来模拟
        Arrays.stream(new int[]{1,2,3,4,5,6,7,8,9,10}).forEach(t -> {
            try {
                Thread.sleep(100);
            } catch (InterruptedException e) {
                e.printStackTrace();
            }
            System.out.println("获取number为:" + t) ;
        });
    }
}
5、访问http://localhost:8080/test,结果如下:
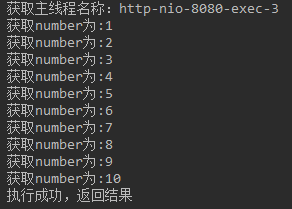
1、使用线程池的方式来实现
修改Controller@Controller public class TestController { @Autowired private TestAsyncService service; /** * 使用传统方式测试 */ @GetMapping("/test") public String test() { System.out.println("获取主线程名称:" + Thread.currentThread().getName()); /** * 这里也可以采用以下方式使用,但是使用线程池的方式可以很便捷的对线程管理(提高程序的整体性能), * 也可以减少每次执行该请求时都需要创建一个线程造成的性能消耗 * new Thread(() ->{ * run方法中的业务逻辑 * }) */ /** * 定义一个线程池 * 核心线程数(corePoolSize):1 * 最大线程数(maximumPoolSize): 1 * 保持连接时间(keepAliveTime):50000 * 时间单位 (TimeUnit):TimeUnit.MILLISECONDS(毫秒) * 阻塞队列 new LinkedBlockingQueue<Runnable>() */ ThreadPoolExecutor executor = new ThreadPoolExecutor(5,5,50000, TimeUnit.MILLISECONDS, new LinkedBlockingQueue<Runnable>()); // 执行业务逻辑方法serviceTest() executor.execute(new Runnable() { @Override public void run() { service.serviceTest(); } }); System.out.println("执行完成,向用户响应成功信息"); return "ok"; } }
注意:由于LinkedBlockingQueue未指定容量,即是无界队列,如果corePoolSize值为1,则线程池中永远只有一个线程执行任务,建议将corePoolSize设置为等于maximumPoolSize。
访问http://localhost:8080/test,结果如下:
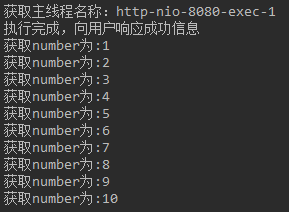
我们发现在主线程中使用线程池中的线程来实现,程序的执行结果表明,主线程直接将结果进行了返回,然后才是线程池在执行业务逻辑,减少了请求响应时长。
虽然这样实现了我们想要的结果,但是,但是我们发现如果我们在多个请求中都需要这种异步请求,每次都写这么冗余的线程池配置,这种问题当然会被我们强大的spring所观察到,所以spring为了提升开发人员的开发效率,使用@EnableAsync来开启异步的支持,使用@Async来对某个方法进行异步执行
2、配置自定义的线程池
如果使用了@Async异步执行,那么就无法获取ThreadLocal中的User信息,因为使用异步增加了一个线程,而ThreadLocal变量对其他线程是隔离的。
启动类:
@SpringBootApplication
@EnableScheduling
@ComponentScan
@EnableAsync
@Configuration
public class Application {
    public static void main(String[] args) {
        SpringApplication.run(Application.class, args);
    }
}
spring 中开启异步只要在配置类加上@EnableAsync 同时在service方法中加上@Async即可,注意service中的方法想要异步调用必须是通过注入调用(spring 代理)。
配置自定义的线程池
@Configuration
@EnableAsync
public class TaskExecutePool {

    private int corePoolSize = 20;//线程池维护线程的最少数量

    private int maxPoolSize =20;//线程池维护线程的最大数量

    private int queueCapacity = 1000; //缓存队列

    private int keepAlive = 600;//允许的空闲时间


    @Bean
    public Executor myTaskAsyncPool() {
        ThreadPoolTaskExecutor executor = new ThreadPoolTaskExecutor();
        executor.setCorePoolSize(corePoolSize);
        executor.setMaxPoolSize(maxPoolSize);
        executor.setQueueCapacity(queueCapacity);
        executor.setKeepAliveSeconds(keepAlive);
        executor.setThreadNamePrefix("MyExecutor-");

        // rejection-policy:当pool已经达到max size的时候,如何处理新任务
        // CALLER_RUNS:不在新线程中执行任务,而是由调用者所在的线程来执行
        executor.setRejectedExecutionHandler(new ThreadPoolExecutor.CallerRunsPolicy());
        executor.initialize();
        return executor;
    }


}
@Controller
public class TestController {
    @Autowired
    private TestAsyncService service;
    /**
     * 使用传统方式测试
     */
    @GetMapping("/test")
    public String test() {
        System.out.println("获取主线程名称:" + Thread.currentThread().getName());
        service.serviceTest();
        System.out.println("执行成功,返回结果");
        return "ok";
    }
}
Service
@Service
@EnableAsync
public class TestAsyncService {
    @Async
    public void serviceTest() {
        // 这里执行实际的业务逻辑,在这里我们就是用一个简单的遍历来模拟
        Arrays.stream(new int[]{1,2,3,4,5,6,7,8,9,10}).forEach(t -> {
            try {
                Thread.sleep(100);
            } catch (InterruptedException e) {
                e.printStackTrace();
            }
            System.out.println("获取number为:" + t) ;
        });
    }
}
@Async注解的限制条件:
(1)、@Async注解标注的方法返回值只能是void或Future;
(2)、@Async注解标注的方法必须是public修饰;
(3)、@Async注解标注的方法和调用方在同一个类中,不会生效。
访问http://localhost:8080/test,结果如下:
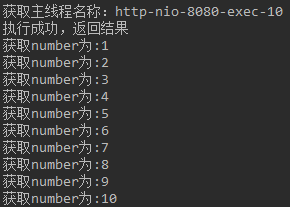
注意:调用异步方法的方法如果与异步方法在同一个类中,则无法实现异步效果,即仍然是主线程在执行。
改造service代码如下:
@Service
@EnableAsync
public class TestAsyncService {
    @Async
    public void serviceTest() {
        // 这里执行实际的业务逻辑,在这里我们就是用一个简单的遍历来模拟
        Arrays.stream(new int[]{1,2,3,4,5,6,7,8,9,10}).forEach(t -> {
            try {
                Thread.sleep(100);
            } catch (InterruptedException e) {
                e.printStackTrace();
            }
            System.out.println("获取number为:" + t) ;
        });
    }

    public void serviceTest1() {
        serviceTest();
    }
}
浏览器访问:http://localhost:8003/test,控制台打印结果如下:
获取主线程名称:http-nio-8003-exec-2
获取number为:1
获取number为:2
获取number为:3
获取number为:4
获取number为:5
获取number为:6
获取number为:7
获取number为:8
获取number为:9
获取number为:10
执行成功,返回结果
即没有异步执行。
现在尝试将调用异步方法的方法与异步方法分开在不同的类中,修改TestAsyncService方法如下:
@Service
public class TestAsyncService {
    @Autowired
    private TestAsyncService2 testAsyncService2;

    public void serviceTest1() {
        testAsyncService2.serviceTest();
    }
}
新增一个TestAsyncService2类,如下所示:
@Service
@EnableAsync
public class TestAsyncService2 {
    @Async
    public void serviceTest() {
        // 这里执行实际的业务逻辑,在这里我们就是用一个简单的遍历来模拟
        Arrays.stream(new int[]{1,2,3,4,5,6,7,8,9,10}).forEach(t -> {
            try {
                Thread.sleep(100);
            } catch (InterruptedException e) {
                e.printStackTrace();
            }
            System.out.println("获取number为:" + t) ;
        });
    }
}
注意:@EnableAsync和@Async注解要在同一个类中,否则无法实现异步。
浏览器访问:http://localhost:8003/test,结果如下:
获取主线程名称:http-nio-8003-exec-1
执行成功,返回结果
获取number为:1
获取number为:2
获取number为:3
获取number为:4
获取number为:5
获取number为:6
获取number为:7
获取number为:8
获取number为:9
获取number为:10
说明已经异步执行。
测试@Async注解标注的方法返回值是Future时,也能实现异步
Controller
@Controller
public class TestController {
    @Autowired
    private TestAsyncService service;
    /**
     * 使用传统方式测试
     */
    @GetMapping("/test")
    public String test() throws ExecutionException, InterruptedException {
        System.out.println("获取主线程名称:" + Thread.currentThread().getName());
        service.serviceTest1();
        System.out.println("执行成功,返回结果");
        return "ok";
    }
}
TestAsyncService
@Service
@EnableAsync
public class TestAsyncService {
    @Autowired
    private TestAsyncService2 testAsyncService2;
    @Autowired
    private TestAsyncService3 testAsyncService3;

    public void serviceTest1() throws ExecutionException, InterruptedException {
        Future<String> stringFuture = testAsyncService2.serviceTest();
        testAsyncService3.callBack(stringFuture);
    }
}
TestAsyncService2
@Service
@EnableAsync
public class TestAsyncService2 {
    @Async
    public Future<String> serviceTest() {
        // 这里执行实际的业务逻辑,在这里我们就是用一个简单的遍历来模拟
        Arrays.stream(new int[]{1,2,3,4,5,6,7,8,9,10}).forEach(t -> {
            try {
                Thread.sleep(100);
            } catch (InterruptedException e) {
                e.printStackTrace();
            }
            System.out.println("获取number为:" + t) ;
        });
        return new AsyncResult("成功"); // 封装成Future
    }
}
TestAsyncService3
@Service
@EnableAsync
public class TestAsyncService3 {
    @Async  // 必须要用Async异步执行,否则主线程会一直等待callBack方法执行完毕才会返回信息给调用者
    public void callBack(Future<String> future) throws ExecutionException, InterruptedException {
        for (; ; ) { // 注意:这里要加while true死循环,否则isDone()返回false,callBack执行完毕
            if (future.isDone()) { // 如果前面一个方法执行完成,则调用另外一个接口
                String str = future.get();
                System.out.println(str);
                // 任务都调用完成,退出循环等待
                break;
            }
            // 没3秒循环一次,任务的完成需要时间,不要频繁循环
            Thread.sleep(3000);
        }
    }
}
结果:
获取主线程名称:http-nio-8003-exec-1
执行成功,返回结果
获取number为:1
获取number为:2
获取number为:3
获取number为:4
获取number为:5
获取number为:6
获取number为:7
获取number为:8
获取number为:9
获取number为:10
成功
3、实现接口AsyncConfigurer的自定义线程池配置(推荐)
在项目应用中,@Async调用线程池,推荐使用自定义线程池的模式。自定义线程池常用方案:重新实现接口AsyncConfigurer。
Spring 已经实现的线程池
- SimpleAsyncTaskExecutor:不是真的线程池,这个类不重用线程,默认每次调用都会创建一个新的线程。
- SyncTaskExecutor:这个类没有实现异步调用,只是一个同步操作。只适用于不需要多线程的地方。
- ConcurrentTaskExecutor:Executor的适配类,不推荐使用。如果ThreadPoolTaskExecutor不满足要求时,才用考虑使用这个类。
- SimpleThreadPoolTaskExecutor:是Quartz的SimpleThreadPool的类。线程池同时被quartz和非quartz使用,才需要使用此类。
- ThreadPoolTaskExecutor :最常使用,推荐。其实质是对java.util.concurrent.ThreadPoolExecutor的包装。
阿里巴巴为什么不建议直接使用Async注解?
@Async应用默认线程池
Spring应用默认的线程池,指在@Async注解在使用时,不指定线程池的名称。查看源码,@Async的默认线程池为SimpleAsyncTaskExecutor。
默认线程池的弊端
@Async应用自定义线程池
自定义线程池,可对系统中线程池更加细粒度的控制,方便调整线程池大小配置,线程执行异常控制和处理。在设置系统自定义线程池代替默认线程池时,虽可通过多种模式设置,但替换默认线程池最终产生的线程池有且只能设置一个(不能设置多个类继承AsyncConfigurer)自定义线程池有如下模式:
- 重新实现接口AsyncConfigurer
- 继承AsyncConfigurerSupport
- 配置由自定义的TaskExecutor替代内置的任务执行器
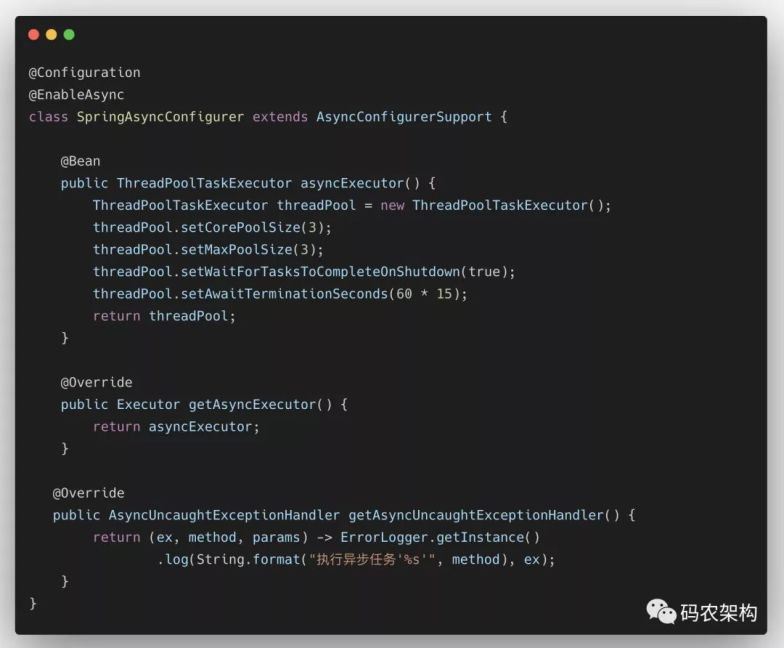
通过查看Spring源码关于@Async的默认调用规则,会优先查询源码中实现AsyncConfigurer这个接口的类,实现这个接口的类为AsyncConfigurerSupport。但默认配置的线程池和异步处理方法均为空,所以,无论是继承或者重新实现接口,都需指定一个线程池,且重新实现 public Executor getAsyncExecutor()方法。
实现接口AsyncConfigurer

@Configuration
@EnableAsync
public class AsyncConfig implements AsyncConfigurer {

    @Bean(name = "taskExecutor")
    public Executor taskExecutor() {
        ThreadPoolTaskExecutor executor = new ThreadPoolTaskExecutor();
        executor.setCorePoolSize(30);
        executor.setMaxPoolSize(40);
        executor.setQueueCapacity(500);
        executor.setKeepAliveSeconds(60);
        executor.setThreadNamePrefix("taskExecutor-");
        executor.setRejectedExecutionHandler(new ThreadPoolExecutor.CallerRunsPolicy());
        executor.initialize();
        return executor;
    }

    @Override
    public Executor getAsyncExecutor() {
        return taskExecutor();
    }
}
由于@Bean(name = "taskExecutor"),故在使用时为@Async("taskExecutor")
继承AsyncConfigurerSupport
配置自定义的TaskExecutor
由于AsyncConfigurer的默认线程池在源码中为空,
public interface AsyncConfigurer {
    @Nullable
    default Executor getAsyncExecutor() {
        return null;
    }

    @Nullable
    default AsyncUncaughtExceptionHandler getAsyncUncaughtExceptionHandler() {
        return null;
    }
}
Spring通过beanFactory.getBean(TaskExecutor.class)先查看是否有线程池,未配置时,通过beanFactory.getBean(DEFAULT_TASK_EXECUTOR_BEAN_NAME, Executor.class),又查询是否存在默认名称为TaskExecutor的线程池。
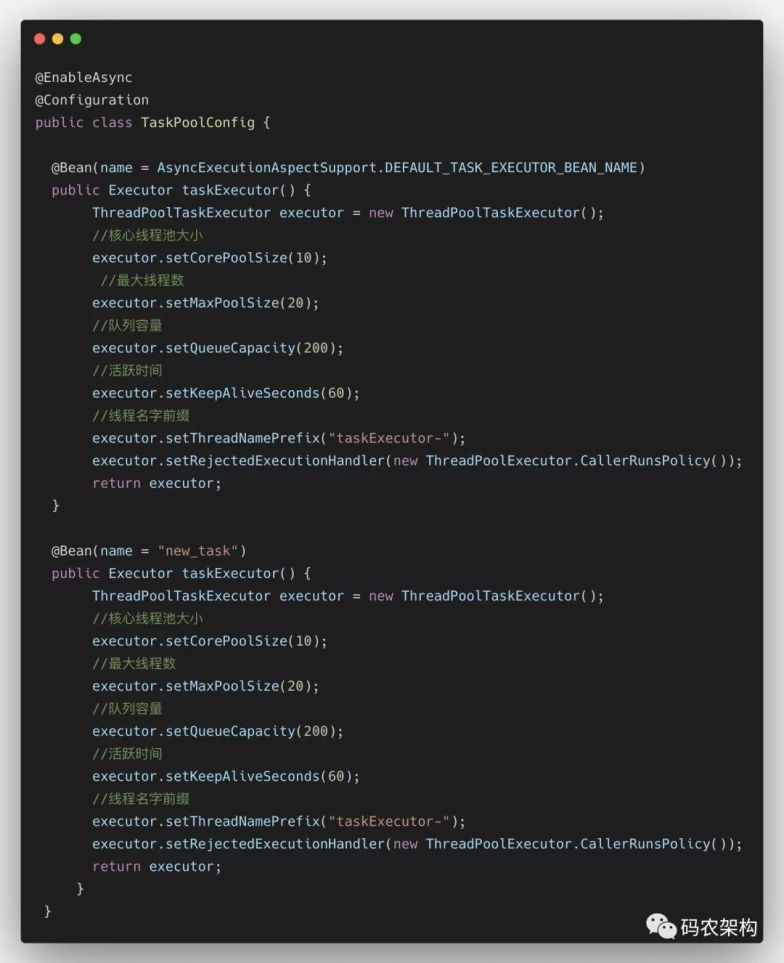
所以可在项目中,定义名称为TaskExecutor的bean生成一个默认线程池。
也可不指定线程池的名称,申明一个线程池,本身底层是基于TaskExecutor.class便可。
比如:
Executor.class:ThreadPoolExecutorAdapter->ThreadPoolExecutor->AbstractExecutorService->ExecutorService->Executor
这样的模式,最终底层为Executor.class,在替换默认的线程池时,需设置默认的线程池名称为TaskExecutor
TaskExecutor.class:ThreadPoolTaskExecutor->SchedulingTaskExecutor->AsyncTaskExecutor->TaskExecutor
这样的模式,最终底层为TaskExecutor.class,在替换默认的线程池时,可不指定线程池名称。
三、源码解析
1、@EnableAsync注解源码
@Target(ElementType.TYPE)
@Retention(RetentionPolicy.RUNTIME)
@Documented
@Import(AsyncConfigurationSelector.class)
public @interface EnableAsync {
    //默认是@Async和EJB3.1规范下的@Asynchronous注解,
    //这里表示可以自定义注解启动异步
    Class<? extends Annotation> annotation() default Annotation.class;

    boolean proxyTargetClass() default false; //true表示启用CGLIB代理

    // 切面通知模式:默认动态代理PROXY
    AdviceMode mode() default AdviceMode.PROXY;

    int order() default Ordered.LOWEST_PRECEDENCE;
}
利用@Import注解来导入ImportSelector的实现类
这个EnableAsync注解,一般注解属性我们都不需要改,默认就行了。那么这里最重要的代码就只有一行了,就是这个**@Import(AsyncConfigurationSelector.class)**,导入AsyncConfigurationSelector配置。
为什么强调父类,因为子类初始化之前,父类是要先完成初始化的,所以加载顺序都是父类先加载,这点必须清楚。
先看父类AdviceModeImportSelector,再看子类AsyncConfigurationSelector
2、父类AdviceModeImportSelector
public abstract class AdviceModeImportSelector<A extends Annotation> implements ImportSelector {

    public static final String DEFAULT_ADVICE_MODE_ATTRIBUTE_NAME = "mode";
    protected String getAdviceModeAttributeName() {
        return DEFAULT_ADVICE_MODE_ATTRIBUTE_NAME;
    }

    @Override
    public final String[] selectImports(AnnotationMetadata importingClassMetadata) {
        Class<?> annType = GenericTypeResolver.resolveTypeArgument(getClass(), AdviceModeImportSelector.class); // EnableAsync注解的类型
        // 获取@EnableAsync的属性值
        AnnotationAttributes attributes = AnnotationConfigUtils.attributesFor(importingClassMetadata, annType); // EnableAsync的属性值
        AdviceMode adviceMode = attributes.getEnum(getAdviceModeAttributeName()); // 获取AdviceMode,值为PROXY
        // 调用抽象方法,由子类重写
        String[] imports = selectImports(adviceMode);
        return imports;
    }

    /**
     * 由子类AsyncConfigurationSelector重写了这个方法
     */
    @Nullable
    protected abstract String[] selectImports(AdviceMode adviceMode);
}
3、子类AsyncConfigurationSelector
//关键点:1、父类AdviceModeImportSelector
//2、导入配置类ProxyAsyncConfiguration
public class AsyncConfigurationSelector extends AdviceModeImportSelector<EnableAsync> {

    private static final String ASYNC_EXECUTION_ASPECT_CONFIGURATION_CLASS_NAME = "org.springframework.scheduling.aspectj.AspectJAsyncConfiguration";

    public AsyncConfigurationSelector() {
    }

    @Nullable
    public String[] selectImports(AdviceMode adviceMode) {
        switch(adviceMode) {
        case PROXY:
            return new String[]{ProxyAsyncConfiguration.class.getName()};
        case ASPECTJ:
            return new String[]{"org.springframework.scheduling.aspectj.AspectJAsyncConfiguration"};
        default:
            return null;
        }
    }
}
Spring提供的AOP功能有两种实现方式,可选值有PROXY 和ASPECTJ,默认值为AdviceMode.PROXY。一种是Spring自带的AOP功能,主要靠JDK代理和CGLIB代理实现,另外一种是通过第三方框架ASPECTJ实现。AdviceMode.PROXY表示用Spring自带的AOP功能,AdviceMode.ASPECTJ表示使用ASPECTJ提供AOP功能。
先看父类再看子类
4、父类AbstractAsyncConfiguration(配置线程池)
@Configuration(
    proxyBeanMethods = false
)
public abstract class AbstractAsyncConfiguration implements ImportAware {
    @Nullable
    protected AnnotationAttributes enableAsync;
    @Nullable
    protected Supplier<Executor> executor;
    @Nullable
    protected Supplier<AsyncUncaughtExceptionHandler> exceptionHandler;

    public AbstractAsyncConfiguration() {
    }

    public void setImportMetadata(AnnotationMetadata importMetadata) {
        this.enableAsync = AnnotationAttributes.fromMap(importMetadata.getAnnotationAttributes(EnableAsync.class.getName()));
        if (this.enableAsync == null) {
            throw new IllegalArgumentException("@EnableAsync is not present on importing class " + importMetadata.getClassName());
        }
    }

    @Autowired
    void setConfigurers(ObjectProvider<AsyncConfigurer> configurers) {
        Supplier<AsyncConfigurer> configurer = SingletonSupplier.of(() -> {
            List<AsyncConfigurer> candidates = (List)configurers.stream().collect(Collectors.toList());
            if (CollectionUtils.isEmpty(candidates)) { // 如果没有自定义的类实现AsyncConfigurer,则返回
                return null;
            } else if (candidates.size() > 1) {
                throw new IllegalStateException("Only one AsyncConfigurer may exist");
            } else {
                return (AsyncConfigurer)candidates.get(0); // 有的话,获取
            }
        });
        this.executor = this.adapt(configurer, AsyncConfigurer::getAsyncExecutor); // 获取自定义的执行器
        this.exceptionHandler = this.adapt(configurer, AsyncConfigurer::getAsyncUncaughtExceptionHandler);
    }

    private <T> Supplier<T> adapt(Supplier<AsyncConfigurer> supplier, Function<AsyncConfigurer, T> provider) {
        return () -> {
            AsyncConfigurer configurer = (AsyncConfigurer)supplier.get();
            return configurer != null ? provider.apply(configurer) : null;
        };
    }
}
所以这个父类中,其实就是一些初始化,初始化this.enableAsync、this.executor和this.exceptionHandler。 当然了,我们不是必须要实现AsyncConfigurer重写executor和exceptionHandler,所以this.executor和this.exceptionHandler可能还是为null的。
5、子类ProxyAsyncConfiguration
@Configuration(
    proxyBeanMethods = false
)
@Role(2)
public class ProxyAsyncConfiguration extends AbstractAsyncConfiguration {
    public ProxyAsyncConfiguration() {
    }

    @Bean(
        name = {"org.springframework.context.annotation.internalAsyncAnnotationProcessor"}
    )
    @Role(2)
    public AsyncAnnotationBeanPostProcessor asyncAdvisor() {
        Assert.notNull(this.enableAsync, "@EnableAsync annotation metadata was not injected");
        AsyncAnnotationBeanPostProcessor bpp = new AsyncAnnotationBeanPostProcessor();
        bpp.configure(this.executor, this.exceptionHandler); // 将通过AsyncConfigurer配置好的线程池跟异常处理器设置到这个后置处理器中
        Class<? extends Annotation> customAsyncAnnotation = this.enableAsync.getClass("annotation");
        if (customAsyncAnnotation != AnnotationUtils.getDefaultValue(EnableAsync.class, "annotation")) {
            bpp.setAsyncAnnotationType(customAsyncAnnotation);
        }

        bpp.setProxyTargetClass(this.enableAsync.getBoolean("proxyTargetClass"));
        bpp.setOrder((Integer)this.enableAsync.getNumber("order"));
        return bpp;
    }
}
6、AsyncAnnotationBeanPostProcessor类
AsyncAnnotationBeanPostProcessor是Spring框架中用于处理异步方法的后处理器。
public class AsyncAnnotationBeanPostProcessor extends AbstractBeanFactoryAwareAdvisingPostProcessor {
    public static final String DEFAULT_TASK_EXECUTOR_BEAN_NAME = "taskExecutor";
    protected final Log logger = LogFactory.getLog(this.getClass());
    @Nullable
    private Supplier<Executor> executor;
    @Nullable
    private Supplier<AsyncUncaughtExceptionHandler> exceptionHandler;
    @Nullable
    private Class<? extends Annotation> asyncAnnotationType;

    public AsyncAnnotationBeanPostProcessor() {
        this.setBeforeExistingAdvisors(true);
    }
  // 将线程池配置到后处理器AsyncAnnotationBeanPostProcessor
    public void configure(@Nullable Supplier<Executor> executor, @Nullable Supplier<AsyncUncaughtExceptionHandler> exceptionHandler) {
        this.executor = executor;
        this.exceptionHandler = exceptionHandler;
    }

    public void setExecutor(Executor executor) {
        this.executor = SingletonSupplier.of(executor);
    }

    public void setExceptionHandler(AsyncUncaughtExceptionHandler exceptionHandler) {
        this.exceptionHandler = SingletonSupplier.of(exceptionHandler);
    }

    public void setAsyncAnnotationType(Class<? extends Annotation> asyncAnnotationType) {
        Assert.notNull(asyncAnnotationType, "'asyncAnnotationType' must not be null");
        this.asyncAnnotationType = asyncAnnotationType;
    }

    public void setBeanFactory(BeanFactory beanFactory) {
        super.setBeanFactory(beanFactory);
        AsyncAnnotationAdvisor advisor = new AsyncAnnotationAdvisor(this.executor, this.exceptionHandler);
        if (this.asyncAnnotationType != null) {
            advisor.setAsyncAnnotationType(this.asyncAnnotationType);
        }

        advisor.setBeanFactory(beanFactory);
        this.advisor = advisor;
    }
}
7、AsyncAnnotationAdvisor类
public class AsyncAnnotationAdvisor extends AbstractPointcutAdvisor implements BeanFactoryAware {
    private Advice advice;
    private Pointcut pointcut;

    public AsyncAnnotationAdvisor() {
        this((Supplier)null, (Supplier)null);
    }

    public AsyncAnnotationAdvisor(@Nullable Executor executor, @Nullable AsyncUncaughtExceptionHandler exceptionHandler) {
        this((Supplier)SingletonSupplier.ofNullable(executor), (Supplier)SingletonSupplier.ofNullable(exceptionHandler));
    }

    public AsyncAnnotationAdvisor(@Nullable Supplier<Executor> executor, @Nullable Supplier<AsyncUncaughtExceptionHandler> exceptionHandler) {
        Set<Class<? extends Annotation>> asyncAnnotationTypes = new LinkedHashSet(2);
        asyncAnnotationTypes.add(Async.class);

        try {
            asyncAnnotationTypes.add(ClassUtils.forName("javax.ejb.Asynchronous", AsyncAnnotationAdvisor.class.getClassLoader()));
        } catch (ClassNotFoundException var5) {
        }

        this.advice = this.buildAdvice(executor, exceptionHandler);
        this.pointcut = this.buildPointcut(asyncAnnotationTypes);
    }

    public void setAsyncAnnotationType(Class<? extends Annotation> asyncAnnotationType) {
        Assert.notNull(asyncAnnotationType, "'asyncAnnotationType' must not be null");
        Set<Class<? extends Annotation>> asyncAnnotationTypes = new HashSet();
        asyncAnnotationTypes.add(asyncAnnotationType);
        this.pointcut = this.buildPointcut(asyncAnnotationTypes);
    }

    public void setBeanFactory(BeanFactory beanFactory) {
        if (this.advice instanceof BeanFactoryAware) {
            ((BeanFactoryAware)this.advice).setBeanFactory(beanFactory);
        }

    }

    public Advice getAdvice() {
        return this.advice;
    }

    public Pointcut getPointcut() {
        return this.pointcut;
    }

    protected Advice buildAdvice(@Nullable Supplier<Executor> executor, @Nullable Supplier<AsyncUncaughtExceptionHandler> exceptionHandler) {
        AnnotationAsyncExecutionInterceptor interceptor = new AnnotationAsyncExecutionInterceptor((Executor)null);
        interceptor.configure(executor, exceptionHandler);
        return interceptor;
    }

    protected Pointcut buildPointcut(Set<Class<? extends Annotation>> asyncAnnotationTypes) {
        ComposablePointcut result = null;

        AnnotationMatchingPointcut mpc;
        for(Iterator var3 = asyncAnnotationTypes.iterator(); var3.hasNext(); result = result.union(mpc)) {
            Class<? extends Annotation> asyncAnnotationType = (Class)var3.next();
            Pointcut cpc = new AnnotationMatchingPointcut(asyncAnnotationType, true);
            mpc = new AnnotationMatchingPointcut((Class)null, asyncAnnotationType, true);
            if (result == null) {
                result = new ComposablePointcut(cpc);
            } else {
                result.union(cpc);
            }
        }

        return (Pointcut)(result != null ? result : Pointcut.TRUE);
    }
}
先看父类AsyncExecutionInterceptor,再看子类AnnotationAsyncExecutionInterceptor
8、AsyncExecutionInterceptor父类
public class AsyncExecutionInterceptor extends AsyncExecutionAspectSupport implements MethodInterceptor, Ordered {
    public AsyncExecutionInterceptor(@Nullable Executor defaultExecutor) {
        super(defaultExecutor);
    }

    public AsyncExecutionInterceptor(@Nullable Executor defaultExecutor, AsyncUncaughtExceptionHandler exceptionHandler) {
        super(defaultExecutor, exceptionHandler);
    }

    @Nullable
    public Object invoke(MethodInvocation invocation) throws Throwable {
        Class<?> targetClass = invocation.getThis() != null ? AopUtils.getTargetClass(invocation.getThis()) : null; // @Async注解所在类的全类名
        Method specificMethod = ClassUtils.getMostSpecificMethod(invocation.getMethod(), targetClass); // 方法名
        Method userDeclaredMethod = BridgeMethodResolver.findBridgedMethod(specificMethod);
        AsyncTaskExecutor executor = this.determineAsyncExecutor(userDeclaredMethod); //获取executor执行器
        if (executor == null) {
            throw new IllegalStateException("No executor specified and no default executor set on AsyncExecutionInterceptor either");
        } else {
            Callable<Object> task = () -> { // 定义一个Callable异步线程
                try {
                    Object result = invocation.proceed(); //执行被拦截的方法
                    if (result instanceof Future) {
                        return ((Future)result).get();
                    }
                } catch (ExecutionException var4) {
                    this.handleError(var4.getCause(), userDeclaredMethod, invocation.getArguments());
                } catch (Throwable var5) {
                    this.handleError(var5, userDeclaredMethod, invocation.getArguments());
                }

                return null;
            };
            return this.doSubmit(task, executor, invocation.getMethod().getReturnType());
        }
    }

    @Nullable
    protected String getExecutorQualifier(Method method) {
        return null;
    }

    @Nullable
    protected Executor getDefaultExecutor(@Nullable BeanFactory beanFactory) {
        Executor defaultExecutor = super.getDefaultExecutor(beanFactory);
        return (Executor)(defaultExecutor != null ? defaultExecutor : new SimpleAsyncTaskExecutor());
    }

    public int getOrder() {
        return Integer.MIN_VALUE;
    }
}
9、拦截器AnnotationAsyncExecutionInterceptor(子类)
public class AnnotationAsyncExecutionInterceptor extends AsyncExecutionInterceptor {
    public AnnotationAsyncExecutionInterceptor(@Nullable Executor defaultExecutor) {
        super(defaultExecutor);
    }

    public AnnotationAsyncExecutionInterceptor(@Nullable Executor defaultExecutor, AsyncUncaughtExceptionHandler exceptionHandler) {
        super(defaultExecutor, exceptionHandler);
    }

    @Nullable
    protected String getExecutorQualifier(Method method) {
        Async async = (Async)AnnotatedElementUtils.findMergedAnnotation(method, Async.class);
        if (async == null) {
            async = (Async)AnnotatedElementUtils.findMergedAnnotation(method.getDeclaringClass(), Async.class);
        }

        return async != null ? async.value() : null;
    }
}
四、实际项目中可以使用线程池来记录日志:
切面类:
package com.jawasoft.pts.framework.aspectj;

import com.alibaba.fastjson.JSONObject;
import org.aspectj.lang.JoinPoint;
import org.aspectj.lang.Signature;
import org.aspectj.lang.annotation.AfterReturning;
import org.aspectj.lang.annotation.AfterThrowing;
import org.aspectj.lang.annotation.Aspect;
import org.aspectj.lang.annotation.Pointcut;
import org.aspectj.lang.reflect.MethodSignature;
import org.slf4j.Logger;
import org.slf4j.LoggerFactory;
import org.springframework.beans.factory.annotation.Autowired;
import org.springframework.scheduling.annotation.Async;
import org.springframework.scheduling.annotation.EnableAsync;
import org.springframework.stereotype.Component;

import java.lang.reflect.Method;
import java.util.Date;
import java.util.Map;

/**
 * 操作日志记录处理
 *
 * @author jawasoft
 */
@Aspect
@Component
@EnableAsync
public class LogAspect
{
    private static final Logger log = LoggerFactory.getLogger(LogAspect.class);

    @Autowired
    private OperLogService operLogService;

    // 配置织入点
    @Pointcut("@annotation(com.zwh.pts.framework.aspectj.lang.annotation.Log)")
    public void logPointCut()
    {
    }

    /**
     * 前置通知 用于拦截操作
     *
     * @param joinPoint 切点
     */
    @AfterReturning(pointcut = "logPointCut()")
    public void doBefore(JoinPoint joinPoint)
    {
        handleLog(joinPoint, null);
    }

    /**
     * 拦截异常操作
     *
     * @param joinPoint
     * @param e
     */
    @AfterThrowing(value = "logPointCut()", throwing = "e")
    public void doAfter(JoinPoint joinPoint, Exception e)
    {
        handleLog(joinPoint, e);
    }

    @Async
    protected void handleLog(final JoinPoint joinPoint, final Exception e)
    {
        try
        {
            // 获得注解
            Log controllerLog = getAnnotationLog(joinPoint);
            if (controllerLog == null)
            {
                return;
            }

            // 获取当前的用户
            User currentUser = SessionCache.get();

            // *========数据库日志=========*//
            OperLog operLog = new OperLog();
            operLog.setStatus(BusinessStatus.SUCCESS);
            // 请求的地址
            if (currentUser != null)
            {
                operLog.setOperName(currentUser.getUserName());
            }

            if (e != null)
            {
                operLog.setStatus(BusinessStatus.FAIL);
                operLog.setErrorMsg(StringUtils.substring(e.getMessage(), 0, 2000));
            }
            // 设置方法名称
            String className = joinPoint.getTarget().getClass().getName();
            String methodName = joinPoint.getSignature().getName();
            operLog.setMethod(className + "." + methodName + "()");
            operLog.setOperTime(new Date());
            // 处理设置注解上的参数
            getControllerMethodDescription(controllerLog, operLog);
            // 保存数据库
            operLogService.save(operLog);
        }
        catch (Exception exp)
        {
            // 记录本地异常日志
            log.error("==前置通知异常==");
            log.error("异常信息:{}", exp.getMessage());
            exp.printStackTrace();
        }
    }

    /**
     * 获取注解中对方法的描述信息 用于Controller层注解
     *
     * @param
     * @return 方法描述
     * @throws Exception
     */
    public void getControllerMethodDescription(Log log, OperLog operLog) throws Exception
    {
        // 设置action动作
        operLog.setAction(log.action());
        // 设置标题
        operLog.setTitle(log.title());
        // 设置channel
        operLog.setChannel(log.channel());
         //设置操作类型
        operLog.setType(log.type());

        // 是否需要保存request,参数和值
        if (log.isSaveRequestData())
        {
            // 获取参数的信息,传入到数据库中。
            setRequestValue(operLog);
        }
    }

    /**
     * 获取请求的参数,放到log中
     *
     * @param operLog
     * @param request
     */
    private void setRequestValue(OperLog operLog)
    {
        Map<String, String[]> map = ServletUtils.getRequest().getParameterMap();
        String params = JSONObject.toJSONString(map);
        operLog.setOperParam(StringUtils.substring(params, 0, 255));
    }

    /**
     * 是否存在注解,如果存在就获取
     */
    private Log getAnnotationLog(JoinPoint joinPoint) throws Exception
    {
        Signature signature = joinPoint.getSignature();
        MethodSignature methodSignature = (MethodSignature) signature;
        Method method = methodSignature.getMethod();

        if (method != null)
        {
            return method.getAnnotation(Log.class);
        }
        return null;
    }
}
其中Log注解定义如下:
@Target({ ElementType.PARAMETER, ElementType.METHOD })
@Retention(RetentionPolicy.RUNTIME)
@Documented
public @interface Log
{
    /** 模块 */
    String title() default "";

    /** 功能 */
    String action() default "";

    /** 渠道 */
    String channel() default OperatorType.MANAGE;

    /**
     * 类型
     * @return
     */
    String type() default  "";

    /** 是否保存请求的参数 */
    boolean isSaveRequestData() default true;

}
使用:在controller中添加@Log注解,如下:
@RestController
@RequestMapping("api/businessNotification")
public class BusinessNotificationController {

    private static Logger logger = LoggerFactory.getLogger(BusinessNotificationController.class);

    @Autowired
    private BusinessNotificationService bnService;
/**
     * 状态改为已读
     * @param id
     * @return
     */
    @PostMapping("/changeRead")
    @Log(title = "已读业务通知",channel= OperatorType.MANAGE ,action="已读业务通知",type = BusinessType.UPDATE)
    public Result changeRead(@RequestParam Integer id){
        return bnService.changeRead(id);
    }
}
如果线程池的任务之间存在父子关系,那么请不要使用同一个线程池
Demo演示
import org.springframework.util.StopWatch;
import java.util.ArrayList;
import java.util.List;
import java.util.concurrent.CountDownLatch;
import java.util.concurrent.LinkedBlockingDeque;
import java.util.concurrent.ThreadPoolExecutor;
import java.util.concurrent.TimeUnit;

public class MainTest {
    public static void main(String[] args) throws InterruptedException {
        ThreadPoolExecutor executorService = new ThreadPoolExecutor(3, 10, 0L, TimeUnit.MILLISECONDS, new LinkedBlockingDeque<>(100));
        StopWatch watch = new StopWatch("MainTest");
        watch.start();
        CountDownLatch countDownLatch = new CountDownLatch(5); // 用给定的计数初始化
        for (int i = 0; i < 5; i++) {
            int finalI = i;
            executorService.submit(()->{
                try {
                    System.out.println("当前线程"+Thread.currentThread().getName()+",---【任务"+finalI+"】开始执行---");
                    // 模拟从数据库查询到数据并对数据进行处理
                    List<String> arrayList = getDataFromeDB();
                    for (String str : arrayList) {
                        try {
                            System.out.println("当前线程"+Thread.currentThread().getName()+",【任务"+finalI+"】开始处理数据="+str);
                            TimeUnit.SECONDS.sleep(1);
                        } catch (InterruptedException e){
                            throw new RuntimeException(e);
                        }
                    }
                    System.out.println("当前线程"+Thread.currentThread().getName()+",---【任务"+finalI+"】执行完成---");
                } finally {
                    countDownLatch.countDown();
                }
            });
        }
        countDownLatch.await(); // 在当前计数到达0之前,await方法会一直受阻塞,之后会释放所有等待的线程
        watch.stop();
        System.out.println(watch.prettyPrint());


    }
    private static List<String> getDataFromeDB(){
        List<String> arrayList = new ArrayList<>();
        arrayList.add("1");
        arrayList.add("2");
        return arrayList;
    }
}
这个代码的逻辑非常简单,首先我们搞了一个线程池,然后起一个 for 循环往线程池里面仍了 5 个任务,这是核心逻辑。其他的 StopWatch 是为了统计运行时间用的。至于 CountDownLatch,你可以理解为在业务流程中,需要这五个任务都执行完成之后才能往下走,所以我搞了一个 CountDownLatch。
这个代码运行起来是没有任何问题的,我们在日志中搜索“执行完成”,也能搜到 5 个,这个结果也能证明程序是正常结束的:
当前线程pool-1-thread-1,---【任务0】开始执行---
当前线程pool-1-thread-3,---【任务2】开始执行---
当前线程pool-1-thread-2,---【任务1】开始执行---
当前线程pool-1-thread-1,【任务0】开始处理数据=1
当前线程pool-1-thread-2,【任务1】开始处理数据=1
当前线程pool-1-thread-3,【任务2】开始处理数据=1
当前线程pool-1-thread-1,【任务0】开始处理数据=2
当前线程pool-1-thread-3,【任务2】开始处理数据=2
当前线程pool-1-thread-2,【任务1】开始处理数据=2
当前线程pool-1-thread-3,---【任务2】执行完成---
当前线程pool-1-thread-1,---【任务0】执行完成---
当前线程pool-1-thread-2,---【任务1】执行完成---
当前线程pool-1-thread-1,---【任务4】开始执行---
当前线程pool-1-thread-1,【任务4】开始处理数据=1
当前线程pool-1-thread-3,---【任务3】开始执行---
当前线程pool-1-thread-3,【任务3】开始处理数据=1
当前线程pool-1-thread-1,【任务4】开始处理数据=2
当前线程pool-1-thread-3,【任务3】开始处理数据=2
当前线程pool-1-thread-3,---【任务3】执行完成---
当前线程pool-1-thread-1,---【任务4】执行完成---
StopWatch 'MainTest': running time (millis) = 4083
-----------------------------------------
ms     %     Task name
-----------------------------------------
04083  100%
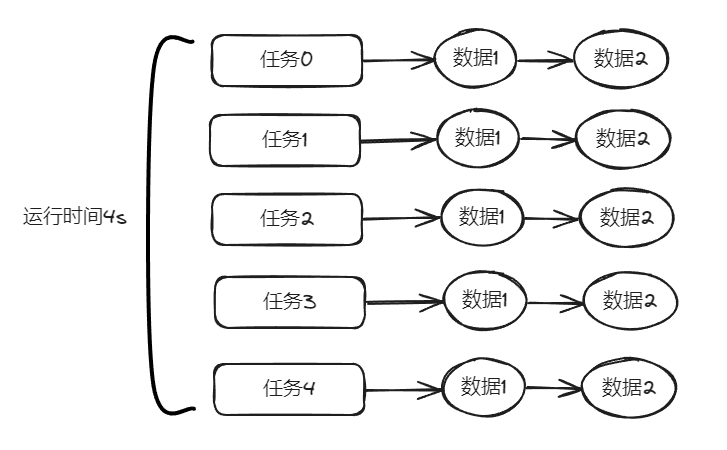
可以发现,线程1和线程3在分别执行完任务0和任务2之后,又开始分别执行任务4和任务3,即3个线程5个任务,等待三个线程执行完前面三个任务后,才会执行剩下的两个任务。线程池中核心线程的数量为3。当提交一个任务时,线程池会新建一个线程来执行任务,直到当前线程数等于3。当系统的线程数量等于3后,因为是指定容量为100无界的任务队列,剩下两个任务添加到任务队列中,所以线程数量不再增加。如果添加成功,则任务会等待空闲线程将其取出并执行;
同时,可以看到运行时间是 4s。
示意图大概是这样的:
然后看着这个代码,发现了一个可以优化的地方:
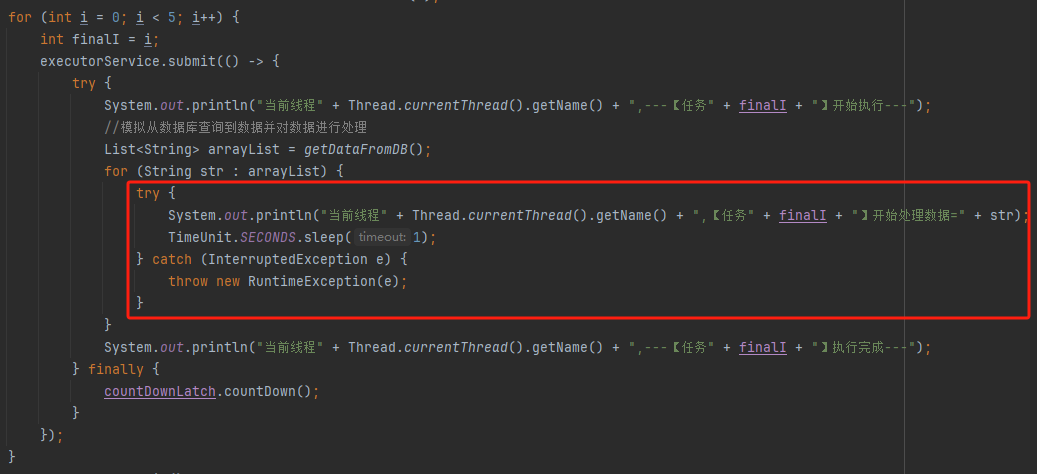
这个地方从数据库捞出来的数据,它们之间是没有依赖关系的,也就是说它们之间也是可以并行执行的。
所以我把代码改成了这样:
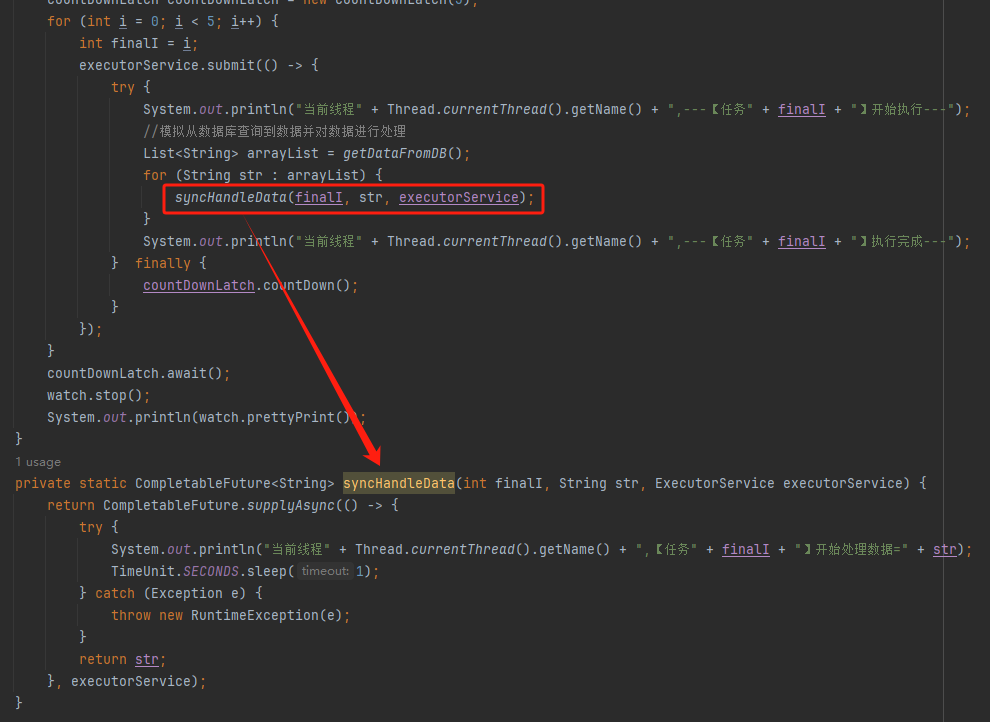
代码如下:

public class MainTest {
    public static void main(String[] args) throws InterruptedException {
        ThreadPoolExecutor executorService = new ThreadPoolExecutor(3, 10, 0L, TimeUnit.MILLISECONDS, new LinkedBlockingDeque<>(100));
        StopWatch watch = new StopWatch("MainTest");
        watch.start();
        CountDownLatch countDownLatch = new CountDownLatch(5);
        for (int i = 0; i < 5; i++) {
            int finalI = i;
            executorService.submit(()->{
                try {
                    System.out.println("当前线程"+Thread.currentThread().getName()+",---【任务"+finalI+"】开始执行---");
                    // 模拟从数据库查询到数据并对数据进行处理
                    List<String> arrayList = getDataFromeDB();
                    for (String str : arrayList) {
                        syncHandleData(finalI,str,executorService);
                    }
                    System.out.println("当前线程"+Thread.currentThread().getName()+",---【任务"+finalI+"】执行完成---");
                } finally {
                    countDownLatch.countDown();
                }
            });
        }
        countDownLatch.await();
        watch.stop();
        System.out.println(watch.prettyPrint());


    }
    private static CompletableFuture<String> syncHandleData(int finalI,String str,ExecutorService executorService){
        return CompletableFuture.supplyAsync(()->{
            try {
                System.out.println("当前线程"+Thread.currentThread().getName()+",【任务"+finalI+"】开始处理数据="+str);
                TimeUnit.SECONDS.sleep(1);
            } catch (InterruptedException e){
                throw new RuntimeException(e);
            }
            return str;
        },executorService);
    }
    private static List<String> getDataFromeDB(){
        List<String> arrayList = new ArrayList<>();
        arrayList.add("1");
        arrayList.add("2");
        return arrayList;
    }
}
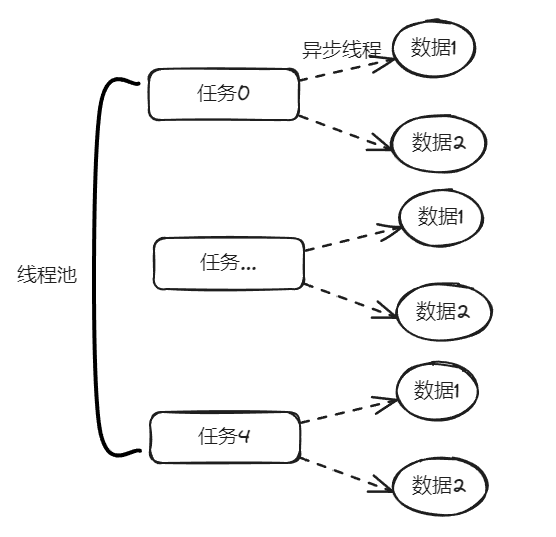
在异步线程里面去处理这部分从数据库中捞出来的数据,并行处理加快响应速度。
对应到图片,大概就是这个意思:
把程序运行起来之后,日志变成了这样:
当前线程pool-1-thread-2,---【任务1】开始执行---
当前线程pool-1-thread-1,---【任务0】开始执行---
当前线程pool-1-thread-3,---【任务2】开始执行---
当前线程pool-1-thread-1,---【任务0】执行完成---
当前线程pool-1-thread-2,---【任务1】执行完成---
当前线程pool-1-thread-3,---【任务2】执行完成---
当前线程pool-1-thread-2,---【任务4】开始执行---
当前线程pool-1-thread-3,【任务0】开始处理数据=1
当前线程pool-1-thread-1,---【任务3】开始执行---
当前线程pool-1-thread-1,---【任务3】执行完成---
当前线程pool-1-thread-1,【任务1】开始处理数据=1
当前线程pool-1-thread-2,---【任务4】执行完成---
当前线程pool-1-thread-2,【任务0】开始处理数据=2
StopWatch 'MainTest': running time (millis) = 53
-----------------------------------------
ms     %     Task name
-----------------------------------------
00053 但是,程序运行直接就是到了 9.9ms: 100%

当前线程pool-1-thread-2,【任务2】开始处理数据=1
当前线程pool-1-thread-3,【任务2】开始处理数据=2
当前线程pool-1-thread-1,【任务1】开始处理数据=2
当前线程pool-1-thread-2,【任务4】开始处理数据=1
当前线程pool-1-thread-1,【任务4】开始处理数据=2
当前线程pool-1-thread-3,【任务3】开始处理数据=1
当前线程pool-1-thread-3,【任务3】开始处理数据=2
我们搜索“执行完成”,也能搜到 5 个对应输出。
从日志输出来看,任务 2 需要处理的两个数据,确实是在不同的异步线程中处理数据,也实现了我的需求。但是,程序运行直接就是到了 53ms:
这个优化这么牛逼的吗?从 4083ms 到了 53ms?稍加分析,你会发现这里面是有问题的。
问题就是由于转异步了,所以 for 循环里面的任务中的 countDownLatch 很快就减到 0 了。于是 await 继续执行,所以很快就输出了程序运行时间。53ms 只是任务提交到线程池的时间,每个任务的数据处理时间还没算呢:
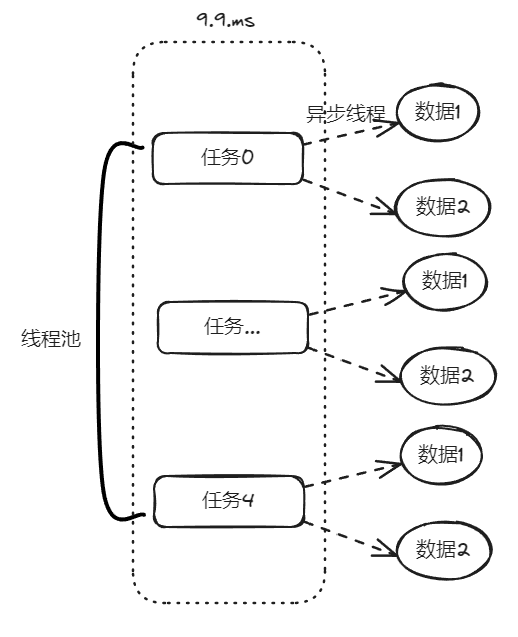
从日志输出上也可以看出,在输出了 StopWatch 的日志后,各个任务还在处理数据。这样时间就显得不够真实。
那么我们应该怎么办呢?很简单嘛,需要子任务真正执行完成后,父任务的 countDownLatch 才能进行 countDown 的动作。
具体实现上就是给子任务再加一个 countDownLatch 栅栏:
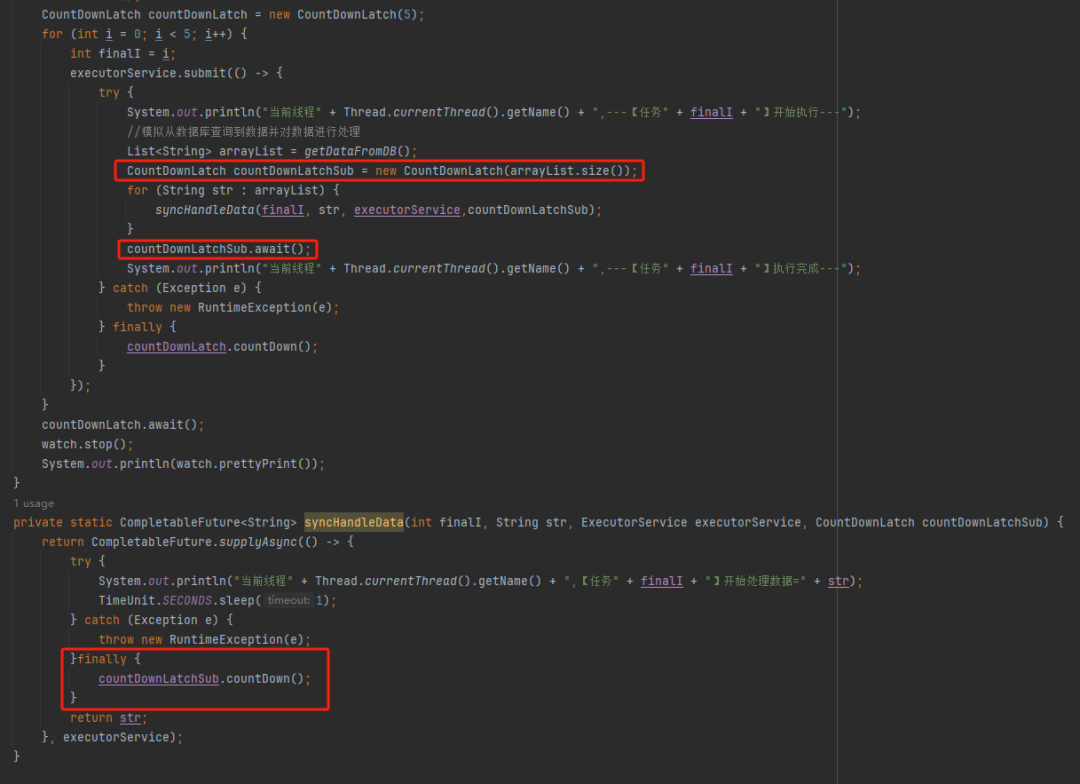
代码如下:

public class MainTest {
    public static void main(String[] args) throws InterruptedException {
        ThreadPoolExecutor executorService = new ThreadPoolExecutor(3, 10, 0L, TimeUnit.MILLISECONDS, new LinkedBlockingDeque<>(100));
        StopWatch watch = new StopWatch("MainTest");
        watch.start();
        CountDownLatch countDownLatch = new CountDownLatch(5);
        for (int i = 0; i < 5; i++) {
            int finalI = i;
            executorService.submit(()->{
                try {
                    System.out.println("当前线程"+Thread.currentThread().getName()+",---【任务"+finalI+"】开始执行---");
                    // 模拟从数据库查询到数据并对数据进行处理
                    List<String> arrayList = getDataFromeDB();
                    CountDownLatch countDownLatchSub = new CountDownLatch(arrayList.size());
                    for (String str : arrayList) {
                        syncHandleData(finalI,str,executorService,countDownLatchSub);
                    }
                    countDownLatchSub.await();
                    System.out.println("当前线程"+Thread.currentThread().getName()+",---【任务"+finalI+"】执行完成---");
                } catch (InterruptedException e) {
                    throw new RuntimeException(e);
                } finally {
                    countDownLatch.countDown();
                }
            });
        }
        countDownLatch.await();
        watch.stop();
        System.out.println(watch.prettyPrint());


    }
    private static CompletableFuture<String> syncHandleData(int finalI,String str,ExecutorService executorService,CountDownLatch countDownLatchSub){
        return CompletableFuture.supplyAsync(()->{
            try {
                System.out.println("当前线程"+Thread.currentThread().getName()+",【任务"+finalI+"】开始处理数据="+str);
                TimeUnit.SECONDS.sleep(1);
            } catch (InterruptedException e){
                throw new RuntimeException(e);
            } finally {
                countDownLatchSub.countDown();
            }
            return str;
        },executorService);
    }
    private static List<String> getDataFromeDB(){
        List<String> arrayList = new ArrayList<>();
        arrayList.add("1");
        arrayList.add("2");
        return arrayList;
    }
}
我们希望的运行结果应该是这样的:
当前线程pool-1-thread-3,---【任务2】开始执行---
当前线程pool-1-thread-1,【任务2】开始处理数据=1
当前线程pool-1-thread-2,【任务2】开始处理数据=2
当前线程pool-1-thread-3,---【任务2】执行完成---
即子任务全部完成之后,父任务才能算执行完成,这样统计出来的时间才是准确的。思路清晰,非常完美,再次运行,观察日志我们会发现:
当前线程pool-1-thread-1,---【任务0】开始执行---
当前线程pool-1-thread-2,---【任务1】开始执行---
当前线程pool-1-thread-3,---【任务2】开始执行---
呃,怎么回事,日志怎么不输出了?是的,就是不输出了。不输出了,就是踩到这个坑了。不论你重启多少次,都是这样:日志不输出了,程序就像是卡着了一样。
上面这个 Demo 已经是我基于遇到的生产问题,极力简化后的版本了。现在,这个坑也已经呈现在你眼前了。我们一起来分析一波。首先,我问你:真的在线上遇到这种程序“假死”的问题,你会怎么办?早几年,歪师傅的习惯是抱着代码慢慢啃,试图从代码中找到端倪。这样确实是可以,但是通常来说效率不高。现在我的习惯是直接把现场 dump 下来,分析现场。比如在这个场景下,我们直观上的感受是“卡住了”,那就 dump 一把线程,管它有枣没枣,打一杆子再说:
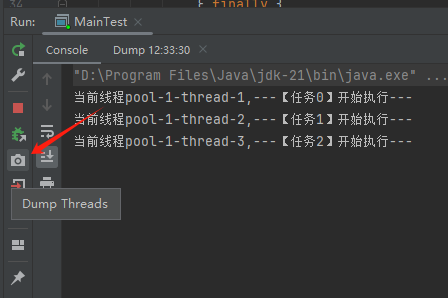
通过 Dump 文件,可以发现线程池的线程都在 MainTest 的第 25 行上 parking ,处于等待状态:
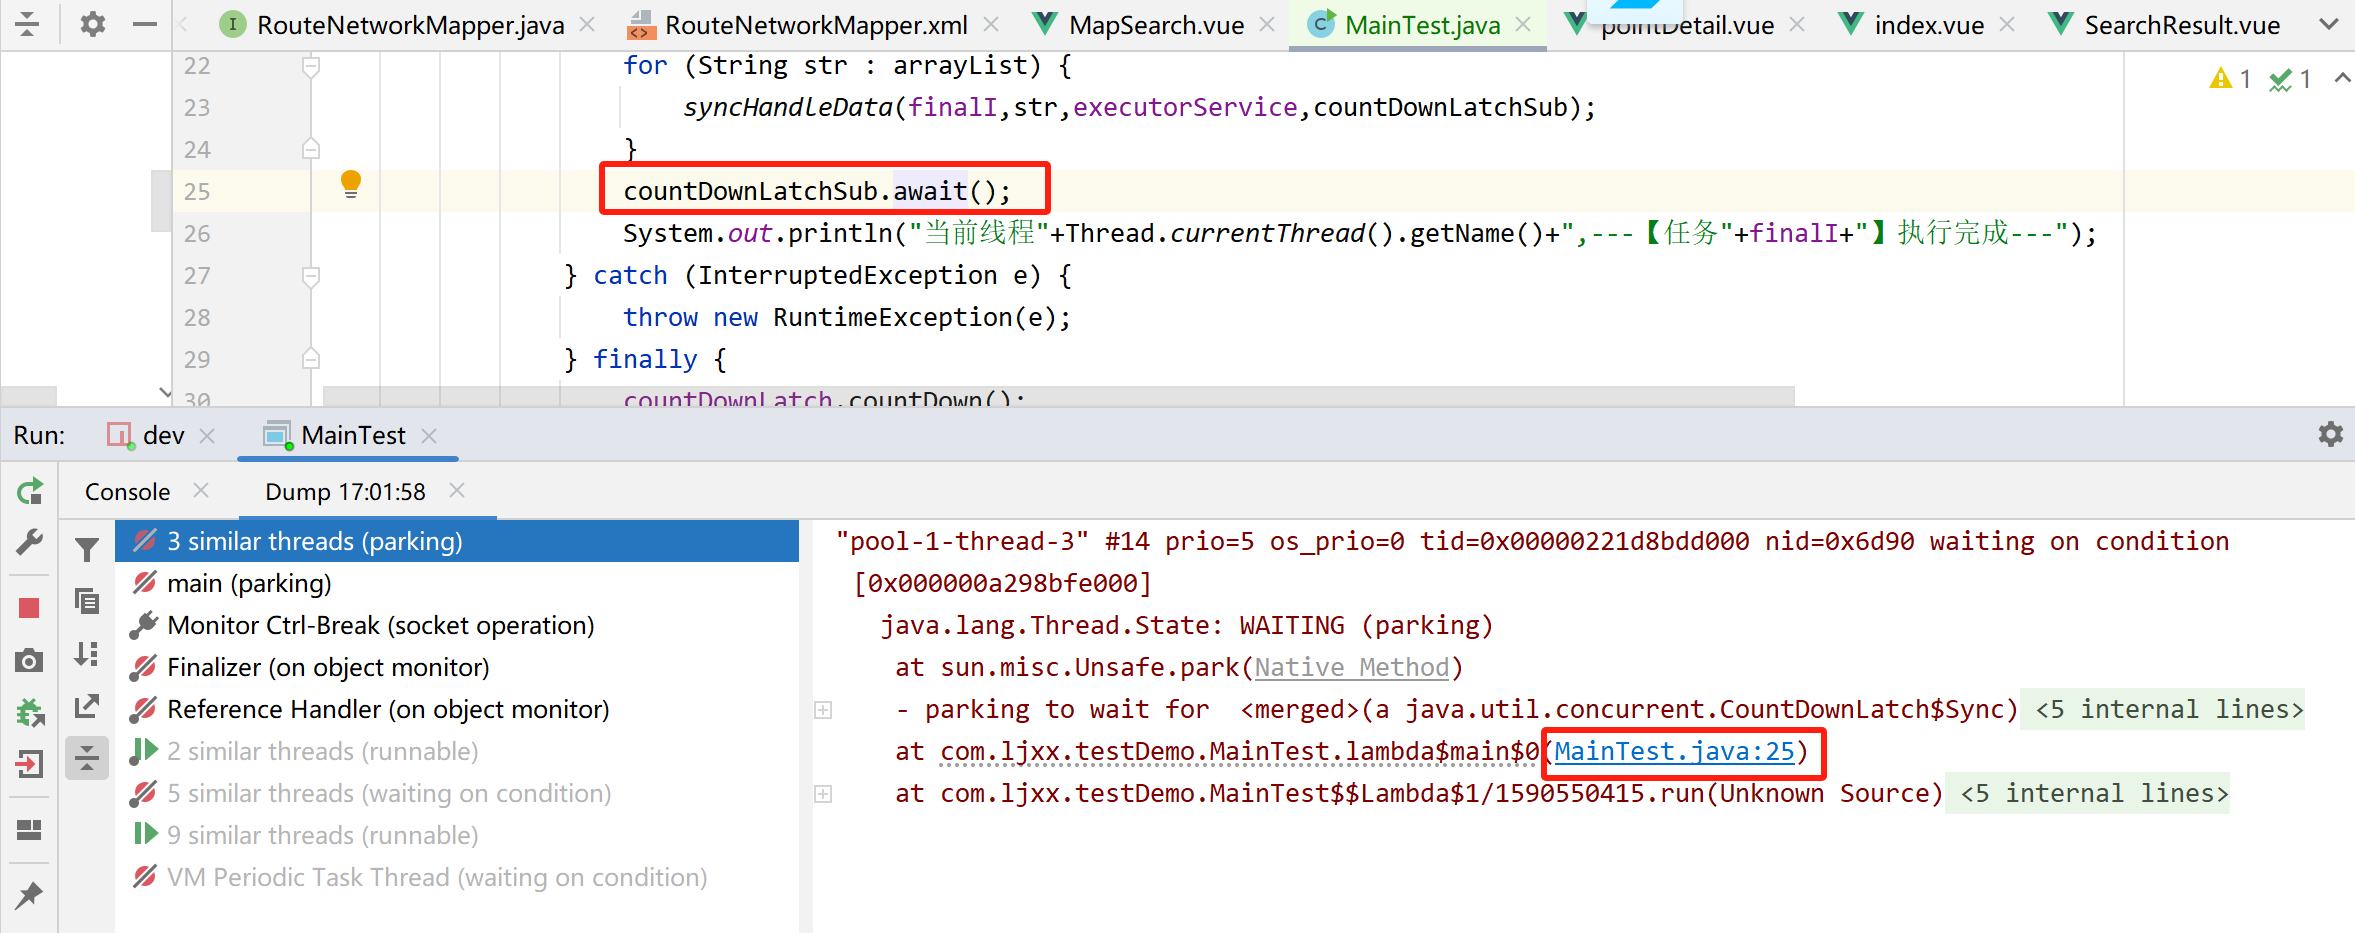
这行代码在干啥?
countDownLatchSub.await();
是父任务在等待子任务执行结束,运行 finally 代码,把 countDownLatchSub 的计数 countDown 到 0,才会继续执行:
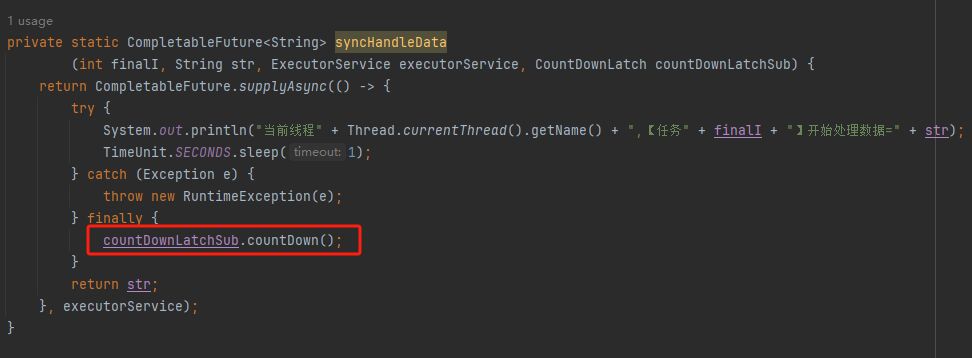
所以现在的现象就是子任务的 countDownLatchSub 把父任务的拦住了。换句话说就是父任务被拦住是因为子任务的 finally 代码中的countDownLatchSub.countDown() 方法没有被执行。好,那么最关键的问题就来了:为什么没有执行?
首先,我们把目光聚焦在线程池这里:
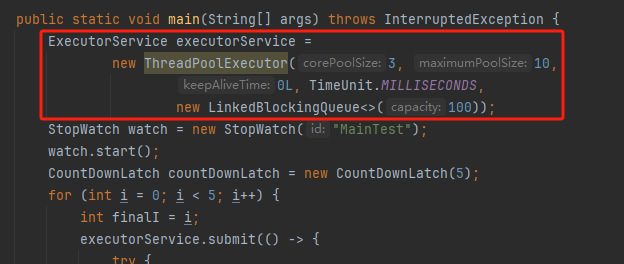
这个线程池核心线程数是 3,但是我们要提交 5 个任务到线程池去。父任务哐哐哐,就把核心线程数占满了。接下来子任务也要往这个线程池提交任务怎么办?当然是进队列等着了。一进队列,就完犊子。到这里,我觉得你应该能想明白问题了。你想想,父任务这个时候干啥?是不是等在 countDownLatchSub.await() 这里。而 countDownLatchSub.await() 什么时候能继续执行?是不是要所有子任务都执行 finally 后?那么子任务现在在干啥?是不是都在线程池里面的队列等着被执行呢?那线程池队列里面的任务什么时候才执行?是不是等着有空闲线程的时候?那现在有没有空闲线程?没有,所有的线程都去执行父任务去了。那你想想,父任务这个时候干啥?是不是等在 countDownLatchSub.await() 这里。
...,父任务在等子任务执行。子任务在等线程池调度。线程池在等父任务释放线程。闭环了,相互等待了,家人们。这,就是坑。
另一种理解:线程池中核心线程的数量为3。当提交一个任务时,线程池会新建一个线程来执行任务,直到当前线程数等于3。当系统的线程数量等于3后,因为是指定容量为100无界的任务队列,剩下两个任务添加到任务队列中,所以线程数量不再增加。如果添加成功,则任务会等待空闲线程将其取出并执行;接下来子任务也要往这个线程池提交任务怎么办?当然是进队列等着了。此时父任务在等待子任务执行完成,而子任务由于没有空闲线程就一直在队列中处于等待状态。
现在把坑的原理摸清楚了,我在给你说一下真实的线上场景踩到这个坑是怎么样的呢?

上游发起请求到微服务 A 的接口 1,该接口需要调用微服务 B 的接口 2。但是微服务 B 的接口 2,需要从微服务 A 接口 3 获取数据。然而在微服务 A 内部,全局使用的是同一个自定义线程池。更巧的是接口 1 和接口 3 内部都使用了这个自定义线程池做异步并行处理,想着是加快响应速度。
整个情况就变成了这样:
- 接口 1 收到请求之后,把请求转到自定义线程池中,然后等接口 2 返回。
- 接口 2 调用接口 3,并等待返回。
- 接口 3 里面把请求转到了自定义线程池中,被放入了队列。
- 线程池的线程都被接口 1 给占住了,没有资源去执行队列里面的接口 3 任务。
- 相互等待,一直僵持。
我们的 Demo 还是能比较清晰的看到父子任务之间的关系。但是在这个微服务的场景下,在无形之间,就形成了不易察觉的父子任务关系。所以就踩到了这个坑。
找到了坑的原因,解决方案就随之而出了。父子任务不要共用一个线程池,给子任务也搞一个自定义线程池就可以了:
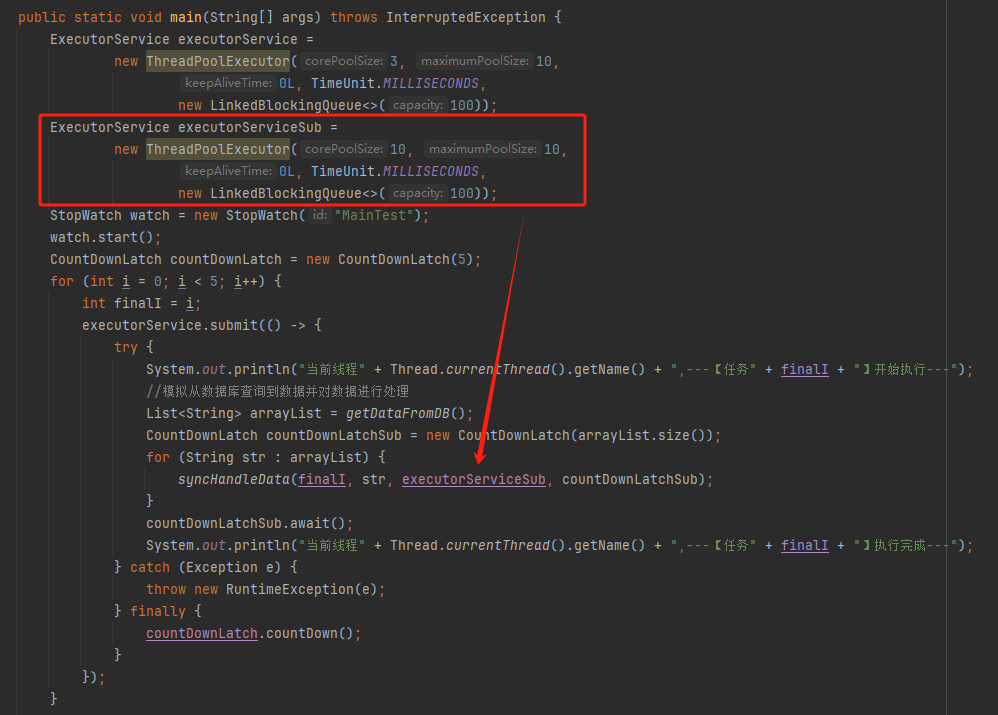
代码如下:

public class MainTest {
    public static void main(String[] args) throws InterruptedException {
        ThreadPoolExecutor executorService = new ThreadPoolExecutor(3, 10, 0L, TimeUnit.MILLISECONDS, new LinkedBlockingDeque<>(100));
        ThreadPoolExecutor executorServiceSub = new ThreadPoolExecutor(10, 10, 0L, TimeUnit.MILLISECONDS, new LinkedBlockingDeque<>(100));
        StopWatch watch = new StopWatch("MainTest");
        watch.start();
        CountDownLatch countDownLatch = new CountDownLatch(5);
        for (int i = 0; i < 5; i++) {
            int finalI = i;
            executorService.submit(()->{
                try {
                    System.out.println("当前线程"+Thread.currentThread().getName()+",---【任务"+finalI+"】开始执行---");
                    // 模拟从数据库查询到数据并对数据进行处理
                    List<String> arrayList = getDataFromeDB();
                    CountDownLatch countDownLatchSub = new CountDownLatch(arrayList.size());
                    for (String str : arrayList) {
                        syncHandleData(finalI,str,executorServiceSub,countDownLatchSub);
                    }
                    countDownLatchSub.await();
                    System.out.println("当前线程"+Thread.currentThread().getName()+",---【任务"+finalI+"】执行完成---");
                } catch (InterruptedException e) {
                    throw new RuntimeException(e);
                } finally {
                    countDownLatch.countDown();
                }
            });
        }
        countDownLatch.await();
        watch.stop();
        System.out.println(watch.prettyPrint());


    }
    private static CompletableFuture<String> syncHandleData(int finalI,String str,ExecutorService executorService,CountDownLatch countDownLatchSub){
        return CompletableFuture.supplyAsync(()->{
            try {
                System.out.println("当前线程"+Thread.currentThread().getName()+",【任务"+finalI+"】开始处理数据="+str);
                TimeUnit.SECONDS.sleep(1);
            } catch (InterruptedException e){
                throw new RuntimeException(e);
            } finally {
                countDownLatchSub.countDown();
            }
            return str;
        },executorService);
    }
    private static List<String> getDataFromeDB(){
        List<String> arrayList = new ArrayList<>();
        arrayList.add("1");
        arrayList.add("2");
        return arrayList;
    }
}
运行起来看看日志:
当前线程pool-1-thread-2,---【任务1】开始执行---
当前线程pool-1-thread-1,---【任务0】开始执行---
当前线程pool-1-thread-3,---【任务2】开始执行---
当前线程pool-2-thread-2,【任务0】开始处理数据=1
当前线程pool-2-thread-3,【任务2】开始处理数据=1
当前线程pool-2-thread-1,【任务1】开始处理数据=1
当前线程pool-2-thread-4,【任务1】开始处理数据=2
当前线程pool-2-thread-6,【任务2】开始处理数据=2
当前线程pool-2-thread-5,【任务0】开始处理数据=2
当前线程pool-1-thread-1,---【任务0】执行完成---
当前线程pool-1-thread-2,---【任务1】执行完成---
当前线程pool-1-thread-3,---【任务2】执行完成---
当前线程pool-1-thread-2,---【任务4】开始执行---
当前线程pool-1-thread-1,---【任务3】开始执行---
当前线程pool-2-thread-7,【任务4】开始处理数据=1
当前线程pool-2-thread-8,【任务3】开始处理数据=1
当前线程pool-2-thread-9,【任务4】开始处理数据=2
当前线程pool-2-thread-10,【任务3】开始处理数据=2
当前线程pool-1-thread-2,---【任务4】执行完成---
当前线程pool-1-thread-1,---【任务3】执行完成---
StopWatch 'MainTest': running time (millis) = 2075
-----------------------------------------
ms     %     Task name
-----------------------------------------
02075  100%
首先整体运行时间只需要 2s 了,达到了我想要的效果。另外,我们观察一个具体的任务:
当前线程pool-1-thread-3,---【任务2】开始执行---
当前线程pool-2-thread-1,【任务2】开始处理数据=1
当前线程pool-2-thread-4,【任务2】开始处理数据=2
当前线程pool-1-thread-3,---【任务2】执行完成---
日志输出符合我们前面分析的,所有子任务执行完成后,父任务才打印执行完成,且子任务在不同的线程中执行。
而使用不同的线程池,换一个高大上的说法就叫做:线程池隔离。而且在一个项目中,公用一个线程池,也是一个埋坑的逻辑。
至少给你觉得关键的逻辑,单独分配一个线程池吧。避免出现线程池的线程都在执行非核心逻辑了,反而重要的任务在队列里面排队去了。
这就有点不合理了。最后,一句话总结这个问题:
如果线程池的任务之间存在父子关系,那么请不要使用同一个线程池。如果使用了同一个线程池,可能会因为子任务进了队列,导致父任务一直等待,出现假死现象。
感谢您的阅读,如果您觉得阅读本文对您有帮助,请点一下“推荐”按钮。本文欢迎各位转载,但是转载文章之后必须在文章页面中给出作者和原文连接。


【推荐】国内首个AI IDE,深度理解中文开发场景,立即下载体验Trae
【推荐】编程新体验,更懂你的AI,立即体验豆包MarsCode编程助手
【推荐】抖音旗下AI助手豆包,你的智能百科全书,全免费不限次数
【推荐】轻量又高性能的 SSH 工具 IShell:AI 加持,快人一步
· TypeScript + Deepseek 打造卜卦网站:技术与玄学的结合
· Manus的开源复刻OpenManus初探
· AI 智能体引爆开源社区「GitHub 热点速览」
· 三行代码完成国际化适配,妙~啊~
· .NET Core 中如何实现缓存的预热?