1、创建maven的jar工程,导入依赖:
<dependencies>
        <dependency>
            <groupId>org.springframework</groupId>
            <artifactId>spring-context</artifactId>
            <version>5.0.5.RELEASE</version>
        </dependency>
        <dependency>
            <groupId>org.springframework</groupId>
            <artifactId>spring-test</artifactId>
            <version>5.0.5.RELEASE</version>
        </dependency>
        <dependency>
            <groupId>commons-dbutils</groupId>
            <artifactId>commons-dbutils</artifactId>
            <version>1.4</version>
        </dependency>
        <dependency>
            <groupId>mysql</groupId>
            <artifactId>mysql-connector-java</artifactId>
            <version>5.1.6</version>
        </dependency>
        <dependency>
            <groupId>c3p0</groupId>
            <artifactId>c3p0</artifactId>
            <version>0.9.1.1</version>
        </dependency>
        <dependency>
            <groupId>junit</groupId>
            <artifactId>junit</artifactId>
            <version>4.12</version>
        </dependency>
    </dependencies>
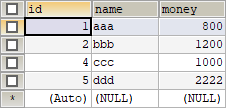
2、创建数据库eesy下的account1表

3、创建Account实体类
public class Account implements Serializable {
    private Integer id;
    private String name;
    private Float money;

    public Integer getId() {
        return id;
    }

    public void setId(Integer id) {
        this.id = id;
    }

    public String getName() {
        return name;
    }

    public void setName(String name) {
        this.name = name;
    }

    public Float getMoney() {
        return money;
    }

    public void setMoney(Float money) {
        this.money = money;
    }

    @Override
    public String toString() {
        return "Account{" +
                "id=" + id +
                ", name='" + name + '\'' +
                ", money=" + money +
                '}';
    }
}
4、写业务层接口IAccountService
public interface IAccountService {
    List<Account> findAllAccount();
    Account findAccountById(Integer accountId);
    void saveAccount(Account account);
    void updateAccount(Account account);
    void deleteAccount(Integer acccountId);
}
5、 写业务层接口的实现类,在类中添加set方法以XML的方式注入依赖
public class AccountServiceImpl implements IAccountService{
    private IAccountDao accountDao;
    public void setAccountDao(IAccountDao accountDao) {
        this.accountDao = accountDao;
    }
    @Override
    public List<Account> findAllAccount() {
        return accountDao.findAllAccount();
    }
    @Override
    public Account findAccountById(Integer accountId) {
        return accountDao.findAccountById(accountId);
    }
    @Override
    public void saveAccount(Account account) {
        accountDao.saveAccount(account);
    }
    @Override
    public void updateAccount(Account account) {
        accountDao.updateAccount(account);
    }
    @Override
    public void deleteAccount(Integer acccountId) {
        accountDao.deleteAccount(acccountId);
    }
}
6、创建持久层接口IAccountDao
public interface IAccountDao {
    List<Account> findAllAccount();
    Account findAccountById(Integer accountId);
    void saveAccount(Account account);
    void updateAccount(Account account);
    void deleteAccount(Integer acccountId);
}
7、创建持久层实现类AccountDaoImpl
public class AccountDaoImpl implements IAccountDao {
    private QueryRunner runner;
    public void setRunner(QueryRunner runner) {
        this.runner = runner;
    }
    @Override
    public List<Account> findAllAccount() {
        try{
            return runner.query("select * from account1",new BeanListHandler<Account>(Account.class));
        }catch (Exception e) {
            throw new RuntimeException(e);
        }
    }
    @Override
    public Account findAccountById(Integer accountId) {
        try{
            return runner.query("select * from account1 where id = ? ",new BeanHandler<Account>(Account.class),accountId);
        }catch (Exception e) {
            throw new RuntimeException(e);
        }
    }
    @Override
    public void saveAccount(Account account) {
        try{
            runner.update("insert into account1(name,money)values(?,?)",account.getName(),account.getMoney());
        }catch (Exception e) {
            throw new RuntimeException(e);
        }
    }
    @Override
    public void updateAccount(Account account) {
        try{
            runner.update("update account1 set name=?,money=? where id=?",account.getName(),account.getMoney(),account.getId());
        }catch (Exception e) {
            throw new RuntimeException(e);
        }
    }
    @Override
    public void deleteAccount(Integer accountId) {
        try{
            runner.update("delete from account1 where id=?",accountId);
        }catch (Exception e) {
            throw new RuntimeException(e);
        }
    }
}
QueryRunner对象也让spring提供。在类中添加set方法以XML的方式注入依赖
8、创建bean.xml文件,导入约束,配置bean对象
<?xml version="1.0" encoding="UTF-8"?>
<beans xmlns="http://www.springframework.org/schema/beans"
       xmlns:xsi="http://www.w3.org/2001/XMLSchema-instance"
       xsi:schemaLocation="http://www.springframework.org/schema/beans
        http://www.springframework.org/schema/beans/spring-beans.xsd">
    <!-- 配置Service -->
    <bean id="accountService" class="com.itheima.service.impl.AccountServiceImpl">
        <!-- 注入dao -->
        <property name="accountDao" ref="accountDao"></property>
    </bean>
    <!--配置Dao对象-->
    <bean id="accountDao" class="com.itheima.dao.impl.AccountDaoImpl">
        <!-- 注入QueryRunner -->
        <property name="runner" ref="runner"></property>
    </bean>
    <!--配置QueryRunner-->
    <bean id="runner" class="org.apache.commons.dbutils.QueryRunner" scope="prototype">
        <!--注入数据源-->
        <constructor-arg name="ds" ref="dataSource"></constructor-arg>
    </bean>
    <!-- 配置数据源 -->
    <bean id="dataSource" class="com.mchange.v2.c3p0.ComboPooledDataSource">
        <!--连接数据库的必备信息-->
        <property name="driverClass" value="com.mysql.jdbc.Driver"></property>
        <property name="jdbcUrl" value="jdbc:mysql://localhost:3306/eesy"></property>
        <property name="user" value="root"></property>
        <property name="password" value="123456"></property>
    </bean>
</beans>
注意:
1)、由于没有使用注解,并不需要context的支持,
2)、配置bean对象时,先配置业务层对象,如果你配置正确了,每一次都会指引你配下一个对象
QueryRunner对象可以通过带参构造函数创建,这样每条SQL语句在一个事务中,也可以使用无参构造函数创建,这样所有的语句在同一个事务中。现在由于我们是单表,一条sql语句的CRUD的操作,此时我们选择带参构造函数来创建QueryRunner对象。另外,QueryRunner没有set方法注入的,故不能用property标签,而是使用constructor-arg标签注入。QueryRunner对象是个单例对象,由于多个dao在使用同一个QueryRunner对象,有可能一个在用而一个还没有用完,导致线程互相干扰,故要把QueryRunner配置成多例对象,即scope=“prototype”,从而保证每次使用对象的时候,都是创建一个新的QueryRunner对象,QueryRunner如果是单例对象,在多个dao同时使用时,可能会产生线程安全问题。
9、使用Junit单元测试,测试我们的配置
以下代码是没有使用注解配置时的测试方法。
public class AccountServiceTest {

    @Test
    public void testFindAll() {
        //1.获取容易
        ApplicationContext ac = new ClassPathXmlApplicationContext("bean.xml");
        //2.得到业务层对象
        IAccountService as = ac.getBean("accountService",IAccountService.class);
        //3.执行方法
        List<Account> accounts = as.findAllAccount();
        for(Account account : accounts){
            System.out.println(account);
        }
    }

    @Test
    public void testFindOne() {
        //1.获取容易
        ApplicationContext ac = new ClassPathXmlApplicationContext("bean.xml");
        //2.得到业务层对象
        IAccountService as = ac.getBean("accountService",IAccountService.class);
        //3.执行方法
        Account account = as.findAccountById(1);
        System.out.println(account);
    }

    @Test
    public void testSave() {
        Account account = new Account();
        account.setName("test");
        account.setMoney(12345f);
        //1.获取容易
        ApplicationContext ac = new ClassPathXmlApplicationContext("bean.xml");
        //2.得到业务层对象
        IAccountService as = ac.getBean("accountService",IAccountService.class);
        //3.执行方法
        as.saveAccount(account);

    }

    @Test
    public void testUpdate() {
        //1.获取容易
        ApplicationContext ac = new ClassPathXmlApplicationContext("bean.xml");
        //2.得到业务层对象
        IAccountService as = ac.getBean("accountService",IAccountService.class);
        //3.执行方法
        Account account = as.findAccountById(4);
        account.setMoney(23456f);
        as.updateAccount(account);
    }

    @Test
    public void testDelete() {
        //1.获取容易
        ApplicationContext ac = new ClassPathXmlApplicationContext("bean.xml");
        //2.得到业务层对象
        IAccountService as = ac.getBean("accountService",IAccountService.class);
        //3.执行方法
        as.deleteAccount(4);
    }
}
如果将数据库连接相关的四个参数写到配置文件中,则
1、在resources目录下创建db.properties文件,内容如下
jdbc.driver=com.mysql.jdbc.Driver
jdbc.url=jdbc:mysql://localhost:3306/eesy
jdbc.username=root
jdbc.password=123456
2、修改bean.xml
<?xml version="1.0" encoding="UTF-8"?>
<beans xmlns="http://www.springframework.org/schema/beans"
       xmlns:xsi="http://www.w3.org/2001/XMLSchema-instance"
       xmlns:context="http://www.springframework.org/schema/context"
       xsi:schemaLocation="http://www.springframework.org/schema/beans
        http://www.springframework.org/schema/beans/spring-beans.xsd
        http://www.springframework.org/schema/context
        http://www.springframework.org/schema/context/spring-context.xsd">
    <!-- 配置Service -->
    <bean id="accountService" class="com.itheima.service.impl.AccountServiceImpl">
        <!-- 注入dao -->
        <property name="accountDao" ref="accountDao"></property>
    </bean>
    <!--配置Dao对象-->
    <bean id="accountDao" class="com.itheima.dao.impl.AccountDaoImpl">
        <!-- 注入QueryRunner -->
        <property name="runner" ref="runner"></property>
    </bean>
    <!--配置QueryRunner-->
    <bean id="runner" class="org.apache.commons.dbutils.QueryRunner" scope="prototype">
        <!--注入数据源-->
        <constructor-arg name="ds" ref="dataSource"></constructor-arg>
    </bean>
    <!-- 配置数据源 -->
    <bean id="dataSource" class="com.mchange.v2.c3p0.ComboPooledDataSource">
        <!--连接数据库的必备信息-->
        <property name="driverClass" value="${jdbc.driver}"></property>
        <property name="jdbcUrl" value="${jdbc.url}"></property>
        <property name="user" value="${jdbc.username}"></property>
        <property name="password" value="${jdbc.password}"></property>
    </bean>
  <!-- 加载配置文件 -->
    <context:property-placeholder location="classpath:db.properties"/>
</beans>

