空战博弈编程实现——gym+jsbsim
笔记
1 珠玉在前
论文1
-
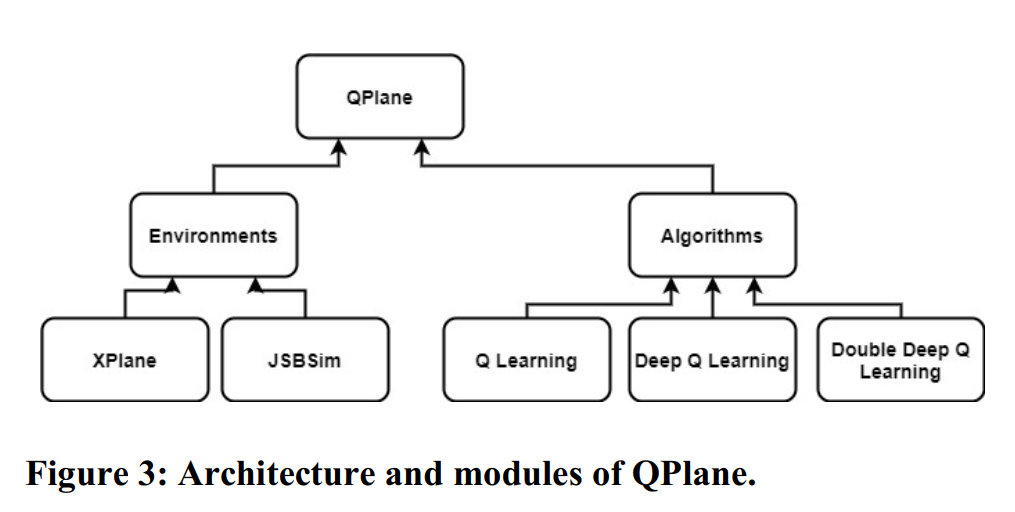
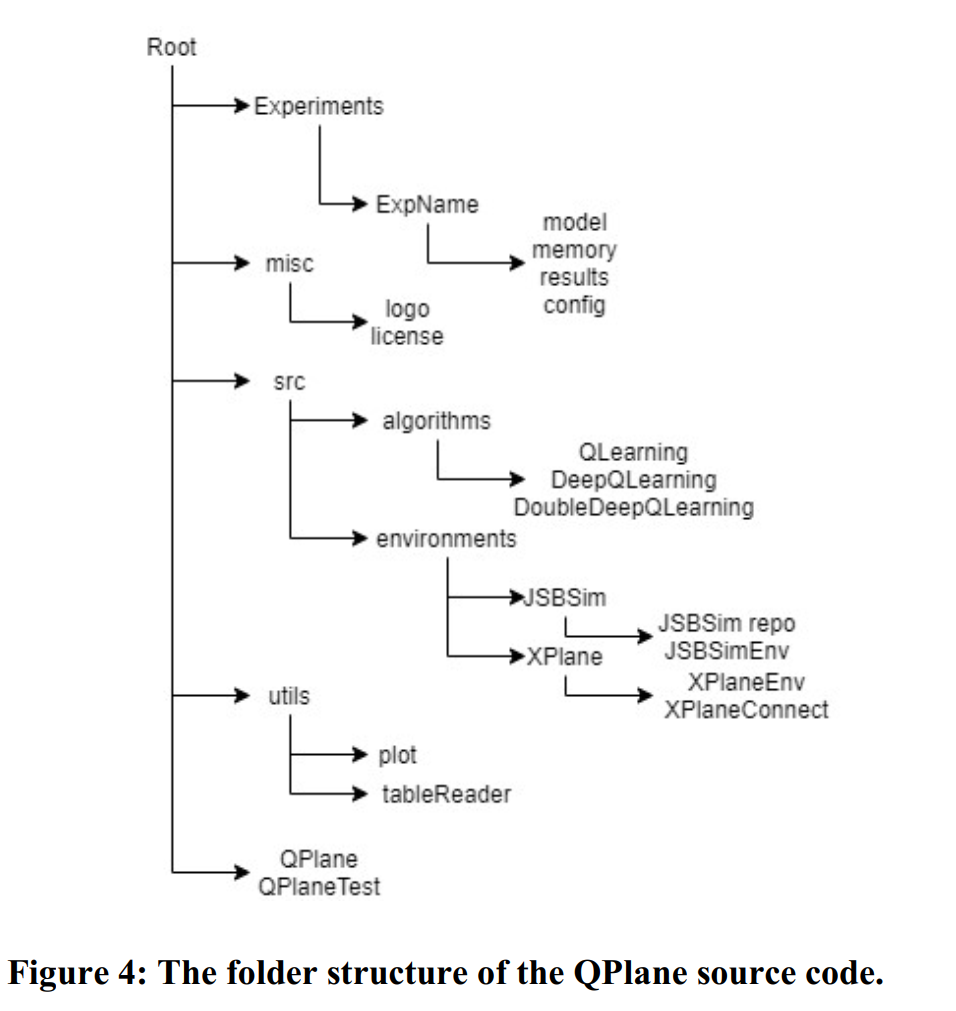
Richter D J, Calix R A. QPlane: An Open-Source Reinforcement Learning Toolkit for Autonomous Fixed Wing Aircraft Simulation[C]//Proceedings of the 12th ACM Multimedia Systems Conference. 2021: 261-266.
QPlane | Proceedings of the 12th ACM Multimedia Systems Conference
[本地](.\QPlane An Open-Source Reinforcement Learning Toolkit for Autonomous Fixed Wing Aircraft Simulation.pdf)
论文2
-
Rennie G. Autonomous Control of Simulated Fixed Wing Aircraft using Deep Reinforcement Learning[D]. Master’s thesis. The University of Bath, Bath, United Kingdom, 2018.
-
Rennie_Gordon.pdf (bath.ac.uk)
[本地](D:\NoteBook\gym+jsbsim\GYM环境下的JSMSim\Autonomous Control of Simulated Fixed Wing Aircraft using Deep Reinforcement Learning.pdf)
-
2 实践
实践1 论文2 gym-jsbsim
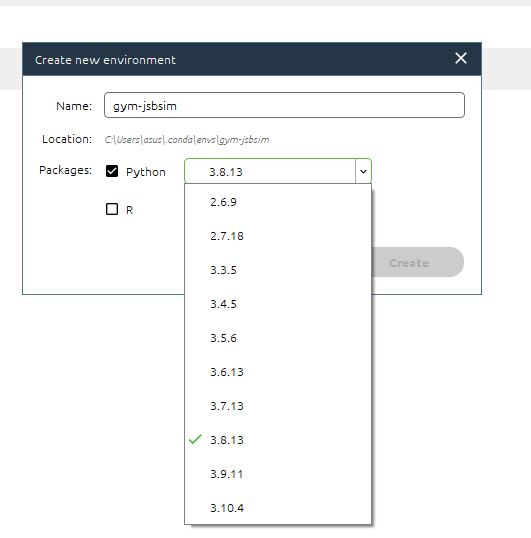
1 新建anaconda环境
-
选择Python3.8 命名为 gym-jsbsim
-
激活环境
conda activate gym-jsbsim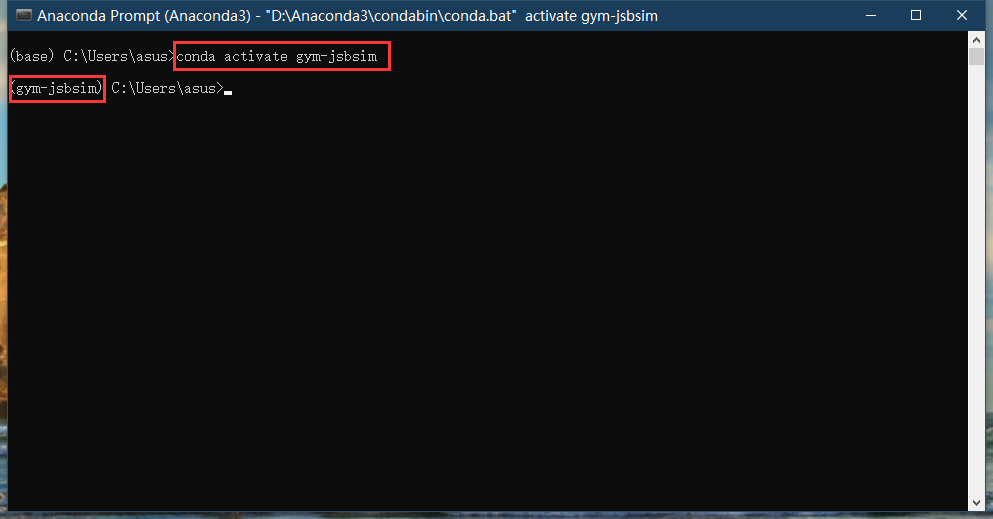
3 使用conda 安装 pytorch:查看之前的文章深度学习第一步 Windows+NVIDA配置 CUDA pytorch 环境 - 英飞 - 博客园 (cnblogs.com)
conda install pytorch torchvision torchaudio cudatoolkit=11.3 -c pytorch
测试pytorch
 import torch
>>> a = torch.ones((3,1))
>>> a = a.cuda(0)
>>> b = torch.ones((3,1)).cuda(0)
>>> a+b
安装 pygame gym ,numpy , matplotlib
pip install pygame
pip install gym
pip install matplotlib
pip install numpy
2 安装jsbsim
1安装python版本 jsbsim
发布 ·JSBSim-Team/jsbsim ·GitHub
conda install -c conda-forge jsbsim
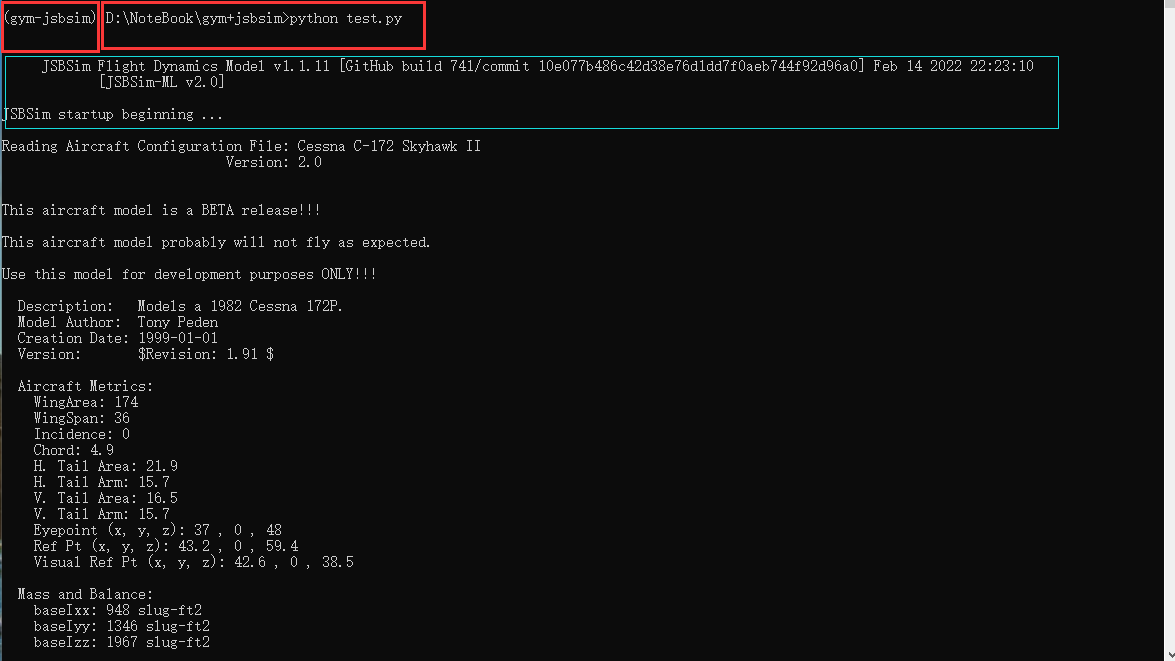
尝试运行Jsbsim
demo
GitHub - JSBSim-Team/jsbsim: An open source flight dynamics & control software library
test.py
import jsbsim

fdm = jsbsim.FGFDMExec(None)  # Use JSBSim default aircraft data.
fdm.load_script('scripts/c1723.xml')
fdm.run_ic()

while fdm.run():
  pass
命令行移动到test.py所在文件夹然后运行
python test.py
2 安装exe版本的jsbsim
下载,https://codeload.github.com/JSBSim-Team/jsbsim/zip/refs/heads/master
解压然后复制到C盘根目录下,并把其加入系统环境变量
在命令行中输入 jsbsim --version 验证

3 FilghtGear 安装
可以先省略
如何:安装飞机 - 飞行装备维基 (flightgear.org)
- 下载链接
Download Central – FlightGear Flight Simulator
一直点继续进行安装即可
然后将目录下的bin文件夹添加到环境变量中,然后重启电脑
fgfs --version
- 下载完成之后还要下载相关数据
Download FlightGear - Flight Simulator from SourceForge.net
下载完成之后解压,然后复制到FilghtGear/data文件夹
-
下载飞机模型Index of /flightgear/ftp/Aircraft/ (ibiblio.org)
这里我们先下载
- F15 fighter jet http://mirrors.ibiblio.org/flightgear/ftp/Aircraft/F-15.zip
- A320 airliner http://mirrors.ibiblio.org/flightgear/ftp/Aircraft/A320-family.zip
解压,然后复制到FilghtGear/data/Aircraft文件夹下即可
4 安装gym-jsbsim
pip install git+https://github.com/Gor-Ren/gym-jsbsim
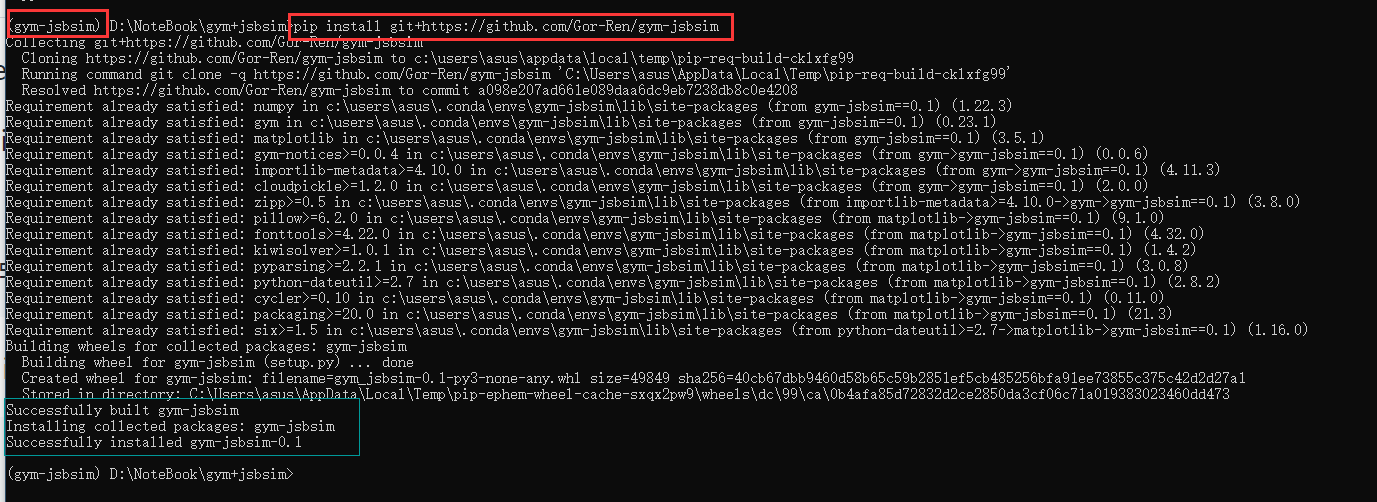
到此为止,我们就完成了对gym-jsbsim的配置,但是 gym-jsbsim只是将jsbsim仿真模型和gym相结合的产物,我们要想使用还得需要强化学习算法的框架。这里我们使用小雅的框架。
5 小雅框架配置
安装所需package
移动到所在文件夹 ,然后执行以下命令
pip install -r requirements.txt
如果嫌弃下载过慢,也可以直接下载
pip install gym pybullet Box2D matplotlib
安装 box-2d.py可能会报错,要先安装swig
conda install swig
安装之后,查看
swig -version
这里也可以直接安装swigwin-4.0.2然后将解压后的目录复制到C盘根目录下,并将文件夹添加到环境变量中
然后再来安装
pip install box2d.py
pip install box2d box2d-kengz --user
注意这里可能还需要安装Windows框架下的C++开发包(Microsoft Visual C++ Build Tools),需要的可以联系我
安装完成后,使用pip list 查看所安装的包
安装完成之后测试gym和pygame
创建test2.py文件,将下列代码复制,然后再命令行中使用python运行
test2.py
import gym

env = gym.make( 'CartPole-v0' )

for i_episode in range( 20 ):
	state = env.reset()

	for t in range( 1000 ):
		env.render()
		print( state )
		action = env.action_space.sample()
		state, reward, done, _ = env.step( action )

		if done:
			print('Episode #%d finished after %d timesteps' % (i_episode, t))
			break

到此所有环境配置完成
6 尝试编写代码
首先先跑一下小雅框架下给的example
1 问题提示 No module named 'isaacgym'
发现这个只有ubuntu Linux 18.04/20.04 release版本Isaac Gym - Download | NVIDIA Developer
2 其他的代码大多能跑通
3 将之前的ace环境加入,也能跑通过
4 查看gym_jsbsim/environment.py 发现这个应该就是配置环境的
4.1 尝试1 直接将gym-jsbsim整合进gym
1 在gym下新建test1文件夹,然后将environment.py和__init_.py 复制进去
尝试使用gym-jsbsim中的env
需要修改 ROOT_DIR = os.path.abspath('C:/JsbSim')
将这个路径改为jsbsim的exe所在路径,也就是第2步中安装exe版本呢的jsbsim路径
1 新建testGym-jsbsim.pyA
#查看 gym-jsbsim中的所有环境
import gym
import gym_jsbsim


T = gym_jsbsim.Envs
print(T)
2 使用debug模式来查看变量T
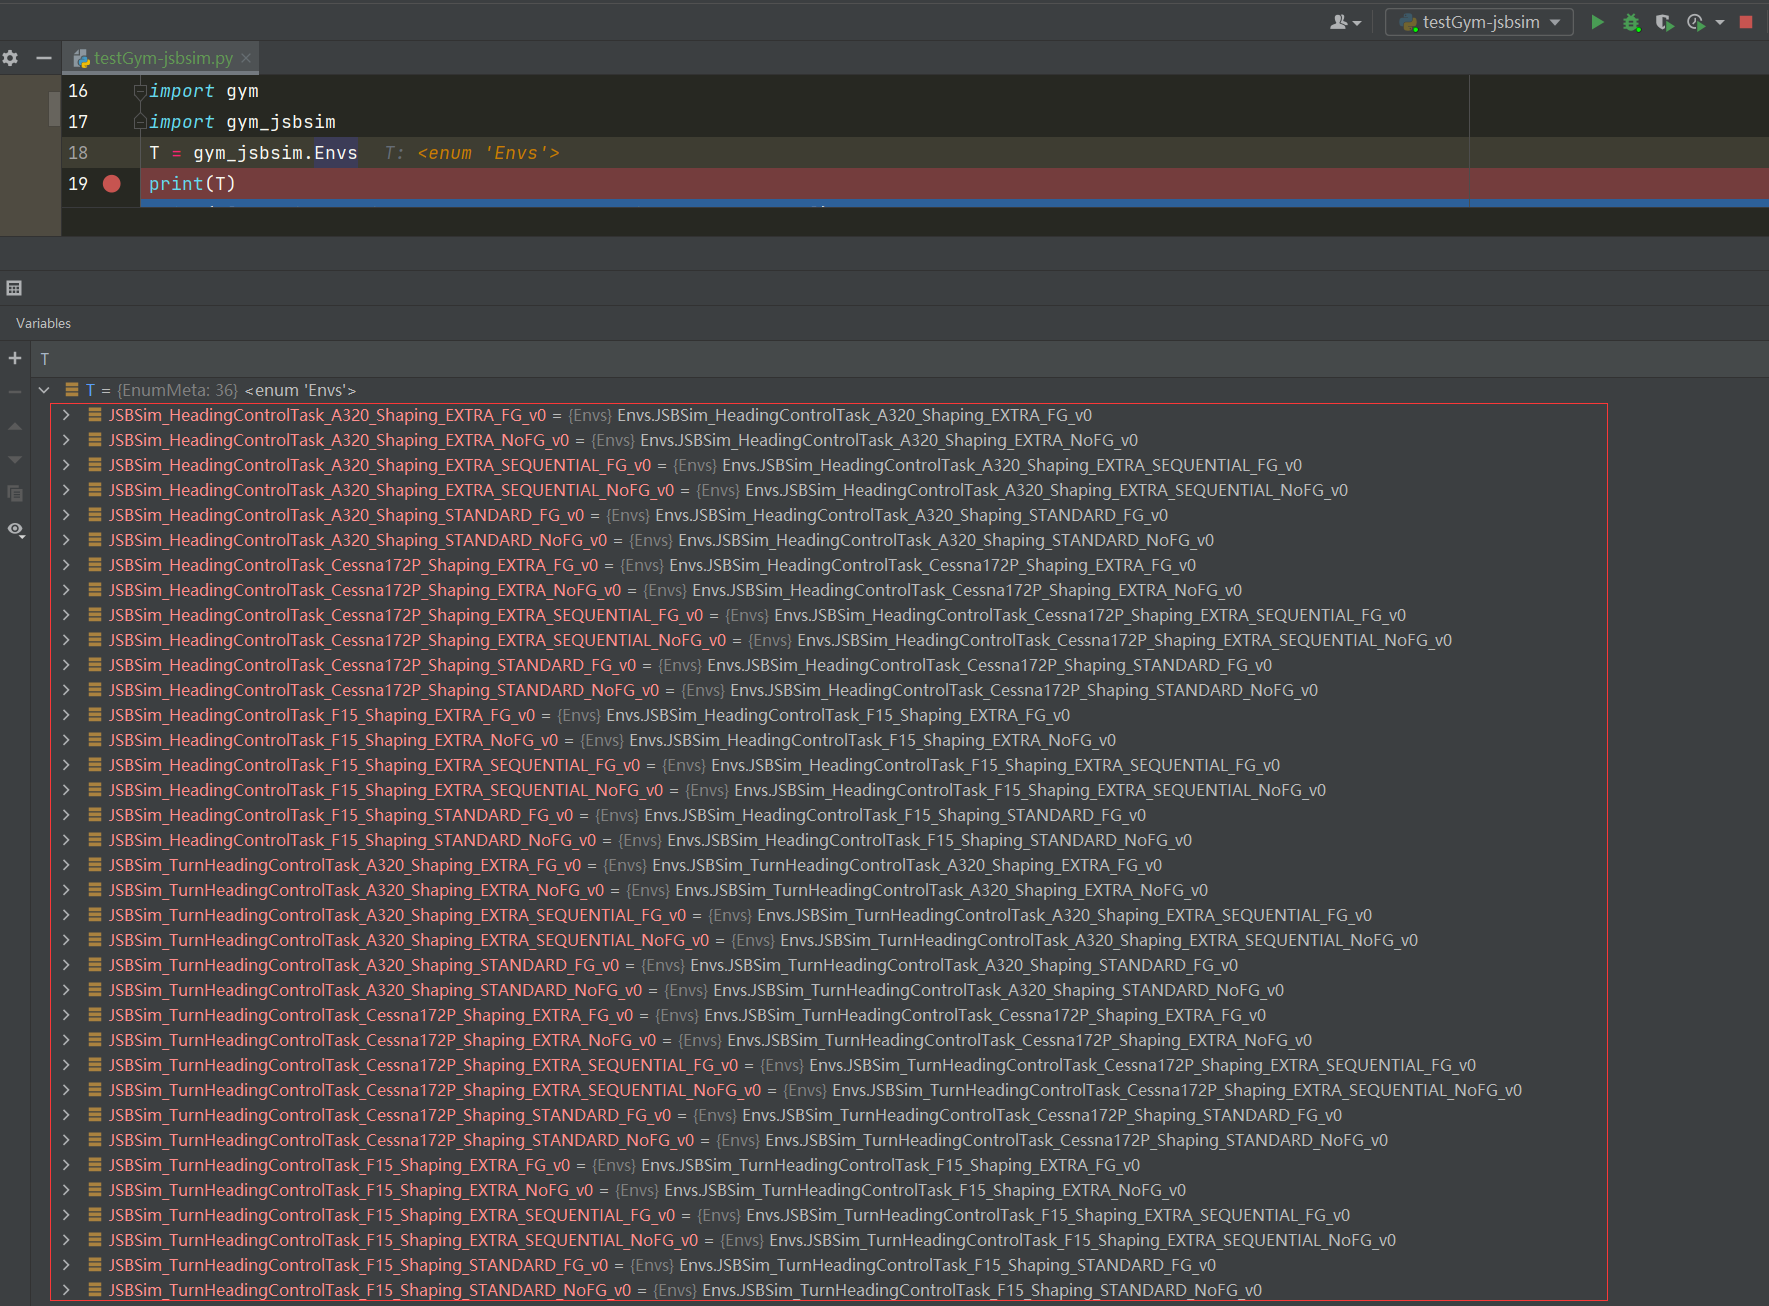
3 可以看到它是一个enmu类型,访问其中的元素:
(27条消息) Python中的枚举数据类型(Enum)_ProQianXiao的博客-CSDN博客_python 字符串 枚举
import gym
import gym_jsbsim
T = gym_jsbsim.Envs # 它的类型是enmu
#访问其中的元素
s1 = T['JSBSim_HeadingControlTask_A320_Shaping_EXTRA_FG_v0'] #使用name访问
s2 = T.JSBSim_HeadingControlTask_A320_Shaping_EXTRA_FG_v0 #使用name访问
s3 = T(T.JSBSim_HeadingControlTask_A320_Shaping_EXTRA_FG_v0.value)#使用value访问
4 测试gym-jsbsim中的环境
import gym
import gym_jsbsim
T = gym_jsbsim.Envs # 它的类型是enmu
# 访问其中的元素
# s1 = T['JSBSim_HeadingControlTask_A320_Shaping_EXTRA_FG_v0'] #使用name访问
# s2 = T.JSBSim_HeadingControlTask_A320_Shaping_EXTRA_FG_v0 #使用name访问
# s3 = T(T.JSBSim_HeadingControlTask_A320_Shaping_EXTRA_FG_v0.value)#使用value访问
# print(T)


env=gym.make(T['JSBSim_HeadingControlTask_A320_Shaping_EXTRA_FG_v0'].value)

for i_episode in range( 20 ):
	state = env.reset()

	for t in range( 1000 ):
		env.render()
		print( state )
		action = env.action_space.sample()
		state, reward, done, _ = env.step( action )

		if done:
			print('Episode #%d finished after %d timesteps' % (i_episode, t))
			break
发现能够运行
尝试 gym-jsbsim整合进小雅
调用jsbsim中的环境
args.env = PreprocessEnv(env=gym.make(gym_jsbsim.Envs.JSBSim_HeadingControlTask_A320_Shaping_EXTRA_FG_v0.value))
发现能够跑通
问题
gym-jsbsim只执行了两个任务agent_montage.mp4 - Google 云端硬盘
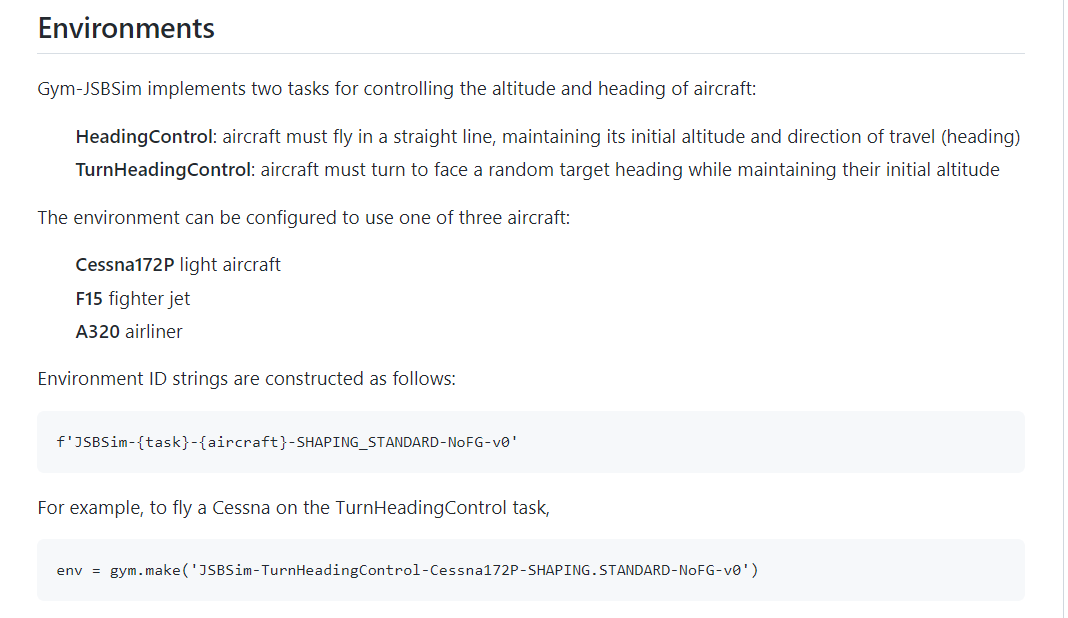
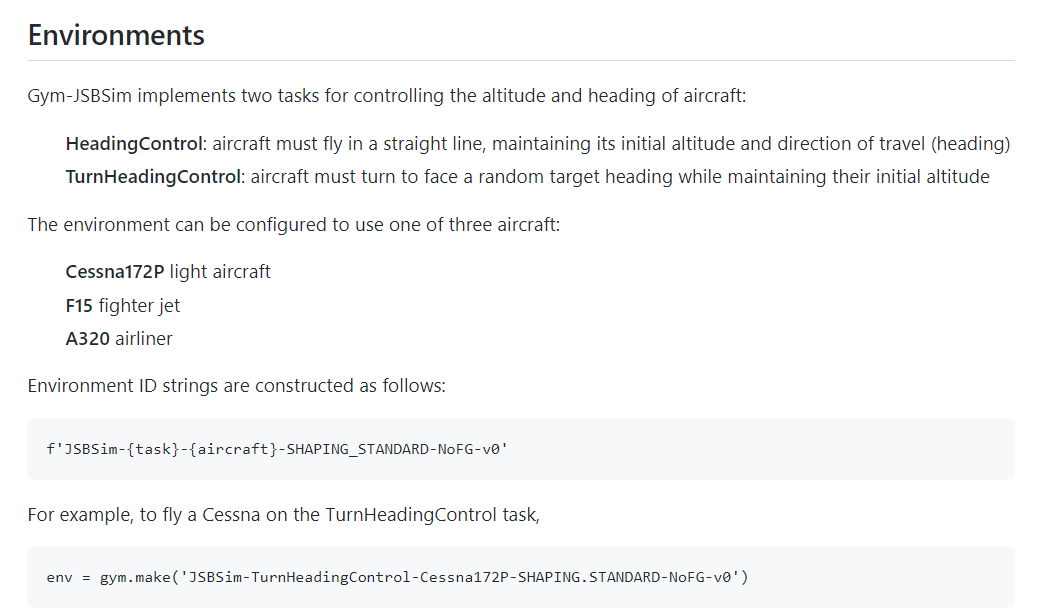
分别是
- 航向控制:飞机必须直线飞行,保持其初始高度和行进方向(航向)
- 转向航向控制:飞机必须转弯以面对随机目标航向,同时保持其初始高度
- 将环境配置为使用以下三种飞机之一:
- 赛斯纳172P轻型飞机
- F15战斗机
- A320客机7
尝试运行gym-jsbsim下的tests文件夹中的各个test
python中使用 unittest.TestCase 进行单元测试_净夜凡尘的博客-CSDN博客_python testcase
unittest --- 单元测试框架 — Python 3.10.4 文档
用法,直接在各个test的文件下输入
if __name__ == '__main__':
    unittest.main()
然后运行这个语句即可
-
test_simulation.py
需要修改 ROOT_DIR = os.path.abspath('C:/JsbSim')
将这个路径改为jsbsim的exe所在路径,也就是第2步中安装exe版本呢的jsbsim路径
-
manual_tests.py
进行单元测试,发现能够调用FlightGear ,但是画面模糊,视角也只是飞行员座舱视角
-
test_agnents.py
进行单元测试,结果如下,没有报错

-
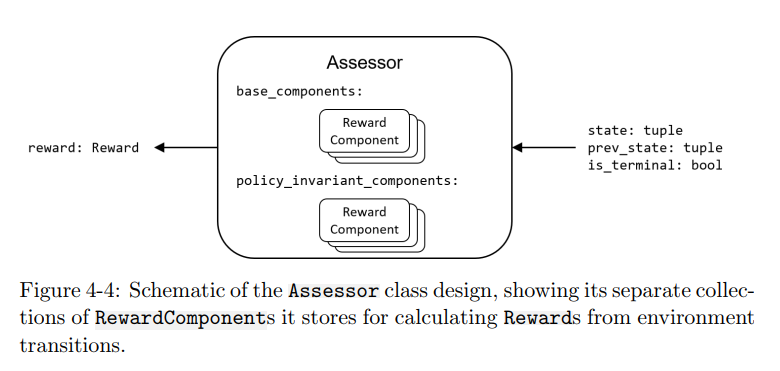
test_assessors.py
进行单元测试,结果如下,没有报错

-
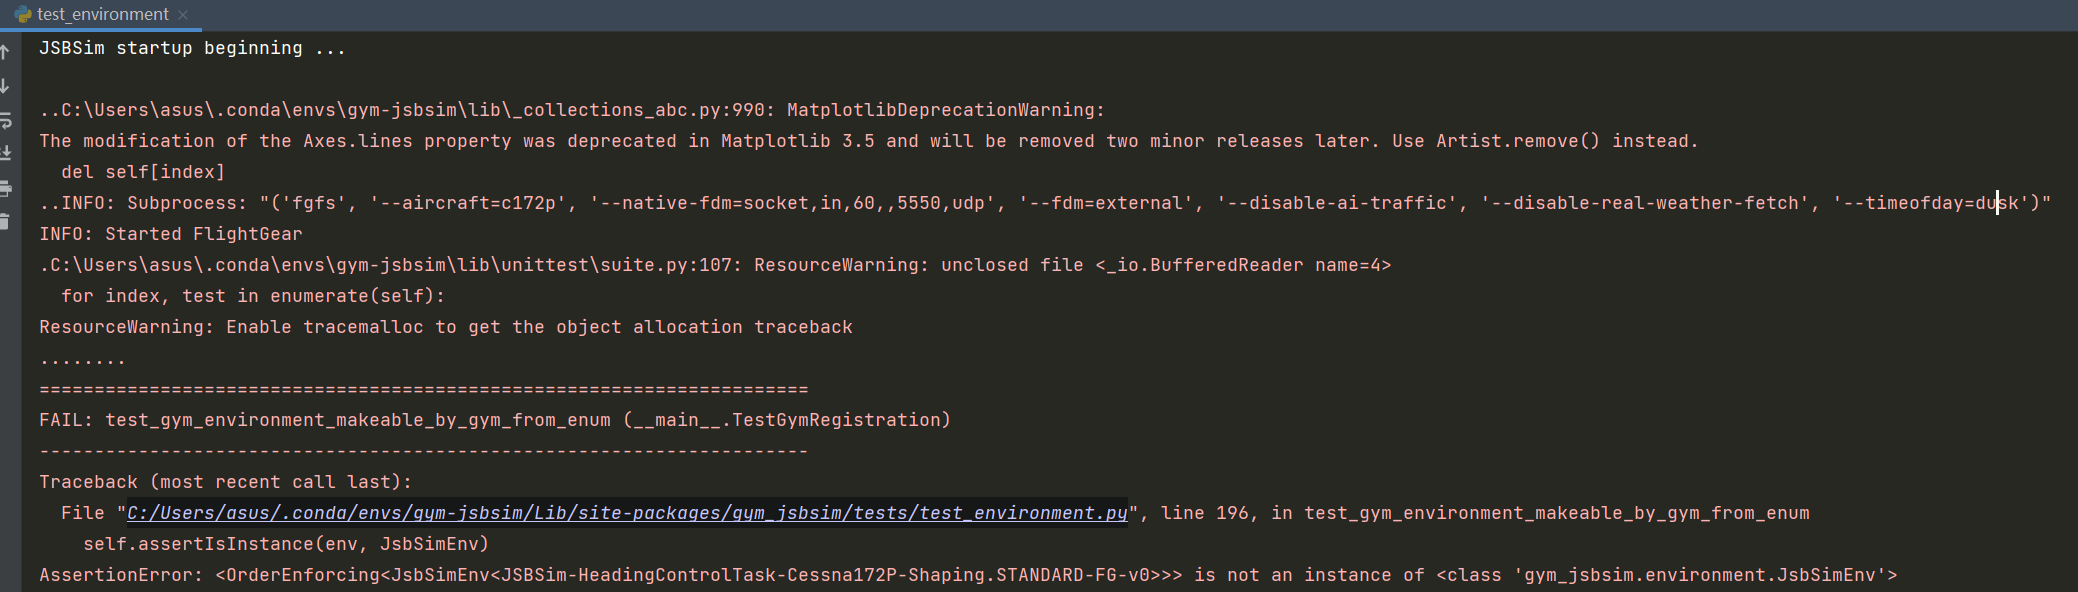
test_environment.py
进行单元测试,提示测试失败 ,尝试注释掉没有通过的测试,重新测试
没有通过的测试一共有五个,包含两个问题
-
第147行 self.assertAlmostEqual(alt_sl, alt_gl)
    def test_asl_agl_elevations_equal(self):
        # we want the height above sea level to equal ground elevation at all times
        self.setUp(agent_interaction_freq=1)
        for i in range(25):
            self.env.step(action=self.env.action_space.sample())
            alt_sl = self.env.sim[prp.altitude_sl_ft]
            alt_gl = self.env.sim[prp.BoundedProperty('position/h-agl-ft', '', 0, 0)]
            self.assertAlmostEqual(alt_sl, alt_gl)
Python unittest assertAlmostEqual()用法及代码示例 - 纯净天空 (vimsky.com)
assertAlmostEqualPython中的()是一个单元测试库函数,用于单元测试中以检查两个给定的值是否几乎相等。此函数将使用五个参数作为输入,并根据断言条件返回布尔值。
此函数通过计算差值,四舍五入到给定的小数位数(默认为7),然后与零进行比较,以检查第一和第二个近似相等。
如果提供了增量而不是位置,则第一和第二之间的差异必须小于或等于增量。
用法: assertAlmostEqual(first, second, places=7, message=None, delta=None)参数:assertAlmostEqual()接受以下说明的三个参数:
- first:第一个输入值(整数)
- second:第二个输入值(整数)
- places:近似的小数位
- message:作为测试消息失败时显示的消息的字符串语句。
- delta:近似的增量值
-
第191行 第196 行 第 208行
self.assertIsInstance(env, JsbSimEnv)
    def test_gym_environments_makeable_by_gym_from_helper_function(self):
        for jsb_env_id in utils.get_env_id_kwargs_map():
            env = gym.make(jsb_env_id)
            self.assertIsInstance(env, JsbSimEnv)
Python unittest assertIsInstance()用法及代码示例 - 纯净天空 (vimsky.com)
assertIsInstancePython中的()是单元测试库函数,用于单元测试中以检查对象是否为给定类的实例。此函数将使用三个参数作为输入,并根据断言条件返回布尔值。如果对象是给定类的实例,它将返回true,否则返回false。
用法: assertIsInstance(object, className, message)参数:assertIsInstance()接受以下说明的三个参数:
- object:作为给定类的实例检查的对象
- className:对象实例要比较的类名
- message:作为测试消息失败时显示的消息的字符串语句。
运行结果
-
-
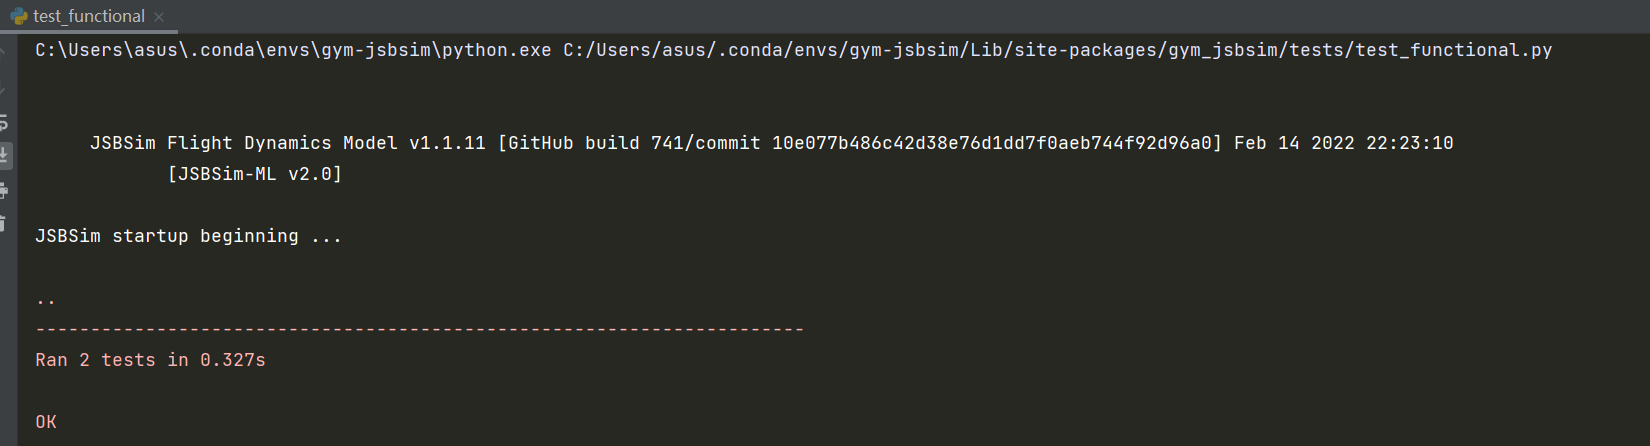
test_functional.py
进行单元测试,结果如下,没有报错,测试通过
-
test.geodetic_position.py
进行单元测试,结果如下,没有报错,测试通过

-
test_rewards.py
进行单元测试,结果如下,没有报错,测试通过

-
test_simulation.py
进行单元测试,结果如下,
提示没有找到相关文件,但这个好像并不影响,测试通过
-
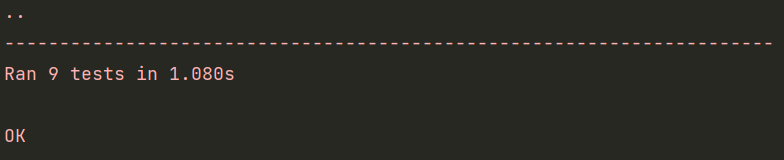
test_tasks.py
进行单元测试,结果如下,没有报错,测试通过

-
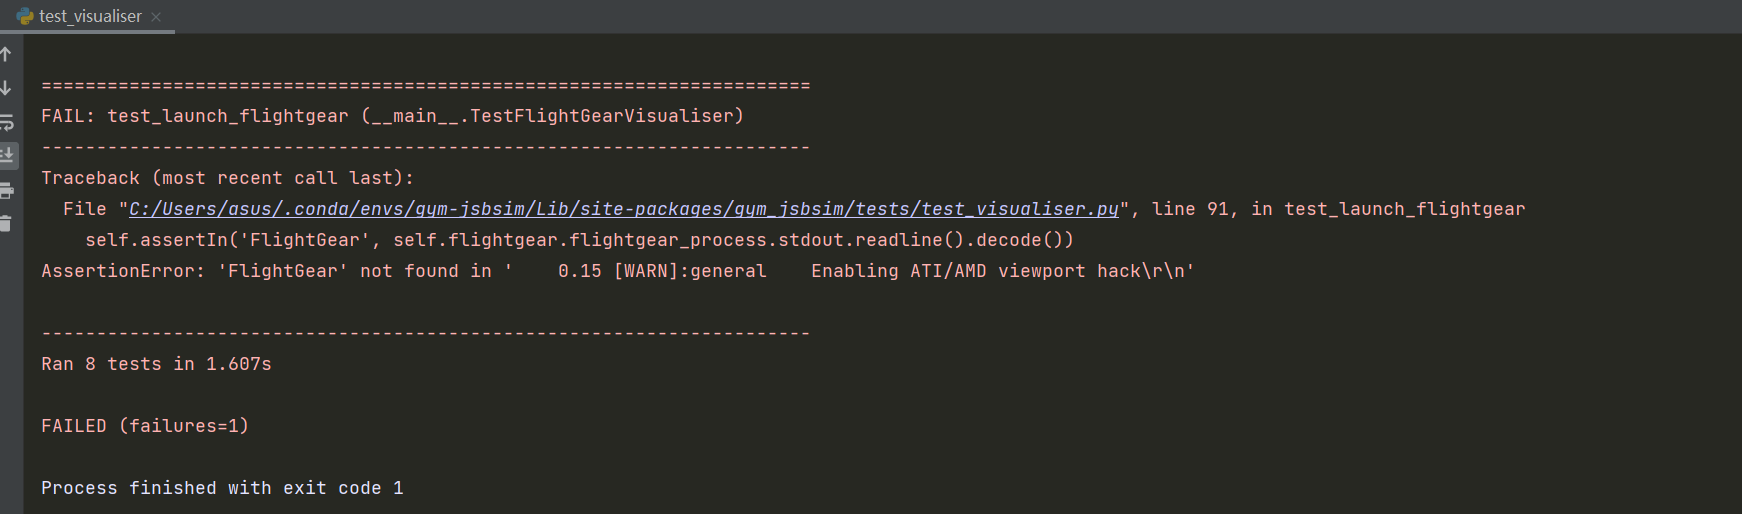
test_visualiser.py
有一个测试没有通过
7 尝试实现可视化
尝试运行FlighterGear 发现总是会卡死,于是放弃;可能换到unbutuan下会好一些
8 解析gym-jsbsim代码架构
pycharm的python_stubs是什么 - 开发技术 - 亿速云 (yisu.com)
[python - PyCharm,python_stubs是什么?- 堆栈溢出 (stackoverflow.com)](https://stackoverflow.com/questions/24266114/pycharm-what-is-python-stubs#:~:text=The python_stubs file is an automatically generated file,of a built-in functoin only from his docs.)
jsb的源码
JSBSim Flight Dynamics Model: FGFCSChannel Class Reference (sourceforge.net)
JSBSim编程实践_32768的博客-CSDN博客_jsbsim
代码调用架构

主要关注点
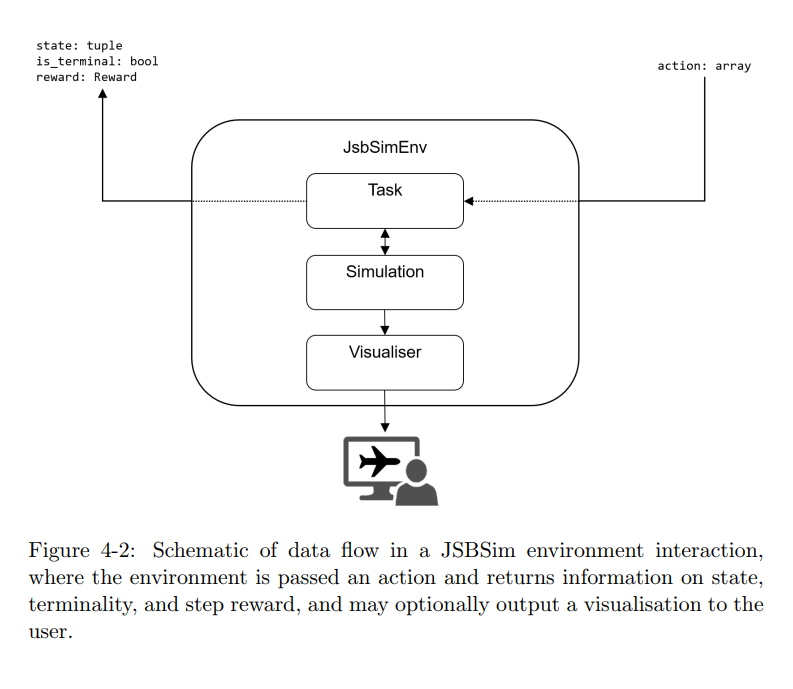
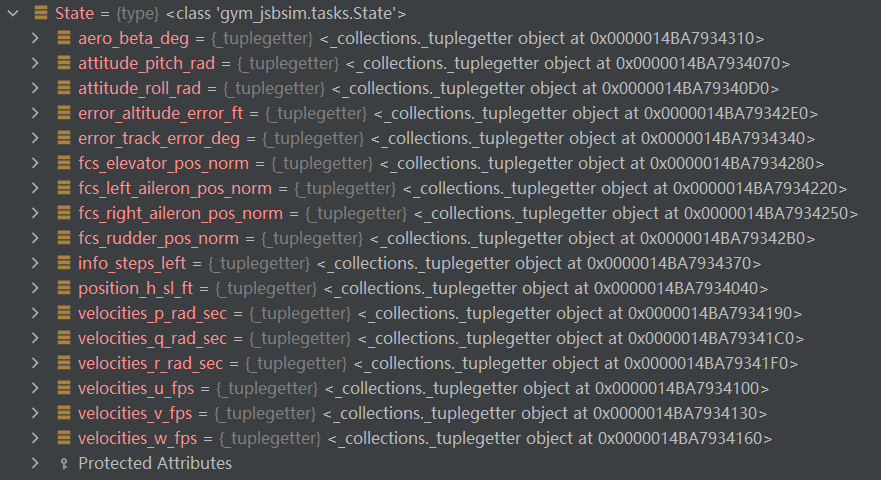
state
state 是一个(17)维度的ndarray
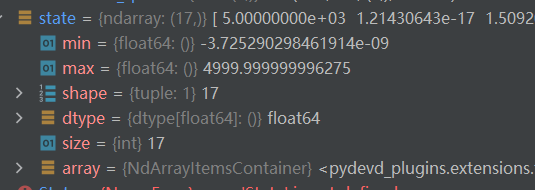
task.py observe_first_state State(
    position_h_sl_ft=4999.999999996275,
    attitude_pitch_rad=1.2143064331837637e-17,
    attitude_roll_rad=1.5092094240998214e-16,
    velocities_u_fps=827.0220000000002,
    velocities_v_fps=1.7763568394002505e-14,
    velocities_w_fps=-2.1316282072803006e-14,
    velocities_p_rad_sec=0.0,
    velocities_q_rad_sec=0.0,
    velocities_r_rad_sec=0.0,
    fcs_left_aileron_pos_norm=0.0,
    fcs_right_aileron_pos_norm=0.0,
    fcs_elevator_pos_norm=0.0,
    fcs_rudder_pos_norm=-1.0737451567970547e-16,
    error_altitude_error_ft=-3.725290298461914e-09,
    aero_beta_deg=1.2306534748390311e-15,     #
    error_track_error_deg=0.0,
    info_steps_left=299.0)

testGym-jsbsim.py [ 5.00000000e+03  1.21430643e-17  1.50920942e-16  8.27022000e+02
  1.77635684e-14 -2.13162821e-14  0.00000000e+00  0.00000000e+00
  0.00000000e+00  0.00000000e+00  0.00000000e+00  0.00000000e+00
 -1.07374516e-16 -3.72529030e-09  1.23065347e-15  0.00000000e+00
  2.99000000e+02]
其含义为
action
action 是一个三维的ndarray
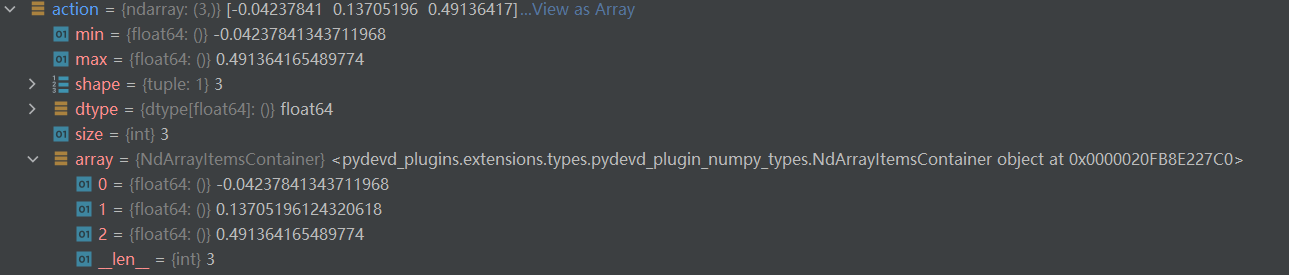
action是指令
        for prop, command in zip(self.action_variables, action):
            sim[prop] = command
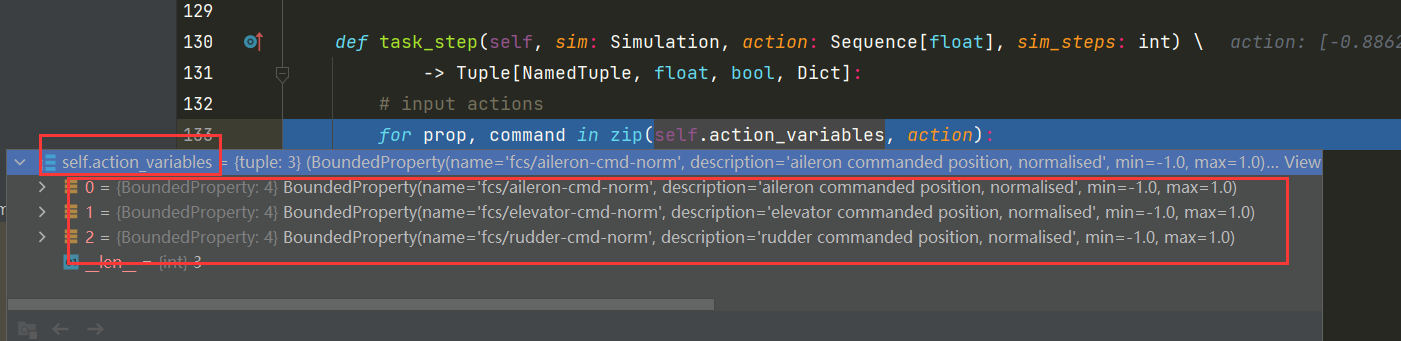
BoundedProperty(name= 'fcs/aileron-cmd-norm description= aileron commanded position, normalised', min=-1.0, max= 1.0)
BoundedProperty(name = 'fcs/elevator-cmd-norm, description= 'elevator commanded position, normalised'; min=-1 .0, max= 1.0)
BoundedProperty(name = 'fcs/rudder-cmd-norm description= rudder commanded position, normalised', min=-1.0, max= 1.0)
aileron commanded position 副翼指令
elevator commanded position 升降副翼指令
rudder commanded position 方向舵指令
action就是将三个指令设置为相应的值
reward
reward
9 相关的jsbsim代码
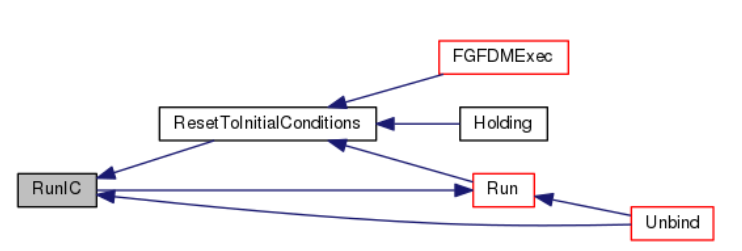
RunIC()
bool RunIC(void)
Initializes the sim from the initial condition object and executes each scheduled model without integrating i.e.
dt=0.
-
Returns
true if successful
Definition at line 552 of file FGFDMExec.cpp.
{
   FGPropulsion* propulsion = (FGPropulsion*)Models[ePropulsion];

   SuspendIntegration(); // saves the integration rate, dt, then sets it to 0.0.
   Initialize(IC);

   Models[eInput]->InitModel();
   Models[eOutput]->InitModel();

   Run();
   Propagate->InitializeDerivatives();
   ResumeIntegration(); // Restores the integration rate to what it was.

   if (debug_lvl > 0) {
     MassBalance->GetMassPropertiesReport(0);

     cout << endl << fgblue << highint
          << "End of vehicle configuration loading." << endl
          << "-------------------------------------------------------------------------------"
          << reset << std::setprecision(6) << endl;
   }

   for (unsigned int n=0; n < propulsion->GetNumEngines(); ++n) {
     if (IC->IsEngineRunning(n)) {
       try {
         propulsion->InitRunning(n);
       } catch (const string& str) {
         cerr << str << endl;
         return false;
       }
     }
   }

   return true;
 }
Here is the caller graph for this function
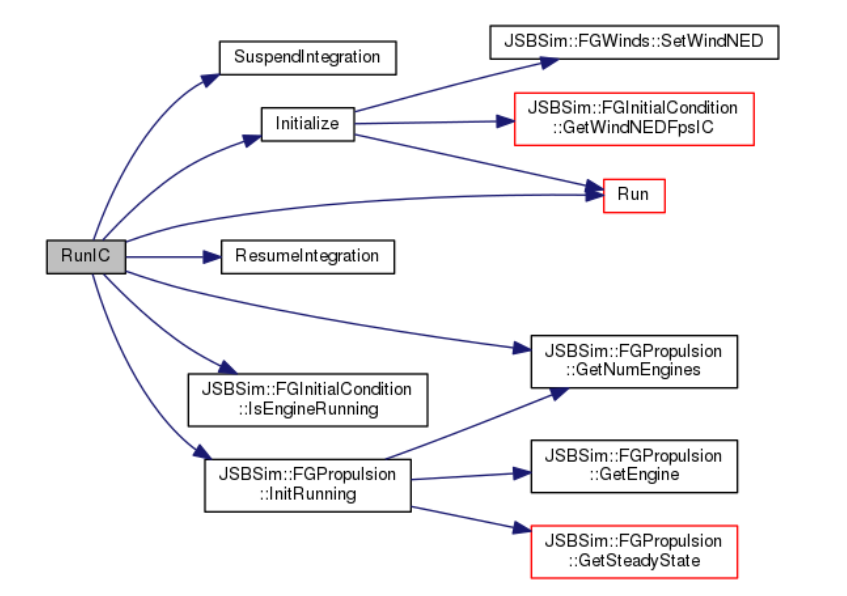
Here is the caller graph for this function
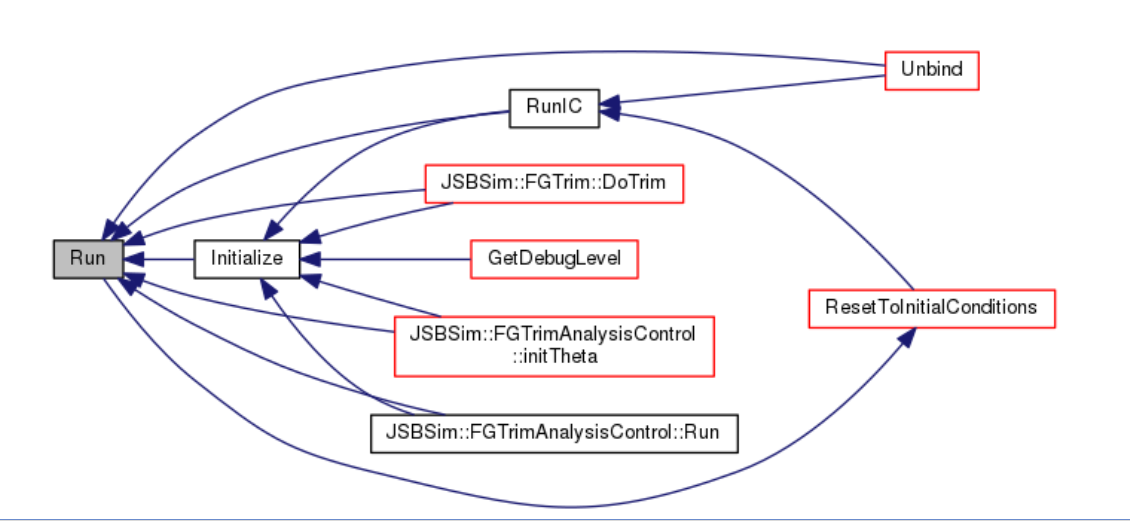
Run()
JSBSim Flight Dynamics Model: FGFDMExec Class Reference (sourceforge.net)
bool Run (void)
This function executes each scheduled model in succession.
-
Returns
true if successful, false if sim should be ended
Definition at line 310 of file FGFDMExec.cpp.
   bool success=true;

   Debug(2);

   for (unsigned int i=1; i<ChildFDMList.size(); i++) {
     ChildFDMList[i]->AssignState( (FGPropagate*)Models[ePropagate] ); // Transfer state to the child FDM
     ChildFDMList[i]->Run();
   }

   IncrTime();

   // returns true if success, false if complete
   if (Script != 0 && !IntegrationSuspended()) success = Script->RunScript();

   for (unsigned int i = 0; i < Models.size(); i++) {
     LoadInputs(i);
     Models[i]->Run(holding);
   }

   if (ResetMode) {
     unsigned int mode = ResetMode;

     ResetMode = 0;
     ResetToInitialConditions(mode);
   }

   if (Terminate) success = false;

   return success;
 }
Here is the caller graph for this function
LoadModel()
bool LoadModel ( const SGPath & AircraftPath,
const SGPath & EnginePath,
const SGPath & SystemsPath,
const std::string & model,
bool addModelToPath = true
)
Loads an aircraft model.
-
Parameters
Aircraft Pathpath to the aircraft/ directory. For instance: "aircraft". Under aircraft, then, would be directories for various modeled aircraft such as C172/, x15/, etc.
EnginePath path to the directory under which engine config files are kept, for instance "engine"
SystemsPath path to the directory under which systems config files are kept, for instance "systems"
model `the name of the aircraft model itself. This file will be looked for in the directory specified in the AircraftPath variable, and in turn under the directory with the same name as the model. For instance: "aircraft/x15/x15.xml"
addModelToPath set to true to add the model name to the AircraftPath, defaults to true
-
Returns
true if successful
Definition at line 666 of file FGFDMExec.cpp.
{
   FGFDMExec::AircraftPath = GetFullPath(AircraftPath);
   FGFDMExec::EnginePath = GetFullPath(EnginePath);
   FGFDMExec::SystemsPath = GetFullPath(SystemsPath);

   return LoadModel(model, addModelToPath);
 }
Here is the caller graph for this function

总结
这篇文章,使用ppo+gym+jsbsim+flightgera融合,主要解决了
- 航向控制:飞机必须直线飞行,保持其初始高度和行进方向(航向)
- 转向航向控制:飞机必须转弯以面对随机目标航向,同时保持其初始高度
两个问题。然后用三种飞机
- 赛斯纳172P轻型飞机
- F15战斗机
- A320客机7
进行仿真实验。
也就是用强化学习来进行姿态控制,实现稳定飞行
其action设置为
aileron commanded position 副翼指令
elevator commanded position 升降副翼指令
rudder commanded position 方向舵指令
action就是将三个指令设置为相应的值。
state是飞机飞行过程中的姿态,共有17个维度进行描述
reward是人为设置的。
实践 论文1
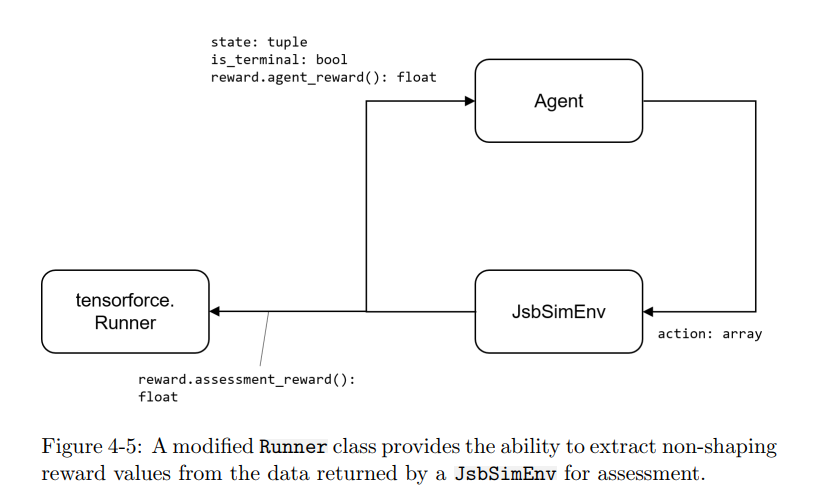
猜测:核心为JSBSimEnv.py
尝试运行,来查看它的action 与 state
action :
1 整合进gym
state :
自定义Gym****环境并注册
Gym的环境都保存在gym/envs目录下,envs目录下包含了各种类型的环境例如:atari、classic_control等,我们研究飞行器等类型问题所建立的自定义环境一般可以放在classic_control中。
Step1:**
在envs/classic_control目录下,建立环境文件jSBSimEnv_1.py**
ace.py中应定义一个环境类一般以XxxEnv为名称,本文建立类名称为AceEnv,按照gym的工作原理,此类中应至少包含reset()、step()、init()、seed()、close()函数,其中,step函数必须返回obs, reward, done, info四个变量,reset返回初始化的状态。(注:此部分的函数定义格式可以参考classic_control内的其他函数,着重是要按照需求更改step和reset函数)。另外需要对环境的主要变量维数进行定义,方便外部强化学习算法直接调用生成模型网络,例如控制量维度、状态量维度等。
在envs目录下,包含一个初始化函数__init__.py,当访问envs类时,会通过这个初始化函数自动注册各环境,因此需要在__init__环境中注册我们定义的环境,给出其调用名“ID”以及此“ID”对应的类。
Step2:**
在envs/init.py内的#Classic分类下,插入注册语句:**
register(

  id='JsbSimEnv-v1', %%此部分为环境调用的ID,可自由设定,与算法中调用一致即可。

  entry_point='gym.envs.classic_control:JsbSimEnv_1',   %%此部分为环境的类,注意:JsbSimEnv_1是ace.py中定义的类,并不是文件名。

)
Step3**
:在envs/classic_control/init.py内,加入引用ace环境的语句**
from gym.envs.classic_control.jSBSimEnv_1 import JsbSimEnv_1
Step4:在算法中进行调用
env = gym.make('Ace-v0')
代码
import gym
import gym_jsbsim
T = gym_jsbsim.Envs # 它的类型是enmu
# 访问其中的元素
# s1 = T['JSBSim_HeadingControlTask_A320_Shaping_EXTRA_FG_v0'] #使用name访问
# s2 = T.JSBSim_HeadingControlTask_A320_Shaping_EXTRA_FG_v0 #使用name访问
# s3 = T(T.JSBSim_HeadingControlTask_A320_Shaping_EXTRA_FG_v0.value)#使用value访问
# print(T)


env=gym.make(T['JSBSim_HeadingControlTask_A320_Shaping_EXTRA_FG_v0'].value)

for i_episode in range( 20 ):
	state = env.reset()

	for t in range( 1000 ):
		env.render()
		print( state )
		action = env.action_space.sample()
		state, reward, done, _ = env.step( action )

		if done:
			print('Episode #%d finished after %d timesteps' % (i_episode, t))
			break
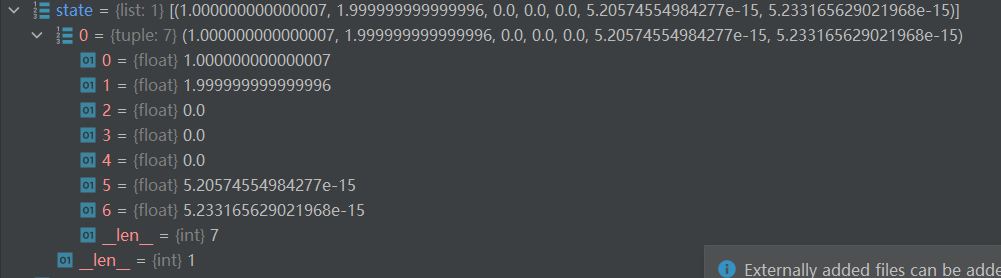
state
state = tuple(observation) + tuple(velocities)
observation : position [pitch , roll ] 横轴和纵轴位置
velocities : self.getVelo()
P = self.fdm["velocities/p-rad_sec"] * self.radToDeg  # The roll rotation rates 纵轴速度
Q = self.fdm["velocities/q-rad_sec"] * self.radToDeg  # The pitch rotation rates 横轴速度
R = self.fdm["velocities/r-rad_sec"] * self.radToDeg  # The yaw rotation rates  Z轴速度
AoA = self.fdm["aero/alpha-deg"]  # The angle of Attack #
AoS = self.fdm["aero/beta-deg"]  # The angle of Slip
values = [P, Q, R, AoA, AoS]
飞机主要借助机翼和平尾上的舵面来实施操纵。通过副翼、升降舵和方向舵(ξ,η,ζ),可以产生绕纵轴、横轴和竖轴(x,y,z)的力矩(L,M,N),借助这些力矩,就可以改变飞机姿态角
action
dictAction = {
    "pi+": 0,
    "pi-": 1,
    "ro+": 2,
    "ro-": 3,
    "ru+": 4,
    "ru-": 5,
    "no": 6}
由 action 到控制 ,控制仿真 , 仿真再返回状态
本文来自博客园,作者:{珇逖},转载请注明原文链接:https://www.cnblogs.com/zuti666/p/18092808

 浙公网安备 33010602011771号