
bpmn-js画流程图 (一)基本安装使用
1. 在页面上直接引用bpmn.js

<!DOCTYPE html>
<html lang="en">

<head>
    <meta charset="UTF-8">
    <meta name="viewport" content="width=device-width, initial-scale=1.0">
    <meta http-equiv="X-UA-Compatible" content="ie=edge">
    <title>BPMNJS</title>
    <!--CDN-->
    <script src="https://unpkg.com/bpmn-js@6.0.2/dist/bpmn-viewer.development.js"></script>
    <style>
        #canvas {
            height: 400px;
        }
    </style>
</head>

<body>
    <div id="canvas"></div>
    <script>
        var bpmnJS = new BpmnJS({
            container: '#canvas'
        });

        bpmnXML='<?xml version="1.0" encoding="UTF-8"?>\n' +
            '<definitions xmlns="http://www.omg.org/spec/BPMN/20100524/MODEL" xmlns:bpmndi="http://www.omg.org/spec/BPMN/20100524/DI" xmlns:omgdi="http://www.omg.org/spec/DD/20100524/DI" xmlns:omgdc="http://www.omg.org/spec/DD/20100524/DC" xmlns:xsi="http://www.w3.org/2001/XMLSchema-instance" id="sid-38422fae-e03e-43a3-bef4-bd33b32041b2" targetNamespace="http://bpmn.io/bpmn" exporter="bpmn-js (https://demo.bpmn.io)" exporterVersion="6.3.3">\n' +
            '  <process id="Process_1" isExecutable="false">\n' +
            '    <startEvent id="StartEvent_1y45yut" name="hunger noticed">\n' +
            '      <outgoing>SequenceFlow_0h21x7r</outgoing>\n' +
            '    </startEvent>\n' +
            '    <task id="Task_1hcentk" name="choose recipe">\n' +
            '      <incoming>SequenceFlow_0h21x7r</incoming>\n' +
            '      <outgoing>SequenceFlow_0wnb4ke</outgoing>\n' +
            '    </task>\n' +
            '    <sequenceFlow id="SequenceFlow_0h21x7r" sourceRef="StartEvent_1y45yut" targetRef="Task_1hcentk" />\n' +
            '    <exclusiveGateway id="ExclusiveGateway_15hu1pt" name="desired dish?">\n' +
            '      <incoming>SequenceFlow_0wnb4ke</incoming>\n' +
            '    </exclusiveGateway>\n' +
            '    <sequenceFlow id="SequenceFlow_0wnb4ke" sourceRef="Task_1hcentk" targetRef="ExclusiveGateway_15hu1pt" />\n' +
            '  </process>\n' +
            '  <bpmndi:BPMNDiagram id="BpmnDiagram_1">\n' +
            '    <bpmndi:BPMNPlane id="BpmnPlane_1" bpmnElement="Process_1">\n' +
            '      <bpmndi:BPMNShape id="StartEvent_1y45yut_di" bpmnElement="StartEvent_1y45yut">\n' +
            '        <omgdc:Bounds x="152" y="102" width="36" height="36" />\n' +
            '        <bpmndi:BPMNLabel>\n' +
            '          <omgdc:Bounds x="134" y="145" width="73" height="14" />\n' +
            '        </bpmndi:BPMNLabel>\n' +
            '      </bpmndi:BPMNShape>\n' +
            '      <bpmndi:BPMNShape id="Task_1hcentk_di" bpmnElement="Task_1hcentk">\n' +
            '        <omgdc:Bounds x="240" y="80" width="100" height="80" />\n' +
            '      </bpmndi:BPMNShape>\n' +
            '      <bpmndi:BPMNEdge id="SequenceFlow_0h21x7r_di" bpmnElement="SequenceFlow_0h21x7r">\n' +
            '        <omgdi:waypoint x="188" y="120" />\n' +
            '        <omgdi:waypoint x="240" y="120" />\n' +
            '      </bpmndi:BPMNEdge>\n' +
            '      <bpmndi:BPMNShape id="ExclusiveGateway_15hu1pt_di" bpmnElement="ExclusiveGateway_15hu1pt" isMarkerVisible="true">\n' +
            '        <omgdc:Bounds x="395" y="95" width="50" height="50" />\n' +
            '        <bpmndi:BPMNLabel>\n' +
            '          <omgdc:Bounds x="388" y="152" width="65" height="14" />\n' +
            '        </bpmndi:BPMNLabel>\n' +
            '      </bpmndi:BPMNShape>\n' +
            '      <bpmndi:BPMNEdge id="SequenceFlow_0wnb4ke_di" bpmnElement="SequenceFlow_0wnb4ke">\n' +
            '        <omgdi:waypoint x="340" y="120" />\n' +
            '        <omgdi:waypoint x="395" y="120" />\n' +
            '      </bpmndi:BPMNEdge>\n' +
            '    </bpmndi:BPMNPlane>\n' +
            '  </bpmndi:BPMNDiagram>\n' +
            '</definitions>';

         // import diagram
        bpmnJS.importXML(bpmnXML, function(err) {
            if (!err) {
                console.log('success!');
                //
                var canvas = bpmnJS.get('canvas')
                canvas.zoom('fit-viewport')
            } else {
                return console.error('could not import BPMN 2.0 diagram', err);
            }
        });
    </script>
</body>

</html>
如上所示, 使用DNS加速直接引入bpmn.js, 然后本地指定一个容器(id为canvas的那个div), 接着用bpmn.js提供的方法importXML就可以解析xml字符串生成对应的工作流图。

2. 使用npm安装bpmn.js
首先需要安装bpmn-js
npm install bpmn-js --save-dev
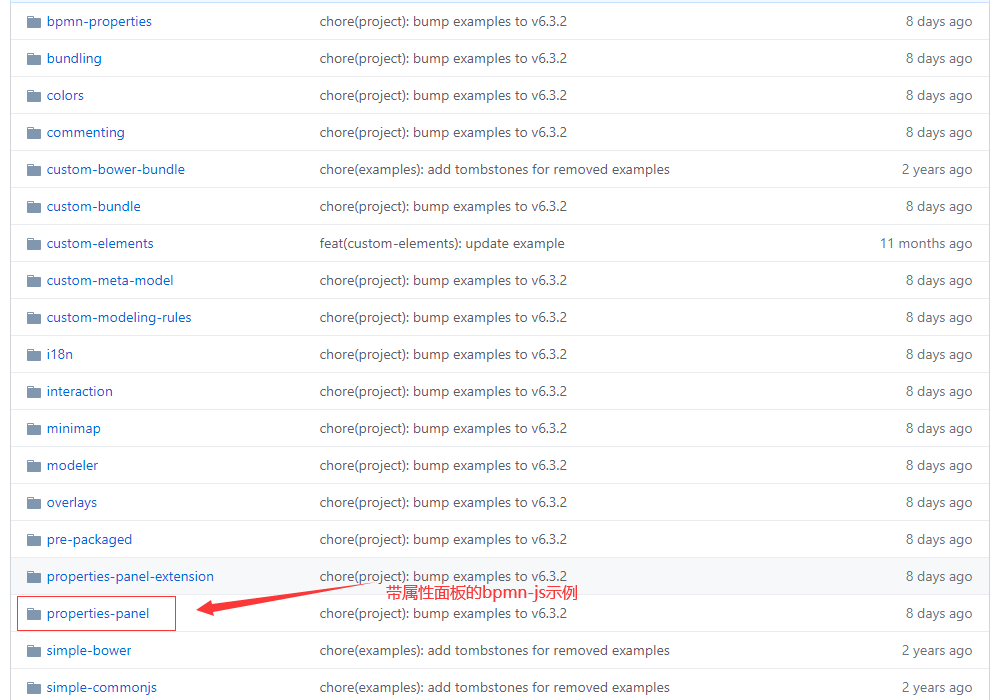
安装好这个只能支持在线绘制工作流,而不能对工作流上的每个节点进行属性设置,这个时候需要安装bpmn-js的一个panel插件。
npm install bpmn-js-properties-panel --save-dev
示例代码可参见 https://github.com/-io/bpmn-js-examples 里的 properties-panel 示例工程。
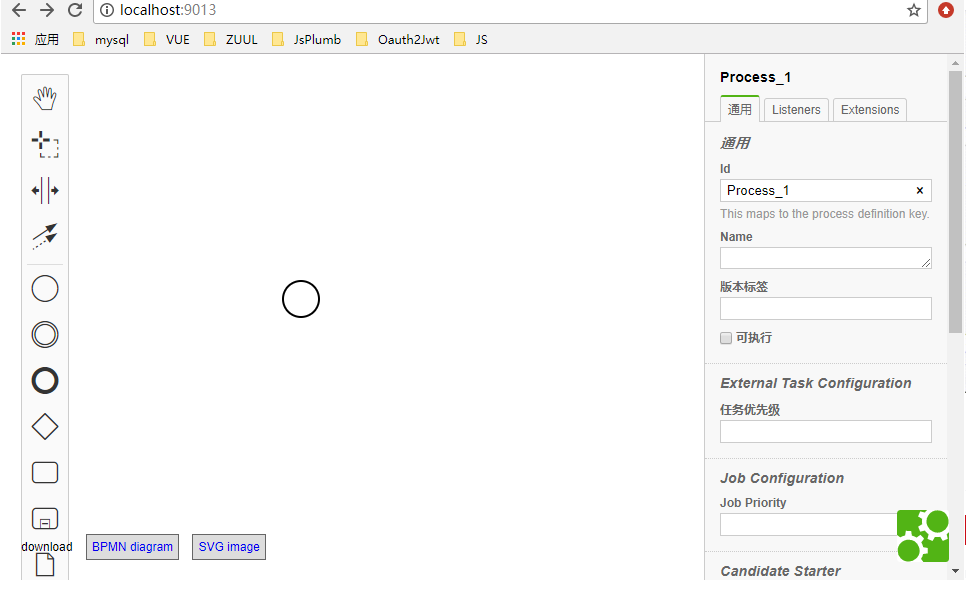
运行效果如下
npm run dev
分类:
VUE
, Activiti工作流


【推荐】国内首个AI IDE,深度理解中文开发场景,立即下载体验Trae
【推荐】编程新体验,更懂你的AI,立即体验豆包MarsCode编程助手
【推荐】抖音旗下AI助手豆包,你的智能百科全书,全免费不限次数
【推荐】轻量又高性能的 SSH 工具 IShell:AI 加持,快人一步
· AI与.NET技术实操系列:基于图像分类模型对图像进行分类
· go语言实现终端里的倒计时
· 如何编写易于单元测试的代码
· 10年+ .NET Coder 心语,封装的思维:从隐藏、稳定开始理解其本质意义
· .NET Core 中如何实现缓存的预热?
· 25岁的心里话
· 闲置电脑爆改个人服务器(超详细) #公网映射 #Vmware虚拟网络编辑器
· 零经验选手,Compose 一天开发一款小游戏!
· 因为Apifox不支持离线,我果断选择了Apipost!
· 通过 API 将Deepseek响应流式内容输出到前端