

通过RadioButton实现底部菜单
先看效果
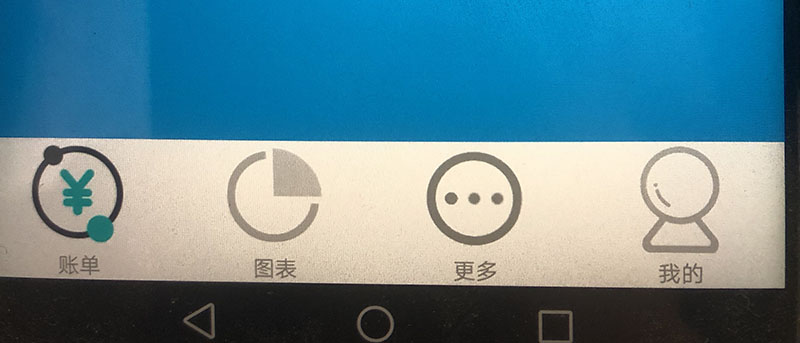
这个是通过 RadioButton 实现的底部菜单栏
先看页面的 MainActivity.xml 里面是 RadioButton 源码

<RadioGroup
            android:id="@+id/radiogroup"
            android:layout_width="match_parent"
            android:layout_height="wrap_content"
            android:orientation="horizontal"
            >
            <RadioButton android:id="@+id/radio_home"
                style="@style/main_tab_bottom"
                android:drawableTop="@drawable/footer_home_selector"
                android:text="账单"
                android:button="@null"
                android:checked="true"

                />

            <RadioButton android:id="@+id/radio_chart"
                style="@style/main_tab_bottom"
                android:drawableTop="@drawable/footer_chart_selector"
                android:text="图表"
                android:button="@null"
                />

            <RadioButton android:id="@+id/radio_more"
                style="@style/main_tab_bottom"
                android:drawableTop="@drawable/footer_more_selector"
                android:text="更多"
                android:button="@null"
                />

            <RadioButton android:id="@+id/radio_mine"
                style="@style/main_tab_bottom"
                android:drawableTop="@drawable/footer_wode_selector"
                android:text="我的"
                android:button="@null"
                />

        </RadioGroup>
drawableTop 是设置图标放置在文字的上方。
在drawables 文件夹下分别创建 footer_home_selector、footer_chart_selector、footer_more_selector、footer_wode_selector 这个4个文件
在这个4个文件里面分别设置图标跟对应的效果图标
footer_home_selector 设置了选中状态
<?xml version="1.0" encoding="utf-8"?>
<selector xmlns:android="http://schemas.android.com/apk/res/android">
    <item android:state_checked="true" android:drawable="@drawable/zhangdan1"></item>
    <item android:drawable="@drawable/zhangdan"></item>
</selector>
footer_chart_selector
<?xml version="1.0" encoding="utf-8"?>
<selector xmlns:android="http://schemas.android.com/apk/res/android">
    <item android:state_checked="true" android:drawable="@drawable/tubiao1"></item>
    <item android:drawable="@drawable/tubiao"></item>
</selector>
footer_more_selector
<?xml version="1.0" encoding="utf-8"?>
<selector xmlns:android="http://schemas.android.com/apk/res/android">
    <item android:state_checked="true" android:drawable="@drawable/more1"></item>
    <item android:drawable="@drawable/more"></item>
</selector>
footer_wode_selector
<?xml version="1.0" encoding="utf-8"?>
<selector xmlns:android="http://schemas.android.com/apk/res/android">
    <item android:state_checked="true" android:drawable="@drawable/wode1"></item>
    <item android:drawable="@drawable/wode"></item>
</selector>
好了,基本的文件设置完成了,现在要到 java文件里面去调整图标的大小
//把图标放进一个数组里面
RadioButton[] rb = new RadioButton[4];
rb[0] = (RadioButton) findViewById(R.id.radio_home);
rb[1] = (RadioButton) findViewById(R.id.radio_chart);
rb[2] = (RadioButton) findViewById(R.id.radio_more);
rb[3] = (RadioButton) findViewById(R.id.radio_mine);

for(int i=0;i<rb.length;i++){
       Drawable[] drawables = rb[i].getCompoundDrawables();
       Rect r = new Rect(0,0,drawables[1].getMinimumWidth()*2/5,drawables[1].getMinimumHeight()*2/5);
       drawables[1].setBounds(r);
       rb[i].setCompoundDrawables(null,drawables[1],null,null);
}
分类:
android


【推荐】国内首个AI IDE,深度理解中文开发场景,立即下载体验Trae
【推荐】编程新体验,更懂你的AI,立即体验豆包MarsCode编程助手
【推荐】抖音旗下AI助手豆包,你的智能百科全书,全免费不限次数
【推荐】轻量又高性能的 SSH 工具 IShell:AI 加持,快人一步
· 分享一个免费、快速、无限量使用的满血 DeepSeek R1 模型,支持深度思考和联网搜索!
· 基于 Docker 搭建 FRP 内网穿透开源项目(很简单哒)
· 25岁的心里话
· ollama系列01:轻松3步本地部署deepseek,普通电脑可用
· 按钮权限的设计及实现