
android AlertDialog对话框的基本用法
AlertDialog 常用的方法
setTitle 设置对话框标题
setMessage 设置对话框提示内容
setNeutralButton 添加普通按钮
setPositiveButton 添加确定按钮
setNegativeButton 添加取消按钮
setView 给对话框设置自定义样式
show 显示对话框,这个非常重要:最后一定要让对话框显示出来。
实例一

new AlertDialog.Builder(MainActivity.this)
  .setTitle("退出登录")
  .setMessage("确定退出?")
  .setNegativeButton("取消",null)
  .setPositiveButton("确定", new DialogInterface.OnClickListener() {
      @Override
      public void onClick(DialogInterface dialog, int which) {
          Toast.makeText(MainActivity.this,"确定退出",Toast.LENGTH_LONG).show();
}
}).show();
注:点击确定的时候执行了一个回调。
实例二 自定义对话框样式
java文件内容
public void alert_dialog_input(){
        //加载对话框内容文件
        View view = View.inflate(Alertdialog.this,R.layout.dialog_input,null);
        final AlertDialog builder = new AlertDialog.Builder(this)
                .setView(view)
                .create();
        negative = view.findViewById(R.id.negative);
        negative.setOnClickListener(new View.OnClickListener() {
            @Override
            public void onClick(View v) {
                builder.dismiss();
            }
        });


        positive= view.findViewById(R.id.positive);

        positive.setOnClickListener(new View.OnClickListener() {
            @Override
            public void onClick(View v) {
                builder.dismiss();
            }
        });

        builder.show();

    }
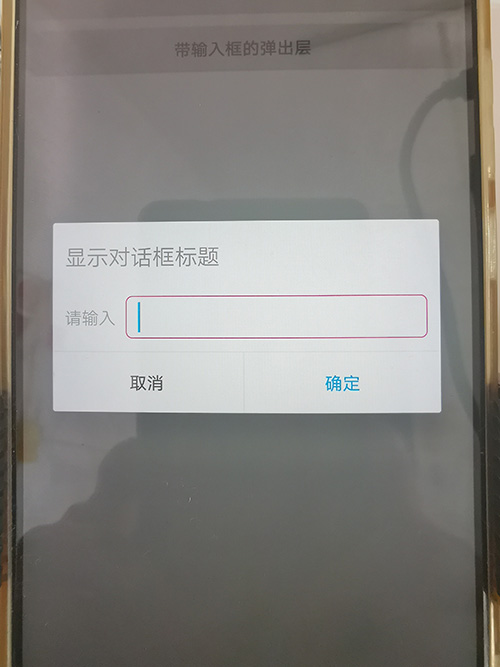
dialog_input.xml 文件内容 对话框加载的内容 :
<?xml version="1.0" encoding="utf-8"?>
<LinearLayout
    xmlns:android="http://schemas.android.com/apk/res/android"
    android:orientation="vertical"
    android:layout_width="match_parent"
    android:layout_height="match_parent"
    >

    <TextView
        android:layout_width="match_parent"
        android:layout_height="wrap_content"
        android:text="显示对话框标题"
        android:textColor="#666"
        android:textSize="18sp"
        android:paddingTop="15dp"
        android:paddingLeft="10dp"
        android:paddingBottom="10dp"
        />

    <LinearLayout
        android:layout_width="match_parent"
        android:layout_height="wrap_content"
        android:orientation="horizontal"
        android:gravity="center_vertical"
        android:padding="10dp"
        >
        <TextView
            android:layout_height="wrap_content"
            android:layout_width="50dp"
            android:text="请输入"
            android:gravity="left"
            />

        <EditText
        android:layout_width="wrap_content"
        android:layout_height="wrap_content"
        android:layout_weight="1"
        android:theme="@style/myEditText"
        android:background="@drawable/custom_edittext"
        android:paddingTop="5dp"
        android:paddingBottom="5dp"
        android:paddingLeft="10dp"
        android:paddingRight="10dp"
        android:textColor="#999999"
        />
    </LinearLayout>
    <View
        android:layout_width="match_parent"
        android:layout_height="1dp"
        android:background="#E6E6E6"
        />
    <LinearLayout
        android:layout_width="match_parent"
        android:layout_height="wrap_content"
        android:orientation="horizontal"
        >

        <Button
            android:id="@+id/negative"
            android:layout_height="wrap_content"
            android:layout_width="0dp"
            android:layout_weight="1"
            android:background="#ffffff"
            android:text="取消"
            android:stateListAnimator="@null"
            />

        <View
            android:layout_width="1dp"
            android:layout_height="match_parent"
            android:background="#E6E6E6"
            />

        <Button
            android:id="@+id/positive"
            android:layout_height="wrap_content"
            android:layout_width="0dp"
            android:layout_weight="1"
            android:background="#ffffff"
            android:text="确定"
            android:textColor="#2196F3"
            android:stateListAnimator="@null"
            />
    </LinearLayout>

</LinearLayout
这里用到一个自定义 EditText 样式文件。参考一下具体的效果吧!
分类:
android


【推荐】国内首个AI IDE,深度理解中文开发场景,立即下载体验Trae
【推荐】编程新体验,更懂你的AI,立即体验豆包MarsCode编程助手
【推荐】抖音旗下AI助手豆包,你的智能百科全书,全免费不限次数
【推荐】轻量又高性能的 SSH 工具 IShell:AI 加持,快人一步
· 25岁的心里话
· 闲置电脑爆改个人服务器(超详细) #公网映射 #Vmware虚拟网络编辑器
· 零经验选手,Compose 一天开发一款小游戏!
· 因为Apifox不支持离线,我果断选择了Apipost!
· 通过 API 将Deepseek响应流式内容输出到前端