通过二维码上传手机文件到服务器
Hello,大家好。这是我的第一篇博客,给大家分享下手机扫码上传图片到服务器实现手机pc同步.
1、自动生成二维码--> 可以去二维码生成工具网站获取api也可以直接用这个:http://qr.topscan.com/api.php?text= ?
注意:问号代表二维码访问的路径如果后面跟www.baidu.com就会跳转百度
2、这里写了个h5页面用于手机扫一扫上传文件跳转
<!DOCTYPE html>
<html lang="en">
<head>
<meta charset="UTF-8">
<meta name="viewport" content="width=device-width, initial-scale=1.0">
<meta http-equiv="X-UA-Compatible" content="ie=edge">
<title>load_photo</title>
<link rel="stylesheet" href="${basePath}/resources/css/lyj/load_photo/load_photo.css">
</head>
<body>
<div class="phone_container">
<div class="photo_content">
<div class="header">
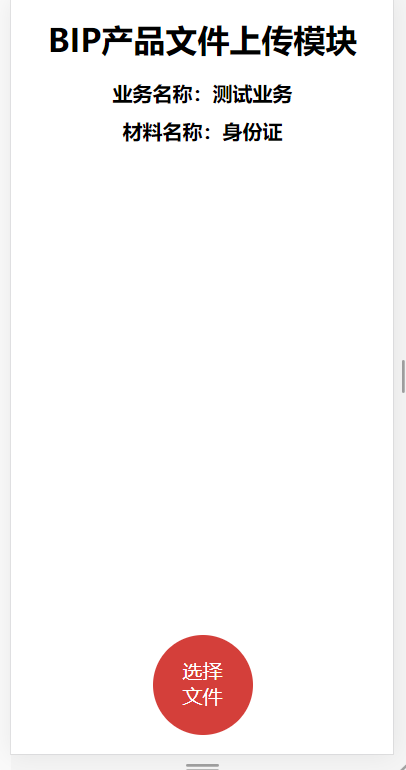
BIP产品文件上传模块
</div>
<div class="business_name">
业务名称:测试业务
</div>
<div class="material_name">
材料名称:身份证
</div>
<img src="" alt="" class="showImg" width="90%">
<div class="low_bottom">
<div class="bottom">
<p>选择</p>
<p>文件</p>
</div>
<div class="bottom_sure">
<p>确认</p>
<p>上传</p>
</div>
</div>
<div class="load_btn">
<form enctype="multipart/form-data">
<input type="file" class='inp_btn'accept="image/png,image/jpeg,image/jpg">
<input type="button" value="提交" class="btn_empty">
</form>
</div>
</div>
</div>
</body>
<script src="${basePath}/resources/js/plugins/jquery/jquery.js"></script>
<script type='text/javascript'>
//type 的值为1:选择文件,2选择文件&确认上传
$(document).ready(function(){
$('.bottom_sure').css('display','none');
$('.btn_empty').css('display','none');
$('.inp_btn').change(function(){
$('.bottom_sure').css('display','inline-block');
$('.btn_empty').css('display','inline-block');
//展示图片
file=$('.inp_btn').get(0).files[0];
var img_photo=$('.showImg');
var reader=new FileReader();
if(file){
reader.readAsDataURL(file);
reader.onload=function(){
$('.showImg').get(0).src=reader.result;
localStorage.setItem('img_data',reader.result);
}
}else{
console.log('文件为空')
}
})
$('.btn_empty').click(function(){
if(localStorage.getItem('img_data')!==''){
console.log(localStorage.getItem("img_data"));
// 发起ajax请求
$.ajax({
url:'/phone/pic',
data:{file:localStorage.getItem("img_data")},
method:'post',
success:function(res_data){
console.log(res_data)
}
})
}
})
})
</script>
</html>
h5 效果:
3、给二维码生成唯一标识(这里通过路由跳转给当前h5页面二维码路径变量上赋值UUID->一打开页面二维码uuid刷新)
  @RequestMapping(value = "/lyjSanWang")
    public String lyjSanWang(Model model,Integer ordId,Integer compId) {
        String front = UUID.randomUUID().toString();
        String back = UUID.randomUUID().toString();
        model.addAttribute("front",front);
        model.addAttribute("back",back);
        model.addAttribute("ordId",ordId);
        model.addAttribute("compId",compId);
        return "lyj/check/check.ftl";
    }
4、二维码check.ftl页面:
<!-- 手机上传 -->
<div id="open_window">
   <div class="img-erweima">
      <div>
         <p>扫一扫上传身份证正面</p>
         <img class="erweima_face" src="http://qr.topscan.com/api.php?text=http://localhost:8087/phone/page?flag=${front}" alt="">
                                                                                //由二维码路径可以看出,二维码跳转的就是h5页面的路由
      </div>
      <div>
         <#--flag=${back}-->
<p>扫一扫上传身份证背面</p>
         <img class="erweima_back"  src="http://qr.topscan.com/api.php?text=http://localhost:8087/phone/page?flag=${back}" alt="">
      </div>
   </div>
   <div><button onclick="closes_window()" class="close_window">返回信息填写</button></div>
</div>
5、服务器这块
1、这个处理器用于扫二维码的展示---h5页面
@RequestMapping(value = "/phone")
@Controller
public class PhonePicController extends BaseController{
    @Autowired
PhonePicService pic;
    protected static String PHONEURL = "http://localhost:8087/flag=";
    private static final Log logger = LogFactory.getLog(PhonePicController.class);
    //展示页面
@RequestMapping(value = "/page", method = RequestMethod.GET)
    public String page(HttpServletRequest request) {
        logger.info(request.getParameter("flag"));
        return "upload/load_photo.ftl";
    }
6、最后写个处理器就可以用于接收h5页面图片了
注意:因为前台传过来的图片是base64二进制,所以我这边后台进行了处理转化了图片路径存服务器
    //手机上传图片图片
    @RequestMapping(value = "/pic", method = RequestMethod.POST)
    @ResponseBody
    public ResultInfo pic(HttpServletRequest request, String file,String flag,Integer side) {
        side=1;
        if (file == null && StringUtil.isEmptyTrim(file)) {
            logger.error("web图片单独上传异常");
        }
        System.out.println("图片----------" + file);
        //写个路径,把base64转路径
        String fileprex = "/resources/upload";
        String filename = UUID.randomUUID().toString() + ".jpg";
        String picpath = request.getSession().getServletContext().getRealPath(fileprex) + filename;
        System.out.println(picpath);
        System.out.println(flag);
        System.out.println(side);
        if (file != null) {
            Base64Utils.Base64ToImage(file, picpath);
        }
        Integer i = pic.save(fileprex + filename,flag);

        if (i < 0) {
            logger.error("失败");

        }
        return ResultInfo.success("上传图片成功",i);
    }
    //获取数据库路径,回显数据
    @RequestMapping(value = "/byurl", method = RequestMethod.POST)
    @ResponseBody
    public ResultInfo findbypic(HttpServletRequest request,String flag) {
        if (flag == null && StringUtil.isEmptyTrim(flag)) {
            logger.error("web图片单独上传异常");
        }
        System.out.println(flag);
        String url = pic.findbypic(flag);
        System.out.println(url);
         String path="http://localhost:8087";
         String data=path+url;
        return ResultInfo.success("ok",data);
    }

    //
    @RequestMapping(value = "/bycomid", method = RequestMethod.POST)
    @ResponseBody
    public ResultInfo bycomid(HttpServletRequest request,String tokenId, String file,String flag,Integer compId) {
            UserInfo userInfo;
            try {
                userInfo = getUserInfo(tokenId);
            } catch (Exception e) {
                return ResultInfo.reLogin();
            }

            if (file == null && StringUtil.isEmptyTrim(file)) {
                logger.error("web图片单独上传异常");
            }
            System.out.println("图片----------" + file);
            //写个路径,把base64转路径
            String fileprex = "/resources/upload/";
            String filename = UUID.randomUUID().toString() + ".jpg";
            String picpath = request.getSession().getServletContext().getRealPath(fileprex) + filename;
            if (file != null) {
                Base64Utils.Base64ToImage(file, picpath);
            }
            Integer i = pic.saveComid(userInfo, fileprex + filename, flag, compId);
            if (i < 0) {
                logger.error("失败");
            }
            return ResultInfo.success("ok", 200);
        }

 浙公网安备 33010602011771号