CentOS6.5安装Elasticsearch
实验环境:Centos6.5 ES 5.6.4 jdk1.8
ELK Stack三大组件:
Logstash: logstash server端用来搜集日志;
Elasticsearch: 存储各类日志;
Kibana: web化接口用作查寻和可视化日志;
Logstash Forwarder: logstash client端用来通过lumberjack 网络协议发送日志到logstash server;
https://www.elastic.co/downloads
一、配置java环境变量
1.1 从官网下载对应安装包
http://www.oracle.com/technetwork/java/javase/downloads/jdk8-downloads-2133151.html
RPM安装
1 rpm -ivh jdk-8u151-linux-x64.rpm
如果安装的jdk版本较高,无需配置环境变量就可以直接使用。可以用 java -version 命令查询,正常输出以下信息就说明配置成功了。

配置环境变量
vim /etc/profile
export JAVA_HOME= /usr/java/jdk1.8.0_151
export PATH=$JAVA_HOME/bin:$PATH
export CLASSPATH=.:$JAVA_HOME/lib/dt.jar:$JAVA_HOME/lib/tools.jar


##. /etc/profile           ##立即生效环境变量
二、安装Elasticsearch
由于Elasticsearch不能以root用户使用,所以我们需要先创建一个用户zqw,注意权限的归属,属主应属于zqw,否则服务无法启动。
2.1 创建用户
1 useradd zqw
2 mkdir /elasticsearch
3 chown zqw -Rf /elasticsearch
4 ll /elasticsearch
2.2 从官网下载对应源码包
https://www.elastic.co/downloads/elasticsearch
####/elasticsearch目录下####
tar xzvf elasticsearch-5.6.4.tar.gz
2.3 运行elasticsearch
1 elasticsearch-5.6.4/bin/elasticsearch
加上 -d 参数,即在后台运行。
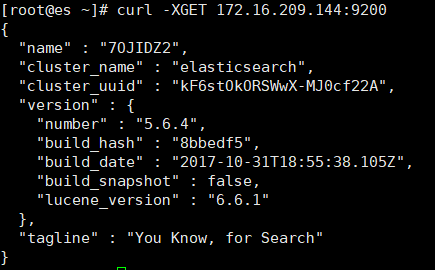
2.4 测试elasticsearch服务是否启用
curl -XGET localhost:9200 #默认占用端口为9200
2.5 使用IP:9200方式登陆
此时无法用 IP:9200 的方式登录
需要修改config/elasticsearch.yml配置文件中的 network.host: 0.0.0.0,冒号后有空格

此时重启会报错,如图所示:

解决方案如下:
ERROR [1] :
1 vim /etc/security/limits.d/90-nproc.conf
2 -----------优雅的分割线------------
3 #### 将1024修改为2048 ####
  *          soft    nproc     2048
ERROR [2] :
1 vim /etc/security/limits.conf
2 -----------优雅的分割线------------
3 ###文末添加如下配置###
  * soft nofile 65536
  * hard nofile 131072
  * soft nproc 2048
  * hard nproc 4096
1 vim /etc/sysctl.conf
2 -----------优雅的分割线------------
3 ####文末添加如下配置#####
  vm.max_map_count=655360
ERROR [3] :
1 vim /elasticsearch/elasticsearch-5.6.4/config/elasticsearch.yml
2 -----------优雅的分割线------------
3 ####文末添加如下配置####
  bootstrap.memory_lock: false
  bootstrap.system_call_filter: false
最后敲打 sysctl -p 命令以立即生效修改的配置。
此时再启动ES就不会报错了。注意要切换回非root用户执行以下脚本。
1 elasticsearch-5.6.4/bin/elasticsearch

如果外网IP无法访问到此端口,应检查是否因防火墙而起。如果不想关闭防火墙,请添加策略开放9200端口。(此实验环境关闭了selinux以及防火墙)
/etc/init.d/iptables stop
chkconfig iptables off
2.6 后台运行ES
1 bin/elasticsearch -d
开启需要一点时间,可以通过netstat -tanpl 查看9200端口是否出现,ps aux | grep elasticsaerch 进程是否起了。
三、安装插件
head
3.1 安装nodejs git
nodejs下载地址:https://npm.taobao.org/mirrors/node/
1 yum install -y git
2
3 tar node-v9.1.0-linux-x64.tar.gz
4 #vim /etc/profile
5 export PATH=$PATH:/opt/node-v9.1.0-linux-x64/bin
6 #source /etc/profile
3.2 修改elasticsearch.yml
#vim elasticsearch.yml
http.cors.enabled: true
http.cors.allow-origin: "*"
3.2 下载安装插件
git clone git://github.com/mobz/elasticsearch-head.git
cd elasticsearch-head
npm install
npm run start
localhost:9100 测试插件是否运行
bigdesk
3.3 从github下载插件
git clone https://github.com/hlstudio/bigdesk
3.4 执行脚本
1 cd bigdesk/_site
2 python -m SimpleHTTPServer
默认端口号为8000
3.5 后台运行
1 screen -S bigdesk
2 python -m SimpleHTTPServer
3 ##Ctrl+a d 最小化##
screen -r 唤醒
screen -ls 罗列所有screen
四、自动发现
4.1 配置elasticsearch.yml
在同一网段时elasticsearch会自动将集群名相同的机器加入到同一集群
修改相关配置
node.name: xxx
cluster.name: xxxxx
discovery.zen.ping.unicast.hosts: ["xxx1", "xxx2"]
### vim /etc/hosts ###
xxx.xxx.xxx.xxx yyy
xxx.xxx.xxx.xxx yyy


