

消息中间件RabbitMQ的原理和使用
一、什么是MQ
MQ是MessageQueue的简写,表示消息队列的意思,它是一种用于在应用程序之间传递消息的技术。多用于分布式系统之间进行通信,作为消息中间件使用。MQ的作用有应用解耦、异步提速、流量削峰填谷,当然也有缺点,加入MQ消息中间件会额外增加系统的外部依赖,是系统稳定性降低,同时也增加系统的复杂度。
消息队列,是基础数据结构中“先进先出”的一种数据结构。指把要传输的数据(消息)放在队列中,用队列机制来实现消息传递——生产者产生消息并把消息放入队列,然后由消费者去处理。消费者可以到指定队列拉取消息,或者订阅相应的队列,由MQ服务端给其推送消息。
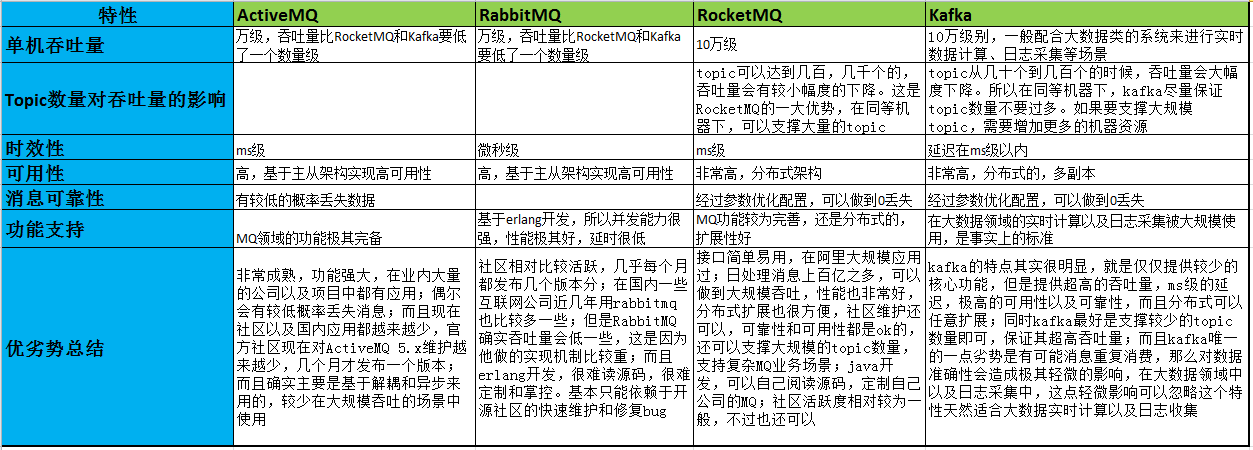
目前主流的作为消息中间件的产品有ActiveMQ、RabbitMQ、Kafka、RocketMQ等开源产品。其产品各有特点,对比如下:
二、什么是RabbitMQ
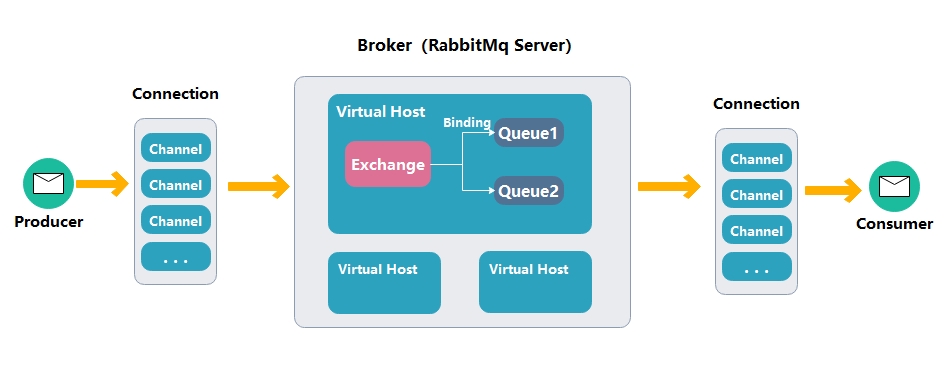
RabbitMQ 是一款开源的基于 AMQP协议模型的消息中间件,是一个由 Erlang 语言开发的 AMQP 的开源实现,具有高可用、可扩展、易用性、跨平台支持和多种协议兼容性等特点。其架构模型与 AMQP协议模型完全一致,如下:
RabbitMQ 共有七种工作模式:
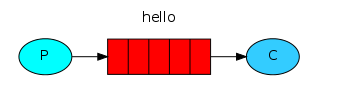
- Simple(简单模式):使用direct交换机,一个生产者对应一个消费者。
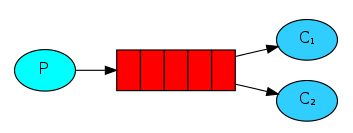
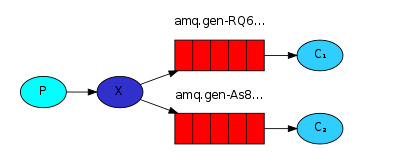
- Work Queue(工作队列模式):使用direct交换机,一个生产者对应多个消费者。这些消费者之间形成竞争关系,一条消息只能被消费一次,默认采用轮询的方式将消息发送给消费者。
- Publish/Subscribe(发布订阅模式):使用fanout交换机,一个交换机会将收到的消息发布到绑定到该交换机的所有队列中,然后再分发给不同的消费者。
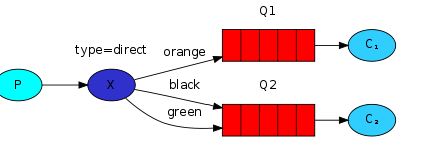
- Routing(路由模式):使用direct交换机,生产者将带有RoutingKey 的消息发送给交换机,交换机根据队列绑定的RoutingKey分发消息到指定的队列。
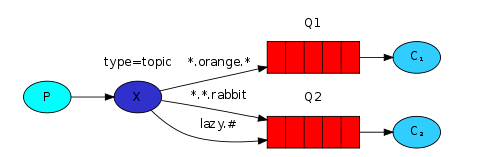
- Topics(通配符模式):使用topic交换机,功能与路由模式相似,但支持通配符路由,允许模糊匹配RoutingKey绑定匹配队列。
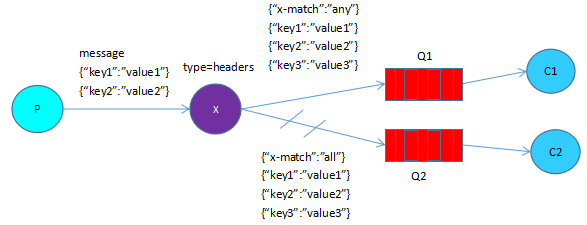
- Headers(请求头模式):使用headers交换机,该模式下取消了routingkey,使用header中的 key/value(键值对)匹配队列。
- RPC(远程调用模式):一个服务器调用另一个服务器的方法,该方式不常用。
三、RabbitMQ的可靠性投递和消息确认机制
消息的可靠性投递指的是从生产者-交换机-队列-消费者的每一个环节都要成功,RabbitMQ在每一步都提供了消息确认机制来保证消息的可靠性传递,除该机制外RabbitMQ还使用事务机制来保证消息的可靠性,但事务机制效率极低,不推荐使用。以下是消息确认机制的原理:
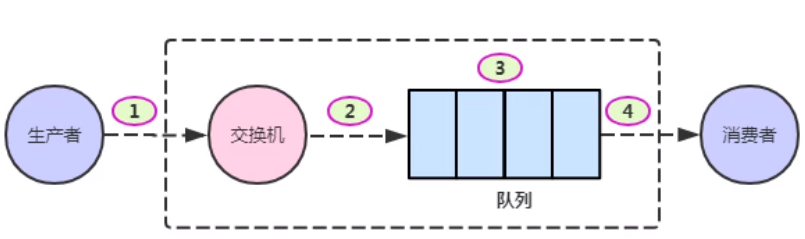
从图中的4个步骤一一分析:
- 生产者发送消息到Broker后,如何确保消息已经正确的投递到交换机?Broker会给生产者返回一个应答Confirm来告知消息是否已经投递到交换机,生产者使用ConfirmListener监听器来获取Confirm,投递成功时handleAck方法被回调,投递失败时handleNack方法被回调。
- 投递到交换机的消息如何确保已经被正确的投递到队列?当正确的投递到队列时Broker则不做任何返回,当消息不能正确的路由到队列时,Broker会返回一个应答Return来告知生产者,生产者使用ReturnListener监听器来获取Return,监听器的handleReturn方法被回调,我们在该方法中做逻辑处理。
- 消息到达队列后如何保证消息不丢失?通过开启交换机持久化、队列持久化、消息持久化可以保证突然断电等情况导致的内存数据丢失。
- 消息从队列投递到消费者,如何保证消费者已经正确的处理了消息?使用消费者的手动确认机制,采用该机制时Broker会等待消费者显示的回复确认信号后才会从队列中删除消息。如果使用消费者自动确认机制,则只要消费者收到消息后就会告知Broker已正确处理信息,消息将被Broker删除。
四、RabbitMQ的死信交换机
当一个队列中的消息满足如下条件时则被成为死信,如果队列配置了 dead-letter-exchange属性,则这些死信会被投递到dead-letter-exchange指定的交换机,从而这个交换机被称为死信交换机。死信的条件:
- 消费者使用 basic.reject 或 basic.nack 声明消费失败,并且消息的 requeue 参数设置为 false。
- 消息时一个过期消息,超时无人消费。
- 要投递的队列消息堆满了,最早的消息可能成为死信。
使用死信交换机可以隔离这些不被正确处理的消息,将其放到一个特殊的队列中做特殊处理,从而减少整个消息系统的运行阻碍时间。
五、延迟队列的使用
延迟队列中的消息不会马上消费,需要等待指定的时间以后才能被消费,它的作用是用于延迟处理消息,比如购买东西时有下单30分钟内未支付则取消订单的需求,此情况下可以让订单消息等待30分钟后再去消费,判断是否支付,如果未支付则需要回滚库存等,这类似于定时器的功能。
RabbitMQ本身没有提供延迟队列的功能,但是可以通过TTL过期时间和死信队列来实现延迟队列。TTL指的是消息存活时间,当然队列也有存活时间。实现原理是设置消息、队列过期时间,不去消费这些消息,等待消息过期后加入到死信队列,通过一个特殊的消费者来专门处理这些消息,就可以实现类似延迟队列的功能。
六、消息的幂等性
幂等性是指对于同一个资源,无论请求多少次,对该资源本身造成的影响应该是相等的,不应该出现重复的请求而对资源重复造成影响。消息消费时的幂等性指的是消息不被重复消费,例如接口幂等性也是一样,同样参数调用同样接口不会造成业务错误。
如何避免消息的重复消费是必须考虑的问题,主流的幂等性处理方式有2种:
- 消息全局 ID :消费消息之前根据 ID 判断该消息是否已消费过,如果已经消费过,则不处理。
- Redis的setnx命令:给消息分配一个全局 ID,消费该消息时,先去 Redis 中查询有没消费记录。
七、RabbitMQ的安装
rabbitMQ有不同的版本,可以安装到windows、linux、mac等系统中,安装方式包括docker安装、源码安装、安装包方式等,由于是基于Erlang语言开发,因此除docker方式外其他方式基本都需要先安装Erlang环境。
以Ubuntu系统docker方式安装为例,命令如下:
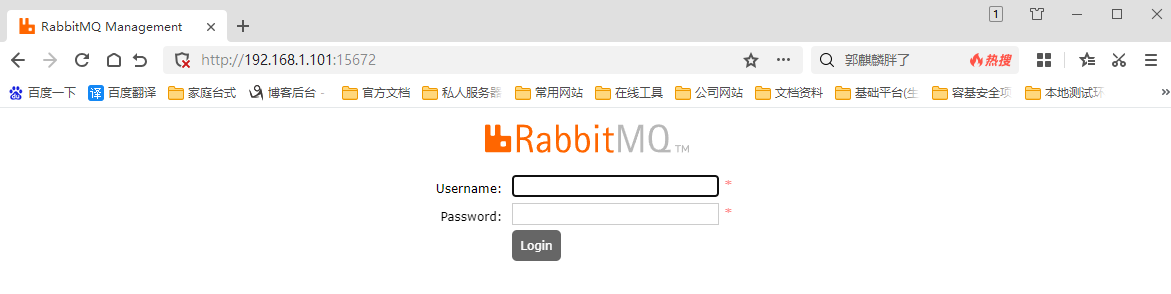
1 | docker run -dit --name rabbitmq --restart=always -e RABBITMQ_DEFAULT_USER=admin -e RABBITMQ_DEFAULT_PASS=admin -p 15672:15672 -p 5672:5672 rabbitmq:management |
通过上面的命令可以看到两个端口15672、5672,前者是RabbitMQ可视化界面的web访问端口,后者是生产者和消费者连接RabbitMQ用到的端口。安装完成后访问IP+15672得到如下界面,即为安装成功。

八、Java—RabbitMQClient快速开发包
以maven项目为例,通过引入com.rabbitmq包,可以快速的开发生产者和消费者,首先引入依赖。
1 2 3 4 5 | <dependency> <groupId>com.rabbitmq</groupId> <artifactId>amqp-client</artifactId> <version>5.7.2</version></dependency> |
在编写代码之前,应该了解com.rabbitmq封装的如下几个重要对象:
1、ConnectionFactory:简单工厂类,用于创建到RabbitMQ中间件的连接,该步骤包括建立TCP连接、数据发送、异常处理、心跳检测等,该类使用具有多个重载的newConnection方法创建AMQConnection实例,可配置常用属性如下:
- host:RabbitMQ服务器主机。
- port:RabbitMQ服务器端口,默认5672。
- username:RabbitMQ用户名。
- password:RabbitMQ密码。
- virtualHost:虚拟主机,默认虚拟主机为"/"。
- connectionTimeout:TCP连接超时等待时间。
- shutdownTimeout:关闭超时,默认是10s,如果是0则无限等待。
- automaticRecovery:启用或禁用自动连接恢复。
- networkRecoveryInterval:设置连接恢复间隔。
- requestedChannelMax:最大通道数。
- requestedFrameMax:请求帧大小,默认0表示不限制。
- requestedHeartbeat:心跳检测间隔,默认是60s。
- handshakeTimeout:握手超时,默认是10s
- exceptionHandler:异常处理器,建立连接异常时被调用。
- metricsCollector:rabbitmq消息监控收集器。
- channelRpcTimeout:通道超时时间,默认为10分钟。
- errorOnWriteListener:监听器,当连接在套接字上写入出现IO错误时被调用。
2、AMQConnection:实现了Connection接口,表示到RabbitMQ中间件的AMQP连接的具体类。该类提供了销毁/关闭连接、创建信道、添加连接阻塞情况监听器的方法:
- createChannel:创建信道。
- openChannel:创建信道。
- abort:销毁连接。
- close:关闭连接。
- addBlockedListener:添加连接阻塞情况监听器。
3、AMQChannel:实现了Channel接口,表示一个传输通道,一个Connecton可以包含多个传输通道。该类提供了关闭/销毁信道、添加各类监听器、绑定交换机、队列、发送消息等方法:
- abort:销毁此信道。
- close:关闭此信道。
- confirmSelect:在该信道上启用消息的发布者确认。消息确认是指生产者发布消息到Broker,Broker收到消息后会给生产者一个应答Confirm ,生产者接收Confirm来判断消息是否正常送达交换机。
- addConfirmListener:添加ConfirmListener,该监听器用于监听Broker收到消息后返回的Confirm。ConfirmListener包含两个方法handleAck(投递成功时回调)、handleNack(投递失败时回调)。
- addReturnListener:添加ReturnListener,该监听器用于监听不能正确路由到队列的消息。当消息不能从交换机投递到队列时,Broker会返回一个应答Return,此时监听器的handleReturn方法会被回调,可以在该方法中对路由失败的消息进行后续处理(前提是配置Mandatory参数为true,如果配置为false,则Broker端会自动删除该消息)。
- addShutdownListener:添加ShutdownListener,该监听器用于监听信道关闭,当信道关闭时该监听器的shutdownCompleted方法会执行。
- basicConsume:开启一个消费者来监听指定队列的消息。
- basicPublish:消息发布。
- exchangeBind:绑定交换机。
- exchangeDeclare:声明一个交换机。
- queueBind:将队列绑定到交换机。
- queueDeclare:声明队列。
- basicQos:设置服务器的限流策略,该方法有三个参数prefetchSize(服务器将提供的最大内容量)、prefetchCount(服务器将传递的最大消息数)、global(设置是否应用于整个通道)。
- exchangeDelete:删除交换机。
- exchangeUnbind:解绑交换机。
- queueDelete:删除队列。
- queueUnbind:取消队列与交换机的绑定。
- queuePurge:清除给定队列的内容。
- basicAck:肯定性的消息确认,表示消息已经被正确处理,Broker可以删除该消息了。
- basicReject:否定性的消息确认,告诉Broker不要再发送该消息了。
- basicNack:否定性的消息确认,表示消息没有被正确处理,Broker需要重新发送消息。
- basicCancel:取消消费者的消费,停止监听队列的消息。
- basicRecover:重新发送未确认的消息。
- basicGet:使用AMQP从队列中检索消息。
- txSelect:启用 TX事务模式。
- txRollback:回滚事务。
- txCommit:提交事务。
- setDefaultConsumer:设置默认消费者。
- rpc:远程方法调用。
九、RabbitMQ-Client使用示例代码
1、消费者端代码:根据前面介绍的工作模式发现,消费者端无需和交换机打交道,消费消息只需要指定队列即可,因此简单模式、路由模式、主题模式、工作队列模式的消费者代码一致的。


 1 package org.rmq;
 2
 3
 4 import com.rabbitmq.client.*;
 5
 6 import java.io.IOException;
 7 import java.nio.charset.StandardCharsets;
 8 import java.util.concurrent.TimeoutException;
 9
10 /**
11  * 消费者代码  消费者端与交换机无关,只需要绑定消费队列监听即可 因此简单模式、路由模式、主题模式、工作队列模式的消费者代码一致
12  * @author zmy
13  */
14 public class ConsumerClient {
15     public static void main(String[] args) throws IOException, TimeoutException {
16         // 创建连接工厂
17         ConnectionFactory connectionFactory = new ConnectionFactory();
18         connectionFactory.setHost("192.168.1.101");
19         connectionFactory.setPort(5672);
20         connectionFactory.setUsername("admin");
21         connectionFactory.setPassword("admin");
22         connectionFactory.setVirtualHost("/");
23
24         // 创建连接
25         Connection conn = connectionFactory.newConnection();
26
27         //创建通道
28         Channel channel = conn.createChannel();
29
30         //实例化一个监听器
31         Consumer consumer = new DefaultConsumer(channel) {
32
33             /**
34              * 当接收到消息后,此方法将被调用
35              * @param consumerTag 消费者标签,在监听队列时设置channel.basicConsume
36              * @param envelope 信封,可从中获取消息id,消息routingkey,交换机,消息和重试标志
37              * @param properties 属性信息
38              * @param body 消息
39              * @throws IOException
40              */
41             @Override
42             public void handleDelivery(String consumerTag, Envelope envelope, AMQP.BasicProperties properties, byte[] body) throws IOException {
43                 //路由key
44                 System.out.println("路由key为:" + envelope.getRoutingKey());
45                 //交换机
46                 System.out.println("交换机为:" + envelope.getExchange());
47                 //消息id
48                 System.out.println("消息id为:" + envelope.getDeliveryTag());
49                 //收到的消息
50                 System.out.println("接收到的消息为:" + new String(body, StandardCharsets.UTF_8));
51
52                 //手动确认消息 确认方式有三种
53                 //channel.basicReject(envelope.getDeliveryTag(), false);
54                 //channel.basicNack(envelope.getDeliveryTag(), false, false);
55                 channel.basicAck(envelope.getDeliveryTag(), false);
56             }
57         };
58
59         /**
60          *开启监听器监听消息
61          *1. queue 队列名称
62          *2. autoAck 自动回复,当消费者接收到消息后要告诉mq消息已接收,如果将此参数设置为ture表示会自动回复mq,如果设置为false要通过编程实现回复
63          *3. callback 消费消息的方法,消费者接收到消息要回调该方法
64          */
65         channel.basicConsume("TopicModelQueue1", false, consumer);
66         channel.basicConsume("TopicModelQueue2", false, consumer);
67         channel.basicConsume("PublishSubscribeModelQueue1", false, consumer);
68         channel.basicConsume("PublishSubscribeModelQueue2", false, consumer);
69         channel.basicConsume("RouteModelQueue1", false, consumer);
70         channel.basicConsume("RouteModelQueue2", false, consumer);
71         channel.basicConsume("WorkQueueModelQueue", false, consumer);
72         channel.basicConsume("SimpleModelQueue", false, consumer);
73         //不关闭连接可以保证客户端一直接收消息
74         //channel.close();
75         //conn.close();
76     }
77 }
2、工作队列模式和简单模式的生产者代码也是一样的,唯一的区别是前者具有多个消费者,形成消息竞争关系,后者只有一个消费者。
 1 package org.rmq;
 2
 3 import com.rabbitmq.client.Channel;
 4 import com.rabbitmq.client.Connection;
 5 import com.rabbitmq.client.ConnectionFactory;
 6
 7 import java.io.IOException;
 8 import java.util.concurrent.TimeoutException;
 9
10
11 public class SimpleProducerClient {
12     public static void main(String[] args) throws IOException, TimeoutException {
13
14         // 创建连接工厂
15         ConnectionFactory connectionFactory = new ConnectionFactory();
16         connectionFactory.setHost("192.168.1.101");
17         connectionFactory.setPort(5672);
18         connectionFactory.setUsername("admin");
19         connectionFactory.setPassword("admin");
20         connectionFactory.setVirtualHost("/");
21
22         // 创建连接
23         Connection conn = connectionFactory.newConnection();
24
25         //创建通道
26         Channel channel = conn.createChannel();
27
28         //默认就是直连交换机,无需显示声明
29         //channel.exchangeDeclare("SimpleModelExchange", "direct", true);
30
31         /**
32          * 声明队列
33          * 参数1:队列名称
34          * 参数2:是否持久化
35          * 参数3:是否独占本连接
36          * 参数4:是否自动删除
37          * 参数5:其他参数
38          */
39         channel.queueDeclare("SimpleModelQueue", true, false, false, null);
40
41         /**
42          * 发送消息
43          * 参数1:交换机名称,如果没有则指定空字符串(默认交换机)
44          * 参数2:路由key,简单模式可以指定队列名称
45          * 参数3:消息其他属性
46          * 参数4:消息内容
47          */
48         channel.basicPublish("", "SimpleModelQueue", null, "我是通过简单模式传递的消息!".getBytes());
49
50         channel.close();
51         conn.close();
52
53     }
54
55
56 }
3、路由模式生产者代码:使用路由键绑定队列,通过路由键发送消息相应队列。
 1 package org.rmq;
 2
 3 import com.rabbitmq.client.BuiltinExchangeType;
 4 import com.rabbitmq.client.Channel;
 5 import com.rabbitmq.client.Connection;
 6 import com.rabbitmq.client.ConnectionFactory;
 7
 8 import java.io.IOException;
 9 import java.util.concurrent.TimeoutException;
10
11
12 public class RouteProducerClient {
13     public static void main(String[] args) throws IOException, TimeoutException {
14
15         // 创建连接工厂
16         ConnectionFactory connectionFactory = new ConnectionFactory();
17         connectionFactory.setHost("192.168.1.101");
18         connectionFactory.setPort(5672);
19         connectionFactory.setUsername("admin");
20         connectionFactory.setPassword("admin");
21         connectionFactory.setVirtualHost("/");
22
23         // 创建连接
24         Connection conn = connectionFactory.newConnection();
25
26         //创建通道
27         Channel channel = conn.createChannel();
28
29         /** 需要显示的声明交换机 类型为direct
30          * 参数1:交换机名称
31          * 参数2:交换机类型
32          * 参数3:是否持久化
33          * 参数4:是否自动删除
34          * 参数5:其他参数
35          */
36         channel.exchangeDeclare("directExchange01", BuiltinExchangeType.DIRECT,true,false,null);
37
38         /**
39          * 声明队列
40          * 参数1:队列名称
41          * 参数2:是否持久化
42          * 参数3:是否独占本连接
43          * 参数4:是否自动删除
44          * 参数5:其他参数
45          */
46         channel.queueDeclare("RouteModelQueue1", true, false, false, null);
47         channel.queueDeclare("RouteModelQueue2", true, false, false, null);
48
49
50         /**
51          * 将队列和交换机绑定,此方式需要设置routingKey
52          * 如下表示key1键匹配了RouteModelQueue1、RouteModelQueue2,key2键匹配了RouteModelQueue2
53          * 只有生产者发送的消息的routingKey和队列的routingKey一致时,消息才能被该队列接收
54          */
55         channel.queueBind("RouteModelQueue1", "directExchange01", "key1");
56         channel.queueBind("RouteModelQueue2", "directExchange01", "key1");
57         channel.queueBind("RouteModelQueue2", "directExchange01", "key2");
58
59         /**
60          * 发送消息
61          * 参数1:交换机名称,如果没有则指定空字符串(默认交换机)
62          * 参数2:路由key, 本例中设置为"key1",这消息会被发送到队列RouteModelQueue1和RouteModelQueue2,因为key1在前面绑定到了这两个队列
63          * 参数3:消息其他属性
64          * 参数4:消息内容
65          */
66         channel.basicPublish("directExchange01", "key1", null, "我是通过路由模式模式匹配key1传递的消息!".getBytes());
67
68         channel.basicPublish("directExchange01", "key2", null, "我是通过路由模式模式匹配key2传递的消息!".getBytes());
69
70         channel.close();
71         conn.close();
72
73     }
74
75
76 }
4、主题模式生产者代码:与路由模式相似,只不过是交换机类型不同,而且主题模式使用路由键通配符模糊匹配。
package org.rmq;

import com.rabbitmq.client.BuiltinExchangeType;
import com.rabbitmq.client.Channel;
import com.rabbitmq.client.Connection;
import com.rabbitmq.client.ConnectionFactory;

import java.io.IOException;
import java.util.concurrent.TimeoutException;


public class TopicsProducerClient {
    public static void main(String[] args) throws IOException, TimeoutException {

        // 创建连接工厂
        ConnectionFactory connectionFactory = new ConnectionFactory();
        connectionFactory.setHost("192.168.1.101");
        connectionFactory.setPort(5672);
        connectionFactory.setUsername("admin");
        connectionFactory.setPassword("admin");
        connectionFactory.setVirtualHost("/");

        // 创建连接
        Connection conn = connectionFactory.newConnection();

        //创建通道
        Channel channel = conn.createChannel();

        /** 需要显示的声明交换机 类型为topic
         * 参数1:交换机名称
         * 参数2:交换机类型
         * 参数3:是否持久化
         * 参数4:是否自动删除
         * 参数5:其他参数
         */
        channel.exchangeDeclare("topicExchange01", BuiltinExchangeType.TOPIC,true,false,null);

        /**
         * 声明队列
         * 参数1:队列名称
         * 参数2:是否持久化
         * 参数3:是否独占本连接
         * 参数4:是否自动删除
         * 参数5:其他参数
         */
        channel.queueDeclare("TopicModelQueue1", true, false, false, null);
        channel.queueDeclare("TopicModelQueue2", true, false, false, null);


        /**
         * 将队列和交换机绑定,此方式需要设置routingKey
         * routingKey以通配符的方式绑定 :使用#或者*进行匹配
         */
        channel.queueBind("TopicModelQueue1", "topicExchange01", "error.*");
        channel.queueBind("TopicModelQueue2", "topicExchange01", "info.*");
        channel.queueBind("TopicModelQueue2", "topicExchange01", "*.warn");

        /**
         * 发送消息
         * 参数1:交换机名称,如果没有则指定空字符串(默认交换机)
         * 参数2:路由key : 该key会与绑定队列时传递的通配符routingKey进行匹配,若匹配成功则投递消息到对应的队列。例如下面第一个消息会被投递到
         *                TopicModelQueue1队列中,第二个消息会被投递到TopicModelQueue2队列中。第三个消息会投递TopicModelQueue2队列中。
         * 参数3:消息其他属性
         * 参数4:消息内容
         */
        channel.basicPublish("topicExchange01", "error.001", null, "我是通过主题模式模糊匹配error传递的消息!".getBytes());
        channel.basicPublish("topicExchange01", "info.log", null, "我是通过主题模式模糊匹配info.log传递的消息!".getBytes());
        channel.basicPublish("topicExchange01", "ms.warn", null, "我是通过主题模式模糊匹配ms.warn传递的消息!".getBytes());

        channel.close();
        conn.close();

    }


}
5、发布订阅模式生产者代码:使用fanout交换机,无须绑定路由键,消息会被发送到所有绑定到交换机的队列。
 1 package org.rmq;
 2
 3 import com.rabbitmq.client.BuiltinExchangeType;
 4 import com.rabbitmq.client.Channel;
 5 import com.rabbitmq.client.Connection;
 6 import com.rabbitmq.client.ConnectionFactory;
 7
 8 import java.io.IOException;
 9 import java.util.concurrent.TimeoutException;
10
11
12 public class PublishSubscribeProducerClient {
13     public static void main(String[] args) throws IOException, TimeoutException {
14
15         // 创建连接工厂
16         ConnectionFactory connectionFactory = new ConnectionFactory();
17         connectionFactory.setHost("192.168.1.101");
18         connectionFactory.setPort(5672);
19         connectionFactory.setUsername("admin");
20         connectionFactory.setPassword("admin");
21         connectionFactory.setVirtualHost("/");
22
23         // 创建连接
24         Connection conn = connectionFactory.newConnection();
25
26         //创建通道
27         Channel channel = conn.createChannel();
28
29         /** 需要显示的声明交换机 类型为fanout
30          * 参数1:交换机名称
31          * 参数2:交换机类型
32          * 参数3:是否持久化
33          * 参数4:是否自动删除
34          * 参数5:其他参数
35          */
36         channel.exchangeDeclare("fanoutExchange01", BuiltinExchangeType.FANOUT,true,false,null);
37
38         /**
39          * 声明队列
40          * 参数1:队列名称
41          * 参数2:是否持久化
42          * 参数3:是否独占本连接
43          * 参数4:是否自动删除
44          * 参数5:其他参数
45          */
46         channel.queueDeclare("PublishSubscribeModelQueue1", true, false, false, null);
47         channel.queueDeclare("PublishSubscribeModelQueue2", true, false, false, null);
48
49
50         // 将队列和交换机绑定,此方式不携带路由信息,不使用路由匹配
51         channel.queueBind("PublishSubscribeModelQueue1", "fanoutExchange01", "");
52         channel.queueBind("PublishSubscribeModelQueue2", "fanoutExchange01", "");
53
54
55         /**
56          * 发送消息
57          * 参数1:交换机名称,如果没有则指定空字符串(默认交换机)
58          * 参数2:路由key,消息会被发送到指定路由key的队列中  因为是fanout模式,所以这里不写路由,表示会发送到所有与该交换机绑定的队列中
59          * 参数3:消息其他属性
60          * 参数4:消息内容
61          */
62         channel.basicPublish("fanoutExchange01", "", null, "我是通过发布订阅模式传递的消息!".getBytes());
63
64         channel.close();
65         conn.close();
66
67     }
68
69
70 }
<!--添加AMQP的启动器-->
<dependency>
    <groupId>org.springframework.boot</groupId>
    <artifactId>spring-boot-starter-amqp</artifactId>
</dependency>
2、在配置文件application.yml中进行rabbitmq参数配置,生产者和消费者部分配置的可能不一样,例如:
server:
  port: 8080
spring:
  application:
    name: rabbitmq-producer
  rabbitmq:
    host: 192.168.1.101
    port: 5672
    username: admin
    password: admin
    virtual-host: /
    # 开启回退模式
    publisher-returns: true
    # 开启发布确认
    publisher-confirm-type: correlated
    listener:
      simple:
        retry:
          #开启重试
          enabled: true
          #最大重试次数
          max-attempts: 3
          #重试间隔
          max-interval: 1000ms
        # 设置消费者并发从队列中获取消息的数量
        prefetch: 500
3、如果是生产者,则需创建RabbitMQConfig配置类,在配置类中创建交换机、创建队列、进行交换机和队列的绑定。
  1 package org.rmq.config;
  2
  3 import org.springframework.amqp.core.*;
  4 import org.springframework.beans.factory.annotation.Qualifier;
  5 import org.springframework.context.annotation.Bean;
  6 import org.springframework.context.annotation.Configuration;
  7
  8 /**
  9  * 该配置文件用于配置RabbitMQ中的队列、交换机、绑定关系等
 10  */
 11 @Configuration
 12 public class RabbitMQConfig {
 13
 14     //用于简单模式的队列
 15     @Bean("simple_queue")
 16     public Queue simpleQueue() {
 17         return QueueBuilder.durable("simple_queue").build();
 18     }
 19
 20     //用于工作队列模式的队列
 21     @Bean("wk_queue")
 22     public Queue wkQueue() {
 23         return QueueBuilder.durable("wk_queue").build();
 24     }
 25
 26     //用于发布订阅模式的队列
 27     @Bean("ps_queue01")
 28     public Queue psQueue01() {
 29         return QueueBuilder.durable("ps_queue01").build();
 30     }
 31
 32     //用于发布订阅模式的队列
 33     @Bean("ps_queue02")
 34     public Queue psQueue02() {
 35         return QueueBuilder.durable("ps_queue02").build();
 36     }
 37
 38     //用于主题模式的队列
 39     @Bean("topic_queue01")
 40     public Queue topicQueue01() {
 41         return QueueBuilder.durable("topic_queue01").build();
 42     }
 43
 44     //用于主题模式的队列
 45     @Bean("topic_queue02")
 46     public Queue topicQueue02() {
 47         return QueueBuilder.durable("topic_queue02").build();
 48     }
 49
 50     //用于路由模式的队列
 51     @Bean("route_queue01")
 52     public Queue routeQueue01() {
 53         return QueueBuilder.durable("route_queue01").build();
 54     }
 55
 56     //用于路由模式的队列
 57     @Bean("route_queue02")
 58     public Queue routeQueue02() {
 59         return QueueBuilder.durable("route_queue02").build();
 60     }
 61
 62     //用于发布订阅模式的交换机
 63     @Bean("fanout_exchange")
 64     public Exchange fanoutExchange() {
 65         return ExchangeBuilder.fanoutExchange("fanout_exchange").durable(true).build();
 66     }
 67
 68     //用于主题模式的交换机
 69     @Bean("topic_exchange")
 70     public Exchange topicExchange() {
 71         return ExchangeBuilder.topicExchange("topic_exchange").durable(true).build();
 72     }
 73
 74     //用于路由模式的交换机
 75     @Bean("route_exchange")
 76     public Exchange routeExchange() {
 77         return ExchangeBuilder.directExchange("route_exchange").durable(true).build();
 78     }
 79
 80     //绑定队列搭到交换机 发布订阅模式不需要路由键
 81     @Bean
 82     public Binding bindQueueExchange01(@Qualifier("ps_queue01") Queue queue, @Qualifier("fanout_exchange") Exchange exchange) {
 83         return BindingBuilder.bind(queue).to(exchange).with("").noargs();
 84     }
 85
 86     //绑定队列搭到交换机 发布订阅模式不需要路由键
 87     @Bean
 88     public Binding bindQueueExchange02(@Qualifier("ps_queue02") Queue queue, @Qualifier("fanout_exchange") Exchange exchange) {
 89         return BindingBuilder.bind(queue).to(exchange).with("").noargs();
 90     }
 91
 92     //绑定队列搭到交换机 主题模式需要使用通配符路由键
 93     @Bean
 94     public Binding bindQueueExchange03(@Qualifier("topic_queue01") Queue queue, @Qualifier("topic_exchange") Exchange exchange) {
 95         //*: 代表单个单词;  #: 代表单个或多个单词
 96         return BindingBuilder.bind(queue).to(exchange).with("info.*").noargs();
 97     }
 98
 99     //绑定队列搭到交换机 主题模式需要使用通配符路由键
100     @Bean
101     public Binding bindQueueExchange04(@Qualifier("topic_queue02") Queue queue, @Qualifier("topic_exchange") Exchange exchange) {
102         //*: 代表单个单词;  #: 代表单个或多个单词
103         return BindingBuilder.bind(queue).to(exchange).with("error.*").noargs();
104     }
105
106     //绑定队列搭到交换机 主题模式需要使用通配符路由键
107     @Bean
108     public Binding bindQueueExchange05(@Qualifier("topic_queue02") Queue queue, @Qualifier("topic_exchange") Exchange exchange) {
109         return BindingBuilder.bind(queue).to(exchange).with("#.error").noargs();
110     }
111
112     //绑定队列搭到交换机 路由模式需要使用路由键
113     @Bean
114     public Binding bindQueueExchange06(@Qualifier("route_queue01") Queue queue, @Qualifier("route_exchange") Exchange exchange) {
115         return BindingBuilder.bind(queue).to(exchange).with("key1").noargs();
116     }
117
118     //绑定队列搭到交换机 路由模式需要使用路由键
119     @Bean
120     public Binding bindQueueExchange07(@Qualifier("route_queue02") Queue queue, @Qualifier("route_exchange") Exchange exchange) {
121         return BindingBuilder.bind(queue).to(exchange).with("key2").noargs();
122     }
123
124
125 }
4、生产者消息发送:使用RabbitTemplate模板类来发送消息。
 1 package org.rmq.controller;
 2
 3
 4 import org.springframework.amqp.rabbit.core.RabbitTemplate;
 5 import org.springframework.beans.factory.annotation.Autowired;
 6 import org.springframework.web.bind.annotation.PostMapping;
 7 import org.springframework.web.bind.annotation.RequestBody;
 8 import org.springframework.web.bind.annotation.RequestMapping;
 9 import org.springframework.web.bind.annotation.RestController;
10
11 @RestController
12 @RequestMapping("/producer/")
13 public class ProducerController {
14     @Autowired
15     private RabbitTemplate rabbitTemplate;
16
17     @PostMapping("publish")
18     public String publish() {
19
20         //设置确认模式下回调函数,在收到Broker的确认消息后回调
21         rabbitTemplate.setConfirmCallback((correlationData, ack, cause) -> {
22             if (ack) {
23                 System.out.println("消息发送到交换机成功!");
24             }else {
25                 //根据原因,进行消息后续处理,但要注意重发时导致死循环
26                 System.out.println("消息发送到交换机失败:"+cause);
27             }
28         });
29
30         //设置消息返回模式下,在消息没有投递到队列时,Broker返回该消息给生产者,该方法会被回调
31         rabbitTemplate.setReturnsCallback(message -> {
32             System.out.println("消息投递到队列失败:"+message.getReplyCode()+" "+message.getReplyText());
33             //根据原因,进行消息后续处理,但要注意重发时导致死循环
34         });
35
36         //简单模式:一个生产者对应一个消费者
37         rabbitTemplate.convertAndSend("simple_queue", "Hello, 简单模式");
38
39         //工作队列模式:一个生产者对应多个消费者
40         rabbitTemplate.convertAndSend("wk_queue", "Hello, 工作队列模式");
41
42         //路由模式:通过路由键精准绑定队列
43         rabbitTemplate.convertAndSend("route_exchange", "key2", "Hello, 路由模式");
44
45         //主题模式:通过路由键模糊匹配队列
46         rabbitTemplate.convertAndSend("topic_exchange", "info.log", "Hello, 主题模式");
47         rabbitTemplate.convertAndSend("topic_exchange", "error.log", "Hello, 主题模式");
48
49         //发布订阅模式:路由键为空,只需指定交换机即可
50         rabbitTemplate.convertAndSend("fanout_exchange", "", "Hello, 发布订阅模式");
51
52
53         return "Message Sent Successfully";
54     }
55
56
57 }
5、消费者端编写监听器类,示例代码如下。
 1 package org.rmq.listener;
 2
 3 import com.rabbitmq.client.AMQP;
 4 import com.rabbitmq.client.Channel;
 5 import org.springframework.amqp.core.Message;
 6 import org.springframework.amqp.rabbit.annotation.RabbitListener;
 7 import org.springframework.stereotype.Component;
 8
 9 import java.io.IOException;
10
11 /**
12  * RabbitMQ消息监听器.
13  */
14 @Component
15 public class RabbitmqListener {
16
17     @RabbitListener(queues = "simple_queue")
18     public void handleMessage01(Message message, Channel channel) throws IOException {
19         System.out.println("监听到队列simple_queue消息: " + message);
20
21         //确认消息已经被正确处理,broker可以删除该条消息了。第一个参数是该消息的delivery tag,第二个参数是是否批量确认(可能会同时收到多条),一般为false。
22         channel.basicAck(message.getMessageProperties().getDeliveryTag(), false);
23
24         // 手动拒绝消息,该方法可以一次拒绝多条消息,第二个参数为是否批量拒绝(可能会同时收到多条),一般为false。第三个参数为是否重新回到队列,一般为false(丢弃)。
25         //channel.basicNack(message.getMessageProperties().getDeliveryTag(), false, false);
26
27         //手动拒绝消息,该方法一次只能拒绝一条消息。第二个参数为是否重新回到队列,一般为false(丢弃)。
28         //channel.basicReject(message.getMessageProperties().getDeliveryTag(), false);
29     }
30
31     @RabbitListener(queues = "wk_queue")
32     public void handleMessage02(Message message, Channel channel) throws IOException {
33         System.out.println("监听到队列wk_queue息: " + message);
34         channel.basicAck(message.getMessageProperties().getDeliveryTag(), false);
35     }
36
37     @RabbitListener(queues = "ps_queue01")
38     public void handleMessage03(Message message, Channel channel) throws IOException {
39         System.out.println("监听到队列sps_queue01消息: " + message);
40         channel.basicAck(message.getMessageProperties().getDeliveryTag(), false);
41     }
42
43     @RabbitListener(queues = "ps_queue02")
44     public void handleMessage04(Message message, Channel channel) throws IOException {
45         System.out.println("监听到队列ps_queue02消息: " + message);
46         channel.basicAck(message.getMessageProperties().getDeliveryTag(), false);
47     }
48
49     @RabbitListener(queues = "topic_queue01")
50     public void handleMessage05(Message message, Channel channel) throws IOException {
51         System.out.println("监听到队列topic_queue01消息: " + message);
52         channel.basicAck(message.getMessageProperties().getDeliveryTag(), false);
53     }
54
55     @RabbitListener(queues = "topic_queue02")
56     public void handleMessage06(Message message, Channel channel) throws IOException {
57         System.out.println("监听到队列topic_queue02消息: " + message);
58         channel.basicAck(message.getMessageProperties().getDeliveryTag(), false);
59     }
60
61     @RabbitListener(queues = "route_queue01")
62     public void handleMessage07(Message message, Channel channel) throws IOException {
63         System.out.println("监听到队列route_queue01消息: " + message);
64         channel.basicAck(message.getMessageProperties().getDeliveryTag(), false);
65     }
66
67     @RabbitListener(queues = "route_queue02")
68     public void handleMessage08(Message message, Channel channel) throws IOException {
69         System.out.println("监听到队列route_queue02消息: " + message);
70         channel.basicAck(message.getMessageProperties().getDeliveryTag(), false);
71     }
72 }
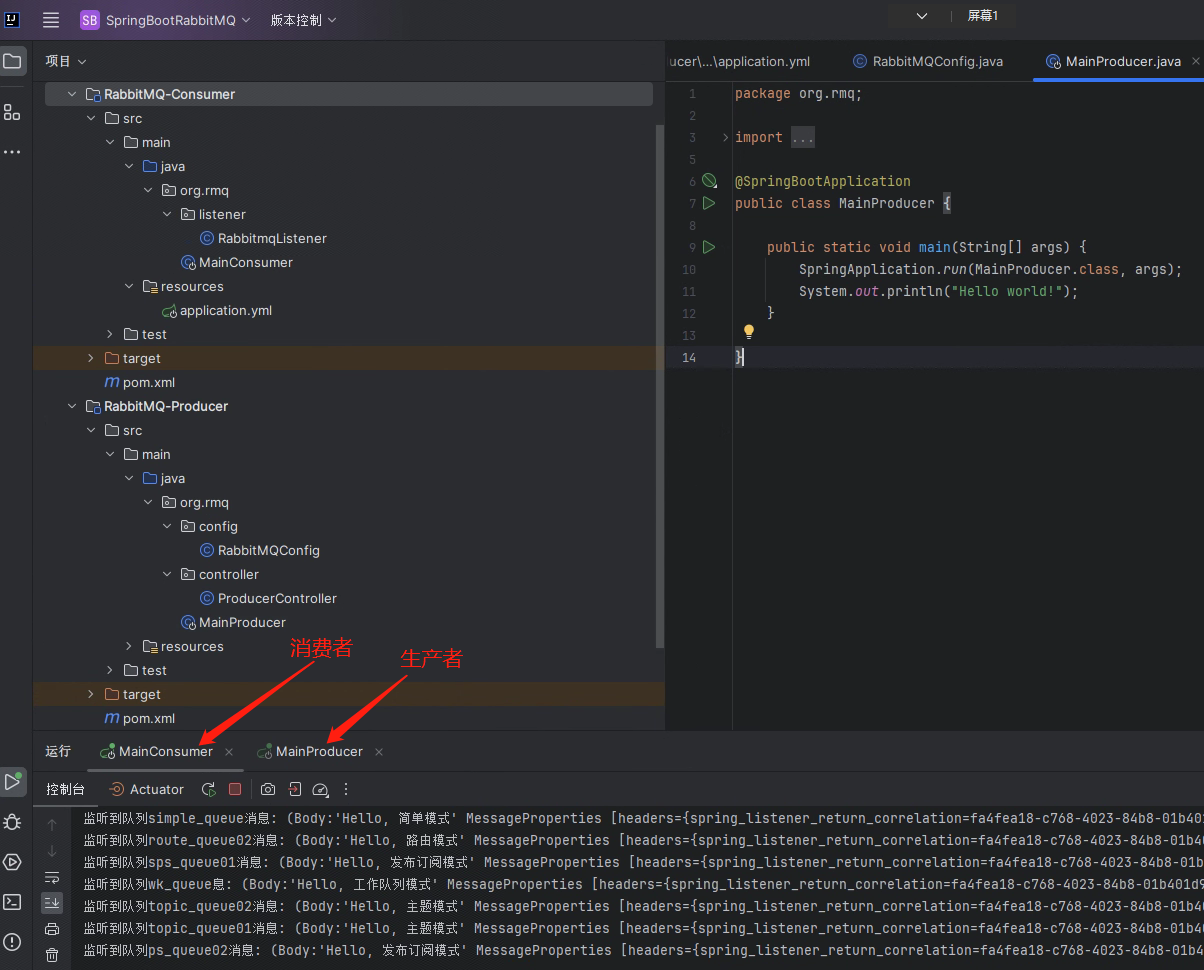
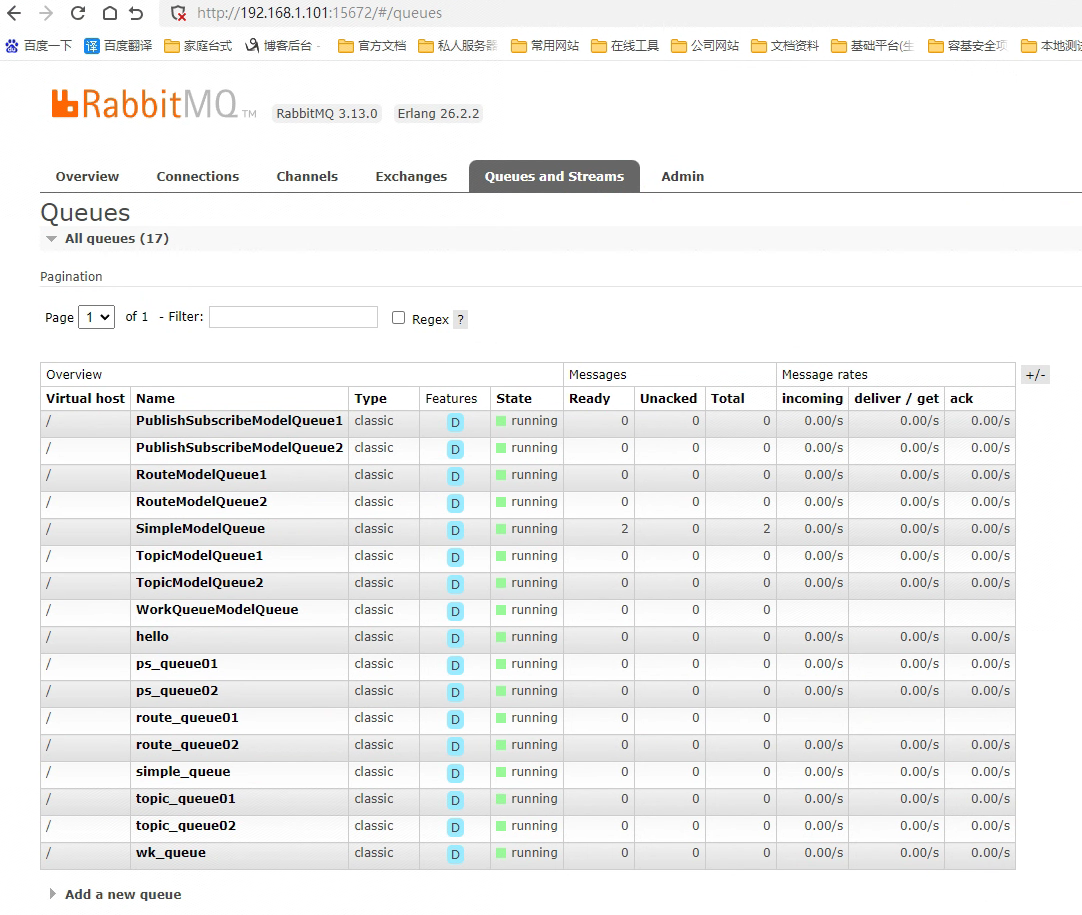
6、运行效果:


【推荐】国内首个AI IDE,深度理解中文开发场景,立即下载体验Trae
【推荐】编程新体验,更懂你的AI,立即体验豆包MarsCode编程助手
【推荐】抖音旗下AI助手豆包,你的智能百科全书,全免费不限次数
【推荐】轻量又高性能的 SSH 工具 IShell:AI 加持,快人一步
· TypeScript + Deepseek 打造卜卦网站:技术与玄学的结合
· Manus的开源复刻OpenManus初探
· AI 智能体引爆开源社区「GitHub 热点速览」
· C#/.NET/.NET Core技术前沿周刊 | 第 29 期(2025年3.1-3.9)
· 从HTTP原因短语缺失研究HTTP/2和HTTP/3的设计差异