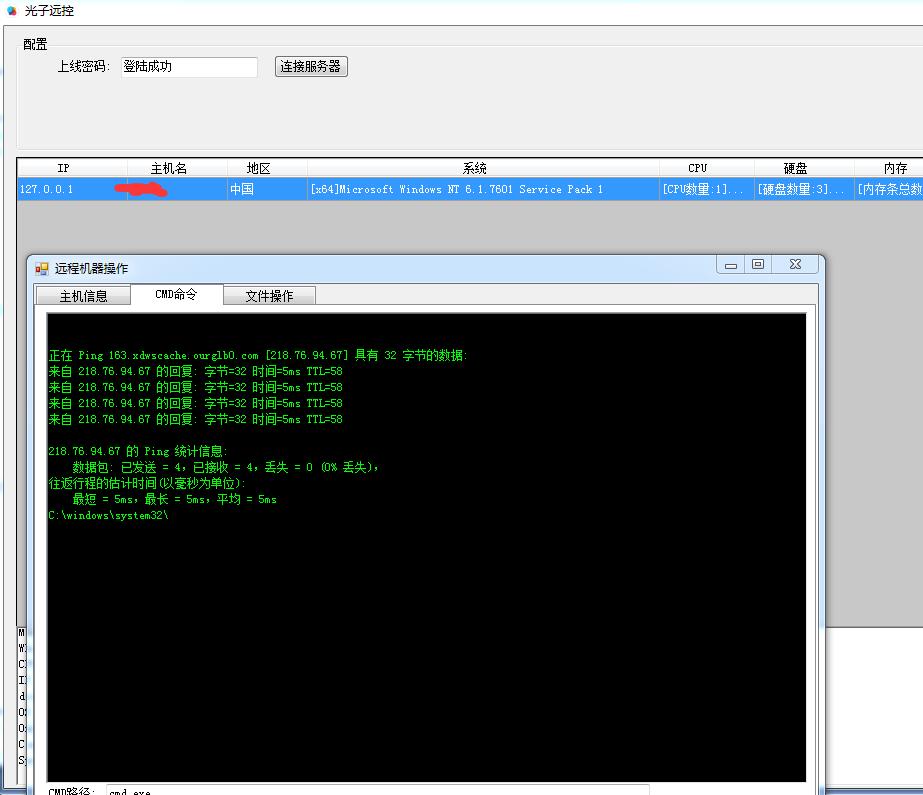
使用游戏引擎photon打造一款特殊的远程控制软件
前言
本文主要是介绍photon引擎的一些基本用法,以及使用游戏引擎开发远控的优势
0x1
有一段时候对做游戏的unity开发有些兴趣,在找游戏服务端引擎的时候,突然发现了这款歪果人开发的游戏引擎photon,这款引擎的资料很少,费了很大劲才了解到一些基本知识。
对于C#码农来说,这款引擎真的非常强大,非常省力,而且和C#搭配非常棒。缺点就是这是一款商业引擎,不过屌丝是可以免费申请100连接数的Key。并且配备了托盘控制台和日志查看等功能。

0x2
好了,废话不多说,开始我们的正题。photon引擎是以加载模块的方式加载您开发的DLL。比如将游戏的逻辑编译成DLL,phototn负责网络连接等一些复杂的操作。
并且帮您完成IOCP和远程函数调用。这才是重点啊。那些复杂的多线程网络操作,都将由photon完成。
我们传统的木马主要有2种。
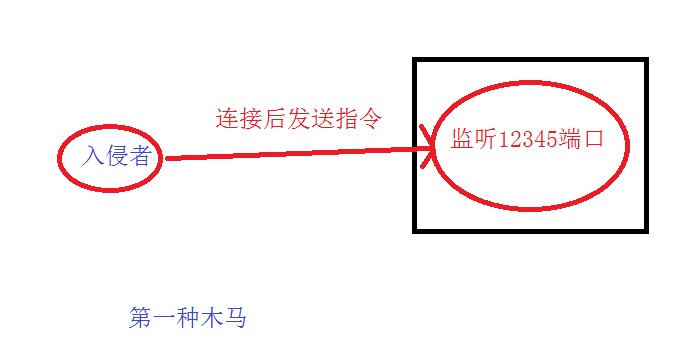
第一种是最原始的,木马本身监听一个端口,等待连接和指令
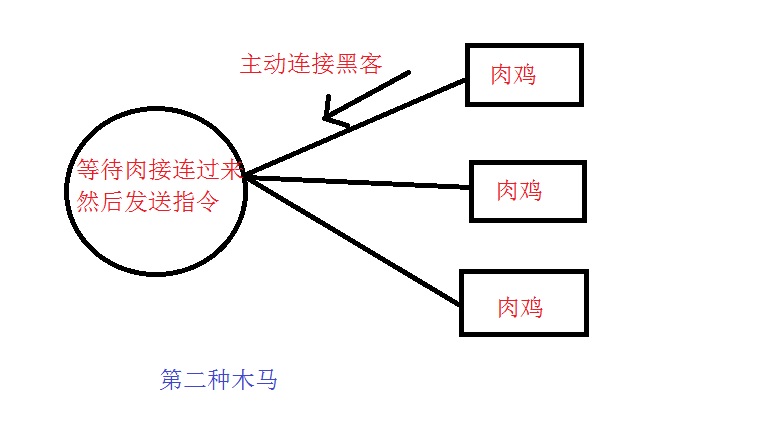
第二种是类似灰鸽子的反弹连接,木马通过域名、IP主动去连接肉鸡主人。
那么,问题来了,这两种方式都非常容易被平平安安爆菊,因为通过IP就能直接确认源头,找到控制端。
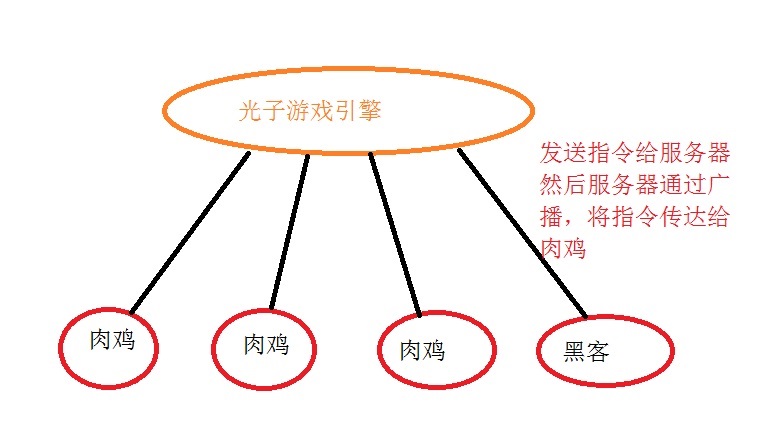
所以我就想着是不是可以通过游戏引擎开发一款远控,让控制者和被控者都相当于游戏参与者,被控者就是普通玩家,控制者相当于游戏GM,服务器将指令将通过广播传达给肉鸡,这样就无法从网络协议上确认控制者是谁。
并且使用UDP协议,隐藏性杠杠的!
------------------------------------------------------------------------------------------------------------
------------------------------------------------------------------------------------------------------------
------------------------------------------------------------------------------------------------------------
0x3
因为photon是加载C#的DLL模块运行的,所以我们只需要开发一个为我们所用的DLL就行了,而不用大动干戈的去修改引擎本身。
首先创建一个类,继承ApplicationBase,在CreatePeer函数返回一个PeerBase的子类,当然这个子类是自己开发的。我命名为fuckPeer。其余的代码为日志设置,这样就能在photon控制看到自己的日志了,方便调试
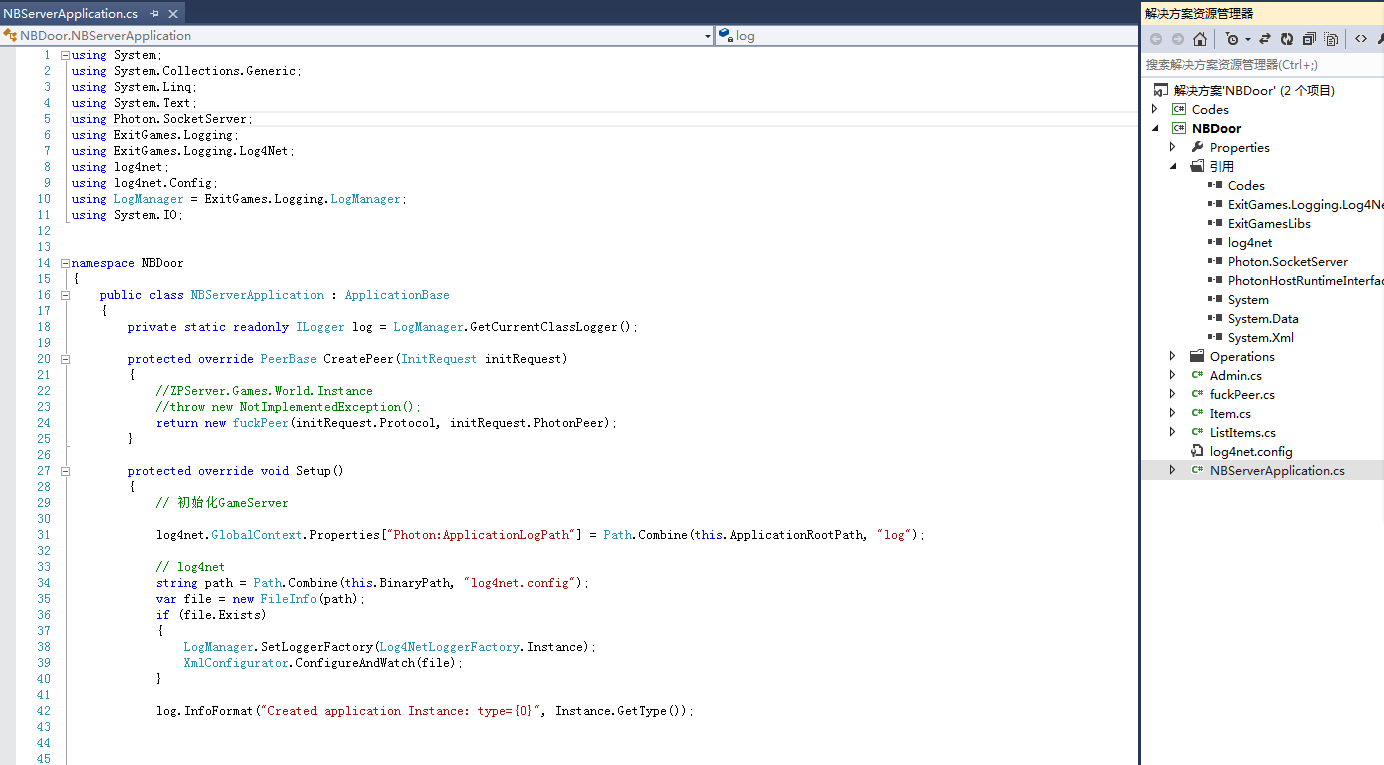
具体Peer的开发 官网的demo非常详细,请直接下载吧。将DLL编译好以后还需要修改一番photon服务器的配置文件 PhotonServer.config
请注意 NBDoor 就是我写的DLL,我把官网那些demo都删掉了,不然启动速度很慢。
  1 <?xml version="1.0" encoding="Windows-1252"?>
  2 <!--
  3     (c) 2010 by Exit Games GmbH, http://www.exitgames.com
  4     Photon server configuration file.
  5     For details see the photon-config.pdf.
  6
  7     This file contains two configurations:
  8
  9         "Default"
 10                 Default. Various applications and demos.
 11                 Starts the apps: Lite, LiteLobby, MmoDemo, CounterPublisher and Policy
 12                 Listens: udp-port 5055, tcp-port: 4530, 843 and 943
 13         "LoadBalancing"
 14                 Loadbalanced setup for local development: A Master-server and two game-servers.
 15                 Starts the apps: Game1, Game2, Master, CounterPublisher and Policy
 16                 Listens: udp-port 5055, tcp-port: 4530, 843 and 943
 17 -->
 18
 19 <Configuration>
 20     <!-- Multiple instances are supported. Each instance has its own node in the config file. -->
 21     <!-- PhotonControl will currently only start "Default" but the .cmd files could be modified to start other instances. -->
 22
 23     <!-- Instance settings -->
 24     <Default
 25         MaxMessageSize="512000"
 26         MaxQueuedDataPerPeer="512000"
 27         PerPeerMaxReliableDataInTransit="51200"
 28         PerPeerTransmitRateLimitKBSec="256"
 29         PerPeerTransmitRatePeriodMilliseconds="200"
 30         MinimumTimeout="1000"
 31         MaximumTimeout="2000">
 32
 33         <!-- 0.0.0.0 opens listeners on all available IPs. Machines with multiple IPs should define the correct one here. -->
 34         <!-- Port 5055 is Photon's default for UDP connections. -->
 35         <UDPListeners>
 36             <UDPListener
 37                 IPAddress="0.0.0.0"
 38                 Port="5055">
 39             </UDPListener>
 40         </UDPListeners>
 41
 42         <!-- 0.0.0.0 opens listeners on all available IPs. Machines with multiple IPs should define the correct one here. -->
 43         <!-- Port 4530 is Photon's default for TCP connecttions. -->
 44         <!-- A Policy application is defined in case that policy requests are sent to this listener (known bug of some some flash clients) -->
 45         <TCPListeners>
 46             <TCPListener
 47                 IPAddress="0.0.0.0"
 48                 Port="4530"
 49                 PolicyFile="Policy\assets\socket-policy.xml"
 50                 InactivityTimeout="10000"
 51                 >
 52             </TCPListener>
 53         </TCPListeners>
 54
 55
 56
 57
 58
 59         <!-- Defines the Photon Runtime Assembly to use. -->
 60         <Runtime
 61             Assembly="PhotonHostRuntime, Culture=neutral"
 62             Type="PhotonHostRuntime.PhotonDomainManager"
 63             UnhandledExceptionPolicy="Ignore">
 64         </Runtime>
 65
 66
 67         <!-- Defines which applications are loaded on start and which of them is used by default. Make sure the default application is defined. -->
 68         <!-- Application-folders must be located in the same folder as the bin_win32 folders. The BaseDirectory must include a "bin" folder. -->
 69         <Applications Default="NBDoor">
 70
 71
 72
 73
 74         <Application
 75         Name="NBDoor"
 76         BaseDirectory="NBDoor"
 77         Assembly="NBDoor"
 78         Type="NBDoor.NBServerApplication"
 79         EnableAutoRestart="true"
 80         WatchFiles="dll;config"
 81         ExcludeFiles="log4net.config">
 82         </Application>
 83
 84
 85
 86
 87         </Applications>
 88
 89
 90     </Default>
 91
 92     <LoadBalancing
 93         MaxMessageSize="512000"
 94         MaxQueuedDataPerPeer="512000"
 95         PerPeerMaxReliableDataInTransit="51200"
 96         PerPeerTransmitRateLimitKBSec="256"
 97         PerPeerTransmitRatePeriodMilliseconds="200"
 98         MinimumTimeout="5000"
 99         MaximumTimeout="30000"
100         DisplayName="LoadBalancing (MyCloud)">
101
102
103
104
105
106
107         <!-- Defines the Photon Runtime Assembly to use. -->
108         <Runtime
109             Assembly="PhotonHostRuntime, Culture=neutral"
110             Type="PhotonHostRuntime.PhotonDomainManager"
111             UnhandledExceptionPolicy="Ignore">
112         </Runtime>
113
114
115     </LoadBalancing>
116 </Configuration>
0x4
控制端和木马程序。控制端其实应该和木马程序功能差不多。只是界面有所不同。
两者都是直接连接游戏引擎服务器,然后发送指令,等待远程函数回调等等。
通过peer.Connect可以直接对服务器进行连接,并且需要指明模块名称,和服务器上的模块名相同
   public void Conn()
        {

            if (peer.Connect("127.0.0.1:5055", "NBDoor"))
            {
                th.Start();
            }
        }
GM管理员和普通用户不同的就是,GM可以通过发送密码,让游戏服务器确定自己的管理员身份,这样服务器就会将当前连接进行标识,从而可以调用管理员的方法,服务器再通过PeerBase.SendEvent函数,对肉鸡发送事件,执行指令

测试效果
