接口文档-jwt介绍和原理-drf_jwt快速使用-定制返回格式-jwt认证类
目录
接口文档-jwt介绍和原理-drf_jwt快速使用-定制返回格式-jwt认证类
昨日内容回顾
# 1 认证类的执行流程---> 源码分析
	请求进来---> 路由匹配成功---> 执行path('test/', view.BookView.as_view()),---> 继承了APIView---> APIView的as_view()内部的闭包函数view---> 这个view中执行了self.dispatch---> APIView的dispatch--->
# dispath
def dispatch(self, request, *args, **kwargs):
    	# 包装了新的request
        request = self.initialize_request(request, *args, **kwargs)
        try:
            # 执行了三大认证
            self.initial(request, *args, **kwargs)

# initial
def initial(self, request, *args, **kwargs):
    	# 认证
        self.perform_authentication(request)
        # 权限
        self.check_permissions(request)
        # 频率
        self.check_throttles(request)


# perform_authentication
def perform_authentication(self, request):
    	# 该找这个request.user
        request.user

# Request 新的Request内部的user
@property
def user(self):
        if not hasattr(self, '_user'):
            # 上下文管理器---> 面试
            with wrap_attributeerrors():
                self._authenticate()
        return self._user

# 核心代码
    def _authenticate(self):
        # self.authenticators---> 列表[认证类对象1,认证类对象2]
        # authenticator 是认证类对象
        for authenticator in self.authenticators:
            try:
                # 认证类对象.authenticate  self 是新的request对象
                user_auth_tuple = authenticator.authenticate(self)
            except exceptions.APIException:
                self._not_authenticated()
                raise

            if user_auth_tuple is not None:
                self._authenticator = authenticator
                # self 是新的request
                # request.user 就是当前登录用户
                # request.auth 一般把token给它
                self.user, self.auth = user_auth_tuple
                return
        self._not_authenticated()

# self.authenticators:是什么时候传入的?执行__init__ 就是在Request初始化的时候传入的
	在APIView的dispatch的self.initialize_request(request, *args, **kwargs)初始化的
    def initialize_request(self, request, *args, **kwargs):
        parser_context = self.get_parser_context(request)

        return Request(
            request,
            parsers=self.get_parsers(),
            # 在这里传入的
            authenticators=self.get_authenticators(),
            negotiator=self.get_content_negotiator(),
            parser_context=parser_context
        )

    -APIView的--get_authenticators()--->
# self.get_authenticators()
    def get_authenticators(self):
        # 这个列表生成式
        return [auth() for auth in self.authentication_classes]

# self.authentication_classes:视图类中配置的一个个的认证类的列表 如果没配 配置文件中 内置配置问价中


# 2 权限类的执行流程
同上


# 3 频率类的执行流程
同上


# 4 自己定义了一个频率类 基于BaseThrottle 重写allow_request


# 5 SimpleRateThrottle
	继承它 比继承BaseThrottle写代码少
    只需要重写get_cache_key和scope类属性 配置文件配置
    源码:allow_request---> 就是咱们上面写的 可扩展性高 好多东西从配置文件中取


# 6 全局异常处理
	源码中 在三大认证 视图类的方法中如果出错 就会执行:self.handle_exception(exc)
# handle_exception
    def handle_exception(self, exc):
        # 去配置文件中找到:EXCEPTION_HANDLER对应的函数 exception_handler
        exception_handler = self.get_exception_handler()
        # exception_handler(exc, content)
        response.exception = True
        return response

    自己再配置文件中配置 以后出了异常 走咱们自己的 有两个参数exc context
    	exc错误对象
        context:上下文 包含view request。。。
今日内容概要
- 1 接口文档
- 2 jwt介绍和原理
- 3 drf-jwt快速使用
- 4 定制返回格式
- 5 jwt的认证类
今日内容详细
1 接口文档
# 前后端分离
	我们做后端 写接口
    前端做前端 根据接口写app pc 小程序

    作为后端来讲 我们很清楚 比如登录接口:/api/v1/login/ 请求方式:post 用户信息:username-password 编码方式:json 返回的格式:{'code': 100, 'msg': '登录成功'}

    后端人员 接口写完 一定要写接口文档


# 接口文档如何编写
	1 使用word md 编写接口文档
    2 使用第三方平台 编写我们的接口文档(非常多)---> 收费
    	-https://www.showdoc.com.cn/item/index 其中一个
    3 有的公司自己使用第三方开源搭建---> Yapi---> 你如果想自己搭建
    	-https://zhuanlan.zhihu.com/p/366025001
    4 使用drf编写的接口 可以自动生成接口文档
    	swagger---> drf-yasg---> 官方推荐使用
        coreapi---> 下面讲

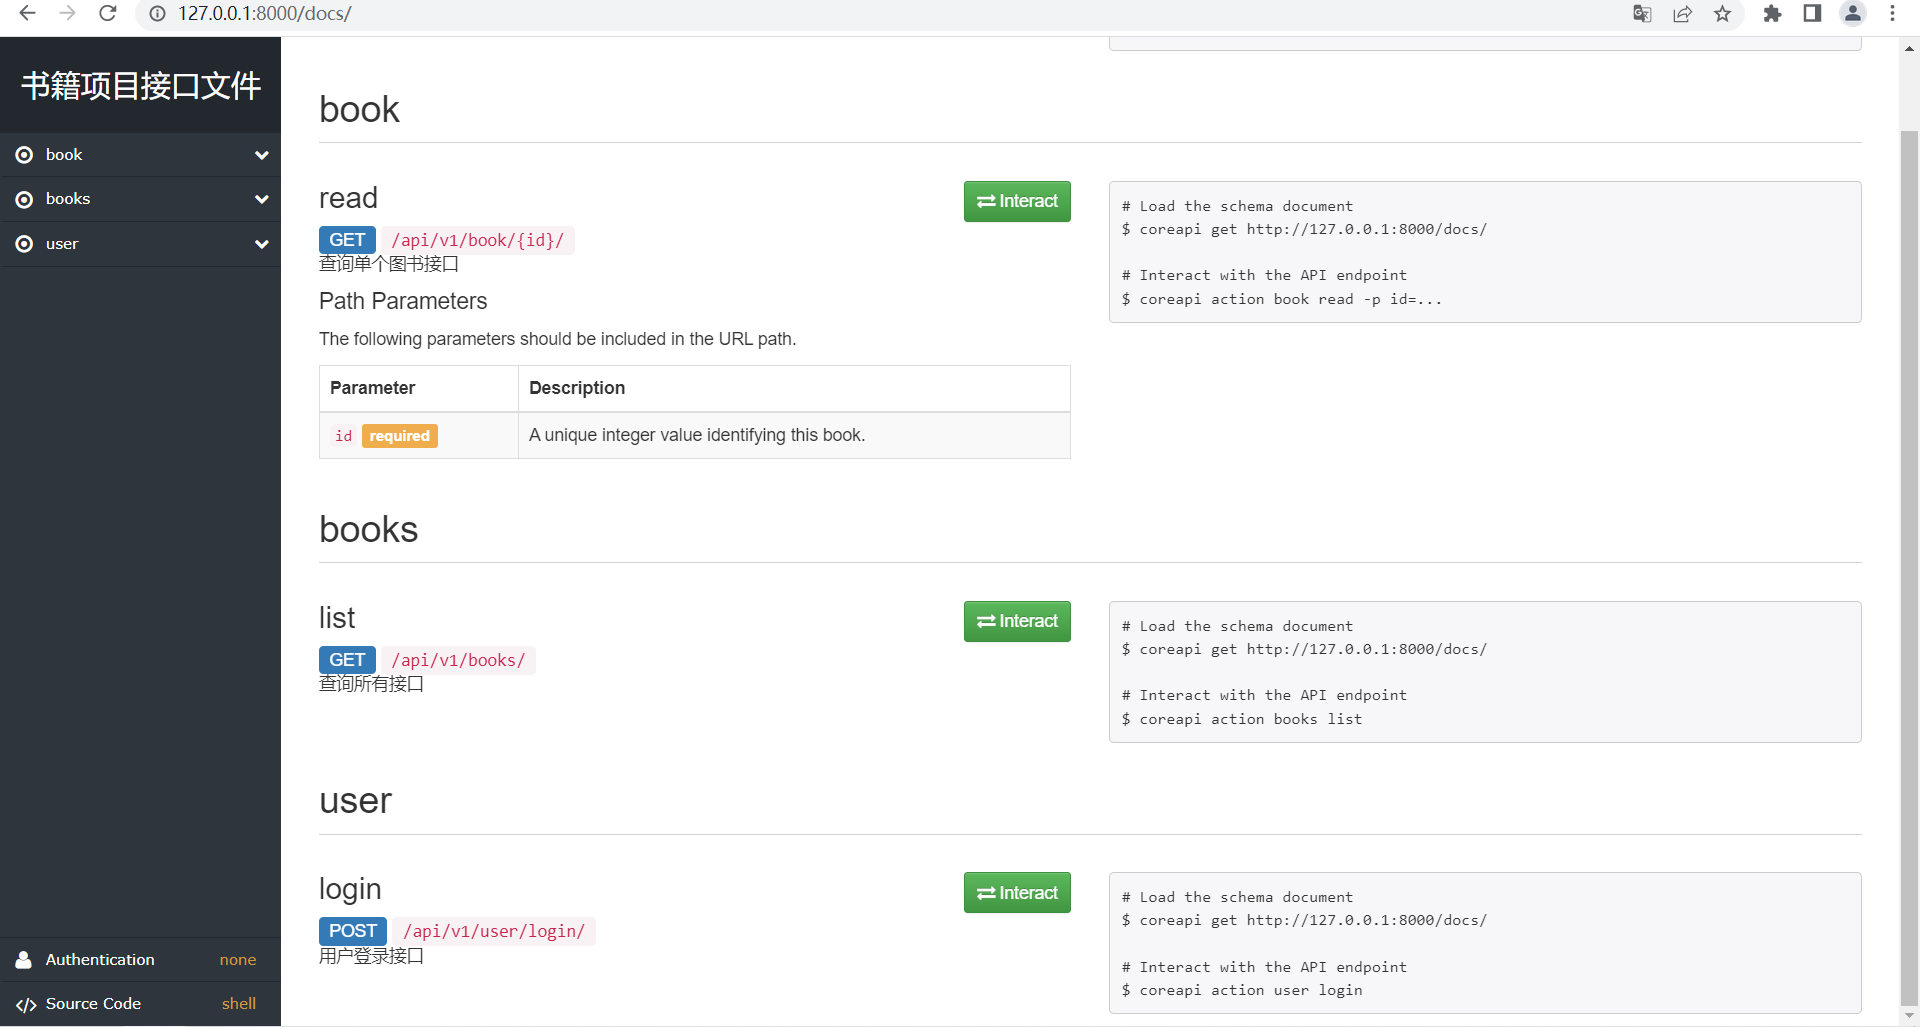
# 使用coreapi自动生成接口文档步骤
	1 安装pip3.8 install coreapi
    2 配置路由
    	from rest_framework.documentation import include_docs_urls
        path('docs/', include_docs_urls(title='xx项目接口文档')),
    3 在视图类 方法上 写注释即可
    	在类上加注释
        在类方法上加注释
        在序列化类或表模型的字段上加help_text required...

    4 配置文件配置
    	REST_FRAMEWORK = {
     		'DEFAULT_SCHEMA_CLASS': 'rest_framework.schemas.coreapi.AutoSchema',

    	}

    5 访问地址:http://127.0.0.1:8000/docs

# 接口文档:需要有的东西
	描述
    地址
    请求方式
    请求编码格式
    请求数据详解(必填 类型)
    返回格式案例
    返回数据字段解释
    错误码

2 jwt介绍和原理
# cookie session token 发展史

# Json web token(JWT)---> 就是web方向token的使用

# JWT的构成 三部分 每部分用 分割
eyJhbGciOiJIUzI1NiIsInR5cCI6IkpXVCJ9.eyJzdWIiOiIxMjM0NTY3ODkwIiwibmFtZSI6IkpvaG4gRG9lIiwiYWRtaW4iOnRydWV9.TJVA95OrM7E2cBab30RMHrHDcEfxjoYZgeFONFh7HgQ

	头:header
    	声明类型 这里是jwt
        声明加密的算法 通常直接使用 HMAC SHA256
        公司信息...
    荷载:payload
    	存放有效信息的地方
        token过期时间
        签发时间
        用户id
        用户名字
    签名:signature
    	第一部分和第二部分通过秘钥+加密方式得到的

# jwt开发重点
	登录接口---> 签发token
    认证类---> jwt认证

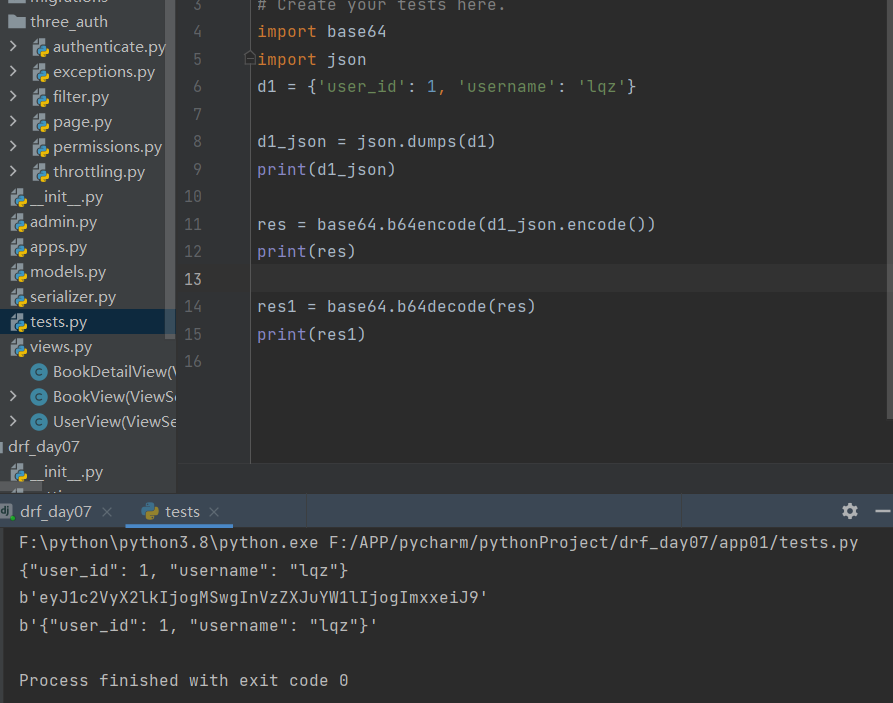
# base64编码和解码

import base64
import json
d1 = {'user_id': 1, 'username': 'lqz'}

d1_json = json.dumps(d1)
print(d1_json)

res = base64.b64encode(d1_json.encode())
print(res)

res1 = base64.b64decode(res)
print(res1)

# base64 应用场景
'''
1 jwt 使用了base64
2 网络中传输数据 也会经常使用 base64编码
3 网络传输中 有的图片使用base64编码
'''

s=''
res=base64.b64decode(s)
with open('a.png','wb') as f:
    f.write(res)


3 drf-jwt快速使用
# django+drf 平台开发jwt这套 有两个模块
	djangorestframework-jwt  ---》一直可以用
    djangorestframework-simplejwt---》公司用的多---》希望你们试一下
    自己封装jwt签发和认证

# 使用步骤
	1 安装pip3.8 install djangorestframework-jwt
    2 快速签发token---> 登录接口 路由中配置
    from rest_framework_jwt.views import obtain_jwt_token
    	path('login/', obtain_jwt_token),
    3 postman 向http://127.0.0.1:8000/login/发送post请求 携带username和password
'''
如果没有绑定自己写的用户表 默认是系统优化表User
'''

4 定制返回格式
# 以后 如果是基于auth的User表签发token 就可以不用自己写了 但是登录接口返回的格式 只有token 不符合公司规范

# 使用步骤
	1 写个函数:jwt_response_payload_handler
def jwt_response_payload_handler(token, user=None, request=None):
            return {
                'code': 100,
                'msg': '登录成功',
                'token': token,
                'username': user.username
                # 'icon':user.icon
            }
    2 配置一下 ,项目配置文件
    JWT_AUTH = {
    	'JWT_RESPONSE_PAYLOAD_HANDLER': 'app01.utils.jwt_response_payload_handler',
	}
    3 使用postman测试,就能看到返回的格式了

5 jwt的认证类
# 以后接口要登录后才能访问的使用

1 视图类上加一个认证类 一个权限类
from rest_framework_jwt.authentication import JSONWebTokenAuthentication

from rest_framework.permissions import IsAuthenticated

BookView(ViewSetMixin, RetrieveAPIView):
    	authentication_classes = [JSONWebTokenAuthentication]
    	permission_classes = [IsAuthenticated]  # 登录用户有权限,不登录用户没权限
	2 postman测试
    	-请求头中key值叫Authorization
        -请求头的value值是:  jwt 有效的token值


【推荐】国内首个AI IDE,深度理解中文开发场景,立即下载体验Trae
【推荐】编程新体验,更懂你的AI,立即体验豆包MarsCode编程助手
【推荐】抖音旗下AI助手豆包,你的智能百科全书,全免费不限次数
【推荐】轻量又高性能的 SSH 工具 IShell:AI 加持,快人一步
· 分享一个免费、快速、无限量使用的满血 DeepSeek R1 模型,支持深度思考和联网搜索!
· 基于 Docker 搭建 FRP 内网穿透开源项目(很简单哒)
· 25岁的心里话
· ollama系列01:轻松3步本地部署deepseek,普通电脑可用
· 按钮权限的设计及实现