深度学习(十一)——神经网络:线形层及其他层介绍
一、正则化层中nn.BatchNorm2d简介
主要作用:对输入函数采用正则化。正则化的主要作用是加快神经网络的训练速度。
class torch.nn.BatchNorm2d(num_features, eps=1e-05, momentum=0.1, affine=True, track_running_stats=True, device=None, dtype=None)
输入参数:
-
num_features: 形状为\((N, C, H, W)\)
-
其他参数默认即可
举例:
# With Learnable Parameters
m = nn.BatchNorm2d(100)
# Without Learnable Parameters
m = nn.BatchNorm2d(100, affine=False)
input = torch.randn(20, 100, 35, 45)
output = m(input)
该函数用得不多
二、其他层简介
1. Recurrent Layers(Recurrent层)
内含RNN、LSTM等函数,主要在nlp领域用的比较多
官方文档: Recurrent Layers
2. Transformer Layers
3. Linear Layers(线性层)
nn.Linear
class torch.nn.Linear(in_features, out_features, bias=True, device=None, dtype=None
(1)参数介绍及计算方法
参数介绍:
-
in_features
-
out_features
-
bias(bool)
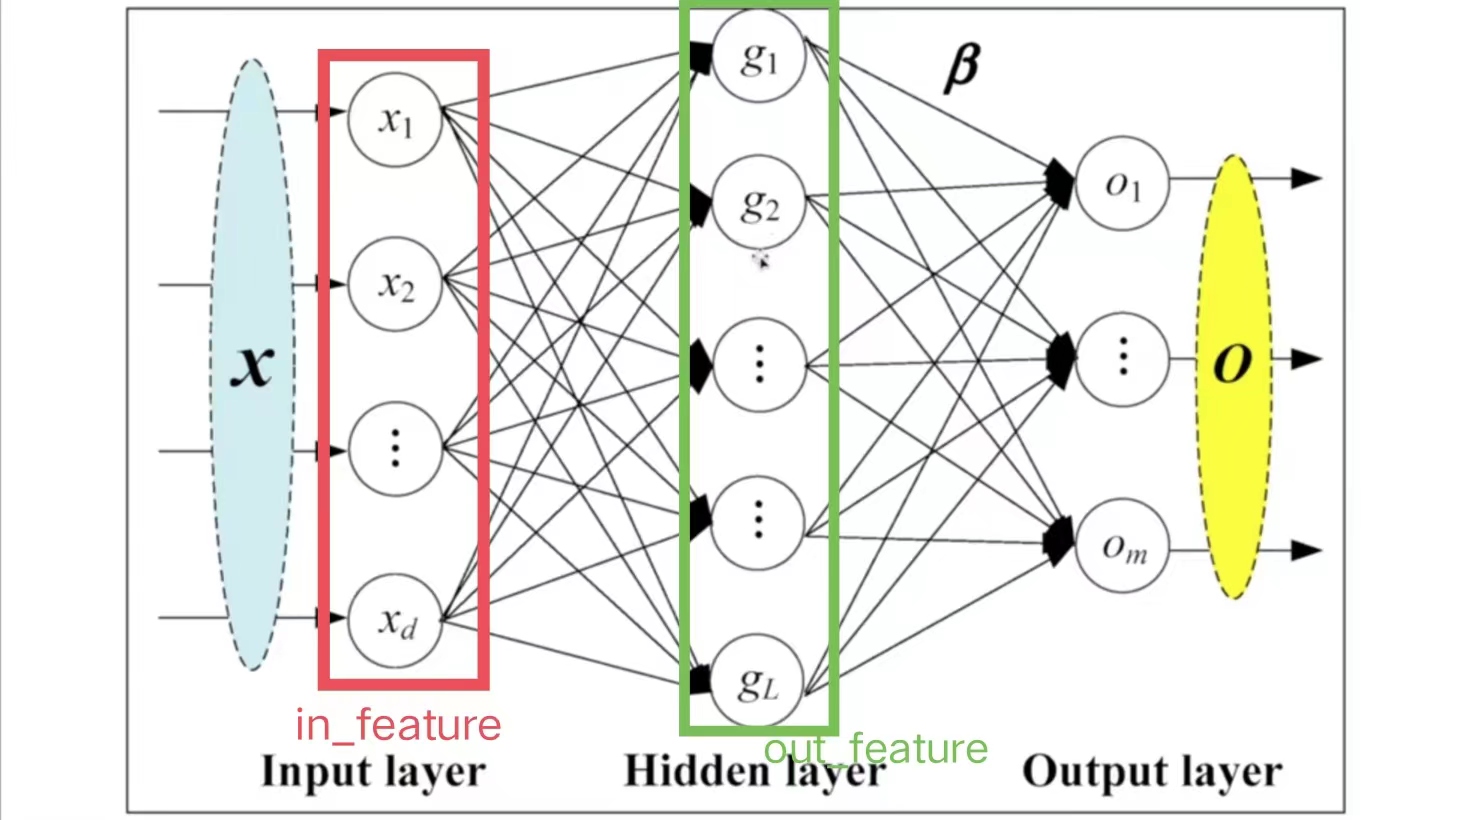
线性层具体参数解释如下图:

-
\(in\_features=d\),即指的是in_features的个数
-
\(out\_features=L\),即指的是out_features的个数
计算\(g\)的方法(以上图\(g_1\)为例):
- \(x_1,\dots,x_i,\dots,x_d\)每个指向\(g_1\)的箭头上,均有:
-
其中,\(b_i\)代表偏置,参数\(bias=True\),则加上\(b\);\(bias=False\),则不加\(b\)
-
在每次训练神经网络的过程中,均会调整\(k_i\)、\(b_i\)的值,直到它变成一个合适的数值
-
由此可得:
(2)代码示例
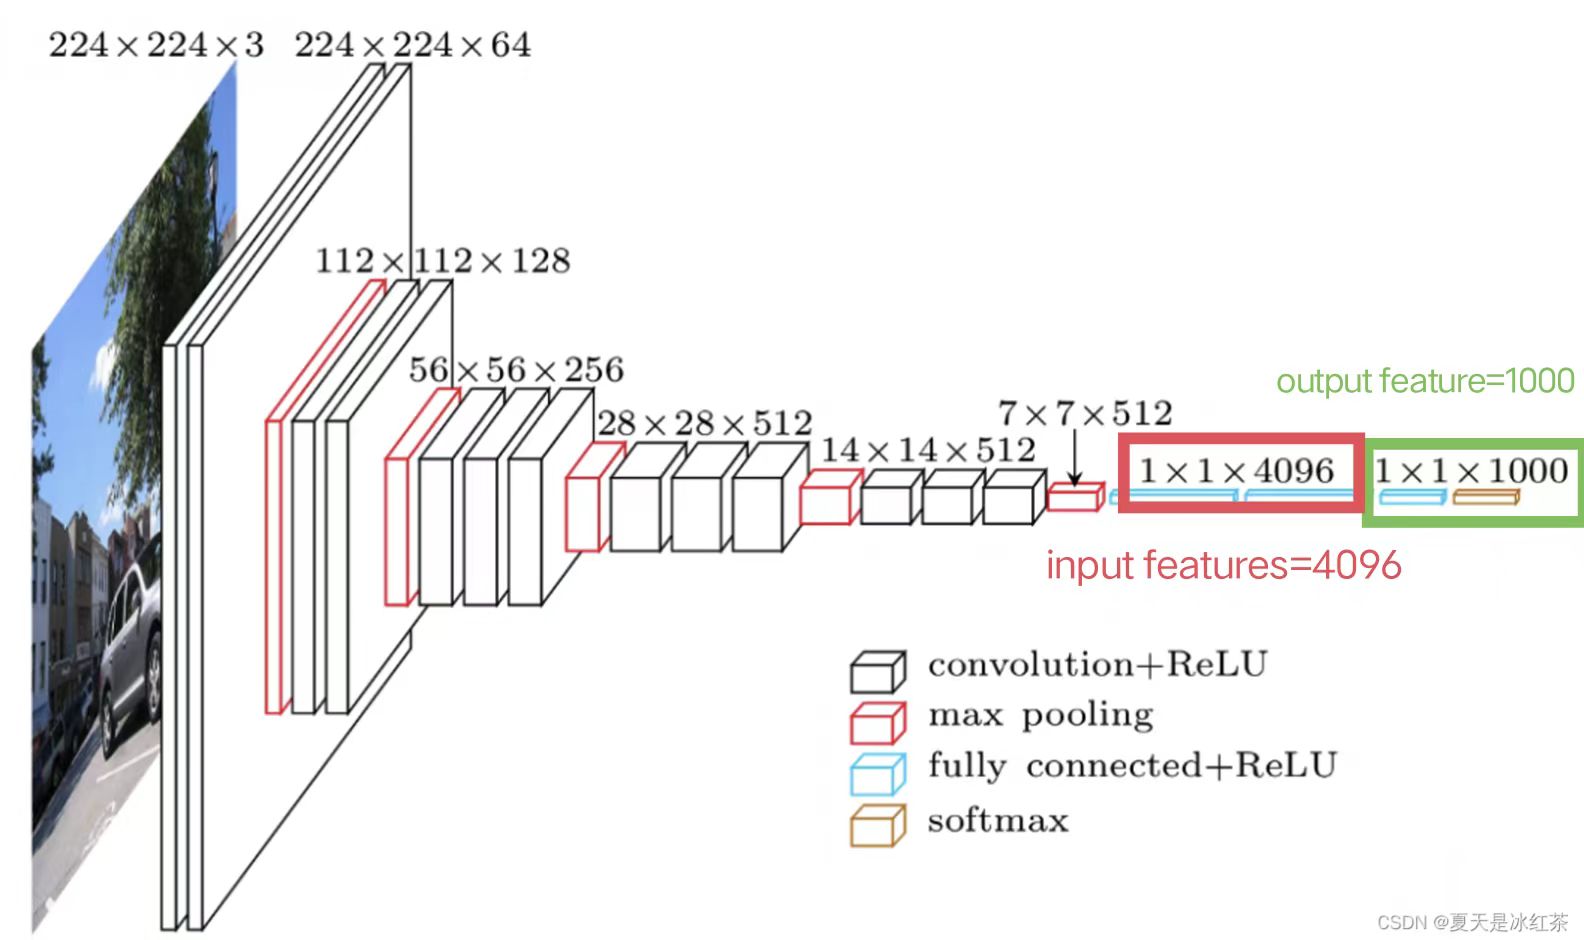
以典型的VGG16 Model网络结构为例:

因此,设置in_features=4096; out_feature=1000
- 下面代码以一个尺寸为n×n的图像为例,先将图像展开成一行,即1×\(n^2\)的尺寸。最后将1×\(n^2\)尺寸的图像通过线性层,转化为1×10尺寸的图像。
import torch
import torchvision
from torch.utils.data import DataLoader
from torch import nn
from torch.nn import Linear

dataset=torchvision.datasets.CIFAR10("./dataset",train=False,download=True,transform=torchvision.transforms.ToTensor())
dataloder=DataLoader(dataset,batch_size=64)

# for data in dataloder:
#     imgs,targets = data
#     #print(imgs.shape)   #[Run] torch.Size([64, 3, 32, 32])
#
#     #我们的目标是把图像尺寸变成1×1×1×根据前面计算得出的数,下面进行转换
#     output=torch.reshape(imgs,(1,1,1,-1))
#     #print(output.shape)  #[Run] torch.Size([1, 1, 1, 196608])

#根据上面output得出的196608尺寸数据,构造神经网络结构
class Demo(nn.Module):
    def __init__(self):
        super(Demo,self).__init__()
        self.linear1=Linear(in_features=196608,out_features=10)

    def forward(self,input):
        output=self.linear1(input)
        return output

#调用神经网络
demo=Demo()

for data in dataloder:
    imgs,targets=data
    output=torch.reshape(imgs,(1,1,1,-1))

    output=demo.forward(output)
    print(output.shape)  #[Run] torch.Size([1, 1, 1, 10])
由此,成功将1×1×1×196608尺寸的图像转化为1×1×1×10尺寸的图像
注意:
- 可以用torch.flatten() 函数将图像展开成一行,即替换第33行的代码
output=torch.reshape(imgs,(1,1,1,-1)),为:
output=torch.flatten(imgs)
# print(output.shape)  #[Run] torch.Size([196608])
-
torch.flatten() 和torch.reshape() 的区别:
-
torch.flatten更方便,可以直接把图像变成一行
-
torch.reshape功能更强大,可任意指定图像尺寸
-
4. Dropout Layers
主要作用:在训练的过程中随机把一些input(输入的tensor数据类型)变成0。变成0的概率由\(p\)决定
class torch.nn.Dropout(p=0.5, inplace=False)
- 变成0的主要原因是防止过拟合
5. Sparse Layers
nn.Embedding
主要用于自然语言处理中
class torch.nn.Embedding(num_embeddings, embedding_dim, padding_idx=None,
      max_norm=None, norm_type=2.0, scale_grad_by_freq=False, sparse=False,
      _weight=None, _freeze=False, device=None, dtype=None)
6.Distance Functions
主要作用:计算两个值之间的误差,并指定误差的衡量标准
7. Loss Function
主要作用:计算Loss的误差大小
三、调用pytorch中的网络模型
现在我们已经学会如何自己搭建神经网络模型了,下面介绍pytorch中神经网络模型的调用方法。根据官方文档,我们可以调用自己需要的网络结构,而不需要自己写代码
1.图像方面的网络结构
官网文档:Models and pre-trained weights — Torchvision 0.15 documentation
2.语音方面的网络结构

 主要介绍神经网络线性层的计算,即torch.nn.Linear的原理及应用。并插入一些神经网络的其他层介绍,及调用pytorch中网络模型的方法。

