
Android 中的ActionBar 和 Tab选项卡效果和自定义主题案例
Android 中的ActionBar 和 Tab选项卡效果和自定义主题案例
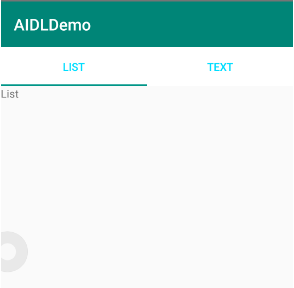
1、效果
2、MainActivity
package com.example.aidldemo;

import android.support.v4.app.FragmentTransaction;
import android.support.v7.app.ActionBar;
import android.support.v7.app.AppCompatActivity;
import android.os.Bundle;
import android.util.Log;
import android.view.KeyEvent;

public class Main4Activity extends AppCompatActivity {

    ActionBar actionBar;
    BaseFragment curFragment;

    @Override
    protected void onCreate(Bundle savedInstanceState) {
        super.onCreate(savedInstanceState);
        setContentView(R.layout.activity_main4);
        actionBar = getSupportActionBar();
        actionBar.setNavigationMode(ActionBar.NAVIGATION_MODE_TABS);

        ActionBar.Tab tab1 = actionBar.newTab();
        tab1.setText("List");

        tab1.setTabListener(new MyTabListener(new ListFragment()));
        ActionBar.Tab tab2 = actionBar.newTab().setText("Text");
        tab2.setTabListener(new MyTabListener(new TextFragment()));
        actionBar.addTab(tab1);
        actionBar.addTab(tab2);

    }

    @Override
    public boolean onKeyDown(int keyCode, KeyEvent event) {
        Log.e("MainActivity", "------------1、onKeyDown-------------keyCode:"+keyCode);

        curFragment.onKeyDown(keyCode,event);
        return super.onKeyDown(keyCode, event);

    }

    class MyTabListener implements ActionBar.TabListener{

        private BaseFragment fragment;
        public MyTabListener (BaseFragment fragment){
            this.fragment=fragment;
        }


        @Override
        public void onTabSelected(ActionBar.Tab tab, FragmentTransaction ft) {
            curFragment = fragment;
            ft.setCustomAnimations(R.anim.slide_right_in,
                    R.anim.slide_left_out,
                    R.anim.slide_left_in,
                    R.anim.slide_right_out).replace(R.id.context,fragment);
        }

        @Override
        public void onTabUnselected(ActionBar.Tab tab, FragmentTransaction ft) {

        }

        @Override
        public void onTabReselected(ActionBar.Tab tab, FragmentTransaction ft) {

        }
    }

    @Override
    protected void onDestroy() {

        super.onDestroy();
    }
}
3、activity_main.xml
<?xml version="1.0" encoding="utf-8"?>
<android.support.constraint.ConstraintLayout xmlns:android="http://schemas.android.com/apk/res/android"
    xmlns:app="http://schemas.android.com/apk/res-auto"
    xmlns:tools="http://schemas.android.com/tools"
    android:layout_width="match_parent"
    android:layout_height="match_parent"
    tools:context=".Main4Activity">

    <FrameLayout
        android:id="@+id/context"
        android:layout_width="match_parent"
        android:layout_height="match_parent"/>

</android.support.constraint.ConstraintLayout>
4、BaseFragment
package com.example.aidldemo;

import android.support.v4.app.Fragment;
import android.util.Log;
import android.view.KeyEvent;

public class BaseFragment extends Fragment {

    //这里的是我们的重点
    public boolean onKeyDown(int keyCode, KeyEvent event){
        Log.i("Test","----------------onKeyDown-----------");
        return true;
    }

}
5、ListFragment
package com.example.aidldemo;


import android.os.Bundle;
import android.support.v4.app.Fragment;
import android.view.LayoutInflater;
import android.view.View;
import android.view.ViewGroup;


/**
 * A simple {@link Fragment} subclass.
 */
public class ListFragment extends BaseFragment {


    @Override
    public View onCreateView(LayoutInflater inflater, ViewGroup container,
                             Bundle savedInstanceState) {
        // Inflate the layout for this fragment
        return inflater.inflate(R.layout.fragment_list, container, false);
    }

}
6、TextFragment
package com.example.aidldemo;


import android.os.Bundle;
import android.support.v4.app.Fragment;
import android.view.LayoutInflater;
import android.view.View;
import android.view.ViewGroup;


public class TextFragment extends BaseFragment {


    @Override
    public View onCreateView(LayoutInflater inflater, ViewGroup container,
                             Bundle savedInstanceState) {
        // Inflate the layout for this fragment
        return inflater.inflate(R.layout.fragment_text, container, false);
    }


}
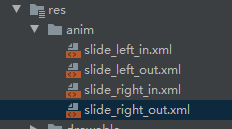
7、在res目录下的anim目录下创建 slide_left_in.xml、slide_left_out.xml 、 slide_right_in.xml 、slide_right_out.xml 文件
7.1)、slide_left_in.xml
<?xml version="1.0" encoding="utf-8"?>
<set xmlns:android="http://schemas.android.com/apk/res/android">

    <translate
        android:fromXDelta="-100%p"
        android:toXDelta="0%p"
        android:duration="300"/>

    <alpha
        android:fromAlpha="0.5"
        android:toAlpha="1.0"
        android:duration="100"/>

</set>
7.2)、slide_left_out.xml
<?xml version="1.0" encoding="utf-8"?>
<set xmlns:android="http://schemas.android.com/apk/res/android">

    <translate
        android:fromXDelta="0%p"
        android:toXDelta="-100%p"
        android:duration="300"/>

    <alpha
        android:fromAlpha="1.0"
        android:toAlpha="0.5"
        android:duration="200"/>

</set>
7.3)、slide_right_in.xml
<?xml version="1.0" encoding="utf-8"?>
<set xmlns:android="http://schemas.android.com/apk/res/android">
    <translate
        android:fromXDelta="100%p"
        android:toXDelta="0%p"
        android:duration="300"/>

    <alpha
        android:fromAlpha="0.5"
        android:toAlpha="1.0"
        android:duration="200"/>

</set>
7.4)、slide_right_out.xml
<?xml version="1.0" encoding="utf-8"?>
<set xmlns:android="http://schemas.android.com/apk/res/android">
    <translate
        android:fromXDelta="0%p"
        android:toXDelta="100%p"
        android:duration="300"/>

    <alpha
        android:fromAlpha="1.0"
        android:toAlpha="0.5"
        android:duration="200"/>

</set>
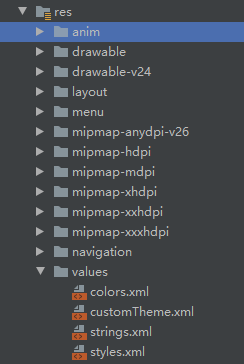
8、在res目录下的values目录下在创建 customTheme.xml
<?xml version="1.0" encoding="utf-8"?>
<resources>

    <style name="CustomActionBarTheme" parent="@style/Theme.AppCompat.Light">
        <item name="android:actionBarStyle">@style/MyActionBar</item>
        <item name="android:actionBarDivider">@null</item>
        <item name="android:actionBarTabTextStyle">@style/MyActionBarTabText</item>
        <!--         <item name="android:actionBarTabStyle">@style/MyActionBarTabs</item> -->
        <item name="android:actionBarTabBarStyle">@style/MyActionBarTabBars</item>
        <item name="android:actionMenuTextColor">@android:color/holo_green_light</item>

        <!-- Support library compatibility -->
        <item name="actionBarStyle">@style/MyActionBar</item>
        <item name="actionBarDivider">@null</item>
        <item name="actionBarTabTextStyle">@style/MyActionBarTabText</item>
        <!--         <item name="actionBarTabStyle">@style/MyActionBarTabs</item> -->
        <item name="actionBarTabBarStyle">@style/MyActionBarTabBars</item>
        <item name="actionMenuTextColor">@android:color/holo_green_light</item>
    </style>

    <!-- ActionBar styles -->
    <style name="MyActionBar" parent="@style/Widget.AppCompat.ActionBar">
        <!--<item name="android:background">@android:color/holo_orange_light</item>-->
        <item name="android:titleTextStyle">@style/MyActionBarTitleText</item>
        <item name="android:backgroundStacked">@color/colorWhite</item>

        <!-- Support library compatibility -->
        <item name="background">@color/colorPrimary</item>
        <item name="titleTextStyle">@style/MyActionBarTitleText</item>
        <item name="backgroundStacked">@color/colorWhite</item>
    </style>

    <!-- ActionBar title text -->
    <style name="MyActionBarTitleText" parent="@style/TextAppearance.AppCompat.Widget.ActionBar.Title">
        <item name="android:textColor">@color/colorWhite</item>
    </style>

    <!-- ActionBar tabs text -->
    <style name="MyActionBarTabText" parent="@style/Widget.AppCompat.ActionBar.TabText">
        <item name="android:textColor">@android:color/holo_blue_bright</item>
    </style>

    <style name="MyActionBarTabBars" parent="@style/Widget.AppCompat.ActionBar.TabBar">
        <item name="android:showDividers">none</item>
    </style>

</resources>
9、清单文件 AndroidManifest.xml
<?xml version="1.0" encoding="utf-8"?>
<manifest xmlns:android="http://schemas.android.com/apk/res/android"
    package="com.example.aidldemo">

    <application
        android:allowBackup="true"
        android:icon="@mipmap/ic_launcher"
        android:label="@string/app_name"
        android:roundIcon="@mipmap/ic_launcher_round"
        android:supportsRtl="true"
        android:theme="@style/CustomActionBarTheme">

        <activity android:name=".Main4Activity">
            <intent-filter>
                <action android:name="android.intent.action.MAIN" />

                <category android:name="android.intent.category.LAUNCHER" />
            </intent-filter>
        </activity>


    </application>

</manifest>

 浙公网安备 33010602011771号