Prometheus + Grafana搭建可视化监控系统(1)
世面上有很多可视化监控的解决方案,Prometheus+Grafana是其中比较成熟的解决方案之一,通过这两个开源项目,我们可以很容易的搭建出一个强大且美观的可视化监控系统。
安装
本次搭建使用了Prometheus 2.22.0版本和Grafana 7.1.0版本,其中Prometheus的安装方式使用原生安装方式,Grafana使用docker官方提供的docker image进行安装。
Prometheus
Prometheus的安装文件可以从 https://github.com/prometheus/prometheus/releases/ 获得,根据自己的平台选择下载即可,我选择了下载 prometheus-2.22.0.linux-amd64.tar.gz的版本。
解压到 /usr/local/目录并重命名文件夹为 prometheus,然后进入到文件目录:
[root@arch-master prometheus]# pwd
/usr/local/prometheus
[root@arch-master prometheus]# ll
total 161696
drwxr-xr-x  5 3434 3434     4096 Nov  6 11:51 .
drwxr-xr-x 16 root root     4096 Nov  5 18:07 ..
drwxr-xr-x  2 3434 3434     4096 Oct 15 22:21 console_libraries
drwxr-xr-x  2 3434 3434     4096 Oct 15 22:21 consoles
drwxr-xr-x  8 root root     4096 Nov  6 13:00 data
-rw-r--r--  1 3434 3434    11357 Oct 15 22:21 LICENSE
-rw-r--r--  1 3434 3434     3420 Oct 15 22:21 NOTICE
-rwxr-xr-x  1 3434 3434 87729971 Oct 15 20:32 prometheus
-rw-r--r--  1 3434 3434     1329 Nov  6 11:51 prometheus.yml
-rwxr-xr-x  1 3434 3434 77801407 Oct 15 20:34 promtool
编辑 prometheus.yml,这个文件定义了所有要监控的软件或者主机,主要是配置 scrape_configs这组配置,我的配置如下,监控了一个SpringBoot服务,一台Linux主机和一个MySQL数据库:
# A scrape configuration containing exactly one endpoint to scrape:
# Here it's Prometheus itself.
scrape_configs:
  # The job name is added as a label `job=<job_name>` to any timeseries scraped from this config.
  - job_name: 'prometheus'

    # metrics_path defaults to '/metrics'
    # scheme defaults to 'http'.

    static_configs:
    - targets: ['localhost:9090']

  # Linux监控
  - job_name: 'ubuntu'
    static_configs:
    - targets: ['10.1.18.90:9100']

  # MySQL监控
  - job_name: 'mysql'
    static_configs:
    - targets: ['10.1.18.90:9104']

  # 需要监控的项目
  #项目名
  - job_name: 'datamanager'
    metrics_path: '/datamanager/actuator/prometheus'
    #需监控项目地址
    static_configs:
    - targets: ['10.1.18.90:8068']
然后指定配置文件并启动,Prometheus的安装就完成了,默认端口是9090,这时候访问 http://127.0.0.1:9090 就可以看到一个简单的界面。
./prometheus --config.file=prometheus.yml
Grafana
Grafana的安装更为简单,我这里直接使用docker-compose进行启动,以下是docker-compose的配置文件内容:
version: "3"
services:
  grafana:
    container_name: grafana
    image: grafana/grafana:7.1.0
    ports:
      - "3000:3000"
    volumes:
      - /etc/localtime:/etc/localtime
    restart: unless-stopped
启动命令:
docker-compose -f grafana.yaml up -d
访问 http://127.0.0.1:3000 打开Grafana的界面,默认用户名密码admin/admin。
部署Exporter
Exporter是Prometheus的一类数据采集组件的总称。它负责从目标处搜集数据,并将其转化为Prometheus支持的格式。与传统的数据采集组件不同的是,它并不向中央服务器发送数据,而是等待中央服务器主动前来抓取。
想要Prometheus采集到想要的数据,就必须部署相应的Exporter,接下来部署三个Exporter。
官方提供了常用软件的Exporter,我们可以在这里找到:https://github.com/prometheus 。
MySQL
官方提供了MySQL的Exporter:mysqld_exporter ,我们可以直接下载对应系统的版本,解压到 /usr/local/promethus-export/mysqld_exporter,文件夹下的内容如下:
zongwei@LAPTOP-ZONGWEI:/usr/local/promethus-export/mysqld_exporter$ ll
total 14480
drwxr-xr-x 1 3434 3434      512 Nov  6 10:33 ./
drwxr-xr-x 1 root root      512 Nov  6 11:48 ../
-rw-r--r-- 1 3434 3434    11325 Jul 29  2019 LICENSE
-rw-r--r-- 1 3434 3434       65 Jul 29  2019 NOTICE
-rw-r--r-- 1 root root       60 Nov  6 10:33 my.cnf
-rwxr-xr-x 1 3434 3434 14813452 Jul 29  2019 mysqld_exporter*
编辑(或者新建)my.cnf,配置mysql的连接参数:
[client]
host=127.0.0.1
port=3306
user=root
password=123456
然后启动,如果没有异常输出,那就是说明启动成功了,默认的9104,可以通过 http://127.0.0.1:9104 访问,验证是否正常启动:
./mysqld_exporter --config.my-cnf=my.cnf
Oracle
官方没有Oracle的Exporter,Github上有一个活跃的第三方项目可以满足需求:oracledb_exporter 。
这里推荐使用Docker的方式部署,可以避免很多环境上的问题。
docker run -d --name oracledb_exporter --link=oracle -p 9161:9161 -e DATA_SOURCE_NAME=system/oracle@oracle/xe iamseth/oracledb_exporter
Prometheus的配置:
- job_name: oracle
    static_configs:
    - targets: ['10.20.31.129:9161']
      labels:
        instance: oracle-129
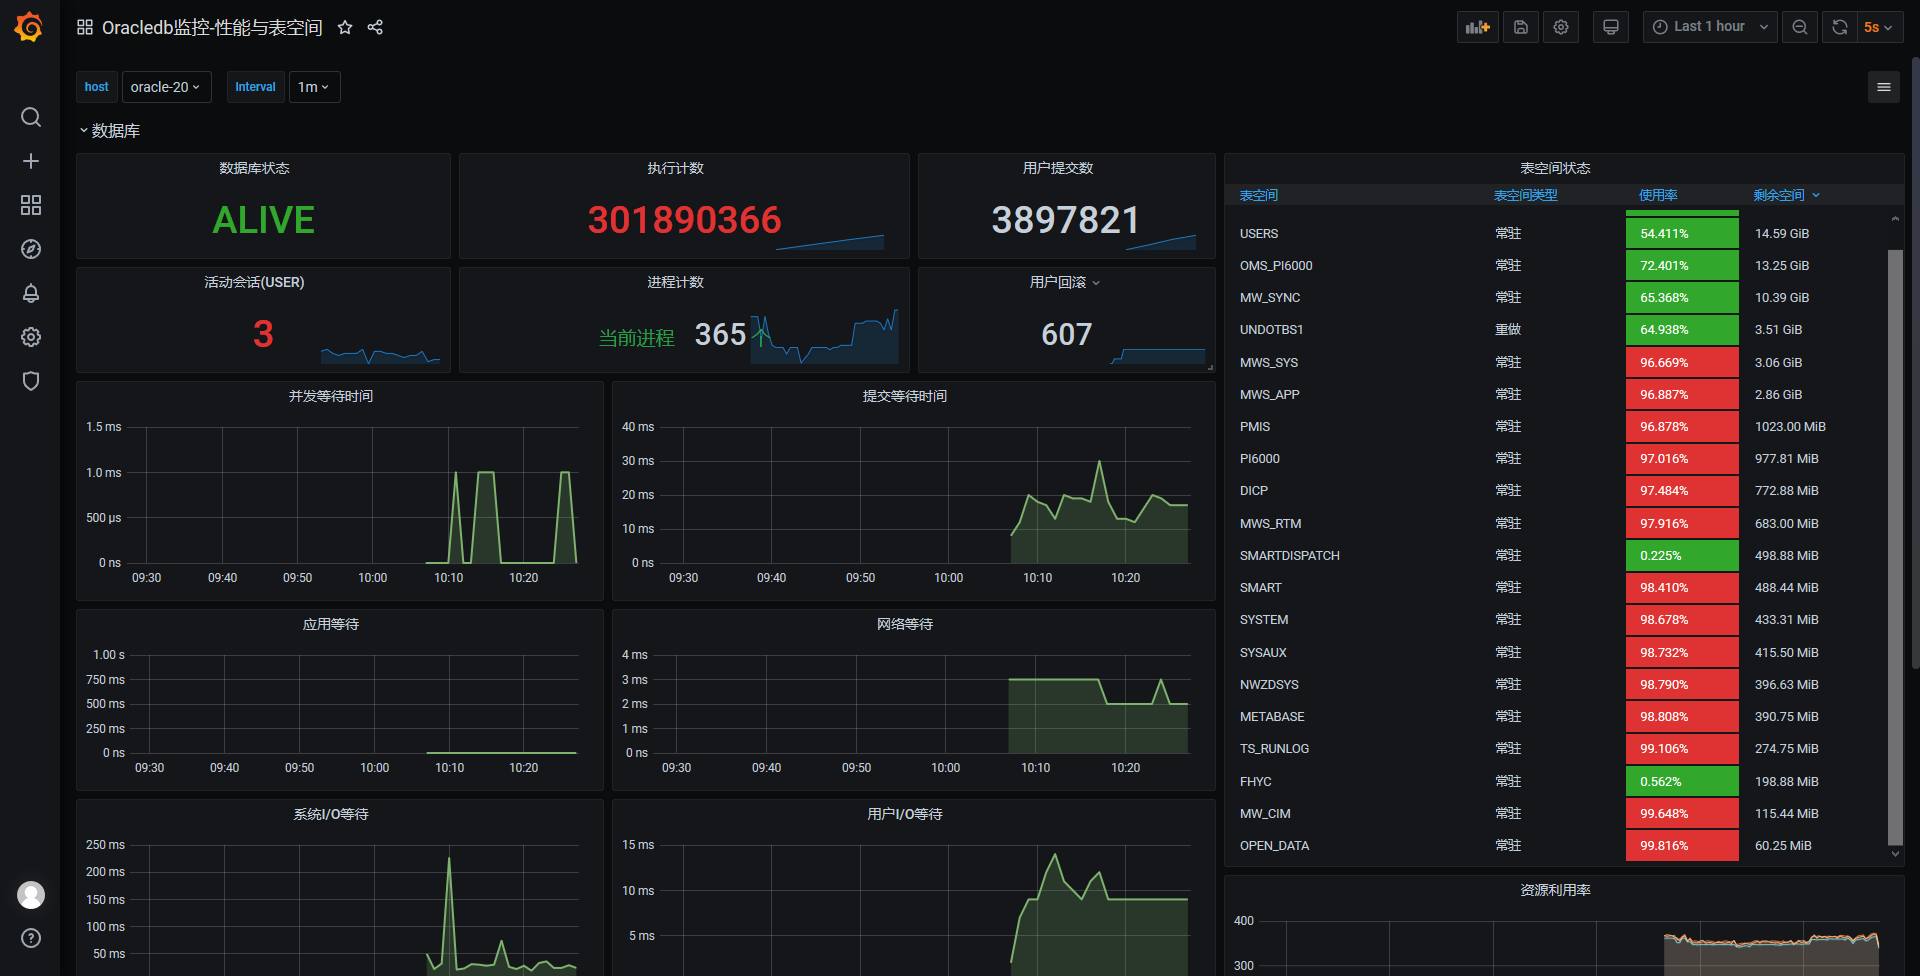
Grafana Labs上汉化的Oracle Dashboard不多,不过也是有一个效果不错的Dashboard,Oracledb监控-性能与表空间 。
效果如下:

Linux
监控远程Linux主机使用的Exporter是node_exporter 组件,同样选择对应的版本下载,解压到 /usr/local/promethus-export/node_exporter,node_exporter无需配置,直接启动即可:
./node_exporter
启动完成后,访问 http://127.0.0.1:9100 验证是否正确启动。
SpringBoot2
本次部署使用的是SpringBoot 2.3.4.RELEASE,对Prometheus的支持非常好,首先引用maven依赖:
<dependency>
    <groupId>io.micrometer</groupId>
    <artifactId>micrometer-registry-prometheus</artifactId>
</dependency>
添加application.yaml
# actuator相关配置
management:
  endpoints:
    web:
      exposure:
        include: "*"
      base-path: /actuator
  endpoint:
    prometheus:
      enabled: true
  metrics:
    export:
      prometheus:
        enabled: true
        step: 1ms
        descriptions: true
配置自定义bean
@Bean
public MeterRegistryCustomizer<MeterRegistry> configurer(@Value("${spring.application.name}") String applicationName) {
    return (registry) -> registry.config().commonTags("application", applicationName);
}
完成这三步后启动Application,就可以使用actuator接口查看到Prometheus收集的数据:http://127.0.0.1:8080/actuator/prometheus 。
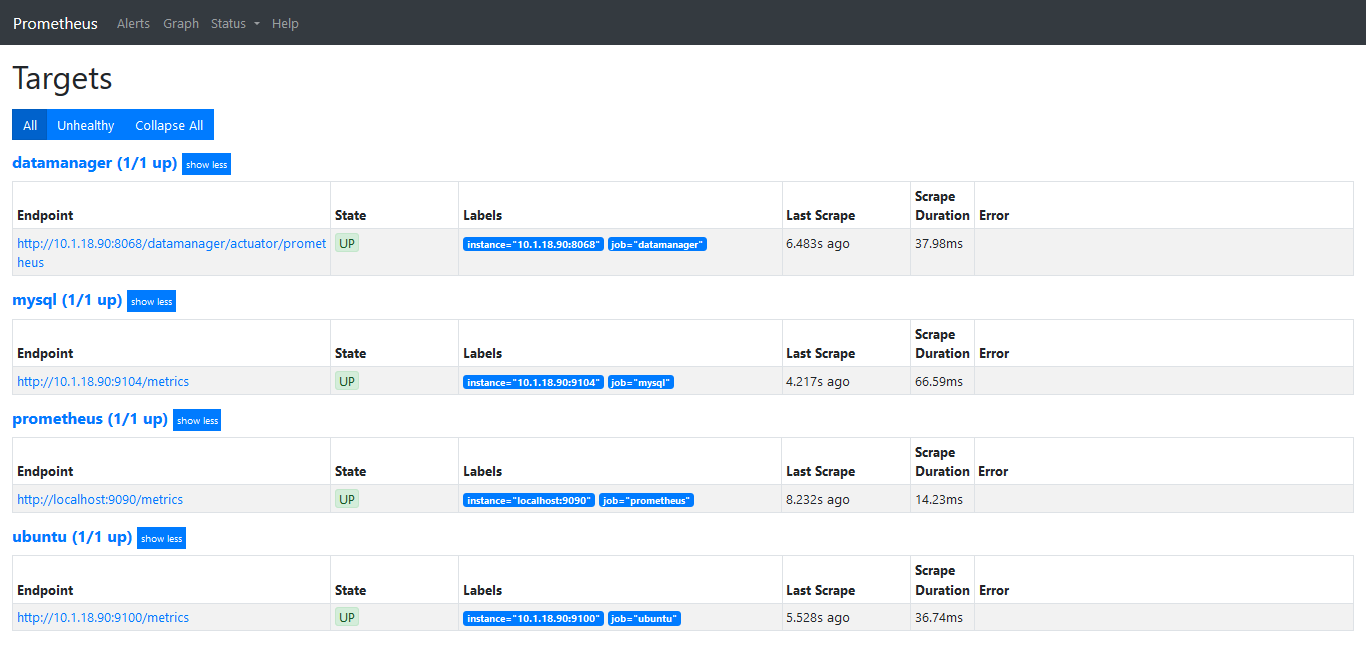
最终,访问Prometheus的target,就能看到我们刚刚部署的这三个exporter:

配置Grafana
Prometheus的查看界面过于简单,也很难做到一目了然,配合Grafana的强大前端表现力和丰富的dashboard,我们可以很轻松的配置出美观的界面。
配置数据源
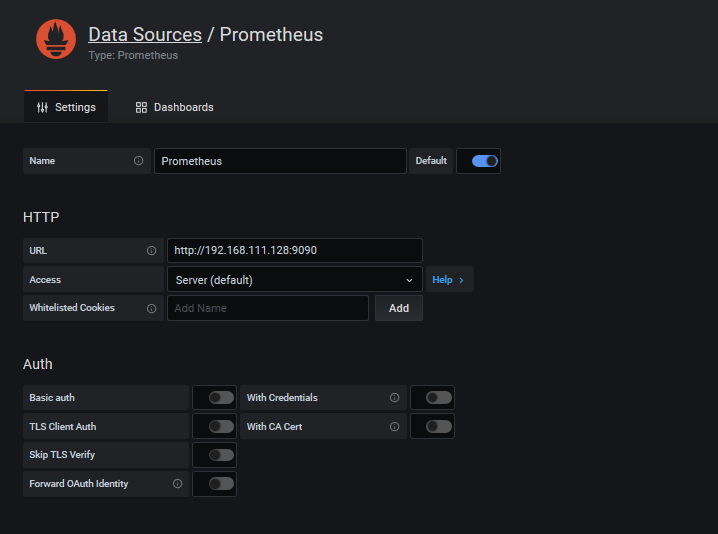
首先添加一个数据源,将Grafana和Prometheus关联起来。选择Configuration的Data Sources,点击Add data source,选择Prometheus,在URL一栏填写Prometheus的访问地址,然后保存即可。

添加Dashboard
数据源配置成功后,选择Create->Import,在此界面上传或配置Dashboard,在https://github.com/percona/grafana-dashboards 这个项目,我们可以找到一些成熟的Dashboard配置,对于Linux监控可以选择 System_Overview.json,对于MySQL可以选择 MySQL_Overview.json,将这两个文件下载,依次选择 【Upload JSON file】按钮进行上传。
注意:上传之前请先将所有的pmm-singlestat-panel替换为singlestat,否则会报panel未定义,无法正常显示。
除了这个开源项目之外,Grafana还提供了官方的Dashboard市场:https://grafana.com/grafana/dashboards 。我们可以在这里找到各种数据源各种收集器的Dashboard配置。
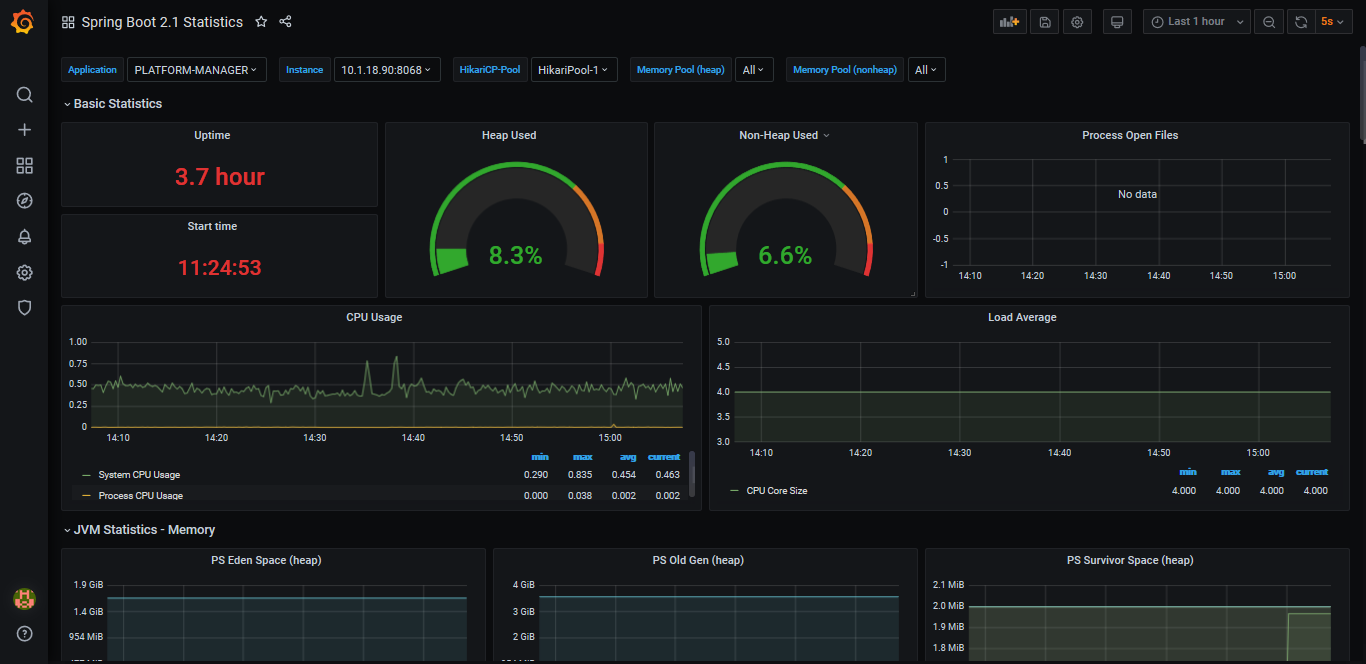
对于Springboot2,我选择了 https://grafana.com/grafana/dashboards/10280 作为配置,将10280填入第一个输入框,然后点击【load】。
至此,所有的配置都已完成,最后来看看SpringBoot的监控效果图。

参考
Spring Boot 2.1X+Prometheus +Grafana实现监控及可视化


