Spring 入门(四):SSM 整合
本文会以 XML方式 和 全注解方式 两种方式分别介绍 SSM 框架的整合。
XML 方式整合
☕️ 建立 Web 的 Maven 工程
使用 IDEA 创建普通 Maven 项目之后,右击项目,选择Add Frameworks Support,勾选Java EE下面的Web Application,并选择 web.xml 的版本,点击确定,会自动在当前项目下创建 web 目录。
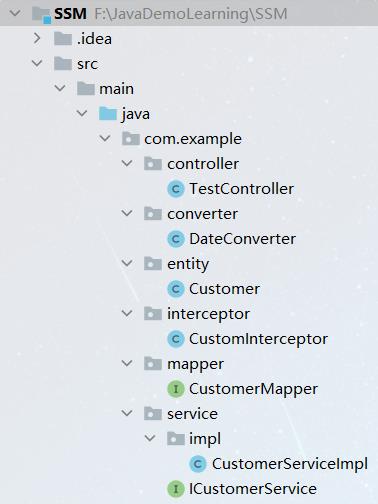
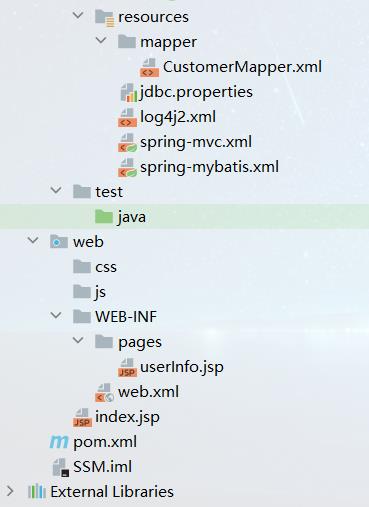
Web 项目还需要配置 Tomcat,此处设置项目的Application context为/,访问端口为 8080。整个项目目录如下所示:
☕️ 在 pom.xml 中导入 jar 包依赖
<properties>
    <spring-version>5.2.8.RELEASE</spring-version>
    <log4j2.version>2.13.3</log4j2.version>
</properties>

<dependencies>
    <!-- spring-context,该 jar 包会将 aop、beans、core、expression 一并下下来 -->
    <dependency>
        <groupId>org.springframework</groupId>
        <artifactId>spring-context</artifactId>
        <version>${spring-version}</version>
    </dependency>

    <!-- SpringMVC -->
    <dependency>
        <groupId>org.springframework</groupId>
        <artifactId>spring-webmvc</artifactId>
        <version>${spring-version}</version>
    </dependency>

    <!-- Servlet -->
    <dependency>
        <groupId>javax.servlet</groupId>
        <artifactId>javax.servlet-api</artifactId>
        <version>4.0.1</version>
        <scope>provided</scope>
    </dependency>

    <!-- jsp -->
    <dependency>
        <groupId>javax.servlet.jsp</groupId>
        <artifactId>javax.servlet.jsp-api</artifactId>
        <version>2.3.3</version>
        <scope>provided</scope>
    </dependency>

    <!-- JSON 转换核心包 -->
    <dependency>
        <groupId>com.fasterxml.jackson.core</groupId>
        <artifactId>jackson-core</artifactId>
        <version>2.11.1</version>
    </dependency>

    <!-- JSON 转换的数据绑定包 -->
    <dependency>
        <groupId>com.fasterxml.jackson.core</groupId>
        <artifactId>jackson-databind</artifactId>
        <version>2.11.1</version>
    </dependency>

    <!-- JSON 转换注解包 -->
    <dependency>
        <groupId>com.fasterxml.jackson.core</groupId>
        <artifactId>jackson-annotations</artifactId>
        <version>2.11.1</version>
    </dependency>

    <!-- Aspectj 语法的解析 -->
    <dependency>
        <groupId>org.aspectj</groupId>
        <artifactId>aspectjweaver</artifactId>
        <version>1.9.6</version>
    </dependency>

    <!-- mySql -->
    <dependency>
        <groupId>mysql</groupId>
        <artifactId>mysql-connector-java</artifactId>
        <version>8.0.21</version>
    </dependency>

    <!-- MyBatis -->
    <dependency>
        <groupId>org.mybatis</groupId>
        <artifactId>mybatis</artifactId>
        <version>3.5.5</version>
    </dependency>

    <!-- MyBatis 和 Spring 整合 -->
    <dependency>
        <groupId>org.mybatis</groupId>
        <artifactId>mybatis-spring</artifactId>
        <version>2.0.5</version>
    </dependency>

    <!-- druid 数据库连接池 -->
    <dependency>
        <groupId>com.alibaba</groupId>
        <artifactId>druid</artifactId>
        <version>1.1.23</version>
    </dependency>

    <!-- spring-jdbc,该 jar 包会将 tx(事务管理) 一并下下来 -->
    <dependency>
        <groupId>org.springframework</groupId>
        <artifactId>spring-jdbc</artifactId>
        <version>${spring-version}</version>
    </dependency>

    <!-- 文件上传(如果不使用该功能,可以不添加)-->
    <dependency>
        <groupId>commons-fileupload</groupId>
        <artifactId>commons-fileupload</artifactId>
        <version>1.4</version>
    </dependency>

    <!-- lombok -->
    <dependency>
        <groupId>org.projectlombok</groupId>
        <artifactId>lombok</artifactId>
        <version>1.18.12</version>
        <scope>provided</scope>
    </dependency>

    <!-- spring 测试-->
    <dependency>
        <groupId>org.springframework</groupId>
        <artifactId>spring-test</artifactId>
        <version>${spring-version}</version>
        <scope>test</scope>
    </dependency>

    <!-- junit4 测试 -->
    <dependency>
        <groupId>junit</groupId>
        <artifactId>junit</artifactId>
        <version>4.12</version>
        <scope>test</scope>
    </dependency>

    <!-- 配置日志 -->
    <!-- log start -->
    <dependency>
        <groupId>org.apache.logging.log4j</groupId>
        <artifactId>log4j-api</artifactId>
        <version>${log4j2.version}</version>
    </dependency>

    <dependency>
        <groupId>org.apache.logging.log4j</groupId>
        <artifactId>log4j-core</artifactId>
        <version>${log4j2.version}</version>
    </dependency>

    <dependency>
        <groupId>org.apache.logging.log4j</groupId>
        <artifactId>log4j-web</artifactId>
        <version>${log4j2.version}</version>
    </dependency>
    <!-- log end -->
</dependencies>

<build>
    <plugins>
        <plugin>
            <groupId>org.apache.maven.plugins</groupId>
            <artifactId>maven-compiler-plugin</artifactId>
            <version>3.8.1</version>
            <configuration>
                <source>1.8</source>
                <target>1.8</target>
                <encoding>UTF-8</encoding>
            </configuration>
        </plugin>
    </plugins>
</build>
Spring 和 MyBatis 整合
⭐️ 数据库脚本
DROP TABLE IF EXISTS `t_customer`;
CREATE TABLE `t_customer` (
	`id` INT PRIMARY KEY AUTO_INCREMENT COMMENT '客户ID',
	`username` VARCHAR(50) COMMENT '客户名',
	`job` VARCHAR(50) COMMENT '职业',
	`phone` VARCHAR(16) COMMENT '手机号码'
) COMMENT '客户表';

INSERT INTO `t_customer` VALUES(1, 'joy', 'doctor', '11111111111');
INSERT INTO `t_customer` VALUES(2, 'jack', 'teacher', '22222222222');
INSERT INTO `t_customer` VALUES(3, 'tom', 'worker', '33333333333');
⭐️ 创建实体类
package com.example.entity;

import lombok.AllArgsConstructor;
import lombok.Data;
import lombok.NoArgsConstructor;
import java.io.Serializable;

@Data
@AllArgsConstructor
@NoArgsConstructor
public class Customer implements Serializable {
    private Integer id;        // 客户 ID
    private String username;   // 客户名
    private String job;        // 职业
    private String phone;      // 手机号码
}
⭐️ 编写 CustomerMapper 接口,并添加 Mapper 方法
package com.example.mapper;

import com.example.entity.Customer;

public interface CustomerMapper {
    // 根据 id 查询客户
    Customer selectById(Integer id);

    // 插入客户
    int insert(Customer customer);
}
⭐️ 在resources/mapper目录下添加接口对应的 XML 映射文件 CustomerMapper.xml
<!DOCTYPE mapper
        PUBLIC "-//mybatis.org//DTD Mapper 3.0//EN"
        "http://mybatis.org/dtd/mybatis-3-mapper.dtd">

<mapper namespace="CustomerMapper">
    <!-- 根据 id 查询客户 -->
    <select id="selectById" resultType="Customer">
        select id, username, job, phone from t_customer where id = #{id}
    </select>

    <!-- 插入客户 -->
    <insert id="insert" useGeneratedKeys="true" keyProperty="id">
        insert into t_customer(username, job, phone) values(#{username}, #{job}, #{phone})
    </insert>
</mapper>
⭐️ 编写 ICustomerService 接口
package com.example.service;

import com.example.entity.Customer;

import java.util.List;

public interface ICustomerService {
    // 根据 id 查询客户
    Customer findOne(int userId);

    // 插入客户
    int save(Customer customer);
}
⭐️ 实现 ICustomerService 接口
package com.example.service.impl;

import com.example.entity.Customer;
import com.example.mapper.CustomerMapper;
import com.example.service.ICustomerService;
import org.springframework.beans.factory.annotation.Autowired;
import org.springframework.stereotype.Service;
import org.springframework.transaction.annotation.Transactional;

@Service
public class CustomerServiceImpl implements ICustomerService {

    @Autowired
    private CustomerMapper customerMapper;

    @Override
    public Customer findOne(int userId) {
        return customerMapper.selectById(userId);
    }

    @Override
    @Transactional(rollbackFor = Exception.class)
    public int save(Customer customer) {
        return customerMapper.insert(customer);
    }
}
⭐️ 编写 jdbc.properties 文件,配置数据库连接信息
jdbc.driver=com.mysql.cj.jdbc.Driver
jdbc.url=jdbc:mysql://localhost:3306/learning?characterEncoding=utf-8&useSSL=false&serverTimezone=Hongkong
jdbc.username=root
jdbc.password=123456
⭐️ 编写 Spring 核心配置文件 spring-mybatis.xml
<?xml version="1.0" encoding="UTF-8"?>
<beans xmlns="http://www.springframework.org/schema/beans"
       xmlns:xsi="http://www.w3.org/2001/XMLSchema-instance"
       xmlns:context="http://www.springframework.org/schema/context"
       xmlns:aop="http://www.springframework.org/schema/aop"
       xmlns:tx="http://www.springframework.org/schema/tx"
       xsi:schemaLocation="http://www.springframework.org/schema/beans
	http://www.springframework.org/schema/beans/spring-beans.xsd
	http://www.springframework.org/schema/context
	http://www.springframework.org/schema/context/spring-context.xsd
	http://www.springframework.org/schema/aop
	http://www.springframework.org/schema/aop/spring-aop.xsd
	http://www.springframework.org/schema/tx
	http://www.springframework.org/schema/tx/spring-tx.xsd">

    <!-- 配置 IoC 容器注解扫描的包路径 -->
    <context:component-scan base-package="com.example">
        <!-- 制定扫包规则,不扫描 @Controller 注解修饰的 Java 类,其它还是要扫描 -->
        <context:exclude-filter type="annotation"
                                expression="org.springframework.stereotype.Controller"/>
    </context:component-scan>

    <!-- 加载配置文件,该文件用来配置数据库连接信息 -->
    <context:property-placeholder location="classpath:jdbc.properties"/>

    <!-- 数据库连接池(Druid) -->
    <bean id="dataSource" class="com.alibaba.druid.pool.DruidDataSource">
        <property name="driverClassName" value="${jdbc.driver}"/>
        <property name="url" value="${jdbc.url}"/>
        <property name="username" value="${jdbc.username}"/>
        <property name="password" value="${jdbc.password}"/>
    </bean>

    <!-- 配置 Mybatis 的 Session 工厂 -->
    <bean id="sqlSessionFactory" class="org.mybatis.spring.SqlSessionFactoryBean">
        <!-- 配置数据库连接池 -->
        <property name="dataSource" ref="dataSource"/>
        <!-- 自定扫描指定路径下的 Mapping 映射文件 -->
        <property name="mapperLocations" value="classpath:mapper/*Mapper.xml"/>
        <!-- 定义别名 -->
        <property name="typeAliasesPackage" value="com.example.entity"/>
        <property name="configuration">
            <bean class="org.apache.ibatis.session.Configuration">
                <!-- 是否开启自动驼峰命名规则(camel case)映射,默认值为 false -->
                <property name="mapUnderscoreToCamelCase" value="true"/>
                <!-- 是否开启延迟加载的全局开关,默认值为 false -->
                <property name="lazyLoadingEnabled" value="true"/>
                <!-- 设置为 false 表示按需加载。默认值在 3.4.1 版本之前为 true,之后为 false -->
                <property name="aggressiveLazyLoading" value="false"/>
                <!-- 是否开启二级缓存,默认为 true,所以不需要配置 -->
                <property name="cacheEnabled" value="true"/>
            </bean>
        </property>
    </bean>

    <!-- 配置事务管理器,使用 Spring 声明式事务管理 -->
    <bean id="transactionManager" class="org.springframework.jdbc.datasource.DataSourceTransactionManager">
        <property name="dataSource" ref="dataSource"/>
    </bean>

    <!-- 配置 Mapper 扫描器,将指定包的所有 Java 类注册为 bean -->
    <bean class="org.mybatis.spring.mapper.MapperScannerConfigurer">
        <!-- Mapper 扫描的包路径 -->
        <property name="basePackage" value="com.example.mapper"/>
    </bean>

    <!-- 开启事务的注解支持
         transaction-manager 属性:指定事务管理器 id,默认值就是 transactionManager
    -->
    <tx:annotation-driven transaction-manager="transactionManager"/>
</beans>
⭐️ 编写日志配置文件 log4j2.xml
<?xml version="1.0" encoding="UTF-8"?>
<Configuration status="WARN">
    <Appenders>
        <Console name="Console" target="SYSTEM_OUT">
            <PatternLayout pattern="%d{HH:mm:ss.SSS} [%t] %-5level %logger{36} - %msg%n"/>
        </Console>
    </Appenders>
    <Loggers>
        <!-- 总体日志级别为 error -->
        <Root level="error">
            <AppenderRef ref="Console"/>
        </Root>
        <!-- 为了打印 sql 日志,将 com.example.mapper 包的日志级别设置为 trace -->
        <logger name="com.example.mapper" level="trace" additivity="false" >
            <appender-ref ref="Console"/>
        </logger>
    </Loggers>
</Configuration>
⭐️ 编写测试方法
import com.example.entity.Customer;
import com.example.service.ICustomerService;
import junit.framework.TestCase;
import org.junit.Assert;
import org.junit.Test;
import org.junit.runner.RunWith;
import org.springframework.beans.factory.annotation.Autowired;
import org.springframework.test.context.ContextConfiguration;
import org.springframework.test.context.junit4.SpringJUnit4ClassRunner;

@RunWith(SpringJUnit4ClassRunner.class)
// 加载 Spring 核心配置文件,创建 IoC 容器
@ContextConfiguration("classpath:spring-mybatis.xml")
public class CustomerServiceImplTest extends TestCase {

    @Autowired
    private ICustomerService customerService;

    @Test
    public void testFindOne() {
        System.out.println(customerService.findOne(1));
    }

    @Test
    public void testSave() {
        Customer customer1 = new Customer(null, "test1", "worker", "44444444444");
        Assert.assertEquals(1, customerService.save(customer1));
        System.out.println(customer1);
    }
}
// testFindOne() 执行结果
==>  Preparing: select id, username, job, phone from t_customer where id = ?
==> Parameters: 1(Integer)
<==    Columns: id, username, job, phone
<==        Row: 1, joy, doctor, 11111111111
<==      Total: 1
Customer(id=1, username=joy, job=doctor, phone=11111111111)
// testSave() 执行结果
==>  Preparing: insert into t_customer(username, job, phone) values(?, ?, ?)
==> Parameters: test1(String), worker(String), 44444444444(String)
<==    Updates: 1
Customer(id=4, username=test1, job=worker, phone=44444444444)
整合 SpringMVC
✏️ 编写 SpringMVC 的核心配置文件 spring-mvc.xml
<?xml version="1.0" encoding="UTF-8"?>
<beans xmlns="http://www.springframework.org/schema/beans"
       xmlns:xsi="http://www.w3.org/2001/XMLSchema-instance"
       xmlns:context="http://www.springframework.org/schema/context"
       xmlns:mvc="http://www.springframework.org/schema/mvc"
       xmlns:mvn="http://www.springframework.org/schema/mvc"
       xsi:schemaLocation="http://www.springframework.org/schema/beans
        http://www.springframework.org/schema/beans/spring-beans.xsd
        http://www.springframework.org/schema/context
        https://www.springframework.org/schema/context/spring-context.xsd
        http://www.springframework.org/schema/mvc
        https://www.springframework.org/schema/mvc/spring-mvc.xsd">

    <!-- 配置 IoC 容器注解扫描的包路径 -->
    <!-- 使用 context:include-filter 时,use-default-filters 属性必须设置为 false -->
    <context:component-scan base-package="com.example" use-default-filters="false">
        <!-- 制定扫包规则,只扫描使用 @Controller 注解修饰的 Java 类 -->
        <context:include-filter type="annotation"
                                expression="org.springframework.stereotype.Controller"/>
    </context:component-scan>

    <!-- 开启 SpringMVC 的注解支持
         conversion-service 属性是引用型转换器工厂(如果没有自定义类型转换器,可以不配置)
     -->
    <mvc:annotation-driven conversion-service="conversionService"/>

    <!-- 配置类型转换器工厂(如果没有自定义类型转换器,可以不配置) -->
    <bean id="conversionService" class="org.springframework.context.support.ConversionServiceFactoryBean">
        <!-- 给工厂注入一个新的类型转换器 -->
        <property name="converters">
            <array>
                <!-- 配置自定义类型转换器,字符串和日期转换 -->
                <bean class="com.example.converter.DateConverter"/>
            </array>
        </property>
    </bean>

    <!-- 配置视图解析器 -->
    <!-- 真正的视图路径为:prefix + 逻辑视图名 + suffix -->
    <bean class="org.springframework.web.servlet.view.InternalResourceViewResolver">
        <property name="prefix" value="/WEB-INF/pages/"/>
        <property name="suffix" value=".jsp"/>
    </bean>

    <!-- 配置文件上传解析器 MultipartResolver(如果不需要文件上传,可以不配置)
         此处需要注意,文件上传解析器的 id 是固定的,不能取其它的名称
     -->
    <bean id="multipartResolver" class="org.springframework.web.multipart.commons.CommonsMultipartResolver">
        <!-- 设置编码方式 -->
        <property name="defaultEncoding" value="UTF-8"/>
        <!-- 设置允许上传文件的最大值,单位为字节 -->
        <property name="maxUploadSize" value="5242880"/>
        <!-- 设置缓存中的最大尺寸,单位为字节 -->
        <property name="maxInMemorySize" value="40960" />
        <!-- 推迟文件解析,以便在 Controller 中捕获文件大小异常 -->
        <property name="resolveLazily" value="true"/>
    </bean>

    <!-- 配置静态资源的访问映射,此配置中的文件,将不会被 DispatcherServlet 拦截
         location:本地资源路径,具体到某个文件夹
         mapping:对外暴露的访问路径,"/**" 表示资源目录下的所有 url
    -->
    <mvn:resources location="/js/" mapping="/js/**"/>
    <mvn:resources location="/css/" mapping="/css/**"/>

    <!-- 配置拦截器(如果没有自定义拦截器,可以不配置) -->
    <mvc:interceptors>
        <mvc:interceptor>
            <!-- 配置需要拦截器作用的路径,/** 表示拦截全部的请求 -->
            <mvc:mapping path="/**"/>
            <!-- 配置不需要拦截作用的路径,静态资源的访问 URL 一般不拦截 -->
            <mvc:exclude-mapping path="/js/**"/>
            <mvc:exclude-mapping path="/css/**"/>
            <!-- 配置自定义拦截器的 bean -->
            <bean class="com.example.interceptor.CustomInterceptor"/>
        </mvc:interceptor>
    </mvc:interceptors>
</beans>
✏️ 编写 web.xml 文件
<?xml version="1.0" encoding="UTF-8"?>
<web-app xmlns="http://xmlns.jcp.org/xml/ns/javaee"
         xmlns:xsi="http://www.w3.org/2001/XMLSchema-instance"
         xsi:schemaLocation="http://xmlns.jcp.org/xml/ns/javaee http://xmlns.jcp.org/xml/ns/javaee/web-app_4_0.xsd"
         version="4.0">

    <!-- 配置 Spring 提供的监听器,在 Web 容器启动时初始化 -->
    <listener>
        <listener-class>org.springframework.web.context.ContextLoaderListener</listener-class>
    </listener>
    <!-- 指定 Spring 核心配置文件路径,用于初始化 Root WebApplicationContext 容器 -->
    <context-param>
        <param-name>contextConfigLocation</param-name>
        <param-value>classpath:spring-mybatis.xml</param-value>
    </context-param>

    <!-- 配置 SpringMVC 的核心组件 DispatcherServlet -->
    <servlet>
        <servlet-name>DispatcherServlet</servlet-name>
        <servlet-class>org.springframework.web.servlet.DispatcherServlet</servlet-class>
        <!-- 指定 SpringMVC 核心配置文件路径,用于初始化 Servlet WebApplicationContext 容器 -->
        <init-param>
            <param-name>contextConfigLocation</param-name>
            <param-value>classpath:spring-mvc.xml</param-value>
        </init-param>
        <!-- 值为 0 或者大于 0 时,Web 容器在启动时会立即加载这个 Servlet  -->
        <load-on-startup>1</load-on-startup>
    </servlet>
    <servlet-mapping>
        <!-- 设置能被 DispatcherServlet 拦截处理的请求 URL -->
        <servlet-name>DispatcherServlet</servlet-name>
        <!-- 默认配置,/ 表示拦截所有请求 URL,包括静态资源的请求,但不包括 *.jsp 请求;
             对于 *.jsp 的请求会交由 JspServlet 处理,所以非 WEB-INF 目录下的 *.jsp 能直接访问
        -->
        <url-pattern>/</url-pattern>
    </servlet-mapping>

    <!-- 配置编码过滤器 CharacterEncodingFilter,将请求消息的编码统一设置为 UTF-8 -->
    <filter>
        <filter-name>CharacterEncodingFilter</filter-name>
        <filter-class>org.springframework.web.filter.CharacterEncodingFilter</filter-class>
        <init-param>
            <param-name>encoding</param-name>
            <param-value>UTF-8</param-value>
        </init-param>
    </filter>
    <filter-mapping>
        <!-- 设置能被 CharacterEncodingFilter 拦截处理的请求 URL -->
        <filter-name>CharacterEncodingFilter</filter-name>
        <!-- * 是通配符,/* 表示拦截所有以 / 开头的请求 URL  -->
        <url-pattern>/*</url-pattern>
    </filter-mapping>
</web-app>
✏️ 编写自定义的类型转换器
package com.example.converter;

import org.springframework.core.convert.converter.Converter;
import java.text.ParseException;
import java.text.SimpleDateFormat;
import java.util.Date;

public class DateConverter implements Converter<String, Date> {
    // 定义日期格式
    private String datePattern = "yyyy-MM-dd HH:mm:ss";

    @Override
    public Date convert(String s) {
        // 格式化日期
        SimpleDateFormat format = new SimpleDateFormat(datePattern);

        try {
            return format.parse(s);
        } catch (ParseException e) {
            throw new IllegalArgumentException("无效的日期格式,请使用这种格式: " + datePattern);
        }
    }
}
✏️ 编写自定义的拦截器
package com.example.interceptor;

import org.springframework.web.servlet.HandlerInterceptor;
import org.springframework.web.servlet.ModelAndView;
import javax.servlet.http.HttpServletRequest;
import javax.servlet.http.HttpServletResponse;

public class CustomInterceptor implements HandlerInterceptor {

    // 在 Controller 方法执行之前被调用
    @Override
    public boolean preHandle(HttpServletRequest request, HttpServletResponse response, Object handler) throws Exception {
        System.out.println("preHandler 执行了!");
        return true;
    }

    // 在 Controller 方法执行之后,视图解析之前被调用
    @Override
    public void postHandle(HttpServletRequest request, HttpServletResponse response, Object handler, ModelAndView modelAndView) throws Exception {
        System.out.println("postHandler 执行了!");
    }

    // 在整个流程处理完成,即渲染视图结束之后被调用
    @Override
    public void afterCompletion(HttpServletRequest request, HttpServletResponse response, Object handler, Exception ex) throws Exception {
        System.out.println("afterCompletion 执行了!");
    }
}
✏️ 编写 TestController 控制器
package com.example.controller;

import com.example.entity.Customer;
import com.example.service.ICustomerService;
import org.springframework.beans.factory.annotation.Autowired;
import org.springframework.stereotype.Controller;
import org.springframework.ui.Model;
import org.springframework.web.bind.annotation.GetMapping;
import org.springframework.web.bind.annotation.PathVariable;
import org.springframework.web.bind.annotation.ResponseBody;

@Controller
public class TestController {

    @Autowired
    private ICustomerService customerService;

    @GetMapping("/get/{userId}")
    public String showUser(@PathVariable int userId, Model model) {
        Customer customer = customerService.findOne(userId);
        model.addAttribute("customer", customer);
        return "userInfo";
    }

    @GetMapping("/insert")
    @ResponseBody
    public Customer insertUser() {
        Customer customer = new Customer(null, "test1", "worker", "44444444444");
        customerService.save(customer);
        return customer;
    }
}
✏️ 启动项目,访问localhost:8080/get/1,页面显示:
编号:1
姓名:joy
职业:doctor
电话:11111111111
后端控制台显示:
preHandler 执行了!
==>  Preparing: select id, username, job, phone from t_customer where id = ?
==> Parameters: 1(Integer)
<==    Columns: id, username, job, phone
<==        Row: 1, joy, doctor, 11111111111
<==      Total: 1
postHandler 执行了!
afterCompletion 执行了!
✏️ 访问localhost:8080/insert,页面显示:
{"id":5,"username":"test","job":"xxx","phone":"xxxxxxxxx"}
后端控制台显示:
preHandler 执行了!
==>  Preparing: insert into t_customer(username, job, phone) values(?, ?, ?)
==> Parameters: test(String), xxx(String), xxxxxxxxx(String)
<==    Updates: 1
postHandler 执行了!
afterCompletion 执行了!
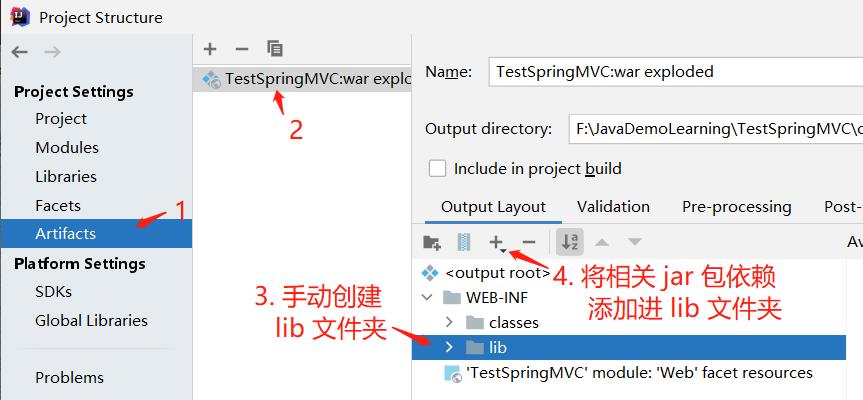
如果访问出现 404,服务器报错,可能原因是 IDEA 的项目发布中没有 lib 依赖,需要手动添加 jar 包(这是 IDEA 的 bug),流程如下:

全注解方式整合
此处将会使用全注解的方式替代 spring-mybatis.xml、spring-mvc.xml 和 web.xml 三个文件。
📚 编写 SpringConfig 配置类替代 spring-mybatis.xml
package com.example.config;

import com.alibaba.druid.pool.DruidDataSource;
import org.mybatis.spring.SqlSessionFactoryBean;
import org.mybatis.spring.mapper.MapperScannerConfigurer;
import org.springframework.beans.factory.annotation.Value;
import org.springframework.context.annotation.Bean;
import org.springframework.context.annotation.ComponentScan;
import org.springframework.context.annotation.Configuration;
import org.springframework.context.annotation.PropertySource;
import org.springframework.core.io.Resource;
import org.springframework.core.io.support.PathMatchingResourcePatternResolver;
import org.springframework.core.io.support.ResourcePatternResolver;
import org.springframework.jdbc.datasource.DataSourceTransactionManager;
import org.springframework.transaction.annotation.EnableTransactionManagement;
import java.io.IOException;

//@Configuration   // 不需要添加 @Configuration 注解
@EnableTransactionManagement    // 开启事务的注解支持,会自动加载事务管理器
@ComponentScan("com.example")   // Spring 的注解扫描的包路径
@PropertySource("classpath:jdbc.properties")  // 加载 jdbc.properties 配置文件
public class SpringConfig {

    /**
     * 配置数据库连接池(Druid)
     */
    @Bean
    public DruidDataSource dataSource(@Value("${jdbc.driver}") String driver,
                                      @Value("${jdbc.url}") String url,
                                      @Value("${jdbc.username}") String username,
                                      @Value("${jdbc.password}") String password) {
        DruidDataSource dataSource = new DruidDataSource();
        dataSource.setDriverClassName(driver);
        dataSource.setUrl(url);
        dataSource.setUsername(username);
        dataSource.setPassword(password);
        return dataSource;
    }

    /**
     * 配置 Mybatis 的 Session 工厂(参数 dataSource 自动注入)
     */
    @Bean
    public SqlSessionFactoryBean sqlSessionFactory(DruidDataSource dataSource) throws IOException {
        SqlSessionFactoryBean factory = new SqlSessionFactoryBean();
        // 设置数据库连接池
        factory.setDataSource(dataSource);
        // 设置 Mapper 的映射文件位置
        ResourcePatternResolver resolver = new PathMatchingResourcePatternResolver();
        Resource[] mapperLocations = resolver.getResources("classpath:mapper/*.xml");
        factory.setMapperLocations(mapperLocations);
        // 设置别名的包路径
        factory.setTypeAliasesPackage("com.example.entity");

        org.apache.ibatis.session.Configuration configuration = new org.apache.ibatis.session.Configuration();
        // 是否开启自动驼峰命名规则(camel case)映射,默认值为 false
        configuration.setMapUnderscoreToCamelCase(true);
        // 是否开启延迟加载的全局开关,默认值为 false
        configuration.setLazyLoadingEnabled(true);
        // 设置为 false 表示按需加载。默认值在 3.4.1 版本之前为 true,之后为 false
        configuration.setAggressiveLazyLoading(false);
        // 是否开启二级缓存,默认为 true,所以可以不需要配置
        configuration.setCacheEnabled(true);
        factory.setConfiguration(configuration);

        return factory;
    }

    /**
     * 配置事务管理器,使用 Spring 的事务管理(参数 dataSource 自动注入)
     */
    @Bean
    public DataSourceTransactionManager transactionManager(DruidDataSource dataSource) {
        DataSourceTransactionManager manager = new DataSourceTransactionManager();
        manager.setDataSource(dataSource);
        return manager;
    }

    /**
     * 配置 Mapper 扫描器,将指定包的所有 Mapper 接口类注册为 bean
     */
    @Bean
    public MapperScannerConfigurer mapperScanner() {
        MapperScannerConfigurer scanner = new MapperScannerConfigurer();
        // Mapper 扫描的包路径
        scanner.setBasePackage("com.example.mapper");
        return scanner;
    }
}
📚 编写 SpringMvcConfig 配置类替代 spring-mvc.xml
package com.example.config;

import com.example.converter.DateConverter;
import com.example.interceptor.CustomInterceptor;
import org.springframework.context.annotation.Bean;
import org.springframework.context.annotation.ComponentScan;
import org.springframework.context.annotation.ComponentScan.Filter;
import org.springframework.context.annotation.Configuration;
import org.springframework.context.annotation.FilterType;
import org.springframework.format.FormatterRegistry;
import org.springframework.stereotype.Controller;
import org.springframework.web.multipart.commons.CommonsMultipartResolver;
import org.springframework.web.servlet.config.annotation.EnableWebMvc;
import org.springframework.web.servlet.config.annotation.InterceptorRegistry;
import org.springframework.web.servlet.config.annotation.ResourceHandlerRegistry;
import org.springframework.web.servlet.config.annotation.WebMvcConfigurer;
import org.springframework.web.servlet.view.InternalResourceViewResolver;
import java.nio.charset.StandardCharsets;

// @Configuration  // 不需要加 @Configuration 注解
@ComponentScan(value = "com.example",   // 配置 IoC 容器注解扫描的包路径
        useDefaultFilters = false,   // 关闭默认的注解扫描的 Filter
        // 制定扫包规则,只扫描使用 @Controller 注解修饰的 Java 类
        includeFilters = @Filter(type = FilterType.ANNOTATION, value = Controller.class)
)
@EnableWebMvc   // 开启 SpringMVC 的注解支持
public class SpringMvcConfig implements WebMvcConfigurer {
    /**
     * 添加自定义类型转换器
     */
    @Override
    public void addFormatters(FormatterRegistry registry) {
        // 添加日期数据的类型解析器
        registry.addConverter(new DateConverter());
    }

    /**
     * 配置视图解析器
     */
    @Bean
    public InternalResourceViewResolver viewResolver(){
        // 真正的视图路径路径为:前缀 + 逻辑视图名 + 后缀
        InternalResourceViewResolver viewResolver = new InternalResourceViewResolver();
        viewResolver.setPrefix("/WEB-INF/pages/");  // 前缀
        viewResolver.setSuffix(".jsp");  // 后缀
        return viewResolver;
    }

    /**
     * 配置文件上传解析器
     * 注意:文件上传解析器 bean 的 id 是固定的,只能为 multipartResolver
     */
    @Bean
    public CommonsMultipartResolver multipartResolver() {
        CommonsMultipartResolver multipartResolver = new CommonsMultipartResolver();
        // 设置编码方式
        multipartResolver.setDefaultEncoding(String.valueOf(StandardCharsets.UTF_8));
        // 设置允许上传文件的最大值,单位为字节
        multipartResolver.setMaxUploadSize(5242880);
        // 设置缓存中的最大尺寸,单位为字节
        multipartResolver.setMaxInMemorySize(40960);
        // 推迟文件解析,以便在 Controller 中捕获文件大小异常
        multipartResolver.setResolveLazily(true);
        return multipartResolver;
    }

    /**
     * 配置静态资源的访问映射
     */
    @Override
    public void addResourceHandlers(ResourceHandlerRegistry registry) {
        // Handler:对外暴露的访问路径,"/**" 表示静态资源目录下的所有文件都能访问
        // Locations:映射到的本地静态资源路径,具体到某个文件夹
        registry.addResourceHandler("/js/**").addResourceLocations("/js/");
        registry.addResourceHandler("/css/**").addResourceLocations("/css/");
    }

    /**
     * 配置自定义拦截器
     */
    @Override
    public void addInterceptors(InterceptorRegistry registry) {
        // addPathPatterns:配置需要拦截器作用的路径,/** 表示拦截全部的请求
        // excludePathPatterns:配置不需要拦截器作用的路径,静态资源的访问 URL 一般不拦截
        registry.addInterceptor(new CustomInterceptor())
                .addPathPatterns("/**").excludePathPatterns("/js/**", "/css/**");
    }
}
📚 编写 WebInitializer 配置类替代 web.xml
package com.example.config;

import org.springframework.web.filter.CharacterEncodingFilter;
import org.springframework.web.servlet.support.AbstractAnnotationConfigDispatcherServletInitializer;
import javax.servlet.FilterRegistration;
import javax.servlet.ServletContext;
import javax.servlet.ServletException;
import java.nio.charset.StandardCharsets;

/**
 * 取代 web.xml
 */
public class WebInitializer extends AbstractAnnotationConfigDispatcherServletInitializer {

    /**
     * 指定 Spring 核心配置类,用于创建 Root WebApplicationContext 容器
     */
    @Override
    protected Class<?>[] getRootConfigClasses() {
        return new Class<?>[]{SpringConfig.class};
    }

    /**
     * 指定 SpringMVC 的核心配置类,用于创建 Servlet WebApplicationContext 容器
     */
    @Override
    protected Class<?>[] getServletConfigClasses() {
        return new Class<?>[]{SpringMvcConfig.class};
    }

    /**
     * 设置能被 DispatcherServlet 拦截并处理的 URL 请求
     */
    @Override
    protected String[] getServletMappings() {
        // 默认配置,/ 表示拦截所有请求 URL,包括静态资源的请求,但不包括 *.jsp 请求;
        // 对于 *.jsp 的请求会交由 JspServlet 处理,所以非 WEB-INF 目录下的 *.jsp 能直接访问
        return new String[]{"/"};
    }

    /**
     * 可以在此方法添加自定义的 Servlet、Listener、Filter
     */
    @Override
    public void onStartup(ServletContext servletContext) throws ServletException {
        // 添加全局过滤的 filter,将请求消息的编码统一设置为 UTF-8
        FilterRegistration.Dynamic encodingFilter = servletContext.addFilter("encodingFilter", CharacterEncodingFilter.class);
        encodingFilter.setInitParameter("encoding", String.valueOf(StandardCharsets.UTF_8));
        // * 是通配符,/* 表示拦截所有以 / 开头的请求 URL
        encodingFilter.addMappingForUrlPatterns(null, false, "/*");

        // 必须调用回父类的 onStartup 方法,否则不会初始化 DispatcherServlet
        super.onStartup(servletContext);
    }
}
📚 启动项目,访问localhost:8080/get/1,页面显示:
编号:1
姓名:joy
职业:doctor
电话:11111111111
后端控制台显示:
preHandler 执行了!
==>  Preparing: select id, username, job, phone from t_customer where id = ?
==> Parameters: 1(Integer)
<==    Columns: id, username, job, phone
<==        Row: 1, joy, doctor, 11111111111
<==      Total: 1
postHandler 执行了!
afterCompletion 执行了!
📚 访问localhost:8080/insert,页面显示:
{"id":6,"username":"test","job":"xxx","phone":"xxxxxxxxx"}
后端控制台显示:
preHandler 执行了!
==>  Preparing: insert into t_customer(username, job, phone) values(?, ?, ?)
==> Parameters: test(String), xxx(String), xxxxxxxxx(String)
<==    Updates: 1
postHandler 执行了!
afterCompletion 执行了!
