SpringMVC 入门(二):父子容器和全注解配置
在 SpringMVC 入门(一):基本使用 一文中,使用了 XML 配置对 SpringMVC 的基本使用进行了讲解,其实 SpringMVC 可以使用全注解的方式,彻底不用 XML 配置,本文将会怼全注解方式进行介绍。在使用全注解对前文用到 XML 的地方进行替换之前,我们需要先对 SpringMVC 的 IoC 容器初始化过程进行了解。
IoC 容器初始化
WebApplicaitonContext
首先我们需要了解下 WebApplicaitonContext,它代表着 Spring Web 的应用上下文(IoC 容器)。Spring 框架本身是没有 Web 功能,而 SpringMVC 使用 WebApplicationContext 扩展 ApplicationContext,增加对 Web 环境的支持。其接口定义如下:
public interface WebApplicationContext extends ApplicationContext {
    String ROOT_WEB_APPLICATION_CONTEXT_ATTRIBUTE = WebApplicationContext.class.getName() + ".ROOT";
    String SCOPE_REQUEST = "request";
    String SCOPE_SESSION = "session";
    String SCOPE_APPLICATION = "application";
    String SERVLET_CONTEXT_BEAN_NAME = "servletContext";
    String CONTEXT_PARAMETERS_BEAN_NAME = "contextParameters";
    String CONTEXT_ATTRIBUTES_BEAN_NAME = "contextAttributes";

    @Nullable
    ServletContext getServletContext();
}
对于在 Web 容器中如何初始化 IoC 容器,需要先从 web.xml 配置开始讲解,相关配置如下:
<!-- Spring 配置 -->
<listener>
    <listener-class>org.springframework.web.context.ContextLoaderListener</listener-class>
</listener>
<!-- 指定 Spring 核心配置文件路径,用于初始化 Root WebApplicationContext 容器 -->
<context-param>
    <param-name>contextConfigLocation</param-name>
    <param-value>classpath:applicationContext.xml</param-value>
</context-param>

<!-- SpringMVC 配置 -->
<servlet>
    <servlet-name>DispatcherServlet</servlet-name>
    <servlet-class>org.springframework.web.servlet.DispatcherServlet</servlet-class>
    <!-- 指定 SpringMVC 核心配置文件路径,用于初始化 Servlet WebApplicationContext 容器 -->
    <init-param>
        <param-name>contextConfigLocation</param-name>
        <param-value>classpath:springmvc-config.xml</param-value>
    </init-param>
    <load-on-startup>1</load-on-startup>
</servlet>
<servlet-mapping>
    <servlet-name>DispatcherServlet</servlet-name>
    <url-pattern>/</url-pattern>
</servlet-mapping>
在上面的配置中:
-
ContextLoaderListener 会被优先初始化时,根据指定的 Spring 的配置文件路径,创建出应用的根上下文
Root WebApplicationContext。 -
DispatcherServlet 是 SpringMVC 的核心组件。在初始化时,根据指定的 SpringMVC 的配置文件路径,创建出 SpringMVC 的独立上下文
Web WebApplicationContext。该上下文在创建过程中,会判断Root WebApplicationContext是否存在,如果存在就将其设置为自己的 parent 上下文。这就是父子上下文(父子容器)的概念。
父子容器的作用在于,当我们尝试从子容器(Servlet WebApplicationContext)中获取一个 bean 时,如果找不到,则会委派给父容器(Root WebApplicationContext)进行查找。
Root WebApplicationContext 的创建
<!-- Spring 配置 -->
<listener>
    <listener-class>org.springframework.web.context.ContextLoaderListener</listener-class>
</listener>
<!-- 指定 Spring 核心配置文件路径,用于初始化 Root WebApplicationContext 容器 -->
<context-param>
    <param-name>contextConfigLocation</param-name>
    <param-value>classpath:applicationContext.xml</param-value>
</context-param>
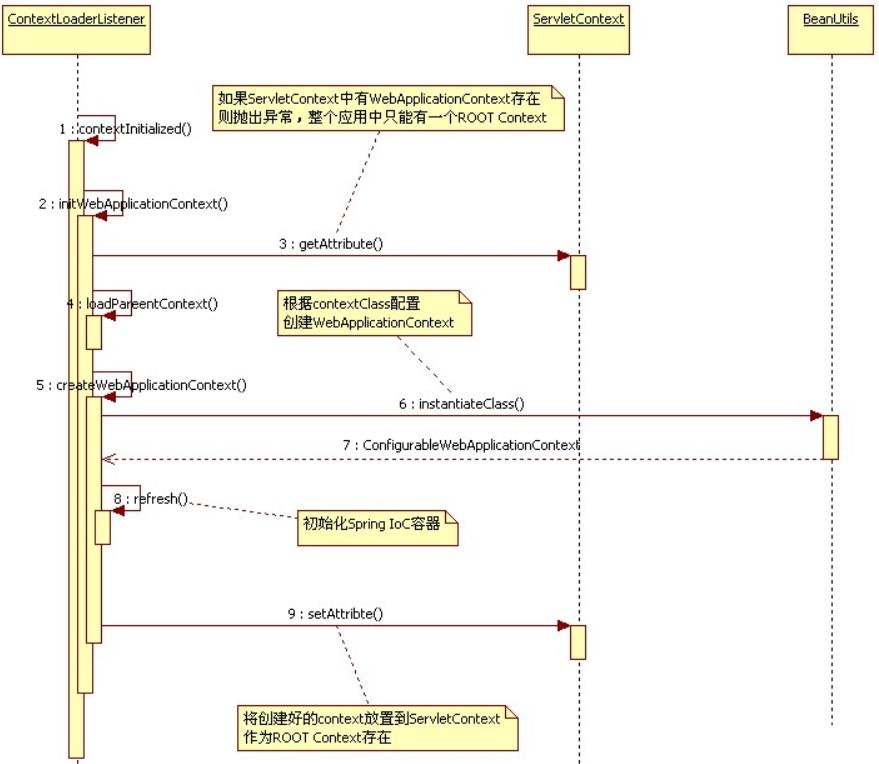
上述配置中,ContextLoaderListener 读取 context-param 中的 contextConfigLocation 指定的配置文件,初始化Root WebApplicationContext容器。下面查看初始化该容器的源码:
public WebApplicationContext initWebApplicationContext(ServletContext servletContext) {
    //(1) 如果已经存在 Root WebApplicationContext,则抛出异常;
    // 在整个 web 应用中,只能有一个 Root WebApplicationContext 容器
    if (servletContext.getAttribute(WebApplicationContext.ROOT_WEB_APPLICATION_CONTEXT_ATTRIBUTE) != null) {
        throw new IllegalStateException("Cannot initialize context because there is already a root application context present - check whether you have multiple ContextLoader* definitions in your web.xml!");
    } else {
        //(2) 打印日志
        servletContext.log("Initializing Spring root WebApplicationContext");
        Log logger = LogFactory.getLog(ContextLoader.class);
        if (logger.isInfoEnabled()) {
            logger.info("Root WebApplicationContext: initialization started");
        }
		// 记录开始时间
        long startTime = System.currentTimeMillis();

        try {
            if (this.context == null) {
                //(3) 创建 WebApplicationContext 对象
                this.context = this.createWebApplicationContext(servletContext);
            }
			//(4) 如果是 ConfigurableWebApplicationContext 的子类,如果未刷新,则进行配置和刷新
            if (this.context instanceof ConfigurableWebApplicationContext) {
                ConfigurableWebApplicationContext cwac = (ConfigurableWebApplicationContext)this.context;
                if (!cwac.isActive()) {  // (4.1)未刷新(激活)
                    if (cwac.getParent() == null) {  //(4.2) 无父容器,则进行加载和设置
                        ApplicationContext parent = this.loadParentContext(servletContext);
                        cwac.setParent(parent);
                    }
					// (4.3) 配置 context 对象,并进行刷新
                    this.configureAndRefreshWebApplicationContext(cwac, servletContext);
                }
            }

//(5) 将 context 放进 servletContext 中,记录为 Root WebApplicationContext
servletContext.setAttribute(WebApplicationContext.ROOT_WEB_APPLICATION_CONTEXT_ATTRIBUTE, this.context);
            //(6) 将 context 和当前线程绑定,这样可以更加方便得到 context
            ClassLoader ccl = Thread.currentThread().getContextClassLoader();
            if (ccl == ContextLoader.class.getClassLoader()) {
                currentContext = this.context;
            } else if (ccl != null) {
                currentContextPerThread.put(ccl, this.context);
            }
			//(7) 打印日志
            if (logger.isInfoEnabled()) {
                long elapsedTime = System.currentTimeMillis() - startTime;
                logger.info("Root WebApplicationContext initialized in " + elapsedTime + " ms");
            }
			//(8) 返回 context
            return this.context;
        } catch (Error | RuntimeException var8) {
            //(9) 当发生异常,将异常放进 servletContext,不再重新初始化
            logger.error("Context initialization failed", var8);
            servletContext.setAttribute(WebApplicationContext.ROOT_WEB_APPLICATION_CONTEXT_ATTRIBUTE, var8);
            throw var8;
        }
    }
}
上述的 (4.3) 过程调用了 configureAndRefreshWebApplicationContext() 方法对 Context 进行配置,源码如下:
protected void configureAndRefreshWebApplicationContext(ConfigurableWebApplicationContext wac, ServletContext sc) {
    String configLocationParam;
    //(1) 如果 wac 使用了默认编号,则重新设置 id 属性
   	// 注意这里的 wac 就是前一个方法创建的 WebApplicationContext 对象
    if (ObjectUtils.identityToString(wac).equals(wac.getId())) {
        // 情况一,使用 contextId 属性
        configLocationParam = sc.getInitParameter("contextId");
        if (configLocationParam != null) {
            wac.setId(configLocationParam);
        // 情况二,自动生成
        } else {
            wac.setId(ConfigurableWebApplicationContext.APPLICATION_CONTEXT_ID_PREFIX + ObjectUtils.getDisplayString(sc.getContextPath()));
        }
    }
	//(2) 让 context 关联上 ServletContext
    wac.setServletContext(sc);
    //(3) 设置 context 的配置文件路径,该路径就是在 web.xml 中配置的 Spring 配置文件路径
    configLocationParam = sc.getInitParameter("contextConfigLocation");
    if (configLocationParam != null) {
        wac.setConfigLocation(configLocationParam);
    }
	//(4) 忽略
    ConfigurableEnvironment env = wac.getEnvironment();
    if (env instanceof ConfigurableWebEnvironment) {
        ((ConfigurableWebEnvironment)env).initPropertySources(sc, (ServletConfig)null);
    }
	//(5) 执行自定义初始化
    this.customizeContext(sc, wac);
    // 刷新 context ,执行初始化
    wac.refresh();
}
最后给出 ContextLoaderListener 初始化Root WebApplicationContext容器的时序图:
Servlet WebApplicationContext 的创建
<!-- SpringMVC 配置 -->
<servlet>
    <servlet-name>DispatcherServlet</servlet-name>
    <servlet-class>org.springframework.web.servlet.DispatcherServlet</servlet-class>
    <!-- 指定 SpringMVC 核心配置文件路径,用于初始化 Root WebApplicationContext 容器 -->
    <init-param>
        <param-name>contextConfigLocation</param-name>
        <param-value>classpath:springmvc-config.xml</param-value>
    </init-param>
    <load-on-startup>1</load-on-startup>
</servlet>
<servlet-mapping>
    <servlet-name>DispatcherServlet</servlet-name>
    <url-pattern>/</url-pattern>
</servlet-mapping>
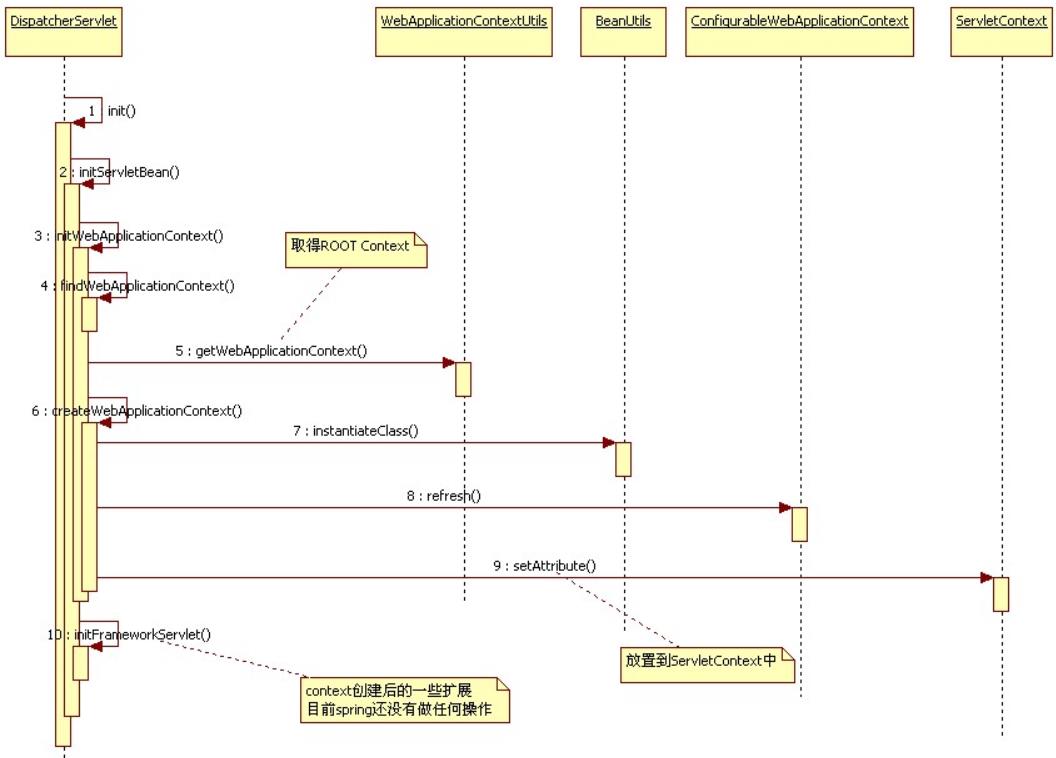
DispatcherServlet 在 Web 容器创建之后,会读取 init-param 中 contextConfigLocation 指定的配置文件,初始化Servlet WebApplicationContext容器。下面查看初始化该容器的源码:
protected WebApplicationContext initWebApplicationContext() {
    //(1) 通过工具类 WebApplicationContextUtils 来获取 Root WebApplicationContext 对象
    // 内部是从 ServletContext 中取出该对象的(前面方法将它放进了 ServletContext)
    WebApplicationContext rootContext = WebApplicationContextUtils.getWebApplicationContext(this.getServletContext());
    //(2) 初始化 WebApplicationContext 对象 wac
    WebApplicationContext wac = null;
    // 第一种情况,如果构造方法已经传入 webApplicationContext 属性,则直接使用
    if (this.webApplicationContext != null) {
        // 赋值给 wac 变量
        wac = this.webApplicationContext;
        // 如果是 ConfigurableWebApplicationContext 类型,并且未激活,则进行初始化
        if (wac instanceof ConfigurableWebApplicationContext) {
            ConfigurableWebApplicationContext cwac = (ConfigurableWebApplicationContext)wac;
            if (!cwac.isActive()) {   // 未激活
                if (cwac.getParent() == null) {
                    // 设置 rootContext 对象为 wac 的父上下文
                    cwac.setParent(rootContext);
                }
				// 配置和初始化 wac
                this.configureAndRefreshWebApplicationContext(cwac);
            }
        }
    }
	// 第二种情况,从 ServletContext 获取已有的 WebApplicationContext 对象
    if (wac == null) {
        wac = this.findWebApplicationContext();
    }
	// 第三种情况,创建一个 WebApplicationContext 对象,并将 rootContext 设置为parent
    if (wac == null) {
        wac = this.createWebApplicationContext(rootContext);
    }
	//(3) 如果未触发刷新事件,则主动触发刷新事件
    if (!this.refreshEventReceived) {
        synchronized(this.onRefreshMonitor) {
            this.onRefresh(wac);
        }
    }
	//(4) 将 context 放进 ServletContext 中,记录为 Servlet WebApplicationContext
    if (this.publishContext) {
        String attrName = this.getServletContextAttributeName();
        this.getServletContext().setAttribute(attrName, wac);
    }
	// 返回初始化后的 webApplicationContext
    return wac;
}
上述 (2) 步骤中调用了 configureAndRefreshWebApplicationContext() 方法对 Context 进行配置,源码如下:
protected void configureAndRefreshWebApplicationContext(ConfigurableWebApplicationContext wac) {
    //(1) 如果 wac 使用了默认编号,则重新设置 id 属性
    // 注意这里的 wac 就是前一个方法获取到的 context 对象
    if (ObjectUtils.identityToString(wac).equals(wac.getId())) {
        // 情况一,使用 contextId 属性
        if (this.contextId != null) {
            wac.setId(this.contextId);
        // 情况二,自动生成
        } else {
 wac.setId(ConfigurableWebApplicationContext.APPLICATION_CONTEXT_ID_PREFIX + ObjectUtils.getDisplayString(this.getServletContext().getContextPath()) + '/' + this.getServletName());
        }
    }
	//(2) 设置 wac 的 servletContext、servletConfig、namespace 属性
    wac.setServletContext(this.getServletContext());
    wac.setServletConfig(this.getServletConfig());
    wac.setNamespace(this.getNamespace());
    //(3) 添加监听器 SourceFilteringListener 到 wac 中
    wac.addApplicationListener(new SourceFilteringListener(wac, new FrameworkServlet.ContextRefreshListener()));
    //(4) 忽略
    ConfigurableEnvironment env = wac.getEnvironment();
    if (env instanceof ConfigurableWebEnvironment) {
        ((ConfigurableWebEnvironment)env).initPropertySources(this.getServletContext(), this.getServletConfig());
    }
	//(5) 执行处理完 WebApplicationContext 后的逻辑
    this.postProcessWebApplicationContext(wac);
    //(6) 执行处理完 WebApplicationContext 后的逻辑
    this.applyInitializers(wac);
    //(7) 刷新 wac ,从而初始化 wac
    wac.refresh();
}
大体上,和Root WebApplicationContext的配置过程是一样的。最后给出 DispatcherServlet 初始化Servlet WebApplicationContext容器的时序图:
父子容器关系总结
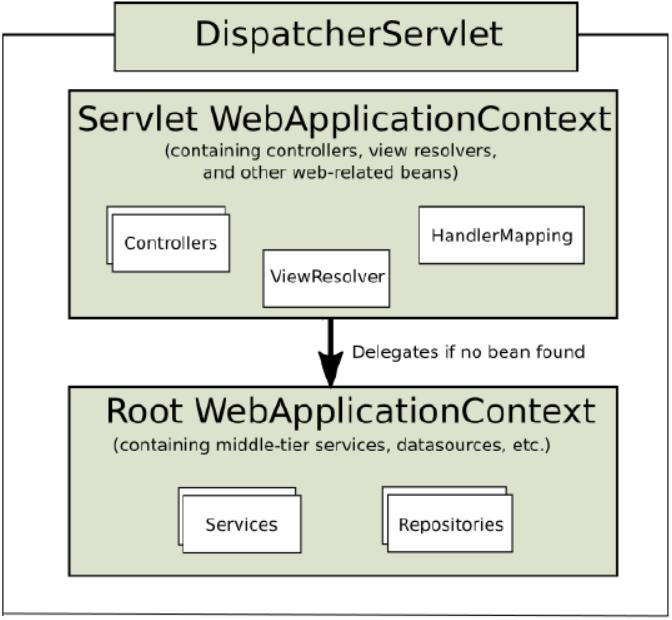
下面一张图很明显的显示出Root WebApplicationContext和WebApplicationContext父子容器关系:
当我们尝试从子容器(Servlet WebApplicationContext)中获取一个 bean 时,如果找不到,则会委派给父容器(Root WebApplicationContext)进行查找。
需要注意1:由于Root WebApplicationContext是早于Servlet WebApplicationContext创建和初始化的,所以父容器的 bean 无法访问子容器的 bean,因为子容器还未初始化;而子容器的 bean 可以访问父容器的 bean,访问方式就是前面说的委派查询。说通俗点就是,在 Controller 层里可以注入 Service 对象,而 Service 层里无法注入 Controller 对象(编译可以通过,但是运行会出错)。
需要注意2:如果我们没有配置 ContextLoaderListener 来创建Root WebApplicationContext容器,那么Servlet WebApplicationContext的父上下文就是 null,也就是没有父容器。
⭐️为什么需要父子容器
父子容器存在的一个意义其实就是分层,如前面那张图所示:
Root WebApplicationContext容器注册各种非 Web 组件的 bean,例如 Services、Repositories。Web WebApplicationContext容器注册各种 Web 组件的 bean,例如 Controllers、ViewResolver 和 HandlerMapping。
所以,这要求我们编写 Spring 和 SpringMVC 配置文件时,Spring 文件配置非 Web 组件的 bean,而 SpringMVC 文件配置 Web 组件的 bean。除此之外,也是为了防止同一组件在不同容器中分别注册初始化,出现两个 bean,这会导致一些错误的出现。
Spring 配置文件中的注解扫描:
<!-- 配置 IoC 容器注解扫描的包路径 -->
<context:component-scan base-package="com.example">
    <!-- 制定扫包规则,不扫描 @Controller 注解修饰的 Java 类,其它还是要扫描 -->
    <context:exclude-filter type="annotation"
                            expression="org.springframework.stereotype.Controller"/>
</context:component-scan>
SpringMVC 配置文件中的注解扫描:
<!-- 配置 IoC 容器的注解扫描的包路径 -->
<context:component-scan base-package="com.example" use-default-filters="false">
    <!-- 制定扫包规则,只扫描使用 @Controller 注解修饰的 Java 类 -->
    <context:include-filter type="annotation"
                            expression="org.springframework.stereotype.Controller"/>
</context:component-scan>
全注解配置开发
快速入门
☕️ 建立 Web 的 Maven 工程
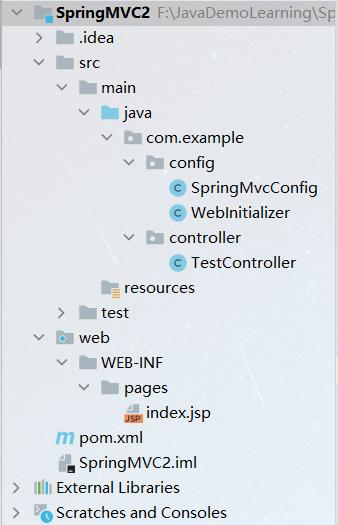
使用 IDEA 创建普通 Maven 项目之后,右击项目,选择Add Frameworks Support,勾选Java EE下面的Web Application,并选择 web.xml 的版本,点击确定,会自动在当前项目下创建 web 目录。
Web 项目还需要配置 Tomcat,此处设置项目的Application context为/,访问端口为 8080。入门案例的整个项目目录如下所示:
☕️ 在 pom.xml 文件中导入 jar 包依赖
<dependencies>
    <!-- spring-context,该 jar 包会将 aop、beans、core、expression 一并下下来 -->
    <dependency>
        <groupId>org.springframework</groupId>
        <artifactId>spring-context</artifactId>
        <version>5.2.8.RELEASE</version>
    </dependency>

    <!-- SpringMVC -->
    <dependency>
        <groupId>org.springframework</groupId>
        <artifactId>spring-webmvc</artifactId>
        <version>5.2.8.RELEASE</version>
    </dependency>

    <!-- Servlet -->
    <dependency>
        <groupId>javax.servlet</groupId>
        <artifactId>javax.servlet-api</artifactId>
        <version>4.0.1</version>
        <scope>provided</scope>
    </dependency>

    <!-- jsp -->
    <dependency>
        <groupId>javax.servlet.jsp</groupId>
        <artifactId>javax.servlet.jsp-api</artifactId>
        <version>2.3.3</version>
        <scope>provided</scope>
    </dependency>

    <!-- lombok -->
    <dependency>
        <groupId>org.projectlombok</groupId>
        <artifactId>lombok</artifactId>
        <version>1.18.12</version>
        <scope>provided</scope>
    </dependency>
</dependencies>

<build>
    <plugins>
        <plugin>
            <groupId>org.apache.maven.plugins</groupId>
            <artifactId>maven-compiler-plugin</artifactId>
            <version>3.8.1</version>
            <configuration>
                <source>1.8</source>
                <target>1.8</target>
                <encoding>UTF-8</encoding>
            </configuration>
        </plugin>
    </plugins>
</build>
☕️ 配置 Spring 的核心配置类
package com.example.config;

import org.springframework.context.annotation.ComponentScan;
import org.springframework.context.annotation.ComponentScan.Filter;
import org.springframework.context.annotation.Configuration;
import org.springframework.context.annotation.FilterType;
import org.springframework.stereotype.Controller;

// @Configuration   // 此处不必添加 @Configuration 注解
@ComponentScan(value = "com.example",  // 配置 IoC 容器注解扫描的包路径
        // 制定扫包规则,不扫描 @Controller 注解修饰的 Java 类,其它还是要扫描
        excludeFilters = @Filter(type = FilterType.ANNOTATION, value = Controller.class))
public class SpringConfig {

}
☕️ 配置 SpringMVC 的核心配置类
package com.example.config;

import org.springframework.context.annotation.Bean;
import org.springframework.context.annotation.ComponentScan;
import org.springframework.context.annotation.ComponentScan.Filter;
import org.springframework.context.annotation.Configuration;
import org.springframework.context.annotation.FilterType;
import org.springframework.stereotype.Controller;
import org.springframework.web.servlet.config.annotation.EnableWebMvc;
import org.springframework.web.servlet.config.annotation.WebMvcConfigurer;
import org.springframework.web.servlet.view.InternalResourceViewResolver;

// @Configuration  // 此处不必添加 @Configuration 注解
@EnableWebMvc   // 开启 SpringMVC 的注解支持
@ComponentScan(value = "com.example",   // 配置 IoC 容器注解扫描的包路径
               useDefaultFilters = false,   // 关闭默认的注解扫描的 Filter
        // 制定扫包规则,只扫描使用 @Controller 注解修饰的 Java 类
        includeFilters = @Filter(type = FilterType.ANNOTATION, value = Controller.class)
)
public class SpringMvcConfig implements WebMvcConfigurer {
    /**
     * 配置视图解析器
     */
    @Bean
    public InternalResourceViewResolver viewResolver(){
        // 真正的视图路径路径为:前缀 + 逻辑视图名 + 后缀
        InternalResourceViewResolver viewResolver = new InternalResourceViewResolver();
        viewResolver.setPrefix("/WEB-INF/pages/");  // 前缀
        viewResolver.setSuffix(".jsp");  // 后缀
        return viewResolver;
    }
}
@EnableWebMvc 注解其实就是 XML 配置中的<mvc:annotation-driven/>。
☕️ 取代 web.xml 的配置类
package com.example.config;

import org.springframework.web.filter.CharacterEncodingFilter;
import org.springframework.web.servlet.support.AbstractAnnotationConfigDispatcherServletInitializer;
import javax.servlet.FilterRegistration;
import javax.servlet.ServletContext;
import javax.servlet.ServletException;
import java.nio.charset.StandardCharsets;

/**
 * 取代 web.xml
 */
public class WebInitializer extends AbstractAnnotationConfigDispatcherServletInitializer {

    /**
     * 指定 Spring 核心配置类,用于创建 Root WebApplicationContext 容器
     */
    @Override
    protected Class<?>[] getRootConfigClasses() {
        return new Class<?>[]{SpringConfig.class};
    }

    /**
     * 指定 SpringMVC 的核心配置类,用于创建 Servlet WebApplicationContext 容器
     */
    @Override
    protected Class<?>[] getServletConfigClasses() {
        return new Class<?>[]{SpringMvcConfig.class};
    }

    /**
     * 设置能被 DispatcherServlet 拦截并处理的 URL 请求
     */
    @Override
    protected String[] getServletMappings() {
        // 默认配置,/ 表示拦截所有请求 URL,包括静态资源的请求,但不包括 *.jsp 请求;
        // 对于 *.jsp 的请求会交由 JspServlet 处理,所以非 WEB-INF 目录下的 *.jsp 能直接访问
        return new String[]{"/"};
    }

    /**
     * 可以在此方法添加自定义的 Servlet、Listener、Filter
     */
    @Override
    public void onStartup(ServletContext servletContext) throws ServletException {
        // 添加全局过滤的 filter,将请求消息的编码统一设置为 UTF-8
        FilterRegistration.Dynamic encodingFilter = servletContext.addFilter("encodingFilter", CharacterEncodingFilter.class);
        encodingFilter.setInitParameter("encoding", String.valueOf(StandardCharsets.UTF_8));
        // * 是通配符,/* 表示拦截所有以 / 开头的请求 URL
        encodingFilter.addMappingForUrlPatterns(null, false, "/*");

        // 必须调用回父类的 onStartup 方法,否则不会初始化 DispatcherServlet
        super.onStartup(servletContext);
    }
}
需要注意:SpringConfig 和 SpringMvcConfig 配置类上不需要加 @Configuration 注解。在上述的方法中,我们使用 getRootConfigClasses() 和 getServletMappings() 分别指定 Spring 和 SpringMVC 的配置类,所以会自动在Root WebApplicationContext和Servlet WebApplicationContext容器中分别注册名为 springConfig 和 springMvcConfig 的 bean。
如果在 SpringConfig 和 SpringMvcConfig 配置类上添加了 @Configuration 注解,由于 @Configuration 注解是@Component 的衍生注解,当 Spring 的注解扫描发现这两个配置类时,会在Root WebApplicationContext容器中再次注册这两个 bean。也就是说,SpringConfig 类在同一个容器中注册了两次,而 SpringMvcConfig 类在两个容器中各注册了一次。SpringConfig 类还好,只会在父容器中有一个 bean;而 SpringMvcConfig 类会在两个容器中各有一个 bean。
☕️ 创建 Controller 方法
@Controller
public class TestController {
@RequestMapping("/test1")
public String test1( Model model) {
// Model 用于封装在视图上展示的数据
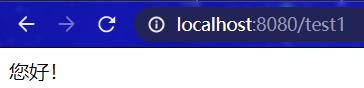
model.addAttribute("msg", "您好!");
// 返回的是逻辑视图名,需要视图解析器解析,解析后路径为 /WEB-INF/pages/index.jsp
return "index";
}
}
☕️ 编写 index.jsp 视图
<%@ page contentType="text/html;charset=UTF-8" language="java" %>
<html>
<head>
    <title>Title</title>
</head>
<body>
    ${msg}
</body>
</html>
☕️ 启动 tomcat,访问路径localhost:8080/test1:
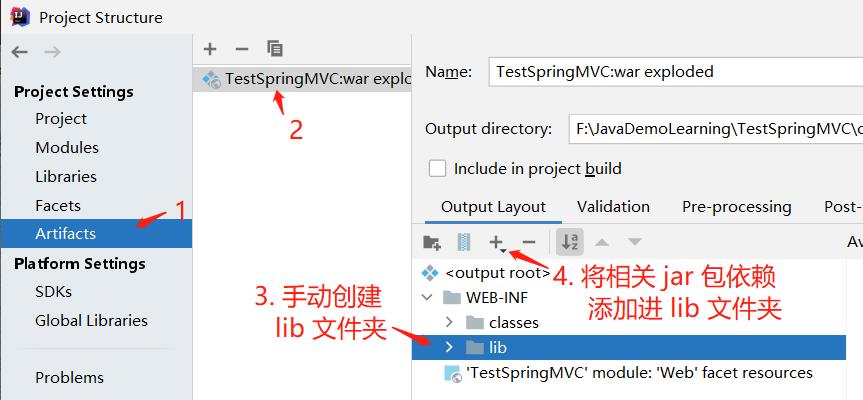
如果访问出现 404,服务器报错,可能原因是 IDEA 的项目发布中没有 lib 依赖,需要手动添加 jar 包(这是 IDEA 的 bug),流程如下:

自定义类型转换器
SpringMVC 提供了一些常用的类型转换器,但是不是所有的数据类型都提供了转换器,没有提供的就需要自定义转换器,例如:日期类型的数据就需要自定义转换器。
⭐️ 创建一个日期转换类 DateConverter:
package com.example.converter;

import org.springframework.core.convert.converter.Converter;
import java.text.ParseException;
import java.text.SimpleDateFormat;
import java.util.Date;

public class DateConverter implements Converter<String, Date> {
    // 定义日期格式
    private String datePattern = "yyyy-MM-dd HH:mm:ss";

    @Override
    public Date convert(String s) {
        // 格式化日期
        SimpleDateFormat format = new SimpleDateFormat(datePattern);

        try {
            return format.parse(s);
        } catch (ParseException e) {
            throw new IllegalArgumentException("无效的日期格式,请使用这种格式: " + datePattern);
        }
    }
}
⭐️ 在 SpringMvcConfig 类中配置转换器
@EnableWebMvc   // 开启 SpringMVC 的注解支持
@ComponentScan(value = "com.example",   // 配置 IoC 容器注解扫描的包路径
               useDefaultFilters = false,
        includeFilters = @Filter(type = FilterType.ANNOTATION, value = Controller.class)
)
public class SpringMvcConfig implements WebMvcConfigurer {
    //...
    /**
     * 添加类型转换器
     */
    @Override
    public void addFormatters(FormatterRegistry registry) {
        // 添加日期数据的类型解析器
        registry.addConverter(new DateConverter());
    }
}
⭐️ 测试转换器类:
@Controller
public class TestController {
    //...
	@RequestMapping("/test2")
    @ResponseBody
    public String test2(Date date) {
        System.out.println(date);
        return "success";
    }
}
访问localhost:8080/test2?date=2020-01-01 15:55:55,后端控制台输出:
Wed Jan 01 15:55:55 CST 2020
json 数据转换
SpringMVC 默认情况下会使用MappingJackson2HttpMessageConverter处理 json 格式的请求和响应,想使用该转换器,只需要添加 Jackson 的相关依赖即可。但有时我们需要自定义消息转换的方式,这时更多使用的是 fastjson。下面会介绍基于 fastjson 的自定义消息转换器的配置。
✏️ 在 pom.xml 添加 fastjson 的依赖
<!-- fastjson -->
<dependency>
    <groupId>com.alibaba</groupId>
    <artifactId>fastjson</artifactId>
    <version>1.2.73</version>
</dependency>
✏️ 在 SpringMvcConfig 类配置自定义消息转换器
@EnableWebMvc   // 开启 SpringMVC 的注解支持
@ComponentScan(value = "com.example",   // 配置 IoC 容器注解扫描的包路径
               useDefaultFilters = false,
        includeFilters = @Filter(type = FilterType.ANNOTATION, value = Controller.class)
)
public class SpringMvcConfig implements WebMvcConfigurer {
    //...
    /**
     * 添加消息转换器(fastjson)
     */
    @Override
    public void configureMessageConverters(List<HttpMessageConverter<?>> converters) {
        FastJsonHttpMessageConverter converter = new FastJsonHttpMessageConverter();
        // 自定义 fastJson 配置
        FastJsonConfig fastJsonConfig = new FastJsonConfig();
        fastJsonConfig.setSerializerFeatures(
                // 保留 map 空的字段
                SerializerFeature.WriteMapNullValue,
                // 将 String 类型的 null 转成 ""
                SerializerFeature.WriteNullStringAsEmpty,
                // 将 Number 类型的 null 转成 0
                SerializerFeature.WriteNullNumberAsZero,
                // 将 List 类型的 null 转成 []
                SerializerFeature.WriteNullListAsEmpty,
                // 将 Boolean 类型的 null 转成 false
                SerializerFeature.WriteNullBooleanAsFalse,
                // 将日期转为 yyyy-MM-dd HH:mm:ss 格式
                SerializerFeature.WriteDateUseDateFormat,
                // 避免循环引用
                SerializerFeature.DisableCircularReferenceDetect
        );
        converter.setFastJsonConfig(fastJsonConfig);
        converter.setDefaultCharset(StandardCharsets.UTF_8);

        // 处理中文乱码问题
        // 相当于在 @RequestMapping 中加了个属性 produces = "application/json"
        List<MediaType> fastMediaList = new ArrayList<>();
        fastMediaList.add(MediaType.APPLICATION_JSON);
        converter.setSupportedMediaTypes(fastMediaList);

        // 将 fastJson 转换器使用的优先级提前,要不然还是优先使用 Jackson 的转换器
        converters.add(0, converter);
    }
}
✏️ 创建 Controller 方法
@Data
public class User {
    private String username;
    private String password;
}
@Controller
public class TestController {
    //...
    @RequestMapping("/test3")
    @ResponseBody
    public User test3() {
        User user = new User();
        user.setUsername("张三");
        user.setPassword("123");
        return user;
    }
}
访问localhost:8080/test3,页面显示:
{
	"password": "123",
	"username": "张三"
}
静态资源访问
DispatcherServlet 的路径拦截规则/会将静态资源的请求 URL 也拦截下来,这会导致静态资源无法直接访问。因此,需要增加对静态资源的访问映射配置,告诉处理器映射器去指定路径下寻找静态资源。
📚 在 SpringMvcConfig 类中进行如下配置:
@EnableWebMvc   // 开启 SpringMVC 的注解支持
@ComponentScan(value = "com.example",   // 配置 IoC 容器注解扫描的包路径
               useDefaultFilters = false,
        includeFilters = @Filter(type = FilterType.ANNOTATION, value = Controller.class)
)
public class SpringMvcConfig implements WebMvcConfigurer {
    //...
	/**
     * 配置静态资源的访问映射
     */
    @Override
    public void addResourceHandlers(ResourceHandlerRegistry registry) {
        // Handler:对外暴露的访问路径,"/**" 表示静态资源目录下的所有文件都能访问
        // Locations:映射到的本地静态资源路径,具体到某个文件夹
        registry.addResourceHandler("/js/**").addResourceLocations("/js/");
        registry.addResourceHandler("/css/**").addResourceLocations("/css/");
    }
}
配置完之后,就可以对 js 和 css 目录下的所有文件进行访问。
📚 下面进行测试,在 js 目录下创建个 test.js 文件,文件内容如下:
Hello World
访问localhsot:8080/js/test.js,页面显示:
Hello World
文件上传
✌ 导入 jar 包
SpringMVC 一般通过使用 MultipartResolver 接口的实现类 CommonsMultipartResolver 对上传的文件进行解析处理,需要导入支持文件上传的相关依赖:
<dependency>
    <groupId>commons-fileupload</groupId>
    <artifactId>commons-fileupload</artifactId>
    <version>1.4</version>
</dependency>
✌ 文件上传表单
<!-- index.jsp -->
<%@ page contentType="text/html;charset=UTF-8" language="java" %>
<html>
<head>
    <title>文件上传</title>
</head>
<body>
    <form action="/fileUpload" method="post" enctype="multipart/form-data">
        名称:<input type="text" name="name"><br>
        <!-- 如果选择多文件上传,name 取值需要一样 -->
        文件1:<input type="file" name="uploadFile"><br>
        文件2:<input type="file" name="uploadFile"><br/>
        <input type="submit" value="上传">
    </form>
</body>
</html>
多数文件上传都是通过表单形式提交给后台服务器的,该表单必须满足以下 3 个条件:
- form 表单的 method 属性设置为 post;
- form 表单的 enctype 属性设置为
multipart/form-data,浏览器会采用二进制流的方式来处理表单数据; - 提供
<input type="file" name="filename"/>的文件上传输入框。
✌ 在 SpringMvcConfig 类中添加文件上传解析器的配置
@EnableWebMvc   // 开启 SpringMVC 的注解支持
@ComponentScan(value = "com.example",   // 配置 IoC 容器注解扫描的包路径
               useDefaultFilters = false,
        includeFilters = @Filter(type = FilterType.ANNOTATION, value = Controller.class)
)
public class SpringMvcConfig implements WebMvcConfigurer {
    //...
    /**
     * 配置文件上传解析器
     * 注意:文件上传解析器 bean 的 id 是固定的,只能为 multipartResolver
     */
    @Bean
    public CommonsMultipartResolver multipartResolver() {
        CommonsMultipartResolver multipartResolver = new CommonsMultipartResolver();
        // 设置编码方式
        multipartResolver.setDefaultEncoding(String.valueOf(StandardCharsets.UTF_8));
        // 设置允许上传文件的最大值,单位为字节
        multipartResolver.setMaxUploadSize(5242880);
        // 设置缓存中的最大尺寸,单位为字节
        multipartResolver.setMaxInMemorySize(40960);
        // 推迟文件解析,以便在 Controller 中捕获文件大小异常
        multipartResolver.setResolveLazily(true);
        return multipartResolver;
    }
}
✌ 编写上传文件的 Controller 方法
@Controller
public class FileUploadController {

    @RequestMapping("/index")
    public String index() {
        return "index";
    }

    @RequestMapping("/fileUpload")
    @ResponseBody
    public String handleFormUpload(String name, List<MultipartFile> uploadFile, HttpServletRequest request) {
        // 判断所上传文件是否存在
        if(!uploadFile.isEmpty() && uploadFile.size() > 0) {
            // 迭代处理多个文件
            for(MultipartFile file : uploadFile) {
                if(file.getSize() == 0) {
                    // 文件大小为 0
                    continue;
                }
                // 获取上传文件的原始名称
                String originalFilename = file.getOriginalFilename();
                // 设置上传文件的保存地址目录
                String dirPath = request.getServletContext().getRealPath("/upload");
                // 输出路径
                System.out.println(dirPath);
                File filePath = new File(dirPath);
                // 如果保存文件的目录不存在,就先创建目录
                if(!filePath.exists()) {
                    filePath.mkdirs();
                }
                // 使用 UUID 重新命名上传的文件名称(上传人_uuid_原始文件名称)
                String newFileName = name + "_" + UUID.randomUUID() + "_" + originalFilename;
                try {
                    //使用 MultipartFile 接口的方法完成文件上传到指定位置
                    file.transferTo(new File(dirPath + "/" + newFileName));
                } catch (IOException e) {
                    e.printStackTrace();
                    return "error";
                }
            }
            return "success";
        }else {
            return "error";
        }
    }
}
访问localhost:8080/index:
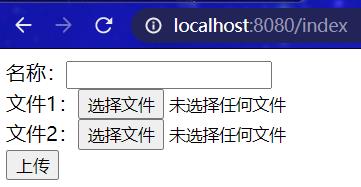
选择文件,点击上传后,控制台后端输出路径为:
项目目录\out\artifacts\SpringMVC2_war_exploded\upload
拦截器
SpringMVC 中的拦截器(Interceptor)类似于 Servlet 中的过滤器,用于对 Handler 进行预处理和后处理,例如通过拦截器进行权限验证、记录请求信息的日志、判断用户是否登录等。
✍ SpringMVC 通过实现 Handlerlnterceptor 接口来自定义拦截器:
package com.example.interceptor;

import org.springframework.web.servlet.HandlerInterceptor;
import org.springframework.web.servlet.ModelAndView;
import javax.servlet.http.HttpServletRequest;
import javax.servlet.http.HttpServletResponse;

public class CustomInterceptor implements HandlerInterceptor {

    // 在 Controller 方法执行之前被调用
    @Override
    public boolean preHandle(HttpServletRequest request, HttpServletResponse response, Object handler) throws Exception {
        System.out.println("preHandler 执行了!");
        return true;
    }

    // 在 Controller 方法执行之后,视图解析之前被调用
    @Override
    public void postHandle(HttpServletRequest request, HttpServletResponse response, Object handler, ModelAndView modelAndView) throws Exception {
        System.out.println("postHandler 执行了!");
    }

    // 在整个流程处理完成,即渲染视图结束之后被调用
    @Override
    public void afterCompletion(HttpServletRequest request, HttpServletResponse response, Object handler, Exception ex) throws Exception {
        System.out.println("afterCompletion 执行了!");
    }
}
上述代码实现了 Handlerlnterceptor 接口的三个方法:
- preHandler() :该方法会在 Controller 方法执行前被调用,其返回值决定是否继续后续操作:返回值为 true 时,继续向下执行;返回值为 false 时,会中断后续的所有操作(包括调用下一个拦截器和 Controller 方法的执行等)。
- postHandle() :该方法会在 Controller 方法执行之后,视图解析之前被调用,可以通过此方法对请求域中的模型和视图做出进一步的修改;
- afterCompletion():该方法会在整个流程处理完成,即渲染视图结束之后被调用,可以通过此方法实现一些资源清理、记录曰志信息等工作。
✍ 在 SpringMvcConfig 类中配置拦截器
@EnableWebMvc   // 开启 SpringMVC 的注解支持
@ComponentScan(value = "com.example",   // 配置 IoC 容器注解扫描的包路径
               useDefaultFilters = false,
        includeFilters = @Filter(type = FilterType.ANNOTATION, value = Controller.class)
)
public class SpringMvcConfig implements WebMvcConfigurer {
    //...
    /**
     * 配置自定义拦截器
     */
    @Override
    public void addInterceptors(InterceptorRegistry registry) {
        // addPathPatterns:配置需要拦截器作用的路径,/** 表示拦截全部的请求
        // excludePathPatterns:配置不需要拦截器作用的路径,静态资源的访问 URL 一般不拦截
        registry.addInterceptor(new CustomInterceptor())
                .addPathPatterns("/**").excludePathPatterns("/js/**", "/css/**");
    }
}
前面提到过,静态资源的请求也会被 DispatcherServlet 拦截,并当做一个 handler 进行处理,而静态资源的请求一般不需要预处理和后处理,所以拦截器不对静态资源的请求 URL 进行拦截。
✍ 创建一个测试用的 Controller 方法:
@Controller
public class TestController {
    //...
    @RequestMapping("/test4")
    @ResponseBody
    public String test4() {
        System.out.println("test4 执行了!");
        return "success";
    }
}
访问localhost:8080/test14,后端控制台显示:
preHandler 执行了!
test4 执行了!
postHandler 执行了!
afterCompletion 执行了!

 浙公网安备 33010602011771号