Spring 入门(三):整合 MyBatis 及声明式事务
本文将对 Spring 和 MyBatis 进行整合,并在其基础上介绍 Spring 的声明式事务的使用。
Spring 和 MyBatis 整合
下面将分别使用 XML + 注解 和 全注解 两种方式对 Spring 和 MyBatis 进行整合。
XML + 注解方式
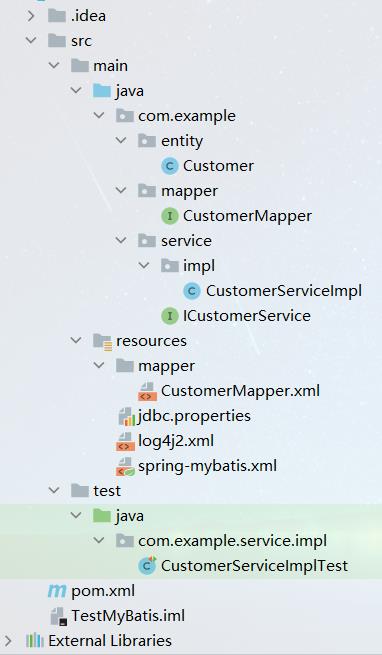
☕️ 工程总体目录
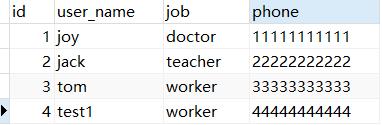
☕️ 数据库脚本
DROP TABLE IF EXISTS `t_customer`;
CREATE TABLE `t_customer` (
	`id` INT PRIMARY KEY AUTO_INCREMENT COMMENT '客户ID',
	`username` VARCHAR(50) COMMENT '客户名',
	`job` VARCHAR(50) COMMENT '职业',
	`phone` VARCHAR(16) COMMENT '手机号码'
) COMMENT '客户表';

INSERT INTO `t_customer` VALUES(1, 'joy', 'doctor', '11111111111');
INSERT INTO `t_customer` VALUES(2, 'jack', 'teacher', '22222222222');
INSERT INTO `t_customer` VALUES(3, 'tom', 'worker', '33333333333');
☕️ 在 pom.xml 文件中导入依赖
<properties>
    <spring-version>5.2.8.RELEASE</spring-version>
    <log4j2.version>2.13.3</log4j2.version>
</properties>

<dependencies>
    <!-- spring-context,该 jar 包会将 aop、beans、core、expression 一并下下来 -->
    <dependency>
        <groupId>org.springframework</groupId>
        <artifactId>spring-context</artifactId>
        <version>${spring-version}</version>
    </dependency>

    <!-- spring-jdbc,该 jar 包会将 tx(事务管理) 一并下下来 -->
    <dependency>
        <groupId>org.springframework</groupId>
        <artifactId>spring-jdbc</artifactId>
        <version>${spring-version}</version>
    </dependency>

    <!-- Aspectj 语法的解析 -->
    <dependency>
        <groupId>org.aspectj</groupId>
        <artifactId>aspectjweaver</artifactId>
        <version>1.9.6</version>
    </dependency>

    <!-- mySql -->
    <dependency>
        <groupId>mysql</groupId>
        <artifactId>mysql-connector-java</artifactId>
        <version>8.0.21</version>
    </dependency>

    <!-- MyBatis -->
    <dependency>
        <groupId>org.mybatis</groupId>
        <artifactId>mybatis</artifactId>
        <version>3.5.5</version>
    </dependency>

    <!-- MyBatis 和 Spring 整合 -->
    <dependency>
        <groupId>org.mybatis</groupId>
        <artifactId>mybatis-spring</artifactId>
        <version>2.0.5</version>
    </dependency>

    <!-- Druid 数据库连接池 -->
    <dependency>
        <groupId>com.alibaba</groupId>
        <artifactId>druid</artifactId>
        <version>1.1.23</version>
    </dependency>

    <!-- lombok -->
    <dependency>
        <groupId>org.projectlombok</groupId>
        <artifactId>lombok</artifactId>
        <version>1.18.12</version>
        <scope>provided</scope>
    </dependency>

    <!-- spring 测试-->
    <dependency>
        <groupId>org.springframework</groupId>
        <artifactId>spring-test</artifactId>
        <version>${spring-version}</version>
        <scope>test</scope>
    </dependency>

    <!-- junit4 测试 -->
    <dependency>
        <groupId>junit</groupId>
        <artifactId>junit</artifactId>
        <version>4.12</version>
        <scope>test</scope>
    </dependency>

    <!-- 配置日志 -->
    <!-- log start -->
    <dependency>
        <groupId>org.apache.logging.log4j</groupId>
        <artifactId>log4j-api</artifactId>
        <version>${log4j2.version}</version>
    </dependency>

    <dependency>
        <groupId>org.apache.logging.log4j</groupId>
        <artifactId>log4j-core</artifactId>
        <version>${log4j2.version}</version>
    </dependency>

    <!-- 如果是 web 项目还需要添加 log4j-web -->
    <!--
    <dependency>
        <groupId>org.apache.logging.log4j</groupId>
        <artifactId>log4j-web</artifactId>
        <version>${log4j2.version}</version>
    </dependency>
    -->
    <!-- log end -->
</dependencies>

<build>
    <plugins>
        <plugin>
            <groupId>org.apache.maven.plugins</groupId>
            <artifactId>maven-compiler-plugin</artifactId>
            <version>3.8.1</version>
            <configuration>
                <source>1.8</source>
                <target>1.8</target>
                <encoding>UTF-8</encoding>
            </configuration>
        </plugin>
    </plugins>
</build>
☕️ 创建实体类
package com.example.entity;

import lombok.AllArgsConstructor;
import lombok.Data;
import lombok.NoArgsConstructor;
import java.io.Serializable;

@Data
@AllArgsConstructor
@NoArgsConstructor
public class Customer implements Serializable {
    private Integer id;        // 客户 ID
    private String username;   // 客户名
    private String job;        // 职业
    private String phone;      // 手机号码
}
☕️ 编写 CustomerMapper 接口,并添加 Mapper 方法
package com.example.mapper;

import com.example.entity.Customer;
import java.util.List;

public interface CustomerMapper {
   // 查询所有的客户
   List<Customer> selectAll();
}
☕️ 在resources/mapper目录下添加接口对应的 XML 映射文件 CustomerMapper.xml
<!DOCTYPE mapper
        PUBLIC "-//mybatis.org//DTD Mapper 3.0//EN"
        "http://mybatis.org/dtd/mybatis-3-mapper.dtd">

<mapper namespace="com.example.mapper.CustomerMapper">
    <!-- 查询所有的客户 -->
    <select id="selectAll" resultType="Customer">
        select id, username, job, phone
        from t_customer
    </select>
</mapper>
☕️ 编写 ICustomerService 接口
package com.example.service;

import com.example.entity.Customer;
import java.util.List;

public interface ICustomerService {

    List<Customer> selectAll();
}
☕️ 实现 ICustomerService 接口
package com.example.service.impl;

import com.example.entity.Customer;
import com.example.mapper.CustomerMapper;
import com.example.service.ICustomerService;
import org.springframework.beans.factory.annotation.Autowired;
import org.springframework.stereotype.Service;
import java.util.List;

@Service
public class CustomerServiceImpl implements ICustomerService {

    @Autowired
    private CustomerMapper customerMapper;

    @Override
    public List<Customer> selectAll() {
        return customerMapper.selectAll();
    }
}
☕️ 编写 jdbc.properties 文件,配置数据库连接信息
jdbc.driver=com.mysql.cj.jdbc.Driver
jdbc.url=jdbc:mysql://localhost:3306/learning?characterEncoding=utf-8&useSSL=false&serverTimezone=Hongkong
jdbc.username=root
jdbc.password=123456
☕️ 编写 Spring 核心配置文件 spring-mybatis.xml
<?xml version="1.0" encoding="UTF-8"?>
<beans xmlns="http://www.springframework.org/schema/beans"
       xmlns:xsi="http://www.w3.org/2001/XMLSchema-instance"
       xmlns:context="http://www.springframework.org/schema/context"
       xmlns:aop="http://www.springframework.org/schema/aop"
       xmlns:tx="http://www.springframework.org/schema/tx"
       xsi:schemaLocation="http://www.springframework.org/schema/beans
	http://www.springframework.org/schema/beans/spring-beans.xsd
	http://www.springframework.org/schema/context
	http://www.springframework.org/schema/context/spring-context.xsd
	http://www.springframework.org/schema/aop
	http://www.springframework.org/schema/aop/spring-aop.xsd
	http://www.springframework.org/schema/tx
	http://www.springframework.org/schema/tx/spring-tx.xsd">

    <!-- 配置 IoC 容器的注解扫描的包路径 -->
    <context:component-scan base-package="com.example"/>

    <!-- 加载 jdbc.properties 配置文件,该文件用来配置数据库连接信息 -->
    <context:property-placeholder location="classpath:jdbc.properties"/>

    <!-- 数据库连接池(Druid) -->
    <bean id="dataSource" class="com.alibaba.druid.pool.DruidDataSource">
        <property name="driverClassName" value="${jdbc.driver}"/>
        <property name="url" value="${jdbc.url}"/>
        <property name="username" value="${jdbc.username}"/>
        <property name="password" value="${jdbc.password}"/>
    </bean>

    <!-- 配置 Mybatis 的 Session 工厂 -->
    <bean id="sqlSessionFactory" class="org.mybatis.spring.SqlSessionFactoryBean">
        <!-- 加载数据库连接池 -->
        <property name="dataSource" ref="dataSource"/>
        <!-- 自定扫描指定路径下的 Mapping 映射文件 -->
        <property name="mapperLocations" value="classpath:mapper/*.xml"/>
        <!-- 设置别名的包路径 -->
        <property name="typeAliasesPackage" value="com.example.entity"/>
        <property name="configuration">
            <bean class="org.apache.ibatis.session.Configuration">
                <!-- 是否开启自动驼峰命名规则(camel case)映射,默认值为 false -->
                <property name="mapUnderscoreToCamelCase" value="true"/>
                <!-- 是否开启延迟加载的全局开关,默认值为 false -->
                <property name="lazyLoadingEnabled" value="true"/>
                <!-- 设置为 false 表示按需加载。默认值在 3.4.1 版本之前为 true,之后为 false -->
                <property name="aggressiveLazyLoading" value="false"/>
                <!-- 是否开启二级缓存,默认为 true,所以可以不需要配置 -->
                <property name="cacheEnabled" value="true"/>
            </bean>
        </property>
    </bean>

    <!-- 配置事务管理器,使用 Spring 的事务管理 -->
    <bean id="transactionManager" class="org.springframework.jdbc.datasource.DataSourceTransactionManager">
        <property name="dataSource" ref="dataSource"/>
    </bean>

    <!-- 配置 Mapper 扫描器,将指定包的所有 Mapper 接口类注册为 bean -->
    <bean id="mapperScanner" class="org.mybatis.spring.mapper.MapperScannerConfigurer">
        <!-- Mapper 扫描的包路径 -->
        <property name="basePackage" value="com.example.mapper"/>
    </bean>
</beans>
☕️ 编写日志配置文件 log4j2.xml
<?xml version="1.0" encoding="UTF-8"?>
<Configuration status="WARN" shutdownHook="disable">
    <Appenders>
        <Console name="Console" target="SYSTEM_OUT">
            <PatternLayout pattern="%d{HH:mm:ss.SSS} [%t] %-5level %logger{36} - %msg%n"/>
        </Console>
    </Appenders>
    <Loggers>
        <!-- 总体日志级别为 error -->
        <Root level="error">
            <AppenderRef ref="Console"/>
        </Root>
        <!-- 为了打印 sql 日志,将 com.example.mapper 包的日志级别设置为 trace -->
        <logger name="com.example.mapper" level="trace" additivity="false" >
            <appender-ref ref="Console"/>
        </logger>
    </Loggers>
</Configuration>
☕️ 编写测试方法
import com.example.entity.Customer;
import com.example.service.ICustomerService;
import org.junit.Test;
import org.junit.runner.RunWith;
import org.springframework.beans.factory.annotation.Autowired;
import org.springframework.test.context.ContextConfiguration;
import org.springframework.test.context.junit4.SpringJUnit4ClassRunner;
import java.util.List;

@RunWith(SpringJUnit4ClassRunner.class)
// 加载 Spring 核心配置文件,创建 IoC 容器
@ContextConfiguration("classpath:spring-mybatis.xml")
public class CustomerServiceImplTest {

    @Autowired
    private ICustomerService customerService;

    @Test
    public void selectAll() {
        List<Customer> customerList = customerService.selectAll();
        customerList.forEach(System.out::println);
    }
}
==>  Preparing: select id, username, job, phone from t_customer
==> Parameters:
<==    Columns: id, username, job, phone
<==        Row: 1, joy, doctor, 11111111111
<==        Row: 2, jack, teacher, 22222222222
<==        Row: 3, tom, worker, 33333333333
<==      Total: 3
Customer(id=1, username=joy, job=doctor, phone=11111111111)
Customer(id=2, username=jack, job=teacher, phone=22222222222)
Customer(id=3, username=tom, job=worker, phone=33333333333)
全注解方式
⭐️ 全注解方式就是使用 Spring 配置类取代配置文件 applicationContext.xml,代替 XML 的配置类如下:
package com.example.config;

import com.alibaba.druid.pool.DruidDataSource;
import org.mybatis.spring.SqlSessionFactoryBean;
import org.mybatis.spring.mapper.MapperScannerConfigurer;
import org.springframework.beans.factory.annotation.Value;
import org.springframework.context.annotation.Bean;
import org.springframework.context.annotation.ComponentScan;
import org.springframework.context.annotation.Configuration;
import org.springframework.context.annotation.PropertySource;
import org.springframework.core.io.Resource;
import org.springframework.core.io.support.PathMatchingResourcePatternResolver;
import org.springframework.core.io.support.ResourcePatternResolver;
import org.springframework.jdbc.datasource.DataSourceTransactionManager;

import java.io.IOException;

//@Configuration   // 不需要添加 @Configuration 注解
@ComponentScan("com.example")   // Spring 的注解扫描的包路径
@PropertySource("classpath:jdbc.properties")  // 加载 jdbc.properties 配置文件
public class SpringConfig {

    /**
     * 配置数据库连接池(Druid)
     */
    @Bean
    public DruidDataSource dataSource(@Value("${jdbc.driver}") String driver,
                                      @Value("${jdbc.url}") String url,
                                      @Value("${jdbc.username}") String username,
                                      @Value("${jdbc.password}") String password) {
        DruidDataSource dataSource = new DruidDataSource();
        dataSource.setDriverClassName(driver);
        dataSource.setUrl(url);
        dataSource.setUsername(username);
        dataSource.setPassword(password);
        return dataSource;
    }

    /**
     * 配置 Mybatis 的 Session 工厂(参数 dataSource 自动注入)
     */
    @Bean
    public SqlSessionFactoryBean sqlSessionFactory(DruidDataSource dataSource) throws IOException {
        SqlSessionFactoryBean factory = new SqlSessionFactoryBean();
        // 设置数据库连接池
        factory.setDataSource(dataSource);
        // 设置 Mapper 的映射文件位置
        ResourcePatternResolver resolver = new PathMatchingResourcePatternResolver();
        Resource[] mapperLocations = resolver.getResources("classpath:mapper/*.xml");
        factory.setMapperLocations(mapperLocations);
        // 设置别名的包路径
        factory.setTypeAliasesPackage("com.example.entity");

        org.apache.ibatis.session.Configuration configuration = new org.apache.ibatis.session.Configuration();
        // 是否开启自动驼峰命名规则(camel case)映射,默认值为 false
        configuration.setMapUnderscoreToCamelCase(true);
        // 是否开启延迟加载的全局开关,默认值为 false
        configuration.setLazyLoadingEnabled(true);
        // 设置为 false 表示按需加载。默认值在 3.4.1 版本之前为 true,之后为 false
        configuration.setAggressiveLazyLoading(false);
        // 是否开启二级缓存,默认为 true,所以可以不需要配置
        configuration.setCacheEnabled(true);
        factory.setConfiguration(configuration);

        return factory;
    }

    /**
     * 配置事务管理器,使用 Spring 的事务管理(参数 dataSource 自动注入)
     */
    @Bean
    public DataSourceTransactionManager transactionManager(DruidDataSource dataSource) {
        DataSourceTransactionManager manager = new DataSourceTransactionManager();
        manager.setDataSource(dataSource);
        return manager;
    }

    /**
     * 配置 Mapper 扫描器,将指定包的所有 Mapper 接口类注册为 bean
     */
    @Bean
    public MapperScannerConfigurer mapperScanner() {
        MapperScannerConfigurer scanner = new MapperScannerConfigurer();
        // Mapper 扫描的包路径
        scanner.setBasePackage("com.example.mapper");
        return scanner;
    }
}
⭐️ 编写测试方法
import com.example.config.SpringConfig;
import com.example.entity.Customer;
import com.example.service.ICustomerService;
import org.junit.Test;
import org.junit.runner.RunWith;
import org.springframework.beans.factory.annotation.Autowired;
import org.springframework.test.context.ContextConfiguration;
import org.springframework.test.context.junit4.SpringJUnit4ClassRunner;
import java.util.List;

@RunWith(SpringJUnit4ClassRunner.class)
// 加载 Spring 配置类,创建 IoC 容器
@ContextConfiguration(classes = SpringConfig.class)
public class CustomerServiceImplTest {

    @Autowired
    private ICustomerService customerService;

    @Test
    public void selectAll() {
        List<Customer> customerList = customerService.selectAll();
        customerList.forEach(System.out::println);
    }
}
==>  Preparing: select id, username, job, phone from t_customer
==> Parameters:
<==    Columns: id, username, job, phone
<==        Row: 1, joy, doctor, 11111111111
<==        Row: 2, jack, teacher, 22222222222
<==        Row: 3, tom, worker, 33333333333
<==      Total: 3
Customer(id=1, username=joy, job=doctor, phone=11111111111)
Customer(id=2, username=jack, job=teacher, phone=22222222222)
Customer(id=3, username=tom, job=worker, phone=33333333333)
Spring 声明式事务
Spring 的事务管理分为两种:
- 编程式事务管理:通过编写代码实现的事务管理,包括定义事务的开始、正常执行后的事务提交和异常时的事务回滚。
- 声明式事务管理:建立在 AOP 之上的。其本质是对方法前后进行拦截,然后在目标方法开始之前创建或者加入一个事务,在执行完目标方法之后根据执行情况提交或者回滚事务。
声明式事务管理不需要入侵代码,并且提供了 @Transactional 注解更为简单、快捷地进行事务操作,推荐使用。
事务属性介绍
事务隔离级别(Isolation)
事务隔离级别指的是若干个并发的事务之间的隔离程度,一般可分为以下五个级别:
- DEFAULT:默认值,表示使用底层数据库的默认隔离级别。对大部分数据库而言,通常这个值就是READ_COMMITTED。
- READ_UNCOMMITTED:该隔离级别表示一个事务可以读取另一个事务修改但还没有提交的数据。该级别不能防止脏读,不可重复读和幻读,因此很少使用该隔离级别。
- READ_COMMITTED:该隔离级别表示一个事务只能读取另一个事务已经提交的数据。该级别可以防止脏读,这也是大多数情况下的推荐值。
- REPEATABLE_READ:该隔离级别表示一个事务在整个过程中可以多次重复执行某个查询,并且每次返回的记录都相同。即使在多次查询之间有新增的数据满足该查询,这些新增的记录也会被忽略。该级别可以防止脏读和不可重复读。
- SERIALIZABLE:所有的事务依次逐个执行,这样事务之间就完全不可能产生干扰,也就是说,该级别可以防止脏读、不可重复读以及幻读。但是这将严重影响程序的性能。通常情况下也不会用到该级别。
事务传播行为(Propagation)
所谓事务传播行为是指,如果在开始当前事务之前,一个事务上下文已经存在,此时指定的一个事务性方法的执行行为。下面举个例子进行说明:
@Transactional
public void test1() {
    test2();   // test1() 调用 test2()
}

@Transactional(propagation = xxx)
public void test2() {
    // 在开始当前事务之前,也就是 test2 事务之前,调用者 test1 已经存在事务管理,
    // 此时使用 propagation 属性指定 test2 事务的执行行为
}
一般可分为以下六种行为:
- REQUIRED:默认值。如果当前存在事务,则加入该事务;如果当前没有事务,则创建一个新的事务。
- REQUIRES_NEW:创建一个新的事务,如果当前存在事务,则把当前事务挂起。
- SUPPORTS:如果当前存在事务,则加入该事务;如果当前没有事务,则以非事务的方式继续运行。
- NOT_SUPPORTED:以非事务方式运行,如果当前存在事务,则把当前事务挂起。
- NEVER:以非事务方式运行,如果当前存在事务,则抛出异常。
- MANDATORY:如果当前存在事务,则加入该事务;如果当前没有事务,则抛出异常。
- NESTED:如果当前存在事务,则创建一个事务作为当前事务的嵌套事务来运行;如果当前没有事务,则该取值等价于 REQUIRED。
声明式事务介绍
事务常用配置
- readOnly:该属性用于设置当前事务是否为只读事务,设置为 true 表示只读,false 则表示可读写,默认值为 false。
@Transactional(readOnly=true)
- rollbackFor:该属性用于设置需要进行回滚操作的异常类数组,当方法中抛出指定异常时,则进行事务回滚操作。
// 指定单一异常类
@Transactional(rollbackFor=RuntimeException.class);
// 指定多个异常类
@Transactional(rollbackFor={RuntimeException.class, Exception.class});
- rollbackForClassName:和 rollbackFor 类似,该属性用来设置需要进行回滚操作的异常类名称数组。
// 指定单一异常类名称
@Transactional(rollbackForClassName="RuntimeException")
// 指定多个异常类名称
@Transactional(rollbackForClassName={"RuntimeException","Exception"})
- noRollbackFor:该属性用于设置不需要进行回滚的异常类数组,当方法中抛出指定异常数组中的异常时,不进行事务回滚。
// 指定单一异常类
@Transactional(noRollbackFor=RuntimeException.class)
// 指定多个异常类
@Transactional(noRollbackFor={RuntimeException.class, Exception.class})。
- noRollbackForClassName:和 noRollbackFor 类似,该属性用来设置不需要进行回滚操作的异常类名称数组。
// 指定单一异常类名称
@Transactional(noRollbackForClassName="RuntimeException")
// 指定多个异常类名称
@Transactional(noRollbackForClassName={"RuntimeException","Exception"})
- propagation: 该属性用于设置事务的传播行为。
@Transactional(propagation=Propagation.NOT_SUPPORTED,readOnly=true)
-
isolation:该属性用于设置底层数据库的事务隔离级别,事务隔离级别用于处理多事务并发的情况,通常使用数据库的默认隔离级别即可,基本不需要进行设置。
-
timeout:该属性用于设置事务的超时秒数,默认值为 -1 表示永不超时。
事务回滚规则
Spring 事务管理器会捕获当前事务内未处理的异常,然后依据规则决定是否要进行事务回滚操作。
默认配置下,Spring 事务管理器只有在抛出的异常为 unchecked 异常时才会进行回滚该事务,也就是说抛出的异常必须为 RuntimeException 或者 Error 的子类。
所以,在使用声明式事务时一般要明确抛出哪些异常时会进行回滚事务,包括 checked 异常;也可以明确抛出哪些异常不进行回滚事务。
需要注意:Spring 事务管理器必须捕获当前事务内未处理的异常,才会进行事务回滚操作。也就是说,要想进行事务回滚操作,不能在方法内部使用try...catch自行将异常处理,是不生效的,如果想再次生效必须进行手动回滚或者手动抛出异常,比如:throw new RuntimeException()。
XML 方式使用
📚 在 spring-mybatis.xml 中配置声明式事务
<!-- 编写通知:对事务进行增强(通知),需要编写对切点和具体执行事务细节
     属性:id:唯一标识
          transaction-manager:指定事务管理器 id,默认值就是 transactionManager
-->
<tx:advice id="advice" transaction-manager="transactionManager">
    <tx:attributes>
        <!-- 事务配置
             属性:name:对哪些方法起作用,例如:insert* 表示所有以 insert 开头的方法名称。
                        一般只需要对增、删、改方法添加事务
                  rollback-for:指定需要进行事务回滚的异常类,默认是 uncheck 异常
             其它属性一般默认即可
        -->
        <tx:method name="insert*" rollback-for="java.lang.Exception"/>
        <tx:method name="delete*" rollback-for="java.lang.Exception"/>
        <tx:method name="update*" rollback-for="java.lang.Exception"/>
    </tx:attributes>
</tx:advice>

<!-- 编写 aop,对目标生成代理,进行事务的通知 -->
<aop:config>
    <!-- 配置切点表达式 -->
    <aop:pointcut id="txPointcut" expression="execution (* com.example.service.impl.*ServiceImpl.*(..))"/>
    <!-- 将切点和事务的通知整合 -->
    <aop:advisor advice-ref="advice" pointcut-ref="txPointcut"/>
</aop:config>
📚 在 CustomerMapper 接口中添加插入方法
@Insert("insert into t_customer(username, job, phone) " +
        "values(#{username}, #{job}, #{phone})")
@Options(useGeneratedKeys = true, keyProperty = "id")
int insert(Customer customer);
📚 在 ICustomerService 接口中添加方法定义
// 正常插入
int insertTest1(Customer customer);
// 插入后抛出异常
int insertTest2(Customer customer);
📚 在 CustomerServiceImpl 类中添加方法实现
@Override
public int insertTest1(Customer customer) {
    return customerMapper.insert(customer);
}

@Override
public int insertTest2(Customer customer) {
    int count = customerMapper.insert(customer);
    int i = 1 / 0;    // By Zero,会抛出一个 RuntimeException 子类异常
    return count;
}
📚 进行测试:
@Test
public void insertTest() {
    Customer customer1 = new Customer(null, "test1", "worker", "44444444444");
    System.out.println("insertTest1:" + customerService.insertTest1(customer1));
    System.out.println();

    Customer customer2 = new Customer(null, "test2", "worker", "55555555555");
    System.out.println("insertTest2:" + customerService.insertTest2(customer2));
}
==>  Preparing: insert into t_customer(username, job, phone) values(?, ?, ?)
==> Parameters: test1(String), worker(String), 44444444444(String)
<==    Updates: 1
insertTest1:1

==>  Preparing: insert into t_customer(username, job, phone) values(?, ?, ?)
==> Parameters: test2(String), worker(String), 55555555555(String)
<==    Updates: 1

java.lang.ArithmeticException: / by zero
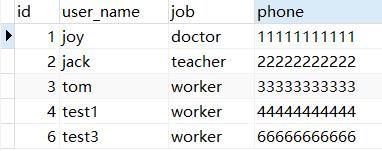
查看数据库,可以发现只有 insertTest1() 方法的记录插入成功:
注解方式使用
使用注解方式的前提是开启事务的注解支持,有两种方式配置:
✌ XML 方式开启事务的注解支持
<!-- 开启事务的注解支持
     transaction-manager 属性:指定事务管理器 id,默认值就是 transactionManager
-->
<tx:annotation-driven transaction-manager="transactionManager"/>
✌ 注解方式开启事务的注解支持
// 其它注解
@EnableTransactionManagement   // 开启事务的注解支持,会自动加载事务管理器
public class SpringConfig {
    // 注册各种 bean
}
开启事务的注解支持之后,可以不用使用 XML,而是直接将 @Transactional 注解作用在类或者方法上。如下所示:
// rollback-for 属性:指定需要进行事务回滚的异常类,默认是 uncheck 异常
@Override
@Transactional(rollbackFor = Exception.class)
public int insertTest1(Customer customer) {
    return customerMapper.insert(customer);
}

@Override
@Transactional(rollbackFor = Exception.class)
public int insertTest2(Customer customer) {
    int count = customerMapper.insert(customer);
    int i = 1 / 0;    // By Zero,会抛出一个 RuntimeException 子类异常
    return count;
}
对上述方法进行测试:
@Test
public void insertTest2() {
    Customer customer1 = new Customer(null, "test3", "worker", "66666666666");
    System.out.println("insertTest1:" + customerService.insertTest1(customer1));
    System.out.println();

    Customer customer2 = new Customer(null, "test4", "worker", "77777777777");
    System.out.println("insertTest2:" + customerService.insertTest2(customer2));
}
==>  Preparing: insert into t_customer(username, job, phone) values(?, ?, ?)
==> Parameters: test3(String), worker(String), 66666666666(String)
<==    Updates: 1
insertTest1:1

==>  Preparing: insert into t_customer(username, job, phone) values(?, ?, ?)
==> Parameters: test4(String), worker(String), 77777777777(String)
<==    Updates: 1

java.lang.ArithmeticException: / by zero
查看数据库,可以发现仍然只有 insertTest1() 方法的记录插入成功:
注意事项
注意1:@Transactional 注解仅对 public 方法有效,如果应用在 private 和 protected 方法上是不起作用的。
注意2:@Transactional 注解可以应用在类上,也可以应用在方法上;如果同时应用在类和方法上,方法上的配置会覆盖类上的配置。
注意3:@Transactional 注解默认捕获 unchecked 异常时才会进行事务回滚,一般需要使用 rollbackFor 指定异常。
注意4:@Transactional 注解的方法仅被外部类方法调用时才会起有效,同一个类方法间的内部调用是不起作用的。这是因为该注解的原理是 AOP,只有目标方法由外部调用,目标方法才由 Spring 生成的代理对象来管理,这会造成自调用问题。
- 同一个类中没有 @Transactional 注解的方法 A 内部调用有 @Transactional 注解的方法 B,B 方法的事务被忽略,相当于调用普通方法,不发生回滚。
- 同一个类中有 @Transactional 注解的方法 A 内部调用有 @Transactional 注解的方法 B,B 方法的事务被忽略,相当于调用普通方法,只有方法 A 的事务生效。
也就是说,一个方法内部调用同一个类的另一个方法,是没有通过代理类的,事务也就无法生效。
