Spring 入门(一):IoC 和 DI
Spring 介绍
什么是 Spring
Spring 是一个轻量级、非侵入式的框架,提倡以“最少侵入”的方式来管理应用中的代码,目的是为了解决企业级应用开发的业务逻辑层和其他各层的耦合问题,最根本的使命是解决企业级应用开发的复杂性,即简化 Java 开发。
Spring 框架中有两大核心理念,这两大核心理念是 Spring 成功的基石:
- 控制反转(
Inversion of Control,IoC)或者称为依赖注入(dependency injection,DI) - 面向切面编程(
aspect-oriented programming,AOP)
Spring 框架的设计目标、设计理念和框架核心:
-
设计目标:为开发者提供一个一站式轻量级应用开发平台。
-
设计理念:在 JavaEE 开发中,支持 pojo 和 JavaBean 开发方式,使应用面向接口开发,充分支持面向对象设计方法;通过 IoC 容器实现对象耦合关系的管理,并实现依赖反转,将对象之间的依赖关系交给 IoC 容器,实现解耦。
-
框架的核心:IoC 容器和 AOP 模块。通过 IoC 容器管理 pojo 对象以及他们之间的耦合关系;通过 AOP 以动态非侵入的方式增强服务。IoC 让相互协作的组件保持松散的耦合,而 AOP 编程允许把遍布于应用各层的功能分离出来形成可重用的功能组件。
Spring 体系结构
Spring 总共大约有 20 个模块,由 1300 多个不同的文件构成,而这些组件被整合在以下模块:
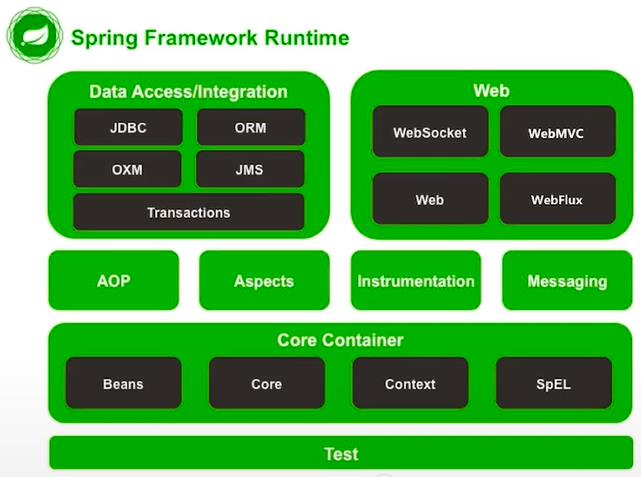
☕️ 核心容器(Core Container)
-
Core 模块:提供了框架基本的核心工具类,包括依赖注入 IoC 与 DI 的最基本实现,其它组件都要使用到这个模块的类。
-
Beans 模块:提供了 BeanFactory 接口,是工厂模式的一个经典实现。该模块负责初始化各种 Bean,并调用它们的生命周期方法,Spring 将 IoC 容器中的管理对象称为 Bean。
-
Context 模块:Spring 的上下文,为 Spring 提供运行时环境,保存对象的状态。该模块建立在 Core 和 Beans 子模块的基础之上,提供的 ApplicationContext 接口是 Beans 模块的 BeanFactory 的扩展,提供一种框架式的对象访问方式。
-
SpEL 模块:提供了强大的表达式语言去支持运行时查询和操作对象图。
☕️ 数据访问/集成(Data Access/Integeration)
- JDBC 模块:提供了一个 JDBC 的封装,大幅度地减少了在开发过程中对数据库操作的编码。
- ORM 模块:为流行的对象关系映射(
Object-Relational Mapping)API 提供集成层,包括 JPA 和Hibernate。 - OXM 模块:提供了一个支持对象和 XML 映射的抽象层实现,如 JAXB、Castor、JiBX 和 XStream。
- JMS 模块:指 Java 消息传递服务,包含用于生产和使用消息的功能。
- Transactions 模块:事务模块,支持用于实现特殊接口以及所有 POJO 类的编程和声明式事务管理。
☕️ Web
-
Web 模块:提供了基本的 Web 开发集成功能,例如多文件上传功能、使用 Servlet 监听器初始化一个 IOC 容器以及 Web 应用上下文。
-
WebMvc模块:包含用于 Web 应用程序的
Spring MVC和REST Web Services实现,提供了领域模型代码和 Web 表单之间的清晰分离,并与 Spring Framework 的所有其它功能集成。 -
WebSocket 模块:提供了 WebSocket 和 SocketJS 的实现。
-
WebFlux 模块:Spring5 新增模块,是一套全新的
Reactive Web栈技术,实现完全非阻塞。
☕️ 其它模块
-
AOP 模块:提供了面向切面编程实现,允许定义方法拦截器和切入点,将代码按照功能进行分离,以降低耦合性。
-
Aspects 模块:提供了与 AspectJ 的集成功能,AspectJ 是一个功能强大且成熟的面向切面编程框架。
-
Instrumentation 模块:提供了类工具的支持和类加载器的实现,可以在特定的应用服务器中使用。
-
Messaging 模块:提供了对消息传递体系结构和协议的支持。
-
Test 模块:支持使用 JUnit 或 TestNG 对 Spring 组件进行单元测试和集成测试。
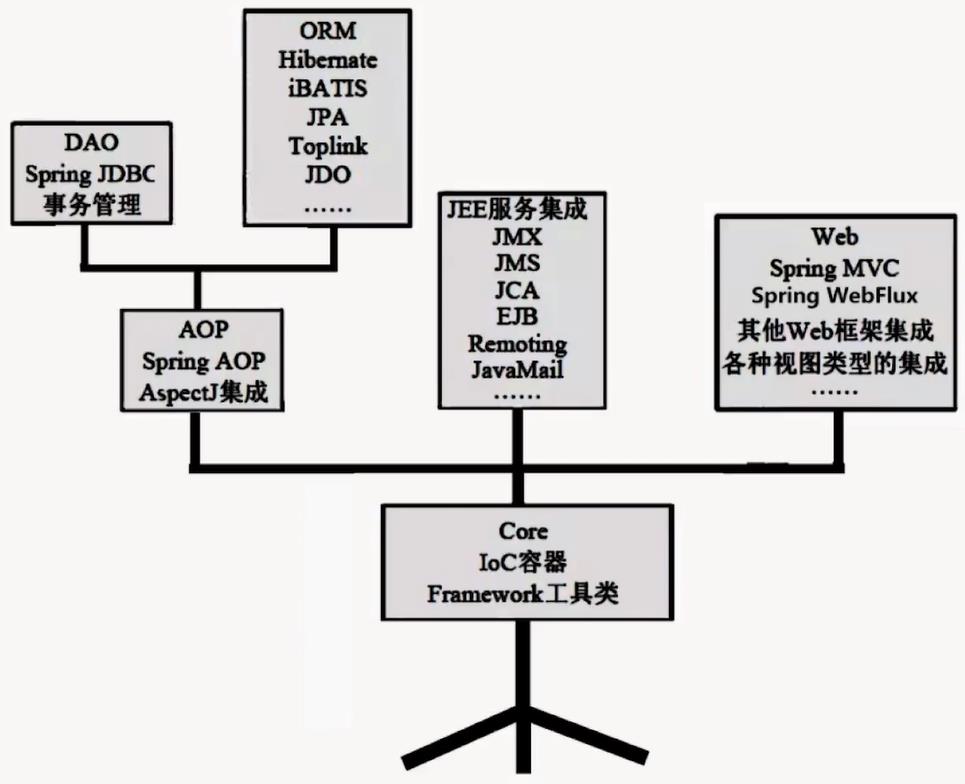
Spring 各模块的依赖关系如下图所示:
Spring 的优缺点
⭐️ Spring 框架的优点:
-
方便解耦,简化开发
通过 Spring 提供的 lOC 容器,可以将对象的创建和依赖关系交由 Spring 进行控制,避免硬编码所造成的过度耦合,也不必再为单例模式类、属性文件解析等这些很底层的需求编写代码,可以更专注于上层的应用。
-
AOP 编程的支持
Spring 提供面向切面编程,许多不容易用传统 OOP 实现的功能可以通过 AOP 轻松实现,例如对程序进行权限拦截、运行监控。
-
声明式事务的支持
只需要通过配置就可以完成对事务的管理,而无需手动编程。
-
方便程序的测试
Spring 对 Junit4/Junit5 进行了支持,可以通过注解方便的测试 Spring 程序。
-
方便集成各种优秀框架
Spring 内部提供了对各种优秀框架的直接支持(如:Struts、Hibernate、MyBatis 等)。
-
降低 JavaEE API 的使用难度
Spring 对 JavaEE 开发中非常难用的一些 API(JDBC、JavaMail、远程调用等)提供了封装,使这些API 应用难度大大降低。
⭐️ Spring 框架的缺点:
- Spring 依赖反射,反射影响程序执行性能。
IoC & DI 的理解
✏️ IoC 是什么?
IoC——Inversion of Control,即“控制反转”,不是一种技术,是一种设计思想。
所谓的“控制”,指的是对对象的控制,即对象的创建、初始化、销毁等生命周期的操作;所谓的“控制反转”,指的是对对象的控制权发生反转,即对象的创建、初始化、销毁等操作交由 IoC 容器管理,而不是传统的在你的对象内部直接控制。
在传统的 Java SE 程序设计中,我们的程序是对象的直接控制者,负责对象的创建、初始化和销毁;而在 Spring 中,对象的创建、初始化和销毁交由 IoC 容器负责,我们的程序无法决定对象生命周期的任何一个阶段,最多是借助于 Spring 的扩展机制做一些微小的动作。
- 创建对象:原来是 new 一个对象,现在由 IoC 容器负责创建;
- 初始化对象:比如 A 依赖 B,原来通过构造器或者 setter 方法赋值,现在由 IoC 容器查找及注入依赖对象;
- 销毁对象:原本直接将对象赋值 null 或者做一些销毁操作,现在由 IoC 容器管理生命周期负责销毁。
也就是说,我们由对象的直接控制者变成了 IoC 容器的被动接受者,对象生命周期的控制权发生了反转。
✏️ IoC 能做什么?
IoC 不是一种技术,只是一种思想,一个重要的面向对象编程的法则,它能指导我们设计出松耦合、更优良的程序。把创建和查找依赖对象的控制权交给了容器,由容器进行注入组合对象,所以对象与对象之间是松散耦合,利于功能复用,更重要的是使得程序的整个体系结构变得非常灵活。
其实 IoC 对编程带来的最大改变不是从代码上,而是从思想上,发生了“主从换位”的变化。应用程序原本是老大,要获取什么资源都是主动出击,但是在 IoC/DI 思想中,应用程序就变成被动的了,被动的等待 IoC 容器来创建并注入它所需要的资源了。
✏️ DI 是什么?
DI——Dependency Injection,即“依赖注入”,是 IoC 的一种重要实现,从 IoC 到 DI,就是从理论到了实践。
一个对象的创建往往会涉及到其它对象的创建,比如一个对象 A 的成员变量持有着另一个对象 B 的引用,这就是依赖,A 依赖于 B。IoC 机制既然负责了对象的创建,那么这个依赖关系也就必须由 IoC 容器负责起来,而负责的方式就是 DI——依赖注入。通过将依赖关系写入配置文件,然后在创建有依赖关系的对象时,由 IoC 容器负责注入依赖的对象,如在创建 A 时,检查到有依赖关系,IoC 容器就把 A 依赖的对象 B 创建后注入到 A 中(组装,通过反射机制实现),然后把 A 返回给对象请求者,完成工作。
理解依赖注入,重点就在于 “依赖”、“注入” 两个概念。什么是依赖?对象运行所需要的外部的数据、资源就是依赖,没有这些东西对象不能完成业务处理,必须拿到才能运行。什么是注入?注入这个词真的很形象,就像打针一样,从外部注入到内部,容器加载了外部的文件、URL、配置和对象,然后把这些数据、对象按需注入给对象。
✏️ IoC 和 DI 的关系
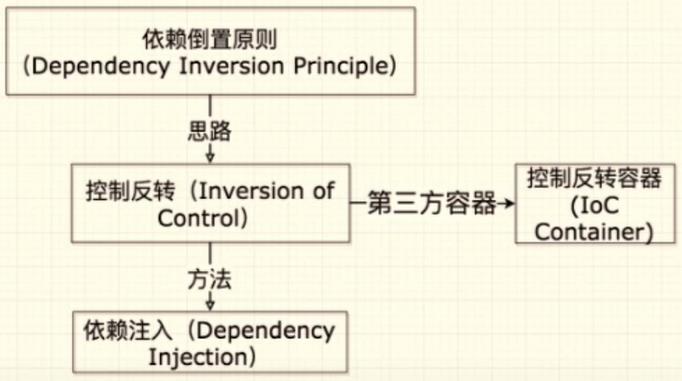
IoC 和 DI 是同一个概念的不同角度描述,但实际上又是有区别的。IoC 强调的是容器和对象的控制权发生了反转,而 DI 强调的是对象的依赖由容器进行注入,大部分情况下说两者相同也不算错。但是广义上 IoC 是一种软件开发模式,也就是说还可以通过别的方式实现,而 DI 只是其中一种,Spring 选择了 DI 从而使 DI 在 Java 开发中深入人心。
核心接口介绍
BeanFactory 和 ApplicationContext
BeanFactory 和 ApplicationContext 是 Spring 中的两大核心接口,都可以把他们当做 IoC 容器。其中,ApplicationContext 扩展了 BeanFactory 接口,是其子接口。
📚 依赖关系
BeanFactory 是 IoC 容器的最底层接口,提供了完整的 IoC 服务支持。简单来说,BeanFactory 实例就是一个管理 Bean 的工厂,负责初始化各种 Bean,控制 Bean 的生命周期,维护 Bean 之间的依赖关系。
ApplicationContext 是 BeanFactory 接口的派生,除了提供 BeanFactory 所具有的功能外,还提供了更完整的框架功能:
- 继承 MessageSource,因此支持国际化。
- 统一的资源文件访问方式。
- 提供在监听器中注册bean的事件。
- 同时加载多个配置文件。
- 载入多个(有继承关系)上下文 ,使得每一个上下文都专注于一个特定的层次,比如应用的web层。
BeanFactory 可以理解为一个 HashMap,key 是 BeanName,value 是 Bean 实例,对外提供注册(put)和获取(get)两个功能,是一个 “低级容器”。
ApplicationContext 继承了多个接口,除了 BeanFactory 所具有的功能,还具有更多的框架功能。从命名就可以看出,ApplicationContext 已经不仅仅是 BeanFactory 之类的工厂,而是”应用上下文”,是一个“高级容器”。
需要注意,ApplicationContext 的“高级容器”和 BeanFactory 的“低级容器”之间的关系是依赖,而不是继承,“高级容器”依赖着 “低级容器” 的 getBean 等功能。
📚 区别
- 加载方式:BeanFactroy 采用的是延迟加载策略来创建 Bean,即只有在使用到某个 Bean 时,才对该 Bean 进行加载实例化;而 ApplicationContext 采取的是立即加载策略来创建 Bean,在容器启动时,一次性创建了所有的 Bean。
- 创建方式:BeanFactory 通常以编程的方式被创建,ApplicationContext 还能以声明的方式创建,如使用 ContextLoader。
- 注册方式:BeanFactory 需要手动注册,而 ApplicationContext 则是自动注册。
具体使用
一般情况下,我们使用 ApplicationContext 来创建 IoC 容器,并对外提供 IoC 服务。该接口的常用实现类如下:
// 从类的根路径下加载配置文件(推荐使用)
ClassPathXmlApplicationContext(String configLocation);

// 从磁盘路径上加载配置文件,配置文件可以在磁盘的任意位置
FileSystemXmlApplicationContext(String configLocation);

// 当使用注解配置容器对象时,需要使用此类来创建 IoC 容器,它用来读取注解。
AnnotationConfigApplicationContext(Class<?>... componentClasses);
获得 IoC 容器中的 Bean 实例方法定义在 BeanFactory 接口上,常用方法如下:
// 通过容器中 Bean 的 id 或 name 获取 Bean 实例
Object getBean(String name) throws BeansException;

// 通过类的类型获取 Bean 实例。IoC 容器相同类型的 Bean 有多个,会抛出异常。
<T> T getBean(Class<T> requiredType) throws BeansException;
下面是实际使用:
✌ 在 pom.xml 中导入依赖
<dependencies>
    <!-- spring-context,该 jar 包会将 aop、beans、core、expression 一并下下来 -->
    <dependency>
        <groupId>org.springframework</groupId>
        <artifactId>spring-context</artifactId>
        <version>5.2.8.RELEASE</version>
    </dependency>

    <!-- 导入 junit 测试 -->
    <dependency>
        <groupId>junit</groupId>
        <artifactId>junit</artifactId>
        <version>4.12</version>
        <scope>test</scope>
    </dependency>
</dependencies>

<build>
    <plugins>
        <plugin>
            <groupId>org.apache.maven.plugins</groupId>
            <artifactId>maven-compiler-plugin</artifactId>
            <version>3.8.1</version>
            <configuration>
                <source>1.8</source>
                <target>1.8</target>
                <encoding>UTF-8</encoding>
            </configuration>
        </plugin>
    </plugins>
</build>
✌ 编写实体类
package com.example;

public class Bean {
    public void say() {
        System.out.println("hello world");
    }
}
✌ 编写 Spring 的配置文件 applicationContext.xml
<?xml version="1.0" encoding="UTF-8"?>
<beans xmlns="http://www.springframework.org/schema/beans"
       xmlns:xsi="http://www.w3.org/2001/XMLSchema-instance"
       xsi:schemaLocation="http://www.springframework.org/schema/beans
       http://www.springframework.org/schema/beans/spring-beans.xsd">

    <!-- 将指定类配置给 IoC 容器,让 IoC 容器创建其对象实例
    	 id 属性:指定 bean 的 id,唯一标识符
         class 属性:Bean 的全限定名称
    -->
    <bean id="bean" class="com.example.Bean"/>
</beans>
Spring 的配置文件的名称任意,通常命名为 applicationContext.xml 或者 beans.xml。
✌ 测试
@Test
public void test() {
    // 加载 Spring 配置文件,初始化 IoC 容器
    ApplicationContext applicationContext = new ClassPathXmlApplicationContext("applicationContext.xml");
    // 通过 id 从 IoC 容器中获取指定 Bean
    Bean bean1 = (Bean) applicationContext.getBean("bean");
    bean1.say();   // hello world

    // 通过类类型从 IoC 容器中获取 Bean 实例
    Bean bean2 = (Bean) applicationContext.getBean("bean");
    bean1.say();   // hello world

    System.out.println(bean1 == bean2);  // true
}
IoC & DI 开发(XML 方式)
Bean 标签配置
基本配置
<!-- id 属性:指定 bean 的 id,唯一标识符
     name 属性:指定 bean 别名,可以有多个
     class 属性:指定 bean 的全限定名称
-->
<bean id="bean" name="a_bean" class="com.example.Bean"/>
使用到的<bean>标签的属性如下:
- id:指定 bean 的 id,唯一标识符。
- name:指定 bean 的别名,可以有多个,用逗号或分号隔开。不常用,一般使用 id 属性即可。
- class:指定 bean 的全限定名称
@Test
public void test() {
    // 加载 Spring 配置文件,初始化 IoC 容器
    ApplicationContext applicationContext = new ClassPathXmlApplicationContext("applicationContext.xml");

    Bean bean1 = (Bean) applicationContext.getBean("bean");
    Bean bean2 = (Bean) applicationContext.getBean("a_bean");
    System.out.println(bean1 == bean2);   // true
}
如果 Bean 未指定 id 和 name,默认会将类名首字母小写的值当作 id 使用。
作用范围配置
<!-- id 属性:指定 bean 的 id,唯一标识符
     class 属性:指定 bean 的全限定名称
     scope 属性:指定 bean 的作用范围,prototype 表示多例
-->
<bean id="bean" class="com.example.Bean" scope="prototype"/>
scope 属性是指定 bean 的作用范围,常用取值如下:
- singleton: 默认值,单例,使用 singleton 定义的 Bean 在 IoC 容器只有一个实例;当 IoC 容器被创建时,对象就被创建了;只要容器在,对象一直活着;当应用卸载,销毁容器时,对象才被销毁。
- prototype:原型(多例),当调用 getBean() 方法从 IoC 容器获取的 prototype 定义的 Bean 时,容器都将创建一个新的 Bean 实例返回;只要对象在使用中,就一直活着;当对象长时间不用时,就会被 Java 的垃圾回收器回收。
@Test
public void test() {
    // 加载 Spring 配置文件,初始化 IoC 容器
    ApplicationContext applicationContext = new ClassPathXmlApplicationContext("applicationContext.xml");

    Bean bean1 = (Bean) applicationContext.getBean("bean");
    Bean bean2 = (Bean) applicationContext.getBean("bean");
    System.out.println(bean1 == bean2);   // false
}
生命周期配置
✍ 对 Bean 实体类进行修改
package com.example;

public class Bean {

    public Bean() {
        System.out.println("Bean 对象创建了");
    }

    public void init() {
        System.out.println("执行 init 方法...");
    }

    public void say() {
        System.out.println("hello world");
    }

    public void destroy() {
        System.out.println("执行 destroy 方法...");
    }
}
✍ 使用生命周期属性
<!-- id 属性:指定 bean 的 id,唯一标识符
     class 属性:bean 的全限定名称
     init-method 属性:指定 bean 初始化时执行的方法
     destroy-method 属性:指定 bean 销毁时执行的方法
-->
<bean id="bean" class="com.example.Bean" init-method="init" destroy-method="destroy"/>
@Test
public void test() {
    // 加载 Spring 配置文件,初始化 IoC 容器
    ApplicationContext applicationContext = new ClassPathXmlApplicationContext("applicationContext.xml");

    Bean bean1 = (Bean) applicationContext.getBean("bean");
    bean1.say();

    // 关闭 IoC 容器,bean 对象是单例,不关闭容器的话就一直存活下去
    ((ClassPathXmlApplicationContext)applicationContext).close();
}
Bean 对象创建了
执行 init 方法...
hello world
执行 destroy 方法...
Bean 实例化方式
Bean 实例化的方式有三种:
💡 使用无参构造函数创建(默认方式)
package com.example;

public class Bean {
    public void say() {
        System.out.println("hello world");
    }
}
<!-- 该方式是 IoC 容器默认创建 bean 的方式,如果 bean 中没有无参构造函数,将会创建失败 -->
<bean id = "bean" class="com.example.Bean"/>
💡 使用静态工厂的方法创建
package com.example;

public class StaticFactory {
    // 静态工厂方法返回 Bean 实例
    public static Bean createBean() {
        return new Bean();
    }
}
<!-- 使用静态工厂的方法创建:
     使用 StaticFactory 类中的静态方法 createBean 创建对象,存入 IoC 容器
     id 属性:指定 bean 的 id,唯一标识符
     class 属性:指定静态工厂的全限定类名
     factory-method 属性:指定生产对象的静态方法
-->
<bean id="bean" class="com.example.StaticFactory" factory-method="createBean"/>
@Test
public void test() {
    // 加载 Spring 配置文件,初始化 IoC 容器
    ApplicationContext applicationContext = new ClassPathXmlApplicationContext("applicationContext.xml");

    Bean bean1 = (Bean) applicationContext.getBean("bean");
    bean1.say();   // hello world
}
💡 使用实例工厂的方法创建
package com.example;

public class InstanceFactory {
    // 实例工厂的方法返回 Bean 实例
    public static Bean createBean() {
        return new Bean();
    }
}
<!-- 使用实例工厂的方法创建:
     先把工厂类的创建交给 IoC 容器来管理,然后再调用工厂 bean 的方法
     factory-bean: 指定工厂 bean 的 id
     factory-method: 于指定工厂中创建对象的方法
-->
<bean id="MyBeanFactory" class="com.example.InstanceFactory"/>
<bean id="bean" factory-bean="MyBeanFactory" factory-method="createBean"/>
@Test
public void test() {
    // 加载 Spring 配置文件,初始化 IoC 容器
    ApplicationContext applicationContext = new ClassPathXmlApplicationContext("applicationContext.xml");

    Bean bean1 = (Bean) applicationContext.getBean("bean");
    bean1.say();   // hello world
}
Bean 依赖注入
Spring 基于 XML 的注入方式有以下两种,分别是构造函数注入和 set 方法注入。
构造函数注入
package com.example;

import java.util.Date;

public class Bean {
    private String name;
    private Integer age;
    private Date birthday;

    // 类中需要提供一个对应参数列表的构造函数
    public Bean(String name, Integer age, Date birthday) {
        this.name = name;
        this.age = age;
        this.birthday = birthday;
    }

    @Override
    public String toString() {
        return "Bean{" +
                "name='" + name + '\'' +
                ", age=" + age +
                ", birthday=" + birthday +
                '}';
    }
}
<!-- 使用构造函数注入,要求类中需要提供一个对应参数列表的构造函数
     constructor-arg 标签:
          index 属性:指定参数在构造函数参数列表的索引位置
          type 属性:指定参数在构造函数中的数据类型
          name 属性:指定参数在构造函数中的名称(一般常用这个)
        =====上面三个属性是找给谁赋值,下面两个是赋什么值的 =====
          value 属性:赋值为基本数据类型和 String 类型,使用这个
          ref 属性:赋值是 IoC 容器中的其它 bean 类型,使用这个(引用)
   -->
<bean id="bean" class="com.example.Bean">
    <constructor-arg name="name" value=" 张三 "/>
    <constructor-arg name="age" value="18"/>
    <constructor-arg name="birthday" ref="now"/>
</bean>

<!-- 创建 Date 类型的 Bean 实例 -->
<bean id="now" class="java.util.Date"></bean>
@Test
public void test() {
    // 加载 Spring 配置文件,初始化 IoC 容器
    ApplicationContext applicationContext = new ClassPathXmlApplicationContext("applicationContext.xml");

    Bean bean1 = (Bean) applicationContext.getBean("bean");
    System.out.println(bean1);
    // Bean{name=' 张三 ', age=18, birthday=Tue Aug 04 22:30:37 CST 2020}
}
set 方法注入
package com.example;

import java.util.Date;

public class Bean {
    private String name;
    private Integer age;
    private Date birthday;

    public void setName(String name) {
        this.name = name;
    }

    public void setAge(Integer age) {
        this.age = age;
    }

    public void setBirthday(Date birthday) {
        this.birthday = birthday;
    }

    @Override
    public String toString() {
        return "Bean{" +
                "name='" + name + '\'' +
                ", age=" + age +
                ", birthday=" + birthday +
                '}';
    }
}
<!-- 使用 set 方法注入,需要注意 bean 类中需要有一个无参构造函数
     property 标签:
        name 属性:指定赋值的属性名(set方法名后面的部分)
        value 属性:赋值为基本数据类型和 String 类型,使用这个
        ref 属性:赋值是 IoC 容器中的其它 Bean 类型,使用这个(引用)
   -->
<bean id="bean" class="com.example.Bean">
    <property name="name" value=" 张三 "/>
    <property name="age" value="18"/>
    <property name="birthday" ref="now"/>
</bean>

<!-- 创建 Date 类型的 Bean 实例 -->
<bean id="now" class="java.util.Date"></bean>
@Test
public void test() {
    // 加载 Spring 配置文件,初始化 IoC 容器
    ApplicationContext applicationContext = new ClassPathXmlApplicationContext("applicationContext.xml");

    Bean bean1 = (Bean) applicationContext.getBean("bean");
    System.out.println(bean1);
    // Bean{name=' 张三 ', age=18, birthday=Tue Aug 04 22:30:37 CST 2020}
}
注入集合属性
当注入的属性是集合类型时,需要使用特殊标签注入。此处使用构造函数注入的方式讲解,set 方法注入集合属性的标签也是一样的。
package com.example;

import java.util.*;

public class Bean {
    private String[] myStrs;
    private List<String> myList;
    private Set<String> mySet;
    private Map<String, String> myMap;
    private Properties myProps;

    public Bean(String[] myStrs, List<String> myList, Set<String> mySet,
                Map<String, String> myMap, Properties myProps) {
        this.myStrs = myStrs;
        this.myList = myList;
        this.mySet = mySet;
        this.myMap = myMap;
        this.myProps = myProps;
    }
}
<bean id="bean" class="com.example.Bean">
    <!-- 在注入集合数据时,只要结构相同,标签可以互换
         List 结构: array,list,set
         Map 结构: map,entry,props,prop
    -->
    <!-- 给数组注入数据 -->
    <constructor-arg name="myStrs">
        <set>
            <value>AAA</value>
            <value>BBB</value>
            <value>CCC</value>
        </set>
    </constructor-arg>
    <!-- 注入 list 集合数据 -->
    <constructor-arg name="myList">
        <array>
            <value>AAA</value>
            <value>BBB</value>
            <value>CCC</value>
        </array>
    </constructor-arg>
    <!-- 注入 set 集合数据 -->
    <constructor-arg name="mySet">
        <list>
            <value>AAA</value>
            <value>BBB</value>
            <value>CCC</value>
        </list>
    </constructor-arg>
    <!-- 注入 Map 数据 -->
    <constructor-arg name="myMap">
        <props>
            <prop key="testA">aaa</prop>
            <prop key="testB">bbb</prop>
        </props>
    </constructor-arg>
    <!-- 注入 properties 数据 -->
    <constructor-arg name="myProps">
        <map>
            <!-- entry 标签有两种赋值方式 -->
            <entry key="testA" value="aaa"></entry>
            <entry key="testB">
                <value>bbb</value>
            </entry>
        </map>
    </constructor-arg>
</bean>
IoC & DI 开发(注解方式)
Bean 实例化
@Componet
该注解的作用是在 IoC 容器中创建了一个 bean,相当于 XML 配置中的使用无参构造函数实例化:
<!-- 相当于 XML 配置中的使用无参构造函数实例化 -->
<bean id="" class="">
该注解只用一个属性 value,用于指定 bean 的 id,如果不指定 value 属性,默认类名(首字母小写)作为 bean 的 id。具体使用如下:
☕️ 修改 Bean 实体类
package com.example;

import org.springframework.stereotype.Component;

@Component("bean")
public class Bean {
    public void say() {
        System.out.println("hello world");
    }
}
☕️ 配置 Spring 的注解扫描
此处还需要使用 XML 配置文件,后续会使用通过编写配置类的方式来完全取代 XML 配置。在 Spring 配置文件中定义注解扫描的包路径:
<?xml version="1.0" encoding="UTF-8"?>
<beans xmlns="http://www.springframework.org/schema/beans"
       xmlns:context="http://www.springframework.org/schema/context"
       xmlns:xsi="http://www.w3.org/2001/XMLSchema-instance"
       xsi:schemaLocation="http://www.springframework.org/schema/beans
       http://www.springframework.org/schema/beans/spring-beans.xsd
       http://www.springframework.org/schema/context
       http://www.springframework.org/schema/context/spring-context.xsd">

    <!-- 需要注意:基于注解整合时,需要多导入 context 名称空间下的约束。-->

    <!-- 告知 Spring 框架,创建 IoC 容器时,进行注解扫描,依据注解创建 benn,注册到容器中。
         base-package 属性:注解扫描的包路径
    -->
    <context:component-scan base-package="com.example"/>
</beans>
☕️ 测试
@Test
public void test() {
    // 加载 Spring 配置文件,初始化 IoC 容器
    ApplicationContext applicationContext = new ClassPathXmlApplicationContext("applicationContext.xml");

    Bean bean1 = (Bean) applicationContext.getBean("bean");
    bean1.say();  // hello world
}
@Controller、@Service 和 @Repository
这三个注解都是 @Componet 的衍生注解,作用及属性都是一样的,只不过提供了更加明确的语义。
- @Controller:一般用于表现层的注解。
- @Service:一般用于业务层的注解。
- @Repository:一般用于持久层的注解。
以 @Controller 为例,查看源码:
@Target({ElementType.TYPE})
@Retention(RetentionPolicy.RUNTIME)
@Documented
@Component
public @interface Controller {
    @AliasFor(
        annotation = Component.class
    )
    String value() default "";
}
Bean 依赖注入
@Autowired
该注解的作用是给 IoC 容器中的 bean 注入其它 bean 类型,相当于 XML 配置中的:
<!-- 使用 set 方法注入其它 bean 类型 -->
<property name="" ref="">
使用注解注入属性时,set 方法是可以省略的,可以直接在 bean 的属性上添加注解。
需要注意,@Autowired 注解只能注入其它 bean 类型。该注解首先会自动按照类型注入,当 IoC 容器中有多个 bean 匹配时,会查找 id 与要注入的属性名称相同的 bean。具体使用如下:
⭐️ 编写 Mapper 层
package com.example.mapper.impl;

import org.springframework.stereotype.Repository;

@Repository   // 默认将 "userMapper" 作为 bean 的 id
public class UserMapper {

    public void say() {
        System.out.println("hello world");
    }
}
⭐️ 编写 Service 层
package com.example.service.impl;

import com.example.mapper.UserMapper;
import org.springframework.beans.factory.annotation.Autowired;
import org.springframework.stereotype.Service;

@Service   // 默认将 "userService" 作为 bean 的 id
public class UserService {

    @Autowired
    private UserMapper userMapper;  // 会将 UserMapper 类型的 bean 注入

    @Override
    public void say() {
        userMapper.say();
    }
}
⭐️ 测试
@Test
public void test() {
    // 加载 Spring 配置文件,初始化 IoC 容器
    ApplicationContext applicationContext = new ClassPathXmlApplicationContext("applicationContext.xml");

    UserService userService = (UserService)applicationContext.getBean("userService");
    userService.say();  // hello
}
@Qualifier 和 @Resource
@Qualifier 注解是在自动按照类型注入的基础之上,指定 bean 的 id 注入,它在给字段注入时不能独立使用,必须和 @Autowire 一起使用;但是给方法参数注入时,可以独立使用。
前面也提到,@Autowire 注解首先会根据类型进行注入,如果 IoC 容器中有多个 bean 匹配时,会查找 id 与要注入的属性名称相同的 bean,而 @Qualifier 的 value 属性就是指定要查找的 bean 的 id。具体使用如下:
package com.example.service.impl;

import com.example.mapper.UserMapper;
import org.springframework.beans.factory.annotation.Autowired;
import org.springframework.beans.factory.annotation.Qualifier;
import org.springframework.stereotype.Service;

@Service   // 默认将 "userService" 作为 bean 的 id
public class UserService {
    /**
     * 首先会自动按照类型注入,即寻找 UserMapper 类型的 bean;
     * 如果 IoC 容器中有多个 bean 匹配,会寻找 id 为 "userMapper" 的 bean 注入
     */
    @Autowired
    @Qualifier("userMapper")
    private UserMapper userMapper;

    @Override
    public void say() {
        userMapper.say();
    }
}
@Resource 注解相当于@Autowired + @Qualifie的组合,该注解有一个 name 属性用于指定 bean 的 id。具体使用如下:
package com.example.service.impl;

import com.example.mapper.UserMapper;
import org.springframework.stereotype.Service;
import javax.annotation.Resource;

@Service   // 默认将 "userService" 作为 bean 的 id
public class UserService {

    @Resource(name = "userMapper")
    private UserMapper userMapper;

    @Override
    public void say() {
        userMapper.say();
    }
}
@Value
前面三个注解是注入其它 bean 类型的,而 @Value 注解是用来注入基本数据类型和 String 类型的,相当于 XML 配置的:
<!-- 使用 set 方法注入基本数据类型和 String 类型 -->
<property name="" value="">
该注解有一个 value 属性用来指定要注入的属性值,该值可以使用 SpEL 表达式,写法为#{表达式}。下面会介绍相关的用法。
✏️ 在 resource 目录下创建 userInfo.properties 文件
# 自定义配置属性
person.name=Bob
person.age=20
✏️ 在 Spring 配置文件中添加配置
<!-- 加载 userInfo.properties 文件 -->
<!-- 该标签用于引入外部的 properties 配置文件-->
<context:property-placeholder location="classpath:userInfo.properties"/>
✏️ 使用 @Value 注解将属性注入
package com.example;

import org.springframework.beans.factory.annotation.Value;
import org.springframework.stereotype.Component;

@Component
public class Person {
    @Value("1")    // 普通用法,直接写值
    private int id;

    @Value("${person.name}")  // 读取 properties 配置文件中自定义属性
    private String name;

    @Value("${person.age}")   // 读取 properties 配置文件中自定义属性
    private int age;

    @Value("#{100 * 5 - 10}")  // 使用 SpEL 表达式
    private int num;

    @Override
    public String toString() {
        return "Person{" +
                "id=" + id +
                ", name='" + name + '\'' +
                ", age=" + age +
                ", num=" + num +
                '}';
    }
}
@Test
public void test() {
    // 加载 Spring 配置文件,初始化 IoC 容器
    ApplicationContext applicationContext = new ClassPathXmlApplicationContext("applicationContext.xml");

    Person person = (Person)applicationContext.getBean("person");
    System.out.println(person);
    // Person{id=1, name='Bob', age=20, num=490}
}
作用范围和生命周期
@Scope
该注解是指定 bean 的作用范围的,相当于 XML 配置中的 scope 属性:
<bean id="" class="" scope="">
该注解使用 value 属性来指定作用范围,常用取值为 singleton(默认值)和 prototype。
@Component
@Scope("prototype")  // 多例
public class Bean {
    public void say() {
        System.out.println("hello world");
    }
}
@PostConstruct 和 @PreDestroy
这两个注解是作用在方法上,@PostConstruct 指定 bean 初始化时执行的方法,@PreDestroy 指定 bean 销毁时执行的方法,相当于 XML 配置中的 init-method 和 destroy-method 属性:
<bean id="" class="" init-method="" destroy-method=""/>
@Component
public class Bean {
    public void say() {
        System.out.println("hello world");
    }

    @PostConstruct
    public void init() {
        System.out.println("init...");
    }

    @PreDestroy
    public void destroy() {
        System.out.println("destroy...");
    }
}
Bean 实例化时,会先执行 Constructor(构造方法) -> @Autowired(依赖注入) -> @PostConstruct(注释的方法)。
纯注解配置
简单使用
前面的介绍中,我们使用了注解,但是还是离不开 XML 配置文件,主要是 Spring 配置文件还需要以下配置:
<!-- 指定注解扫描的包路径 -->
<context:component-scan base-package=""/>
<!-- 加载指定路径下的 properties 文件 -->
<context:property-placeholder location=""/>
<!-- 创建 Bean 对象 -->
<bean id="" class=""/>
Spring 是可以纯注解配置的,通过使用配置类来取代 XML 配置,下面介绍纯注解配置的简单使用:
📚 修改实体类
package com.example;

import org.springframework.stereotype.Component;

@Component
public class Bean {
    public void say() {
        System.out.println("hello world");
    }
}
package com.example;

import org.springframework.beans.factory.annotation.Value;

public class Person {

    @Value("${person.name}")  // 读取配置文件中的属性值
    private String name;

    @Value("${person.age}")
    private int age;

    @Override
    public String toString() {
        return "Person{" +
                "name='" + name + '\'' +
                ", age=" + age +
                '}';
    }
}
📚 创建配置类
package com.example;

import org.springframework.context.annotation.Bean;
import org.springframework.context.annotation.ComponentScan;
import org.springframework.context.annotation.Configuration;
import org.springframework.context.annotation.PropertySource;

// @Configuration  // 此处不必添加 @Configuration 注解
@ComponentScan("com.example")  // 指定 IoC 容器注解扫描的包路径
@PropertySource("classpath:userInfo.properties")  // 加载指定路径下的 properties 文件
public class SpringConfig {

    /**
     * 将方法返回对象注册为 IoC 容器中 bean。默认情况下,bean 的 id 为方法名
     */
    @Bean
    public Person person() {
        return new Person();
    }
}
📚 测试
@Test
public void test() {
    // 这里不能使用 ClassPathXmlApplicationContext 实现类
    // 使用 AnnotationConfigApplicationContext 实现类,加载 Spring 配置类,初始化 IoC 容器
    ApplicationContext applicationContext = new AnnotationConfigApplicationContext(SpringConfig.class);

    Bean bean = (Bean) applicationContext.getBean("bean");
    bean.say();   // hello world

    Person person = (Person) applicationContext.getBean("person");
    System.out.println(person);   // Person{name='Bob', age=20}
}
配置类常用注解
下面对配置类上常使用到的注解进行介绍:
✌ @Configuration 注解
该注解作用在类上,用于表明当前类是一个 Spring 配置类,定义如下:
@Target({ElementType.TYPE})
@Retention(RetentionPolicy.RUNTIME)
@Documented
@Component
public @interface Configuration {
    @AliasFor(
        annotation = Component.class
    )
    String value() default "";

    boolean proxyBeanMethods() default true;
}
可以发现该注解本身就是 @Component 的衍生注解,所以 @Configuration 修饰的 Java 类在 IoC 容器会注册为 bean。具体使用如下:
@Configuration   // 表明当前类是一个 Spring 配置类
public class SpringConfig1 {
    // 注册各种 bean
}
注意:前面的配置类没有使用 @Configuration,是因为该配置类被 AnnotationConfigApplicationContext 实现类指定为 Spring 配置类,所以在 IoC 容器中会自动进行注册。如果需要多个 Spring 配置类,除了被加载的主配置类外,其它配置类都需要使用 @Configuration 修饰,并且还要被 @ComponentScan 注解扫描到。
✌ @ComponentScan 注解
该注解作用在类上,用于指定 IoC 容器注解扫描的包路径,相当于 XML 配置中:
<!-- 指定注解扫描的包路径 -->
<context:component-scan base-package=""/>
该注解定义如下:
@Retention(RetentionPolicy.RUNTIME)
@Target({ElementType.TYPE})
@Documented
@Repeatable(ComponentScans.class)
public @interface ComponentScan {
    @AliasFor("basePackages")
    String[] value() default {};

    @AliasFor("value")
    String[] basePackages() default {};
    //...
}
其中,basePackages 属性和 value 属性互为别名,都是用于指定注解扫描的包路径。具体使用如下:
@Configuration   // 表明当前类是一个 Spring 配置类
@ComponentScan("com.example")  // 指定 IoC 容器注解扫描的包路径
public class SpringConfig1 {
    // 注册各种 bean
}
✌ @PropertySource 注解
该注解作用在类上,用于加载指定外部配置的 properties 文件,相当于 XML 配置中的:
<!-- 加载外部配置 properties 文件 -->
<context:property-placeholder location=""/>
该注解有一个 value 属性,该属性类型为String[],用于指定 properties 文件位置。需要注意,如果文件位于类路径下,需要写上classpath:。具体使用如下:
@Configuration   // 表明当前类是一个 Spring 配置类
@ComponentScan("com.example")   // 指定 IoC 容器注解扫描的包路径
@PropertySource("classpath:userInfo.properties")  // 加载指定路径下的 properties 文件
public class SpringConfig1 {
    // 注册各种 bean
}
✌ @Bean 注解
该注解作用在方法上,用于在 IoC 容器里注册一个 bean。 相当于 XML 配置的:
<bean id="" class=""/>
该注解定义如下:
@Target({ElementType.METHOD, ElementType.ANNOTATION_TYPE})
@Retention(RetentionPolicy.RUNTIME)
@Documented
public @interface Bean {
    @AliasFor("name")
    String[] value() default {};

    @AliasFor("value")
    String[] name() default {};
    //...
}
其中,name 属性和 value 属性互为别名,都是用于指定 bean 的 id。如果该注解没有指定 name 和 value 属性,默认情况下将方法名作为 bean 的 id。具体使用如下:
@Configuration   // 表明当前类是一个 Spring 配置类
@ComponentScan("com.example")   // 指定 IoC 容器注解扫描的包路径
@PropertySource("classpath:userInfo.properties")  // 加载指定路径下的 properties 文件
public class SpringConfig1 {
    /**
     * 将方法返回对象注册为 IoC 容器中 bean。默认情况下,bean 的 id 为方法名
     */
    @Bean
    public Person person() {
        return new Person();
    }
}

 浙公网安备 33010602011771号