MyBatis 入门(一):基本用法
MyBatis(前身是 iBatis)是一个支持普通 SQL 查询、存储过程以及高级映射的持久层框架,它消除了几乎所有的JDBC 代码和参数的手动设置以及对结果集的检索,并使用简单的 XML 或注解进行配置和原始映射,用以将接口和 pojo 映射成数据库中的记录,使得 Java 开发人员可以使用面向对象的编程思想来操作数据库。MyBatis3 的官方文档地址为:https://mybatis.org/mybatis-3/zh/index.html。
快速入门
入门案例
首先查看入门案例的整体目录结构:

☕️ 数据库脚本
DROP TABLE IF EXISTS `t_customer`;
CREATE TABLE `t_customer` (
	`id` INT PRIMARY KEY AUTO_INCREMENT COMMENT '客户ID',
	`username` VARCHAR(50) COMMENT '客户名',
	`job` VARCHAR(50) COMMENT '职业',
	`phone` VARCHAR(16) COMMENT '手机号码'
) COMMENT '客户表';

INSERT INTO `t_customer` VALUES(1, 'joy', 'doctor', '11111111111');
INSERT INTO `t_customer` VALUES(2, 'jack', 'teacher', '22222222222');
INSERT INTO `t_customer` VALUES(3, 'tom', 'worker', '33333333333');
☕️ 在 pom.xml 文件中添加相关依赖
<dependencies>
    <!-- MyBatis -->
    <dependency>
        <groupId>org.mybatis</groupId>
        <artifactId>mybatis</artifactId>
        <version>3.5.5</version>
    </dependency>

    <!-- MySql -->
    <dependency>
        <groupId>mysql</groupId>
        <artifactId>mysql-connector-java</artifactId>
        <version>8.0.21</version>
    </dependency>

    <!-- lombok -->
    <dependency>
        <groupId>org.projectlombok</groupId>
        <artifactId>lombok</artifactId>
        <version>1.18.12</version>
        <scope>provided</scope>
    </dependency>

    <!-- log4j -->
    <dependency>
        <groupId>log4j</groupId>
        <artifactId>log4j</artifactId>
        <version>1.2.17</version>
    </dependency>

    <!-- junit4 单元测试 -->
    <dependency>
        <groupId>junit</groupId>
        <artifactId>junit</artifactId>
        <version>4.12</version>
        <scope>test</scope>
    </dependency>
</dependencies>

<build>
    <plugins>
        <plugin>
            <groupId>org.apache.maven.plugins</groupId>
            <artifactId>maven-compiler-plugin</artifactId>
            <version>3.8.1</version>
            <configuration>
                <source>1.8</source>
                <target>1.8</target>
                <encoding>UTF-8</encoding>
            </configuration>
        </plugin>
    </plugins>
</build>
☕️ 创建实体类
package com.example.entity;

import lombok.AllArgsConstructor;
import lombok.Data;
import lombok.NoArgsConstructor;
import java.io.Serializable;

@Data
@AllArgsConstructor
@NoArgsConstructor
public class Customer implements Serializable {
    private Integer id;        // 客户 ID
    private String username;   // 客户名
    private String job;        // 职业
    private String phone;      // 手机号码
}
实体类属性的数据类型最好不要使用基本类型,而是使用其包装类。
☕️ 编写 CustomerMapper 接口,并添加 Mapper 方法
package com.example.mapper;

import com.example.entity.Customer;
import java.util.List;

public interface CustomerMapper {
    // 查询所有的客户
    List<Customer> selectAll();
}
☕️ 编写接口对应的 XML 映射文件 CustomerMapper.xml
<!DOCTYPE mapper
        PUBLIC "-//mybatis.org//DTD Mapper 3.0//EN"
        "http://mybatis.org/dtd/mybatis-3-mapper.dtd">

<!-- mapper 是映射文件的根标签
     namespace 属性:当映射文件与某个 Mapper 接口关联时,值为对应接口的全限定类名
 -->
<mapper namespace="com.example.mapper.CustomerMapper">

    <!-- select 是查询 Sql 语句的标签
         属性:id:唯一标识,一般与对应接口方法名相同
              resultType:设置语句返回值类型的完全限定名或别名
    -->
    <select id="selectAll" resultType="com.example.entity.Customer">
        select id, username, job, phone from t_customer
    </select>
</mapper>
该映射文件位于resources/mapper目录下,文件命名任意,只要和 MyBatis 的核心配置文件中的命名统一即可,推荐和接口名一致。
☕️ 编写 MyBatis 的核心配置文件 mybatis-config.xml
<?xml version="1.0" encoding="UTF-8" ?>
<!DOCTYPE configuration
PUBLIC "-//mybatis.org//DTD Config 3.0//EN"
"http://mybatis.org/dtd/mybatis-3-config.dtd">
<!-- configuration 是 MyBatis 配置文件的根标签 -->
<configuration>
<!-- environments 标签:配置 MyBatis 的运行环境,内部可配置多个环境
default 属性:指定要运行的那个环境的 id
-->
<environments default="development">
<!-- 配置 id 为 development 的环境 -->
<environment id="development">
<!-- 使用 JDBC 的事务管理 -->
<transactionManager type="JDBC"/>
<!-- 配置数据库连接池 -->
<dataSource type="POOLED">
<!-- 配置连接数据库的4个基本信息 -->
<property name="driver" value="com.mysql.cj.jdbc.Driver"/>
<property name="url" value="jdbc:mysql://localhost:3306/learning?characterEncoding=utf-8&useSSL=false&serverTimezone=Hongkong"/>
<property name="username" value="root"/>
<property name="password" value="123456"/>
</dataSource>
</environment>
</environments>
<!-- 配置 XML 映射文件位置 -->
<mappers>
<!-- 使用相对于 classpath 路径的资源 -->
<mapper resource="mapper/CustomerMapper.xml"/>
</mappers>
</configuration>
MyBatis 核心配置文件的命名任意。
☕️ 编写 log4j.properteis 进行日志配置
# 配置日志的目的是在控制台输出 SQL 语句
# 将总体日志级别设置为 warn,com.example.mapper包的日志级别设置为 trace
log4j.rootCategory=warn,stdout
log4j.logger.com.example.mapper=trace
log4j.appender.stdout=org.apache.log4j.ConsoleAppender
log4j.appender.stdout.layout=org.apache.log4j.PatternLayout
☕️ 对 selectAll() 方法进行测试
package com.example.mapper;

import com.example.entity.Customer;
import org.apache.ibatis.io.Resources;
import org.apache.ibatis.session.SqlSession;
import org.apache.ibatis.session.SqlSessionFactory;
import org.apache.ibatis.session.SqlSessionFactoryBuilder;
import org.junit.After;
import org.junit.Before;
import org.junit.Test;
import java.io.IOException;
import java.io.InputStream;
import java.util.List;

public class CustomerMapperTest {

    private SqlSession sqlSession;
    private CustomerMapper customerMapper;

    @Before
    public void init() throws IOException {
        // 读取 MyBatis 的核心配置文件
        InputStream resourceAsStream = Resources.getResourceAsStream("mybatis-config.xml");
        // 创建 SqlSessionFactory 工厂对象
        SqlSessionFactory sqlSessionFactory = new SqlSessionFactoryBuilder().build(resourceAsStream);
        // 关闭输入流
        resourceAsStream.close();

        // 使用 SqlSessionFactory 生产 SqlSession 对象
        sqlSession = sqlSessionFactory.openSession();
        // 使用 SqlSession 创建 Mapper 接口的代理对象
        customerMapper = sqlSession.getMapper(CustomerMapper.class);
    }

    @Test
    public void selectAll() {
        // 使用代理对象执行 selectAll 方法
        List<Customer> customerList = customerMapper.selectAll();
        customerList.forEach(System.out::println);
    }

    @After
    public void end() throws IOException {
        // 释放 SqlSession
        sqlSession.close();
    }
}
==>  Preparing: select id, username, job, phone from t_customer
==> Parameters:
<==    Columns: id, username, job, phone
<==        Row: 1, joy, doctor, 11111111111
<==        Row: 2, jack, teacher, 22222222222
<==        Row: 3, tom, worker, 33333333333
<==      Total: 3
Customer(id=1, username=joy, job=doctor, phone=11111111111)
Customer(id=2, username=jack, job=teacher, phone=22222222222)
Customer(id=3, username=tom, job=worker, phone=33333333333)
执行流程分析
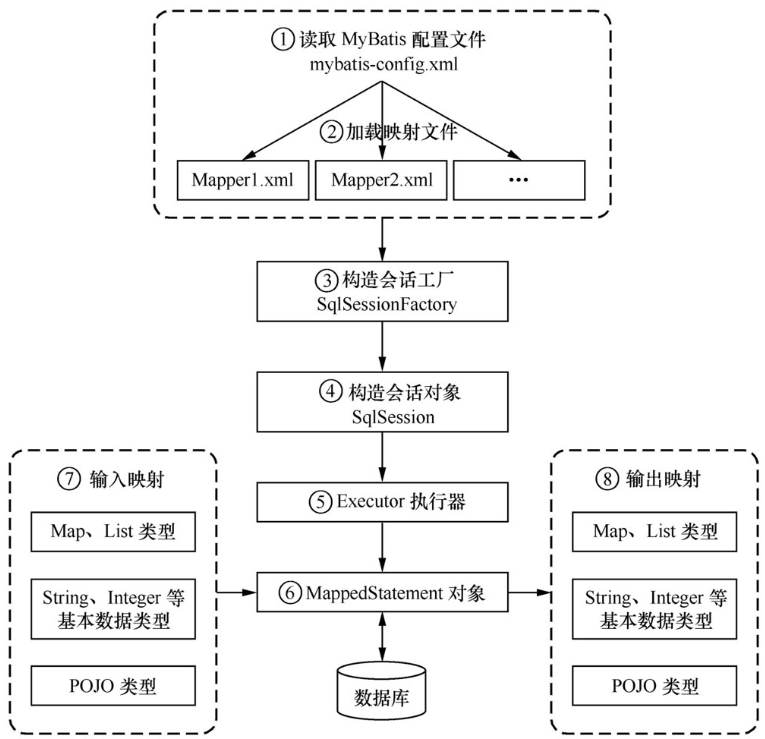
MyBatis 框架在操作数据库时,大体会经过了以下 8 个步骤:
- 读取配置文件 mybatis-config.xml,该文件是 MyBatis 的核心配置文件,配置了 MyBatis 的运行环境等信息,其中主要内容是获取数据库连接。
- 加载映射文件 Mapper.xml,该文件配置了操作数据库的 SQL 语句,需要在 mybatis-config.xml 中配置加载才能执行。一般而言每个 Mapper.xml 文件对应数据库中的一张表。
- 构建会话工厂。通过 MyBatis 的环境等配置信息构建会话工厂 SqlSessionFactory。
- 创建 SqlSession 对象。由会话工厂创建 SqlSession 对象,该对象中包含了执行 SQL 的所有方法。
- MyBatis 底层定义了一个 Executor 接口来操作数据库,它会根据 SqlSession 传递的参数动态地生成需要执行的 SQL 语句,同时负责查询缓存的维护。
- 在 Executor 接口的执行方法中,包含一个 MappedStatement 类型的参数,该参数是对映射信息的封装,用于存储要映射的 SQL 语句的 id、参数等。Mapper.xml 文件中一个 SQL 对应一个 MappedStatement 对象,SQL 的 id 即是 MappedStatement 的 id。
- 输入参数映射。在执行方法时,MappedStatement 对象会对用户执行 SQL 语句的输入参数进行定义(可以定义为 Map、List 类型、基本类型和 pojo 类型),Executor 执行器会通过 MappedStatement 对象在执行 SQL 前,将输入的 Java 对象映射到 SQL 语句中。这里对输入参数的映射过程就类似于 JDBC 编程中对 preparedStatement 对象设置参数的过程。
- 输出结果映射。在数据库中执行完 SQL 语句后,MappedStatement 对象会对 SQL 执行输出的结果进行定义(可以定义为 Map 和 List 类型、基本类型、pojo 类型),Executor 执行器会通过 MappedStatement 对象在执行 SQL 语句后,将输出结果映射至 Java 对象中。这种将输出结果映射到 Java 对象的过程就类似于 JDBC 编程中对结果的解析处理过程。
核心配置文件配置
MyBatis 核心配置文件 mybatis-config.xml 的主要元素如下所示:
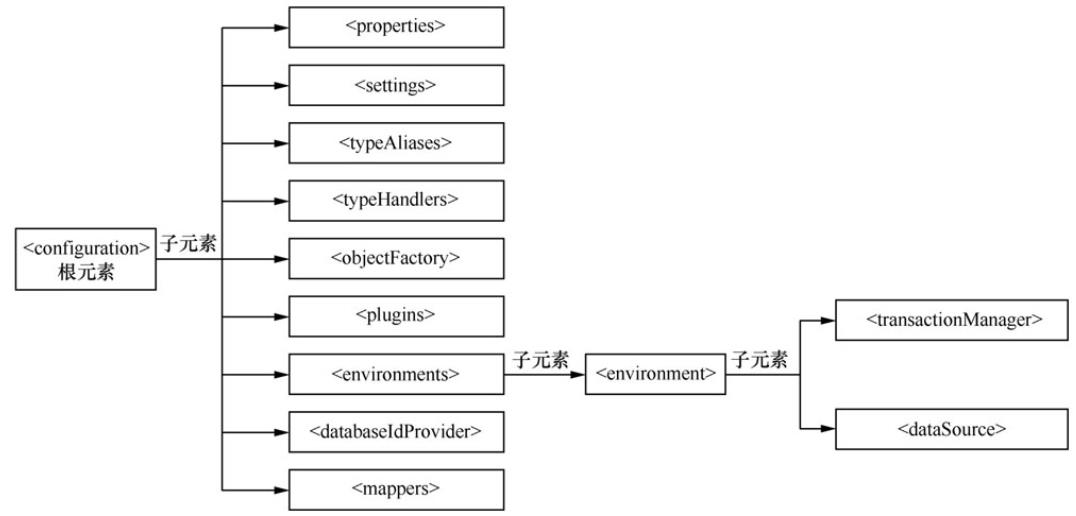
此处需要注意,<configuration> 的子元素必须按上图中的由上到下的顺序配置,不可以颠倒。
⭐️ <properties>标签
该标签用于配置属性,通常用于将内部的配置外在化,即通过外部的配置来动态地替换内部定义的配置。例如,数据的连接信息配置。
在 resource 目录下定义 jdbc.properties 文件:
jdbc.driver=com.mysql.cj.jdbc.Driver
jdbc.url=jdbc:mysql://localhost:3306/learning?characterEncoding=utf-8&useSSL=false&serverTimezone=Hongkong
jdbc.username=root
jdbc.password=123456
在<configuration>根标签下配置:
<!-- 加载外部配置的 properties 文件 -->
<properties resource="jdbc.properties"/>
此时<dataSource>标签就可以引用上述定义的配置:
<!-- 配置数据库连接池 -->
<dataSource type="POOLED">
    <!-- 配置连接数据库的4个基本信息 -->
    <property name="driver" value="${jdbc.driver}"/>
    <property name="url" value="${jdbc.url}"/>
    <property name="username" value="${jdbc.username}"/>
    <property name="password" value="${jdbc.password}"/>
</dataSource>
⭐️ <set>标签
MyBatis 在运行时有一些默认的配置,可以通过该标签更改这些默认配置,例如开启二级缓存,开启延迟加载,具体使用会出现在后续的介绍中。此处先只介绍 mapUnderscoreToCamelCase,该配置是用来开启自动驼峰命名规则(camel case)映射,默认值为 false。
<!-- 设置 -->
<settings>
    <!-- 是否开启自动驼峰命名规则(camel case)映射,默认值为 false -->
    <setting name="mapUnderscoreToCamelCase" value="true"/>
</settings>
开启该配置后,查询结果列会按照驼峰命名规则映射到 pojo 类的属性,例如名称为 a_column 的查询结果列会自动映射到属性 aColumn。
⭐️ <typeAliases>标签
该标签是用于为配置文件中的 Java 类型设置一个简短的名字,即设置别名。具体使用如下:
<typeAliases>
    <!-- 将 com.example.entity.Customer 的别名设置为 Customer -->
    <typeAlias type="com.example.entity.Customer" alias="Customer"/>
</typeAliases>
设置别名之后,在 MyBatis 文件的任意位置都可以使用 Customer 来代替com.example.entity.Customer。因此,入门案例中的 selectAll() 方法对应 SQL 的返回值类型可以设置为 Customer:
<select id="selectAll" resultType="Customer">
    select id, username, job, phone from t_customer
</select>
上述的方式只是单个别名定义,MyBatis 还可以通过包扫描的方式来批量别名定义:
<!-- 定义别名 -->
<typeAliases>
    <!-- 扫描指定包,包下所有的类的别名为类名(首字母大写或小写都可以)-->
    <package name="com.example.entity"/>
</typeAliases>
⭐️ <mappers>标签
该标签用于指定 MyBatis 映射文件的位置,一般可以使用以下三种方式:
1)使用 classpath 路径引入
<mappers>
    <!-- 使用相对 classpath 的路径 -->
    <mapper resource="mapper/CustomerMapper.xml"/>
</mappers>
2)使用 mapper 接口类路径引入
<mappers>
    <!-- 使用 mapper 接口类路径
         注意:此种方法要求 mapper 接口名称和 mapper 映射文件名称相同,且放在同一个目录中
    -->
    <mapper class="com.example.mapper.CustomerMapper"/>
</mappers>
3)使用包名引入
<!-- 配置 XML 映射文件位置 -->
<mappers>
    <!-- 注册指定包下的所有 mapper 接口
         注意:此种方法要求 mapper 接口名称和 mapper 映射文件名称相同,且放在同一个目录中。
    -->
    <package name="com.example.mapper"/>
</mappers>
⭐️ 最终的配置
数据库连接信息配置 jdbc.properties:
jdbc.driver=com.mysql.cj.jdbc.Driver
jdbc.url=jdbc:mysql://localhost:3306/learning?characterEncoding=utf-8&useSSL=false&serverTimezone=Hongkong
jdbc.username=root
jdbc.password=123456
MyBatis 的核心配置文件 mybatis-config.xml:
<?xml version="1.0" encoding="UTF-8" ?>
<!DOCTYPE configuration
        PUBLIC "-//mybatis.org//DTD Config 3.0//EN"
        "http://mybatis.org/dtd/mybatis-3-config.dtd">

<!-- configuration 是 MyBatis 配置文件的根标签 -->
<configuration>
    <!-- 加载外部配置的 properties 文件 -->
    <properties resource="jdbc.properties"/>

    <!-- 设置 -->
    <settings>
        <!-- 是否开启自动驼峰命名规则(camel case)映射,默认值为 false -->
        <setting name="mapUnderscoreToCamelCase" value="true"/>
    </settings>

    <!-- 定义别名 -->
    <typeAliases>
        <!-- 扫描指定包,包下所有的类的别名为类名(首字母大写或小写都可以)-->
        <package name="com.example.entity"/>
    </typeAliases>

    <!-- environments 标签:配置 MyBatis 的运行环境,内部可配置多个环境
         default 属性:指定要运行的那个环境的 id
     -->
    <environments default="development">
        <!-- 配置 id 为 development 的环境 -->
        <environment id="development">
            <!-- 使用 JDBC 的事务管理 -->
            <transactionManager type="JDBC"/>
            <!-- 配置数据库连接池 -->
            <dataSource type="POOLED">
                <!-- 配置连接数据库的4个基本信息 -->
                <property name="driver" value="${jdbc.driver}"/>
                <property name="url" value="${jdbc.url}"/>
                <property name="username" value="${jdbc.username}"/>
                <property name="password" value="${jdbc.password}"/>
            </dataSource>
        </environment>
    </environments>

    <!-- 配置 XML 映射文件位置 -->
    <mappers>
        <!-- 使用相对 classpath 的路径 -->
        <mapper resource="mapper/CustomerMapper.xml"/>
    </mappers>
</configuration>
CRUD 操作
Select 用法
📚 在 CustomerMapper 接口中定义接口方法:
Customer selectById(Integer id);
📚 在 CustomerMapper.xml 映射文件中添加相应的 SQL 语句:
<!-- 可重用的 sql 片段,通过 id 引用 -->
<sql id="Base_Column_List">
   id, username, job, phone
</sql>

<select id="selectById" resultType="Customer">
   select
   <include refid="Base_Column_List"/>
   from t_customer where id = #{id}
</select>
<select>标签的属性如下:
- id:唯一标识符,代表这条语句,一般与对应的接口方法名相同。
- parameterType:可选属性,用于指定传入参数的类型,但是 MyBatis 可以通过 TypeHandler 推断出具体的参数类型,所以该属性可以省略。
- resultType:设置语句返回类型的全限定类名或别名。如果返回类型的是集合,该属性设置为集合中包含的类型,而不是集合本身。不能与 resultMap 同时使用。
- resultMap:表示外部 resultMap 的命名引用,不能与 resultType 同时使用。
📚 对 selectById() 进行测试:
@Test
public void selectById() {
    System.out.println(customerMapper.selectById(1));
}
==>  Preparing: select id, username, job, phone from t_customer where id = ?
==> Parameters: 1(Integer)
<==    Columns: id, username, job, phone
<==        Row: 1, joy, doctor, 11111111111
<==      Total: 1
Customer(id=1, username=joy, job=doctor, phone=11111111111)
📚 <resultMap>标签设置字段映射
前面的案例中,查询结果列数据能直接注入 Java 对象中,是因为列名称和 Java 属性名称相同。如果列名称和属性名称不相同或者不满足自动驼峰命名规则映射,例如列名称为 username 而对应属性名称为 name,那么该列的数据将无法注入对应属性。此时可以通过使用<resultMap>标签设置字段映射来注入数据。
<resultMap>标签是用于设置查询结果列和 Java 对象属性的映射关系,通过设置 column 和 property 可以将查询结果列映射到指定 Java 对象属性上。
在 CustomerMapper 接口中定义接口方法:
Customer selectByUsername(String username);
在 CustomerMapper.xml 中添加相应的 SQL 语句:
<resultMap id="customerMap" type="Customer">
    <!-- 主键字段映射 -->
    <id property="id" column="id"/>
    <!-- 普通字段映射 -->
    <result property="username" column="name"/>
    <result property="job" column="job"/>
    <result property="phone" column="phone"/>
</resultMap>

<select id="selectByUsername" resultMap="customerMap">
    select id, username name, job, phone
    from t_customer where username = #{username}
</select>
<resultMap>标签的属性如下:
- id:必填,唯一标识。
<select>标签的 resultMap 属性引用此处的 id 值。 - type:必填,用于配置查询结果所映射到的 Java 对象类型。
<resultMap>标签的子标签如下:
<id>:配置查询结果的主键字段和 Java 对象属性的映射。<result>:配置查询结果的普通字段和 Java 对象属性的映射。
<id>和<result>子标签的属性如下:
- column:从数据库得到的列名,或者列的别名。
- property:映射到列结果的 Java 对象属性名。
对 selectByUsername() 方法进行测试:
@Test
public void selectByUsername() {
    System.out.println(customerMapper.selectByUsername("jack"));
}
==>  Preparing: select id, username name, job, phone from t_customer where username = ?
==> Parameters: jack(String)
<==    Columns: id, name, job, phone
<==        Row: 2, jack, teacher, 22222222222
<==      Total: 1
Customer(id=2, username=jack, job=teacher, phone=22222222222)
Insert 用法
普通插入方法
✌ 在 CustomerMapper 接口中定义接口方法:
int insert(Customer customer);
✌ 在 CustomerMapper.xml 中添加相应的 SQL 语句:
<insert id="insert">
    insert into t_customer values (#{id}, #{username}, #{job}, #{phone})
</insert>
此处需要注意两点:
- 当接口方法的传入参数是一个 pojo 类型时,占位符
#{}可以直接使用对象的属性名,使用的是 OGNL 表达式,即#{username}会去查询传入参数 customer 的 getUsername() 方法的返回值。 - insert() 方法的 int 类型返回值不是数据库自增的主键,而是执行的 SQL 影响的行数。删除和更新方法的 int 类型返回值也是指影响的行数。
✌ 对 insert() 方法进行测试:
@After
public void end() throws IOException {
    // 在进行增删改操作时,一定要使用 commit() 方法提交事务,要不然数据库不会更新记录
    // 提交事务
    sqlSession.commit();
    // 释放 SqlSession
    sqlSession.close();
}

@Test
public void insert() {
    Customer customer = new Customer(4, "mark", "student", "44444444444");
    // 返回的是执行的 SQL 影响的行数
    int result = customerMapper.insert(customer);
    // 影响的行数为 1
    Assert.assertEquals(1, result);
}
==>  Preparing: insert into t_customer values (?, ?, ?, ?)
==> Parameters: 4(Integer), mark(String), student(String), 44444444444(String)
<==    Updates: 1
需要注意:MyBatis 的增删改操作,必须使用 commit() 方法提交事务。查询方法不必提交事务,因为查询操作不修改数据,事务的提交反而影响性能。
主键自增回写
虽然 insert() 方法的返回值不是数据库的自增主键,但是可以通过配置相关属性让自增主键回写。
✍ 在 CustomerMapper 接口中定义接口方法:
int insert2(Customer customer);
✍ 在 CustomerMapper.xml 中添加相应的 SQL 语句:
<insert id="insert2" useGeneratedKeys="true" keyProperty="id">
    insert into t_customer(username, job, phone) values (#{username}, #{job}, #{phone})
</insert>
<insert>元素大部分属性和<select>相同,但是拥有三个特有的属性:
- useGeneratedKeys:默认值为 false。此属性会使 MyBatis 使用 JDBC 的 getGeneratedKeys() 方法来获取由数据库内部生产的主键值,如 MySQL 自增的主键值。
- keyProperty:此属性的作用是将插入或更新操作时的返回值赋值给 pojo 的某个属性,通常会设置为主键对应的属性。如果需要设置联合主键,可以在多个值之间用逗号隔开。
- keyColumn:此属性用于设置第几列是主键,当主键列不是表中的第一列时需要设置。在需要主键联合时,值可以用逗号隔开。
上述语句中,设置useGeneratedKeys="true"使得 MyBatis 使用数据库自增的主键;设置keyPropert="id"使得插入操作时自增的主键值回写到传入参数 customer 对象的 id 属性中。
✍ 对 insert2() 方法进行测试:
@Test
public void insert2() {
    Customer customer = new Customer(null, "Alice", "student", "55555555555");
    // 返回的是执行的 SQL 影响的行数
    int result = customerMapper.insert2(customer);
    // 影响的行数为 1
    Assert.assertEquals(1, result);
    // 自增主键回写进 customer 的 id 属性
    Assert.assertEquals(5, (long)customer.getId());
    System.out.println(customer);
}
==>  Preparing: insert into t_customer(username, job, phone) values (?, ?, ?)
==> Parameters: Alice(String), student(String), 55555555555(String)
<==    Updates: 1
Customer(id=5, username=Alice, job=student, phone=55555555555)
Update 用法
✏️ 在 CustomerMapper 接口中定义接口方法:
int updateById(Customer customer);
✏️ 在 CustomerMapper.xml 中添加相应的 SQL 语句:
<update id="updateById">
    update t_customer
    set username=#{username}, job=#{job}, phone=#{phone}
    where id=#{id}
</update>
✏️ 对 updateById() 进行测试:
@Test
public void updateById() {
    Customer customer = new Customer(5, "Alice", "teacher", "55555555555");
    // 返回的是执行的 SQL 影响的行数
    int result = customerMapper.updateById(customer);
    // 影响的行数为 1
    Assert.assertEquals(1, result);
}
=>  Preparing: update t_customer set username=?, job=?, phone=? where id=?
==> Parameters: Alice(String), teacher(String), 55555555555(String), 5(Integer)
<==    Updates: 1
Delete 用法
💡 在 CustomerMapper 接口中定义接口方法:
int deleteById(Integer id);
💡 在 CustomerMapper.xml 中添加相应的 sql 语句:
<delete id="deleteById">
    delete from t_customer where id=#{id}
</delete>
💡 对 deleteById() 方法进行测试:
@Test
public void deleteById() {
    // 返回的是执行的 SQL 影响的行数
    int result = customerMapper.deleteById(4);
    // 影响的行数为 1
    Assert.assertEquals(1, result);
}
==>  Preparing: delete from t_customer where id=?
==> Parameters: 4(Integer)
<==    Updates: 1
SQL 语句的传参
前面已经介绍了 MyBatis 的 CURD 的简易实现,现在具体介绍下 SQL 语句的传参。SQL 语句传入参数可以是基本类型,引用类型(例如:String 类型),还可以是实体类类型(pojo 类),并且传入参数的个数可以不止一个,下面将进行讨论。
参数绑定规则
📚 当传入单个参数,且参数类型为简单数据类型(基本类型和字符串类型)时,在映射文件中,#{}里可以写任意值,MyBatis 不关心这个参数叫什么,会直接把这个唯一的参数拿来使用。
Customer selectById(Integer id);
<!-- MyBatis 不关心单个简单数据类型的参数叫什么,所以 #{AAAA} 运行结果也是正确的 -->
<select id="selectById" resultType="Customer">
    select id, username, job, phone
    from t_customer
    where id = #{AAAA}
</select>
@Test
public void selectById() {
    System.out.println(customerMapper.selectById(1));
}
==>  Preparing: select id, username, job, phone from t_customer where id = ?
==> Parameters: 1(Integer)
<==    Columns: id, username, job, phone
<==        Row: 1, joy, doctor, 11111111111
<==      Total: 1
Customer(id=1, username=joy, job=doctor, phone=11111111111)
📚 当传入单个参数,且参数类型为 pojo 类时,直接使用#{属性名}取出 pojo 对象的属性值,使用#{pojo对象名.属性名}反而会抛出异常。需要注意,#{属性名}取值是使用 OGNL 表达式,所以相关属性要有 get 方法。
List<Customer> selectByUsernameLikeAndJob(Customer customer);
<select id="selectByUsernameLikeAndJob" resultType="Customer">
    select id, username, job, phone
    from t_customer
    where username like concat('%', #{username}, '%') and job = #{job}
</select>
@Test
public void selectByUsernameLikeAndJob() {
    Customer customer = new Customer();
    customer.setUsername("j");
    customer.setJob("doctor");

    List<Customer> customers = customerMapper.selectByUsernameLikeAndJob(customer);
    customers.forEach(System.out::println);
}
==>  Preparing: select id, username, job, phone from t_customer where username like concat('%', ?, '%') and job = ?
==> Parameters: j(String), doctor(String)
<==    Columns: id, username, job, phone
<==        Row: 1, joy, doctor, 11111111111
<==      Total: 1
Customer(id=1, username=joy, job=doctor, phone=11111111111)
📚 当传入单个参数,且参数类型为集合或者数组时,传入的参数会被封装进一个 Map 中,如果参数类型为集合,则 key 为 collection;如果参数类型为 List,还会添加一个 list 的 key;如果参数类型为数组,则 key 为 array。在映射文件中,使用#{list}和#{array}从 Map 中获取 List 集合和数组,使用#{list[0]}和#{array[0]}这种索引的方式分别获取 List 和数组的第一个元素。
List<Customer> selectByUsernameLikeAndJob(List<Customer> customerList);
<select id="selectByUsernameLikeAndJob" resultType="Customer">
    select id, username, job, phone
    from t_customer
    where username like concat('%', #{list[0].username}, '%') and job = #{list[0].job}
</select>
@Test
public void selectByUsernameLikeAndJob() {
    Customer customer = new Customer();
    customer.setUsername("j");
    customer.setJob("doctor");

    List<Customer> customers = customerMapper.selectByUsernameLikeAndJob(Arrays.asList(customer));
    customers.forEach(System.out::println);
}
==>  Preparing: select id, username, job, phone from t_customer where username like concat('%', ?, '%') and job = ?
==> Parameters: j(String), doctor(String)
<==    Columns: id, username, job, phone
<==        Row: 1, joy, doctor, 11111111111
<==      Total: 1
Customer(id=1, username=joy, job=doctor, phone=11111111111)
📚 当传入多个参数时,所有参数会被封装进一个 Map,param1...paramN作为 key,对应索引位置的参数值作为 value。在映射文件中,使用#{param1}从 Map 中获取指定 key 的 value。
List<Customer> selectByUsernameLikeAndJob(String username, String job);
<select id="selectByUsernameLikeAndJob" resultType="Customer">
    select id, username, job, phone
    from t_customer
    where username like concat('%', #{param1}, '%') and job = #{param2}
</select>
@Test
public void selectByUsernameLikeAndJob() {
    List<Customer> customers = customerMapper.selectByUsernameLikeAndJob("j", "doctor");
    customers.forEach(System.out::println);
}
==>  Preparing: select id, username, job, phone from t_customer where username like concat('%', ?, '%') and job = ?
==> Parameters: j(String), doctor(String)
<==    Columns: id, username, job, phone
<==        Row: 1, joy, doctor, 11111111111
<==      Total: 1
Customer(id=1, username=joy, job=doctor, phone=11111111111)
📚 当传入的参数被 @Param 注解指定名字时,无论参数有多少个,都会被封装进一个 Map。此时,@Param 注解指定的名字作为 key,对应参数值作为 value。
List<Customer> selectByUsernameLikeAndJob(@Param("c") Customer customer);
<select id="selectByUsernameLikeAndJob" resultType="Customer">
    select id, username, job, phone
    from t_customer
    where username like concat('%', #{c.username}, '%') and job = #{c.job}
</select>
此处需要注意,如果单纯传入单个 pojo 对象,可以直接使用#{属性名}取出对象的属性值;但是如果该 pojo 对象被 @Param 注解指定名字,那么只能使用#{指定名字.属性名}的方式取出对象的属性值。这是因为 pojo 对象被 @Param 修饰后,被封装进一个 Map,所以要先从 Map 中取出该 pojo 对象。
@Test
public void selectByUsernameLikeAndJob() {
    Customer customer = new Customer();
    customer.setUsername("j");
    customer.setJob("doctor");

    List<Customer> customers = customerMapper.selectByUsernameLikeAndJob(customer);
    customers.forEach(System.out::println);
}
==>  Preparing: select id, username, job, phone from t_customer where username like concat('%', ?, '%') and job = ?
==> Parameters: j(String), doctor(String)
<==    Columns: id, username, job, phone
<==        Row: 1, joy, doctor, 11111111111
<==      Total: 1
Customer(id=1, username=joy, job=doctor, phone=11111111111)
多个参数的用法
当需要传入多个参数时,可以将多个参数封装为一个 pojo 对象,但并不适合全部的情况,因为不能只为了两三个参数去创建新的 pojo 类,因此对于参数比较少的情况,还有两种方式可以采用:使用 Map 类型作为参数和使用 @Param 注解。
✌ 使用 Map 类型作为参数
List<Customer> selectByJobAndPhone(Map<String, Object> map);
<select id="selectByJobAndPhone" resultType="customer">
    select id, username, job, phone
    from t_customer
    where job=#{job} and phone=#{phone}
</select>
这里#{job}和#{phone}参数名是传入 Map 的 key。下面对 selectByJobAndPhone() 进行测试:
@Test
public void selectByJobAndPhone() {
    Map<String, Object> map = new HashMap<>();
    map.put("job", "teacher");
    map.put("phone", "55555555555");

    List<Customer> customers = customerMapper.selectByJobAndPhone(map);
    customers.forEach(System.out::println);
}
==>  Preparing: select id, username, job, phone from t_customer where job=? and phone=?
==> Parameters: teacher(String), 55555555555(String)
<==    Columns: id, username, job, phone
<==        Row: 5, Alice, teacher, 55555555555
<==      Total: 1
Customer(id=5, username=Alice, job=teacher, phone=55555555555)
✌ 使用 @Param 注解
List<Customer> selectByJobAndPhone2(@Param("job") String job, @Param("phone") String phone);
<select id="selectByJobAndPhone2" resultType="Customer">
    select id, username, job, phone
    from t_customer
    where job=#{job} and phone=#{phone}
</select>
这里#{job}和#{phone}参数名是 @Param 注解指定的名字。下面对 selectByJobAndPhone2() 进行测试:
@Test
public void selectByJobAndPhone2() {
    List<Customer> customers = customerMapper.selectByJobAndPhone2("teacher", "55555555555");
    customers.forEach(System.out::println);
}
==>  Preparing: select id, username, job, phone from t_customer where job=? and phone=?
==> Parameters: teacher(String), 55555555555(String)
<==    Columns: id, username, job, phone
<==        Row: 5, Alice, teacher, 55555555555
<==      Total: 1
Customer(id=5, username=Alice, job=teacher, phone=55555555555)
需要注意:如果在动态 SQL 中使用了简单数据类型的参数作为判断条件,该参数需要使用 @Param 注解指定名字,即便只有一个参数。
动态 SQL
前面我们使用的 SQL 语句都是比较简单的,有些时候业务逻辑复杂时,我们的 SQL 是动态变化的,此处就需要使用动态 SQL。
if 用法
<if>元素是最常用的判断语句,可类比于 Java 的 if 语句,用于实现某些简单的条件选择。
✍ where 条件中使用<if>
下面定义一个高级查询功能。该查询能支持以下三种情况:当只输入客户名时,根据客户名进行模糊查询;当只输入职业时,根据职业进行完全匹配;当同时输入客户名和职业时,用这两个条件去查询匹配的客户。
List<Customer> selectByCustomer(Customer customer);
<select id="selectByCustomer" resultType="Customer">
    select id, username, job, phone
    from t_customer
    where 1 = 1
    <!-- 只有 test 属性中的表达式为 true,才会拼接字符串 -->
    <if test="username != null and username != ''">
        and username like concat('%', #{username}, '%')
    </if>
    <if test="job != null and job != ''">
        and job = #{job}
    </if>
</select>
test 是<if>标签中的必填属性,属性值是一个符合 OGNL 要求的判断表达式,表达式的结果为 true 或 false。为了避免 SQL 语法错误导致的异常,我们在 where 关键字后加了1 = 1条件,这种写法不美观,可以使用<where>标签代替,后续会介绍。下面对 selectByCustomer() 方法进行测试:
@Test
public void selectByCustomer() {
    Customer customer = new Customer();
    customer.setUsername("j");
    customer.setJob("teacher");

    List<Customer> customers = customerMapper.selectByCustomer(customer);
    customers.forEach(System.out::println);
}
==>  Preparing: select id, username, job, phone from t_customer where 1 = 1 and username like concat('%', ?, '%') and job = ?
==> Parameters: j(String), teacher(String)
<==    Columns: id, username, job, phone
<==        Row: 2, jack, teacher, 22222222222
<==      Total: 1
Customer(id=2, username=jack, job=teacher, phone=22222222222)
✍ 在 update 更新列中使用<if>
下面定义一个选择性更新方法,只更新有变化的字段,不能将原来有值但没有发生变化的字段更新为空或 null。
int updateByIdSelective(Customer customer);
<update id="updateByIdSelective">
    update t_customer
    set
    <!-- 只有 test 属性中的表达式为 true,才会拼接字符串 -->
    <if test="username != null and username != ''">
        username = #{username},
    </if>
    <if test="job != null and job != ''">
        job = #{job},
    </if>
    <if test="phone != null and phone != ''">
        phone = #{phone},
    </if>
    id = #{id}
    where id = #{id}
</update>
动态 SQL 也提供了一个<set>标签,后续会介绍。下面对 updateByIdSelective() 方法进行测试:
@Test
public void updateByIdSelective() {
    Customer customer = new Customer();
    customer.setId(2);
    customer.setJob("student");

    int result = customerMapper.updateByIdSelective(customer);
    Assert.assertEquals(1, result);
}
==>  Preparing: update t_customer set job = ?, id = ? where id = ?
==> Parameters: student(String), 2(Integer), 2(Integer)
<==    Updates: 1
✍ 在 insert 动态插入列中使用<if>
下面定义一个动态插入列的方法。在数据库表中插入数据的时候,如果某一列的参数值不为空,就使用传入的值;如果传入参数为空,就不使用传入的空值。
int insertSelective(Customer customer);
<!-- 使用数据库自增主键,并将新产生的主键回填进传入的 pojo -->
<insert id="insertSelective" useGeneratedKeys="true" keyProperty="id">
    insert into t_customer(
        <!-- 只有 test 属性中的表达式为 true,才会拼接字符串 -->
        <if test="job != null and job != ''">
            job,
        </if>
        <if test="phone != null and phone != ''">
            phone,
        </if>
    	username)
    values(
        <if test="job != null and job != ''">
            job = #{job},
        </if>
        <if test="phone != null and phone != ''">
            phone = #{phone},
        </if>
    	#{username})
</insert>
对 insertSelective() 方法进行测试:
@Test
public void insertSelective() {
    Customer customer = new Customer();
    customer.setUsername("Bob");

    int result = customerMapper.insertSelective(customer);
    Assert.assertEquals(1, result);
}
==>  Preparing: insert into t_customer( username) values( ?)
==> Parameters: Bob(String)
<==    Updates: 1
choose 用法
<if>标签能提供了基本的条件判断,但有时需要从多个选项中选择一个去执行。
下面定义一个查询需求,当参数 id 有值优先使用 id 查询;当 id 没有值时,就去判断客户名是否有值,如果有值就用客户名查询,如果无值,那么 SQL 查询无结果。
Customer selectByIdOrUsername(Customer customer);
<select id="selectByIdOrUsername" resultType="Customer">
    select id, username, job, phone
    from t_customer
    where 1 = 1
    <!-- 相当于 Java 的 switch...case...default -->
    <choose>
        <when test="id != null">
            and id = #{id}
        </when>
        <when test="username != null and username != ''">
            and username = #{username}
        </when>
        <otherwise>
            and 1 = 2
        </otherwise>
    </choose>
</select>
choose...when...otherwise标签相当于 Java 的switch...case...default,从多个选项选择一个去执行。一个 choose 中至少有一个 when,有 0 个或者 1 个 otherwise。下面对 selectByIdOrUsername() 方法进行测试:
@Test
public void selectByIdOrUsername() {
    Customer customer = new Customer();
    customer.setUsername("jack");

    System.out.println(customerMapper.selectByIdOrUsername(customer));
}
==>  Preparing: select id, username, job, phone from t_customer where 1 = 1 and username = ?
==> Parameters: jack(String)
<==    Columns: id, username, job, phone
<==        Row: 2, jack, student, 22222222222
<==      Total: 1
Customer(id=2, username=jack, job=student, phone=22222222222)
where、set、trim 用法
这 3 个标签解决了类似的问题,并且<where>和<set>都属于<trim>的一种特殊用法。
where 用法
使用<where>标签重写 selectByCustomer() 方法对应的 SQL:
<select id="selectByCustomer" resultType="com.example.entity.Customer">
    select id, username, job, phone
    from t_customer
    <!-- 如果 <where> 标签内元素有返回值,自动在 SQL 语句前添加 where 关键字;
         如果关键字 where 后面的字符串是多余的 and 或 or,也会自动去除
    -->
    <where>
        <if test="username != null and username != ''">
            and username like concat('%', #{username}, '%')
        </if>

        <if test="job != null and job != ''">
            and job = #{job}
        </if>
    </where>
</select>
set 用法
使用<set>标签重写 updateByIdSelective() 方法对应的 SQL:
<update id="updateByIdSelective">
    update t_customer
    <!-- 如果 <set> 标签内元素有返回值,自动在 SQL 语句前添加 set 关键字
    	 如果 set 后面的 SQL 语句是以逗号结尾的,会将最后一个多余的逗号去除
    -->
    <set>
        <if test="username != null and username != ''">
            username = #{username},
        </if>
        <if test="job != null and job != ''">
            job = #{job},
        </if>
        <if test="phone != null and phone != ''">
            phone = #{phone},
        </if>
        id = #{id},
    </set>
    where id = #{id}
</update>
在<set>标签的用法中,SQL 后面的逗号会自动去除,但是如果 set 元素中没有内容,仍会出现 SQL 错误,所以为了避免错误产生,类似id=#{id}这样条件还需保留。
trim 用法
<where>和<set>标签的功能都可以用 trim 标签来实现。
💡 <where>标签对应<trim>实现如下:
<trim prefix="where" prefixOverrides="and |or ">
    ...
</trim>
注意:这里的 and 和 or 后面的空格不能省略,为了避免匹配到 andes、orders 等单词。
💡 <set>标签对应<trim>实现如下:
<trim prefix="set" suffixOverrides=",">
    ...
</trim>
💡 <trim>标签属性
- prefix:当
<trim>标签内包含内容时,会给内容增加 prefix 指定的前缀。 - prefixOverrides:当
<trim>标签内包含内容时,会把内容中匹配的前缀字符串去掉。 - suffix:当
<trim>标签内包含内容时,会给内容增加 suffix 指定的后缀。 - suffixOverrides:当
<trim>标签内包含内容时,会把内容中匹配的后缀字符串去掉。
foreach 用法
基本使用
<foreach> 元素通常在构建 in 条件语句时使用,用于数组和集合循环遍历。
下面定义一个根据传入的客户 id 集合查询出所有符合条件的客户方法:
List<Customer> findCustomerByIds(List<Integer> ids);
<select id="findCustomerByIds" resultType="Customer">
    select id, username, job, phone
    from t_customer where id in
    <foreach collection="list" item="id" index="index"
             open="(" separator="," close=")">
        #{id}
    </foreach>
</select>
<foreach>标签属性如下:
- collection:必填,值为要选代循环的属性名。这个属性值的情况有很多。
- item:变量名,值为从迭代对象中取出的每一个值。
- index:索引的属性名,在集合数组情况下值为当前索引值, 当选代循环的对象是 Map 类型时,这个值为 Map 的 key (键值)。
- open/close:整个循环内容开头/结尾的字符串。
- separator:每次循环的分隔符。
在使用<foreach>时,collection 属性必须设置。在不同情况下,该属性值不一样的:
☕️ 传入的单个参数类型为集合或数组
前面也提到,当传入的单个参数类型是集合或数组时,会被封装进一个 Map:
- 如果参数类型是集合,会添加一个 key 为 collection 的值;如果参数类型是 List 集合,还会继续添加一个 key 为 list 的值;因此,当需要遍历传入的 List 集合时,设置
collection = "list"。 - 如果参数类型是数组,会添加一个 key 为 array 的值。因此,当需要遍历数组时,设置
collection = "array"。
上面提到的是数组或集合参数在 Map 中的默认名字,推荐使用 @Param 来指定名字,这时 collection 就可以设置为 @Param 注解指定的名字。
☕️ 传入多个参数
当有多个参数的时候,一般需要使用 @Param 注解给每个参数指定一个名字,否则在 SQL 中使用参数就会不方便,因此将 collection 设置为 @Param 注解指定的名字即可。
☕️ 传入的参数是 Map
使用 Map 和使用 @Param 注解方式类似,如果想循环的是 Map 中的某个 value,将 collection 指定为对应的 key 即可。如果要循环的是所传入的 Map,推荐使用 @Param 注解指定名字,此时可将 collection 设置为指定的名字;如果不想指定名字,就使用默认值_parameter,_parameter是 MyBatis 的内置参数,代表整个传入参数。
☕️ 传入参数是 pojo 对象
这种情况下指定为对象的属性名即可。当使用对象内多层嵌套的对象时,使用属性.属性(集合和数组可以使用下标取值)的方式可以指定深层的属性值。
对 findCustomerByIds() 方法进行测试:
@Test
public void findCustomerByIds() {
    List<Integer> ids = new ArrayList<>();
    ids.add(1);
    ids.add(2);

    List<Customer> customers = customerMapper.findCustomerByIds(ids);
    customers.forEach(System.out::println);
}
==>  Preparing: select id, username, job, phone from t_customer where id in ( ? , ? )
==> Parameters: 1(Integer), 2(Integer)
<==    Columns: id, username, job, phone
<==        Row: 1, joy, doctor, 11111111111
<==        Row: 2, jack, student, 22222222222
<==      Total: 2
Customer(id=1, username=joy, job=doctor, phone=11111111111)
Customer(id=2, username=jack, job=student, phone=22222222222)
实现批量插入
int insertList(List<Customer> customerList);
<insert id="insertList" useGeneratedKeys="true" keyProperty="id">
    insert into t_customer(username, job, phone) values
    <foreach collection="list" item="c" separator=",">
        (#{c.username}, #{c.job}, #{c.phone})
    </foreach>
</insert>
对 insertList() 进行测试:
@Test
public void insertListTest() {
    List<Customer> customerList = new ArrayList<>();
    customerList.add(new Customer(null, "A", "Student", null));
    customerList.add(new Customer(null, "B", "Student", null));
    customerList.add(new Customer(null, "C", "Student", null));
    int result = customerMapper.insertList(customerList);
    Assert.assertEquals(3, result);
}
==>  Preparing: insert into t_customer(username, job, phone) values (?, ?, ?) , (?, ?, ?) , (?, ?, ?)
==> Parameters: A(String), Student(String), null, B(String), Student(String), null, C(String), Student(String), null
<==    Updates: 3
实现动态更新
int updateByMap(@Param("map") Map<String, Object> map);
<update id="updateByMap">
    update t_customer
    set
    <foreach collection="map" index="key" item="val" separator=",">
        ${key} = #{val}
    </foreach>
    where id = #{map.id}
</update>
对 updateByMap() 方法进行测试:
@Test
public void updateByMap() {
    Map<String, Object> map = new HashMap<>();
    map.put("id", 1);
    map.put("phone", "1234566777");

    int result = customerMapper.updateByMap(map);
    Assert.assertEquals(1, result);
}
==>  Preparing: update t_customer set phone = ? , id = ? where id = ?
==> Parameters: 1234566777(String), 1(Integer), 1(Integer)
<==    Updates: 1
bind 用法
<bind>元素可以通过 OGNL 表达式来创建一个上下文变量。
List<Customer> selectByNameLike(Customer customer);
<select id="selectByNameLike" resultType="Customer">
    <bind name="pattern_username" value="'%' + username + '%'"/>
    select id, username, job, phone
    from t_customer
    where username like #{pattern_username}
</select>
对 selectByNameLike() 方法进行测试:
@Test
public void testSelectByNameLike() {
    Customer c = new Customer();
    c.setUsername("j");

    List<Customer> customers = customerMapper.selectByNameLike(c);
    customers.forEach(System.out::println);
}
==>  Preparing: select id, username, job, phone from t_customer where username like ?
==> Parameters: %j%(String)
<==    Columns: id, username, job, phone
<==        Row: 1, joy, doctor, 1234566777
<==        Row: 2, jack, student, 22222222222
<==      Total: 2
Customer(id=1, username=joy, job=doctor, phone=1234566777)
Customer(id=2, username=jack, job=student, phone=22222222222)
内置参数_paramter
MyBatis 里存在一个内置参数_paramter,该内置参数表示整个传入参数。
- 当传入单个参数时,
_parameter就是这个参数; - 当传入多个参数时,参数会被封装为一个 map,
_parameter就是代表这个map。
下面对 selectByCustomer() 方法对应的 SQL 进行重写:
List<Customer> selectByCustomer(Customer customer);
<select id="selectByCustomer" resultType="Customer">
    select id, username, job, phone
    from t_customer
    <where>
        <if test="_parameter.username != null and _parameter.username != ''">
            and username like concat('%', #{_parameter.username}, '%')
        </if>

        <if test="_parameter.job != null and _parameter.job != ''">
            and job = #{_parameter.job}
        </if>
    </where>
</select>
上述语句中,_parameter代表着传入的参数 customer,可以使用_parameter.属性名获取其属性值。


【推荐】编程新体验,更懂你的AI,立即体验豆包MarsCode编程助手
【推荐】凌霞软件回馈社区,博客园 & 1Panel & Halo 联合会员上线
【推荐】抖音旗下AI助手豆包,你的智能百科全书,全免费不限次数
【推荐】博客园社区专享云产品让利特惠,阿里云新客6.5折上折
【推荐】轻量又高性能的 SSH 工具 IShell:AI 加持,快人一步
· Java 中堆内存和栈内存上的数据分布和特点
· 开发中对象命名的一点思考
· .NET Core内存结构体系(Windows环境)底层原理浅谈
· C# 深度学习:对抗生成网络(GAN)训练头像生成模型
· .NET 适配 HarmonyOS 进展
· 本地部署 DeepSeek:小白也能轻松搞定!
· 如何给本地部署的DeepSeek投喂数据,让他更懂你
· 从 Windows Forms 到微服务的经验教训
· 李飞飞的50美金比肩DeepSeek把CEO忽悠瘸了,倒霉的却是程序员
· 超详细,DeepSeek 接入PyCharm实现AI编程!(支持本地部署DeepSeek及官方Dee