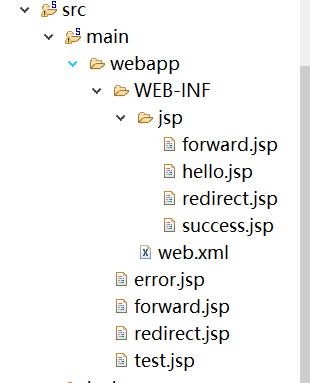
springMVC应用入门
此文主要讲解springMVC中的请求和转发的使用;以及参数绑定的使用。
一、ModelAndView
比较简单,直接列代码。
    /*
     * ModelAndView测试
     */
    @RequestMapping("a")
    public ModelAndView a() {
        ModelAndView mav = new ModelAndView();
        mav.addObject("msg", "a");
        mav.setViewName("hello");
        return mav;
    }
    //localhost/a 正常输出
    //localhost/b 报错。
    /*@RequestMapping("abcd") //错误示例
    public void bbbb(ModelAndView mav) {
        mav.addObject("msg", "b");
        mav.setViewName("hello");//不返回值则默认返回请求路径的对应的jsp。如:"/a"->"a.jsp";"/a/b/c"->/a/b/c.jsp
     }*/
    @RequestMapping("b")//这个才是正确用法,上面那个是错误的
    public ModelAndView b(ModelAndView mav) {
        mav.addObject("msg", "b");
        mav.setViewName("hello");
        return mav ;
     }
二、重定向和转发

1、servlet方式实现。
/**
     * 使用resquest和response进行:重定向测试、服务器转发测试(本质上就是使用原生的servlet进行操作的)
     * @throws IOException
     */
    @RequestMapping("rA")
    public void redirectA(HttpServletResponse resp) throws IOException {
        resp.sendRedirect("redirect.jsp");
        //resp.sendRedirect("/WEB-INF/jsp/redirect.jsp");重定向是无法访问安全目录WEB-INF下的
    }
    @RequestMapping("fA")
    public void forwardA(HttpServletRequest req, HttpServletResponse rsp) throws ServletException, IOException {
        req.getRequestDispatcher("/WEB-INF/jsp/forward.jsp").forward(req, rsp);//转发可以访问WEB-INF下的文件
    }
    @RequestMapping("fB")
    public void forwardB(HttpServletRequest req, HttpServletResponse rsp) throws ServletException, IOException {
        req.getRequestDispatcher("redirect.jsp").forward(req, rsp);//请求jsp文件
    }
    @RequestMapping("fC")
    public void forwardC(HttpServletRequest req, HttpServletResponse rsp) throws ServletException, IOException {
        req.getRequestDispatcher("fB").forward(req, rsp);//表示再请求/fB
    }
2、使用springmvc特性实现。
/**
     * 使用springmvc的特性重新进行【重定向】和【转发】测试(返回类型是一个String语义)
     */
    @RequestMapping("mvcrA")
    public String testRedirectA() {
        return "redirect:WEB-INF/jsp/redirect.jsp";//浏览器是无法直接访问WEB-INF下的文件的,所以这个方法会报错
    }
    @RequestMapping("/mvcrB")
    public String testRedirectB() {
        return "redirect:redirect.jsp";
    }
    @RequestMapping("mvcrC")
    public String testRedirectC() {//错误示例,请求会报错。
        //注意此处是重定向一个新请求localhost/${contextPath}/redirect
        //如果写成"redirect:redirect",则重定向的路径就是localhost/${contextPath}/窄化路径xxx/redirect
        //一定要注意这两点的区别。可以把斜杠"/"理解为绝对路径的意思,不带斜杠表示相对路径。
        return "redirect:/redirect";
    }
    @RequestMapping("mvcfA")
    public String testForwardA() {
        return "forward:WEB-INF/jsp/forward.jsp";
    }
    @RequestMapping("mvcfB")
    public String testForwardB() {
        return "forward:forward.jsp";
    }
三、ResponseBody注解
方法上添加ResponseBody注解之后,就表示返回的是数据。而不是视图。
/**
     * springmvc直接返回测试数据。
     * HttpMessageConverter
     * 可以使用ResponseBody注解;也可以使用Controller和ResponseBody的结合注解:RestConTroller
     */
    @RequestMapping(value="returnString",produces="text/plain;charset=UTF-8")
    @ResponseBody
    public String returnString() {
        //如果返回值是String类型,则返回值会由StringHttpMessageConverter进行处理
        return "返回一个字符串";
    }
    @RequestMapping(value="returnPOJO",produces="application/json;charset=UTF-8")
    @ResponseBody
    public Hero returnPOJO() {
        Hero hero = new Hero();
        hero.setId(1);
        hero.setName("姜子牙");
        hero.setRemark("法师");
        hero.setLevel(666);
        //如果返回值是pojo类型,则会由MappingJacksonHttpMessageConverter(需要第三方jar包支持)进行处理
        return hero;
    }
四、参数绑定
success.JSP代码
<body>
    ${msg}<br>
    ${msg1}<br>
    ${msg2}
</body>
JSP代码:
<%@ page language="java" contentType="text/html; charset=UTF-8"
    pageEncoding="UTF-8"%>
<!DOCTYPE html PUBLIC "-//W3C//DTD HTML 4.01 Transitional//EN" "http://www.w3.org/TR/html4/loose.dtd">
<html>
<head>
<meta http-equiv="Content-Type" content="text/html; charset=UTF-8">
<title>Insert title here</title>
</head>
<body>
    ${pageContext.request.contextPath}<br/>
    <a href="${pageContext.request.contextPath}/returnString">测试返回String</a><br/>
    <a href="${pageContext.request.contextPath}/returnPOJO">测试返回POJO</a><br>
    ------------------------------------------------------------------------<br>
    【参数获取】<br>
    <a href="${pageContext.request.contextPath}/getId1?id=1">getID1直接绑定id</a><br>
    <a href="${pageContext.request.contextPath}/getId2?uid=1">getID2注解绑定id</a><br>
    <a href="${pageContext.request.contextPath}/idList?id=1&id=2&id=3">idList参数封装到List-错误示例</a><br>
    <a href="${pageContext.request.contextPath}/idList2?id=1&id=2&id=3">idList2参数封装到List【注解绑定】</a><br>
    <a href="${pageContext.request.contextPath}/idArray?id=1&id=2&id=3">idArray参数封装到Array【直接绑定】</a><br>
    <a href="${pageContext.request.contextPath}/idArray2?id=1&id=2&id=3">idArray2参数封装到Array【注解绑定】</a><br>

    <form action="${pageContext.request.contextPath}/saveUser">
        id:<input type="text" name="id">
        username:<input type="text" name="username">
        birthday:<input type="text" name="birthday">
        address.remark:<input type="text" name="address.remark">
        <input type="submit" value="saveUser将接收参数封装为POJO和包装POJO">
    </form>

    <form action="${pageContext.request.contextPath}/listAddress">
        地址1 remark:<input type="text" name="itemList[0].remark"><br>
        地址2 remark:<input type="text" name="itemList[1].remark"><br>
        地址3 remark:<input type="text" name="itemList[2].remark">
        <input type="submit" value="pojo-list">
    </form>

    <form action="${pageContext.request.contextPath}/mapAddress">
        地址1 remark:<input type="text" name="itemMap['item1'].remark"><br>
        地址2 remark:<input type="text" name="itemMap['item2'].remark"><br>
        地址3 remark:<input type="text" name="itemMap['item3'].remark">
        <input type="submit" value="pojo-map">
    </form>
</body>
</html>
controller代码:
/*
     *简单类型
     */
    @RequestMapping("getId1")//直接绑定
    public String getId1(Integer id,Model model,HttpServletRequest request) {
        model.addAttribute("msg1", "直接参数绑定接收到的参数id="+id);
        model.addAttribute("msg2", "通过request.getParameter获取到的参数id="+request.getParameter("id"));
        return "success";
    }
    @RequestMapping("getId2")//RequestParam注解绑定
    public String getId2(@RequestParam("uid")Integer id,Model model,HttpServletRequest request) {
        model.addAttribute("msg1", "直接参数绑定接收到的参数id="+id);
        model.addAttribute("msg2", "通过request.getParameter获取到的参数id="+request.getParameter("uid"));
        return "success";
    }
    /*
     *简单POJO类型(包含一个特殊类型转换String to Date)、包装POJO、集合POJO
     */
    @RequestMapping("saveUser")
    public String saveUser(User user,Model model) {
        //<a href="${pageContext.request.contextPath}/saveUser?id=1&username=zhangsan">saveUser将接收参数封装为POJO</a><br>
        model.addAttribute("msg", "接收到的POJO为:"+user);
        model.addAttribute("msg1", "这里将输入的字符串转化成了Date"+user.getBirthday());
        return "success" ;
    }
    @RequestMapping("listAddress")
    public String listUser(User user,Model model) {
        //POJO集合需要封装到另一个POJO中才能接收
        model.addAttribute("msg", "接收到的POJO集合list数量:"+user.getItemList().size());
        model.addAttribute("msg1", "第一个get(0)的值为:"+user.getItemList().get(0));
        return "success" ;
    }
    @RequestMapping("mapAddress")
    public String mapUser(User user,Model model) {
        //map
        model.addAttribute("msg", "接收到的POJO集合map数量:"+user.getItemMap().size());
        model.addAttribute("msg1", "key为item1的值为:"+user.getItemMap().get("item1"));
        return "success" ;
    }
    /*
     *简单类型集合或者数组类型
     */
    @RequestMapping("idList")//错误示例
    public String idList(List<Integer> ids,Model model) {
        //<a href="${pageContext.request.contextPath}/idList?id=1&id=2&id=3">idList参数封装到List</a>
        model.addAttribute("msg", "将参数封装为list:"+ids);
        return "success" ;
    }
    @RequestMapping("idList2")//正确示例
    public String idList2(@RequestParam("id")List<Integer> ids,Model model) {
        //<a href="${pageContext.request.contextPath}/idList2?id=1&id=2&id=3">idList参数封装到List</a>
        model.addAttribute("msg", "将参数封装为list:"+ids);
        return "success" ;
    }
    @RequestMapping("idArray")//注意:此时方法参数必须要和请求参数名一致才行!!!
    public String idArray(Integer[] id,Model model) {
        //<a href="${pageContext.request.contextPath}/idArray?id=1&id=2&id=3">idArray参数封装到Array</a>
        model.addAttribute("msg", "将参数封装为Array:"+id);
        return "success" ;
    }
    @RequestMapping("idArray2")
    public String idArray2(@RequestParam("id") Integer[] ids,Model model) {
        //<a href="${pageContext.request.contextPath}/idArray2?id=1&id=2&id=3">idArray参数封装到Array</a>
        model.addAttribute("msg", "将参数封装为Array:"+ids);
        return "success" ;
    }
po类为:
public class User {
    private int id;
    private String username;
    private Date birthday ;
    private Address address;//测试包装POJO
    private List<Address> itemList ;//测试POJO List(要想接收一个POJO,只能将其封装到另一个POJO中)
    private Map<String,Address> itemMap ;//测试POJO Map

    //setter、getter、toString省略
}
注意:User类中的birthday属性为Date类型,而表单传递的属性都为String,所以需要为其自定义类型转换器。
package com.kkb.ssm.controller.converter;

import java.text.ParseException;
import java.text.SimpleDateFormat;
import java.util.Date;

import org.springframework.core.convert.converter.Converter;

public class DateConverter implements Converter<String, Date> {

    @Override
    public Date convert(String source) {
        SimpleDateFormat format = new SimpleDateFormat("yyyy-MM-dd");//注意这个指的是入参source的格式
        try {
            return format.parse(source);
        } catch (ParseException e) {
            e.printStackTrace();
        }
        return null;
    }

}
<!-- 配置String转Date【类型转换器】。springmvc中已经内置了常用的类型转化器,这里只需要加入用户自定义的转换器  -->
    <!-- 加载注解驱动器 -->
    <mvc:annotation-driven conversion-service="conversionService" />
    <!-- 转换器配置 -->
    <bean id="conversionService"
    class="org.springframework.format.support.FormattingConversionServiceFactoryBean">
        <property name="converters">
            <set>
                <bean class="com.kkb.ssm.controller.converter.DateConverter"></bean>
            </set>
        </property>
    </bean>
五、MultiPartFile类型
此类型主要用于文件类型的参数交互。支持格式不仅限图片,同时支持各种文本以及特殊格式等。用法如下:
首先要导入第三方包:
<!-- 文件上传 -->
        <dependency>
            <groupId>commons-fileupload</groupId>
            <artifactId>commons-fileupload</artifactId>
            <version>1.3.1</version>
        </dependency>
需要在springmvc文件中添加文件解析器配置:
<!-- 配置【文件上传解析器】 -->
    <bean id="multipartResolver"
        class="org.springframework.web.multipart.commons.CommonsMultipartResolver">
        <!-- 上传文件最大大小,5M。单位为字节 -->
        <property name="maxUploadSize" value="5242880"></property>
        <property name="defaultEncoding" value="UTF-8"></property>
    </bean>
jsp:
<%@ page language="java" contentType="text/html; charset=UTF-8"
    pageEncoding="UTF-8"%>
<!DOCTYPE html PUBLIC "-//W3C//DTD HTML 4.01 Transitional//EN" "http://www.w3.org/TR/html4/loose.dtd">
<html>
<head>
<meta http-equiv="Content-Type" content="text/html; charset=UTF-8">
<title>文件上传</title>
</head>
<body>
    <!-- 文件类型必须指定enctype="multipart/form-data" -->
    <form action="${pageContext.request.contextPath}/fileupload" enctype="multipart/form-data" method="post">
        请选择文件:<input type="file" name="uploadFile">
        <input type="submit" value="上传">
    </form>
</body>
</html>
controller:
package com.kkb.ssm.controller;

import java.io.File;
import java.io.IOException;
import java.util.UUID;

import org.springframework.stereotype.Controller;
import org.springframework.web.bind.annotation.RequestMapping;
import org.springframework.web.bind.annotation.ResponseBody;
import org.springframework.web.multipart.MultipartFile;

@Controller
public class FileController {

    @RequestMapping("fileupload")
    @ResponseBody
    public String fileupload(MultipartFile uploadFile) throws IllegalStateException, IOException {
        //注意:支撑的文件格式不仅仅是图片。txt,word,xls等都支持。
        if(uploadFile!=null) {
            //原始图片名称
            String originalFilename = uploadFile.getOriginalFilename();
            System.out.println("原始图片名称为:"+originalFilename);
            //如果没有图片名称,则上传不成功
            if(originalFilename!=null && originalFilename.length()>0) {
                //存放图片的路径
                String picPath = "D:\\";
                //获取上传的扩展名
                String extName = originalFilename.substring(originalFilename.lastIndexOf("."));
                //新文件的名称
                String newFileName = UUID.randomUUID()+extName;
                //新的文件
                File newFile = new File(picPath+newFileName);
                //把上传的文件保存成一个新的文件
                uploadFile.transferTo(newFile);
                //同时需要把新的文件名更新到数据库中
                //......
            }
        }
        return "upload file success!" ;
    }
}
There are two things to do in a day: a happy thing and a difficult one.


