Go使用protocolbuffer快速开发api服务教程
如果无法查看图片, 请跳转博客正文: https://www.cnblogs.com/zolo/p/14066444.html
前述
本教程只说"实践",不谈"理论". 如果哪位觉得有趣, 可以加本人QQ(1255422783)详细交流!
问题
对于后端开发, 经常"众口难调". 一套业务逻辑却要三套不同实现API!
- 网页端要"http(json) api"(如restful api)
- 移动端要"websocket api"
- 服务端要"grpc api"
正题
本教程主要介绍如何使用"protogen + protoapi"的开发步骤.
源码仓库:https://github.com/fasgo/demo
开发步骤
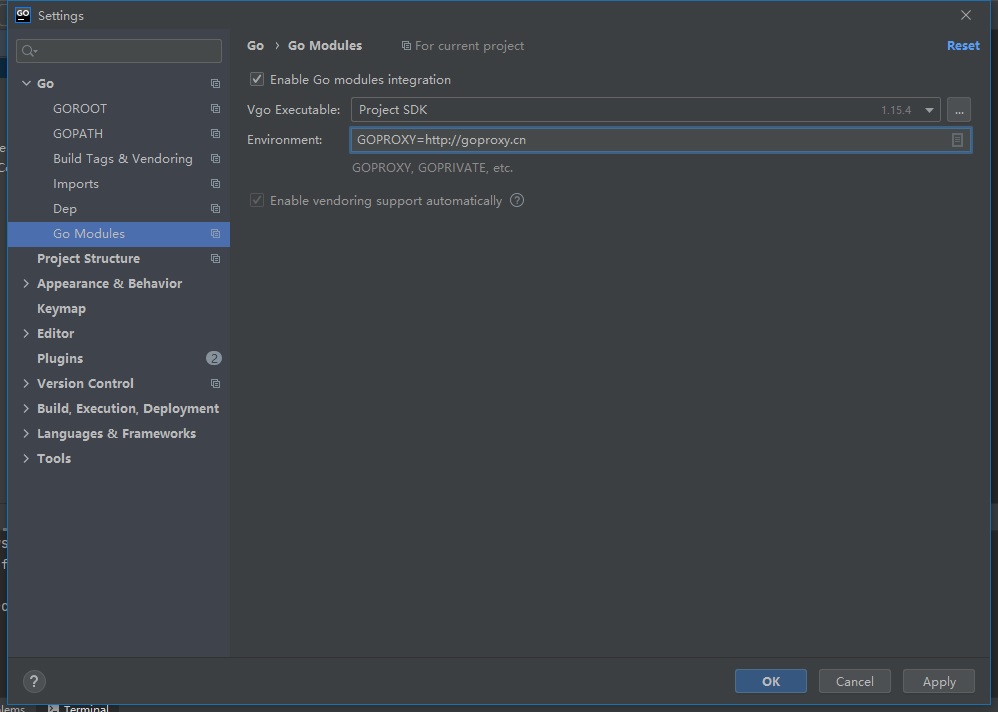
第1步: Goland启用"GoModule"支持
Settings > Go > Go Modules > 打勾 Enable go modules intergration

第2步: 根据需求定义proto
syntax = "proto3";

package api;

// 学生数据结构
message Student {
  uint64 sno = 1;   // 学生编号
  string name = 2;  // 学生名称
  uint32 age = 3;   // 学生年龄
  bool   male = 4;  // 性别为男
  string desc = 5;  // 学生介绍
}

// 搜索请求
message AllReq {
  int32 from = 1; // 分页开始下标(从0开始)
  int32 size = 2; // 分页大小
  string search = 3; // 模糊查询的输入内容
  string field = 4; // 查询结果排序字段
  bool desc = 5; // 查询结果排序是否DESC
}

// 搜索响应
message AllRsp{
  int32  total = 1; //查询结果总数
  repeated Student data = 2; // 查询结果数据
}

// 所有方法都支持+JSON与+FORM,根据需求灵活配置
// 1. +JSON(Content-Type:application/json)
// 2. +FORM(Content-Type:application/x-www-form-urlencode或multipart/form-data)
service StudentService {
  // +POST /demo/students
  rpc Add(Student) returns (Student);
  // +DELETE /demo/students/:sno
  rpc Del(Student) returns (Student);
  // +PUT /demo/students/:sno
  rpc Upd(Student) returns (Student);
  // +WBSK /demo/student/ws
  // +GET /demo/students/:sno
  rpc Get(Student) returns (Student);
  // +GET /demo/students
  rpc All(AllReq) returns (AllRsp);
}
第3步: 进入项目执行protogen
项目结构:
E:\temp
|__api
|__biz
|__test-client
|__conf.toml
|__go.mod
|__go.sum
|__main.go
|__README.md
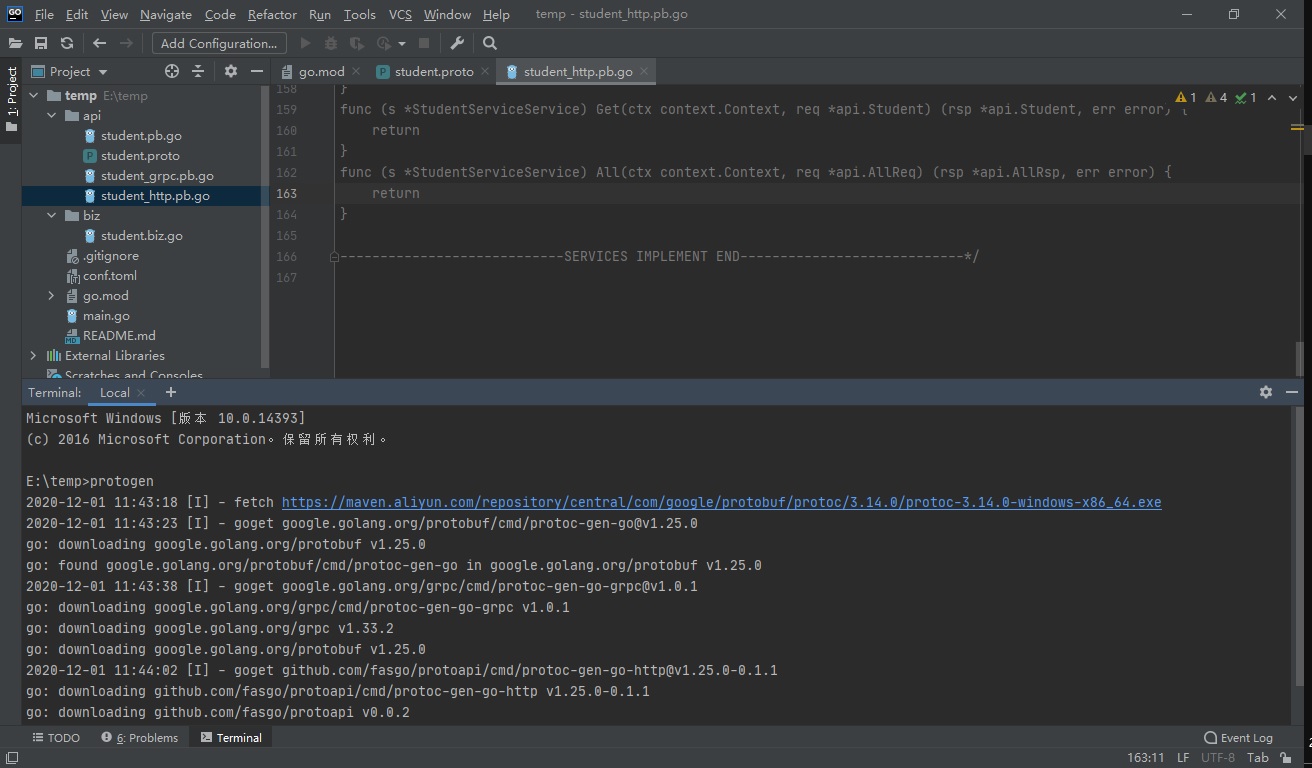
进入项目目录执行protogen, 首次执行会下载相关的插件, 过程稍慢, 请耐心稍等!
E:\temp>protogen
2020-12-01 11:43:18 [I] - fetch https://maven.aliyun.com/repository/central/com/google/protobuf/protoc/3.14.0/protoc-3.14.0-windows-x86_64.exe
2020-12-01 11:43:23 [I] - goget google.golang.org/protobuf/cmd/protoc-gen-go@v1.25.0
go: downloading google.golang.org/protobuf v1.25.0
go: found google.golang.org/protobuf/cmd/protoc-gen-go in google.golang.org/protobuf v1.25.0
2020-12-01 11:43:38 [I] - goget google.golang.org/grpc/cmd/protoc-gen-go-grpc@v1.0.1
go: downloading google.golang.org/grpc/cmd/protoc-gen-go-grpc v1.0.1
go: downloading google.golang.org/grpc v1.33.2
go: downloading google.golang.org/protobuf v1.25.0
2020-12-01 11:44:02 [I] - goget github.com/fasgo/protoapi/cmd/protoc-gen-go-http@v1.25.0-0.1.1
go: downloading github.com/fasgo/protoapi/cmd/protoc-gen-go-http v1.25.0-0.1.1
go: downloading github.com/fasgo/protoapi v0.0.2
go: downloading google.golang.org/protobuf v1.25.0
2020-12-01 11:44:18 [I] - build E:\temp\api\student.proto
执行protogen后, 会在proto文档所在目录生成:
- xxx.pb.go: 使用protoc-gen-go生成的PB源码
- xxx_grpc.pb.go: 使用protoc-gen-go-grpc生成的GRPC源码
- xxx_http.pb.go: 使用protoc-gen-go-http生成的http适配代码, 后面的http实现就靠它了!!!
注意: 如果你用Goland,可以打开Terminal控制台操作会更方便:

第4步: 复制service模板
import (
	"context"
)
type StudentServiceService struct {
	*api.UnimplementedStudentServiceServer
}
var _ api.StudentServiceServer = (*StudentServiceService)(nil)
func (s *StudentServiceService) Add(ctx context.Context, req *api.Student) (rsp *api.Student, err error) {
	return
}
func (s *StudentServiceService) Del(ctx context.Context, req *api.Student) (rsp *api.Student, err error) {
	return
}
func (s *StudentServiceService) Upd(ctx context.Context, req *api.Student) (rsp *api.Student, err error) {
	return
}
func (s *StudentServiceService) Get(ctx context.Context, req *api.Student) (rsp *api.Student, err error) {
	return
}
func (s *StudentServiceService) All(ctx context.Context, req *api.AllReq) (rsp *api.AllRsp, err error) {
	return
}
注意:
为每个proto文件生成的在xxxx_http.pb.go(例如stduent_http.pb.go)的最后会有service的实现模板!
开发人员直接将其复制到自己的biz代码即可, 这样可以大大提高开发效率!
第5步: 实现service逻辑
package biz

import (
	"context"
	"fmt"
	"github.com/fasgo/base"
	"github.com/fasgo/demo/api"
)

type StudentServiceService struct {
	*api.UnimplementedStudentServiceServer
}

var _ api.StudentServiceServer = (*StudentServiceService)(nil)

func (s *StudentServiceService) Add(ctx context.Context, req *api.Student) (rsp *api.Student, err error) {
	fmt.Println(base.Json(req))
	rsp = req
	return
}
func (s *StudentServiceService) Del(ctx context.Context, req *api.Student) (rsp *api.Student, err error) {
	fmt.Println(base.Json(req))
	rsp = req
	return
}
func (s *StudentServiceService) Upd(ctx context.Context, req *api.Student) (rsp *api.Student, err error) {
	fmt.Println(base.Json(req))
	rsp = req
	return
}
func (s *StudentServiceService) Get(ctx context.Context, req *api.Student) (rsp *api.Student, err error) {
	fmt.Println(base.Json(req))
	rsp = req
	return
}
func (s *StudentServiceService) All(ctx context.Context, req *api.AllReq) (rsp *api.AllRsp, err error) {
	fmt.Println(base.Json(req))
	rsp = new(api.AllRsp)
	return
}
第6步: 注册service实例, 并启动服务
package main

import (
	"github.com/fasgo/demo/api"
	"github.com/fasgo/demo/biz"
	"github.com/fasgo/protoapi"
)

func main() {
	// 1. 创建server. 可以从conf配置, 也可以编程配置
	//s := serverWithConfig()
	s := serverWithConfToml()

	// 2. 注册服务实现. 每个service会有对应的Registry/Implement注册到server
	s.RegisterService(api.StudentServiceRegistry, new(biz.StudentServiceService))

	// 3. 监听与服务
	if err := s.ListenAndServe(); err != nil {
		panic(err)
	}
}

// 从conf.toml加载配置
func serverWithConfToml() *protoapi.Server {
	// load config from conf.toml
	s := protoapi.NewServer()
	return s
}

// 自己定义配置
func serverWithConfig() *protoapi.Server {
	c := &protoapi.Config{
		HttpAddr:        ":80",
		GrpcAddr:        ":90",
		WbskCheckOrigin: -1,
	}
	s := protoapi.NewServerWith(c)
	return s
}
第7步: 客户端连接测试
- grpc client
package main

import (
	"context"
	"fmt"
	"github.com/fasgo/demo/api"
	"google.golang.org/grpc"
)

func main() {
	conn, err := grpc.Dial("127.0.0.1:90", grpc.WithInsecure(), grpc.WithBlock())
	if err != nil {
		panic(err)
	}
	defer conn.Close()

	client := api.NewStudentServiceClient(conn)

	req := &api.Student{
		Name: "小王",
	}

	rsp, err := client.Add(context.Background(), req)
	if err != nil {
		panic(err)
	}

	fmt.Printf("%+v\n", rsp)
}

/*
输出:
Load conf success: E:\temp\conf.toml
name:"小王"
*/
- http client
package main

import (
	"bytes"
	"encoding/json"
	"fmt"
	"github.com/fasgo/demo/api"
	"io"
	"net/http"
	"os"
)

func main() {
	tag := &api.Student{
		Name: "demo",
	}
	bs, _ := json.Marshal(tag)
	rsp, err := http.Post("http://127.0.0.1/demo/students", "application/json", bytes.NewReader(bs))
	if err != nil {
		panic(err)
	}
	defer rsp.Body.Close()

	fmt.Println(rsp.Proto, rsp.Status)
	io.Copy(os.Stdout, rsp.Body)
}

/*
输出:
Load conf success: E:\temp\conf.toml
HTTP/1.1 200 OK
{"code":0,"data":{"name":"demo"},"tag":"StudentService.Add"}
*/
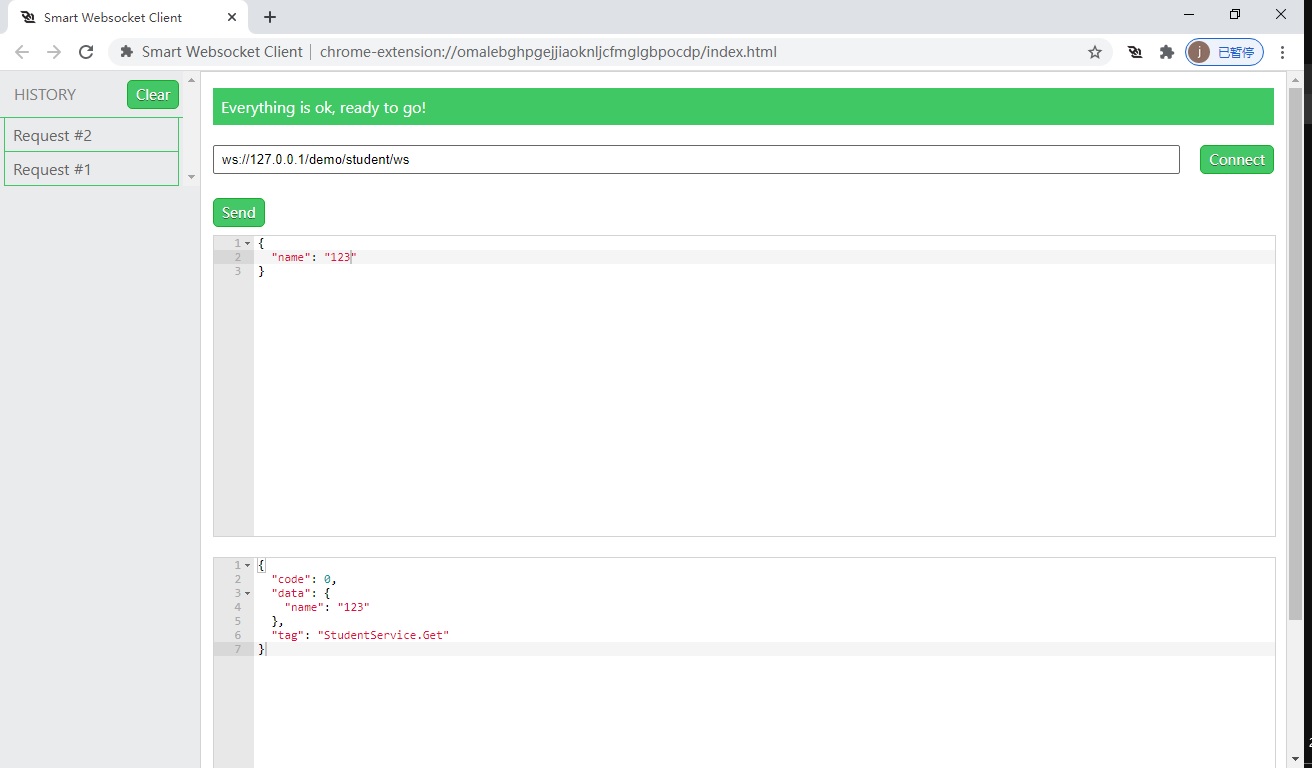
- websocket client
这里使用chrome的smart websocket client:

搭建环境
第1步: 下载安装Go 1.15
GO下载页面: https://golang.google.cn/dl/
详情不再赘述! Go都不会安装, 哪还能说啥?
第2步: 下载安装protogen
-
protogen介绍
protogen是作者开发的一个快速构建工具,封装了protoc等一系列pb常用工具的下载,安装与使用! 一键完成proto的所有烦琐配置!
-
protogen安装:
"强烈建议添加protogen到系统环境PATH!"
第3步教程假定你已经将protogen添加到PATH.
protogen采用go get安装方式, 整体流程分4步:
- 指定GoPath
- 启用GoModule
- 设置GoProxy
- GoGet下载安装
具体脚本操作:
- windows安装: (以临时目录为例)
set GOPATH=c:\Windows\Temp
set GO111MODULE=on
set GOPROXY=https://goproxy.cn
go get github.com/fasgo/protogen@latest
安装位置: c:\Windows\Temp\bin\protogen
c:\Windows\Temp\bin\protogen.exe --help Usage of protogen [options] {files...} : -clean 清除缓存.protogen -compatible gRPC接口兼容v1.x -debug 开启调试 -goproxy string GO代理服务,默认$GOPROXY(https://goproxy.cn) (default "https://goproxy.cn") -h 打印帮助 -help 打印帮助 -proto_path string PB查找路径,多值逗号分隔 -version 打印版本- linux(darwin)安装: (以临时目录为例)
export GOPATH=/tmp
export GO111MODULE=on
export GOPROXY=https://goproxy.cn
go get github.com/fasgo/protogen@latest
安装位置: /tmp/bin/protogen
/tmp/bin/protogen --help
Usage of protogen [options] {files...} :
  -clean
        清除缓存.protogen
  -compatible
        gRPC接口兼容v1.x
  -debug
        开启调试
  -goproxy string
        GO代理服务,默认$GOPROXY(https://goproxy.cn) (default "https://goproxy.cn")
  -h    打印帮助
  -help
        打印帮助
  -proto_path string
        PB查找路径,多值逗号分隔
  -version
        打印版本
第3步: 下载项目源码
git clone https://github.com/fasgo/demo.git e:\temp\
step-by-step教程:Go使用protocolbuffer快速构建api服务教程


 浙公网安备 33010602011771号