使用 Spring Cloud Bus 自动刷新配置
使用 Spring Cloud Bus 自动刷新配置
Spring Cloud Bus 是和 Spring Cloud Config 配合起来使用的,Spring Cloud Config 负责提供配置(从 git 仓库),Spring Cloud Bus 负责刷新配置(利用 RabbitMQ)。
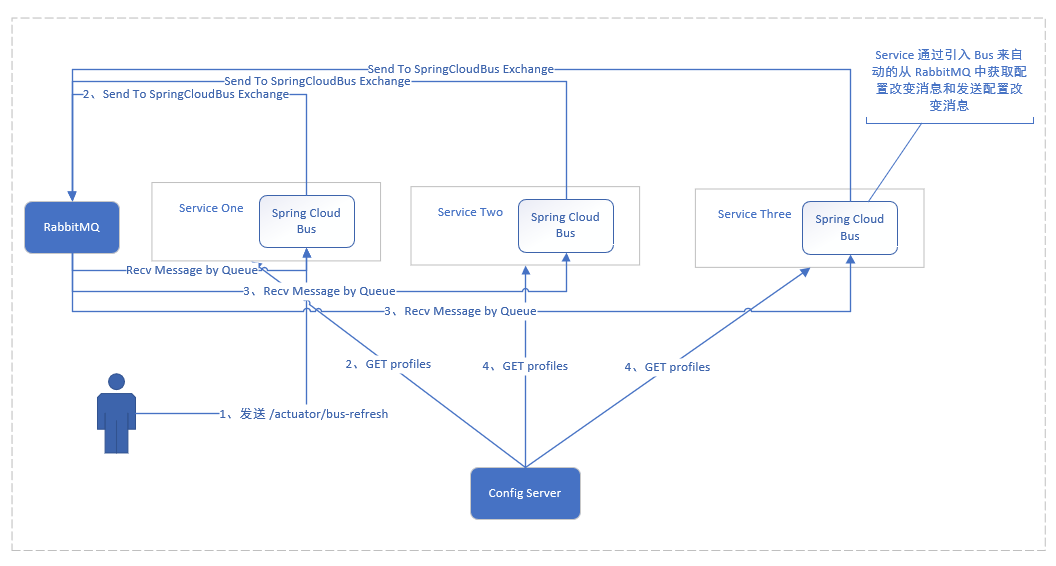
下面的图片展示了 Spring Cloud Bus 刷新流程和使用架构。
一、简单使用
-
Spring Cloud Bus 使用起来很简单,只需要在 pom.xml 中添加:
<dependency> <groupId>org.springframework.cloud</groupId> <artifactId>spring-cloud-starter-bus-amqp</artifactId> </dependency> -
注意需要在 application.yml 中配置 RabbitMQ 。
spring: rabbitmq: host: 192.168.1.11 password: zolmk username: zolmk port: 5672 -
注意,还需要暴露 /actuator/bus-refresh(Spring Boot 版本 2.4.0以下) 或者 /actuator/busrefresh(Spring Boot 版本 2.4.0及以上)
-
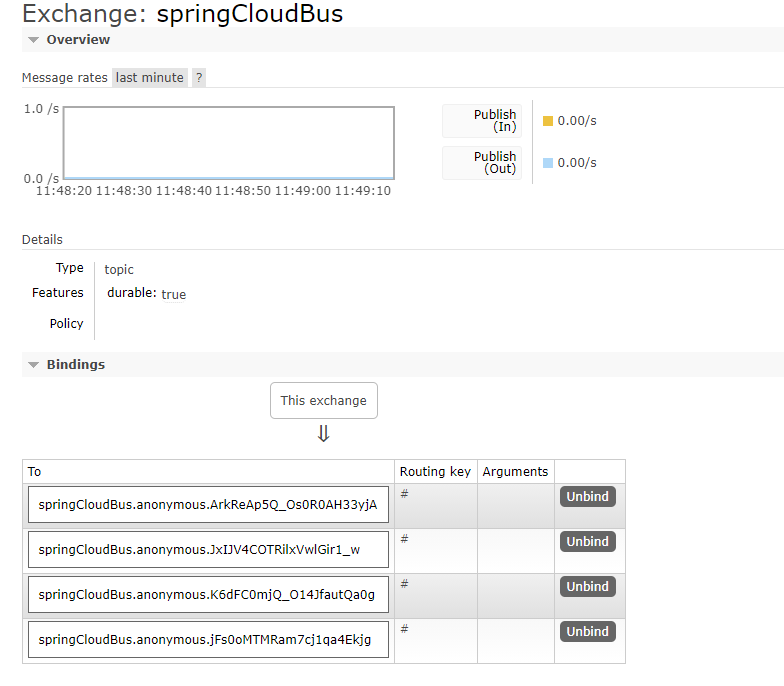
启动多个 Spring Cloud Bus 实例,可以在 RabbitMQ 管理界面看到如下信息,由图可知,我启动了四个实例,这些实例各自创建了一个队列,并且绑定到了 springCloudBus 交换器上。
当我们访问某个微服务的 /actuator/bus-refresh 时,该微服务中的 bus 会自动向交换器中写入配置改变消息,然后消息入所有交换器绑定的队列,监听这些队列的微服务接收到配置改变消息,从配置服务器 Config Server 获取最新配置。
二、架构演进
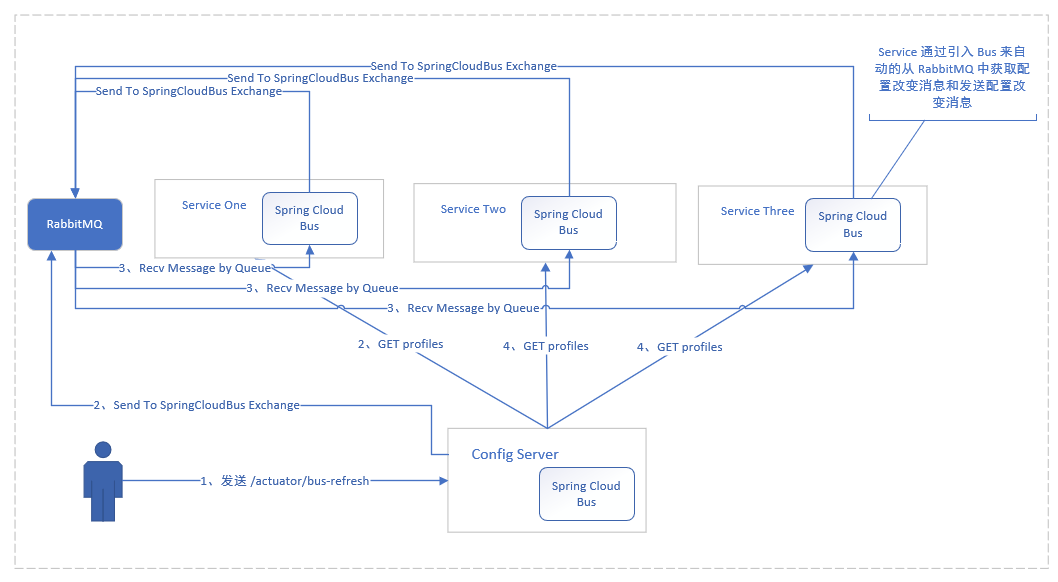
用上面的方式实现配置刷新,但这种方式并不优雅。因为:
- 破坏了微服务的职责单一原则。业务微服务只应关注自身业务,不应该承担配置刷新的职责。
- 破坏了微服务各节点的对称性。
- 有局限性,因为微服务的 ip 会经常变化。
我们可以让 Config Server 承担 刷新配置的职责。改进的架构图如下:
三、进阶使用
1、局部刷新
某些场景下,若只想刷新部分微服务的配置,可通过 /bus/refresh 端点的 destination 参数来定位要刷新的应用程序。
例如:
/actuator/bus-refresh?destination=customer:9000,这样消息总线的实例就会根据 destination 参数的值来判断是否需要刷新。其中,customers:9000 指的是各个微服务的 applicationContextID。默认情况下 customers 表示名称为 customers 的微服务,9000 指微服务运行端口。
2、与 Git 内容同步刷新
可以通过在 git 服务器端配置 WebHooks 实现同步刷新。
3、跟踪事件总线
一些场景下需要知道 Spring Cloud Bus 事件传播的细节,可以跟踪事件总线。
Spring boot 2.x 版本中如果单纯开启 spring.cloud.bus.enable = true 是无法跟踪的,这部分需要自己实现。

由图片可知 2.x 版本的 Spring Boot 在 onAck 和 onSend 函数中并没有将接收到的数据保存起来,并且 Trace 类型为 HttpTrace ,不是我们需要的 Trace。
-
创建 CustomTrace.java 来记录跟踪数据。
public class CustomTrace { private final Date timestamp; private final Map<String,Object> info; public CustomTrace (Date timestamp, Map<String, Object> info) { this.timestamp = timestamp; this.info = info; } public Date getTimestamp () { return timestamp; } public Map<String, Object> getInfo () { return info; } } -
创建 CustomTraceRepository 接口,用来操作 CustomTrace
public interface CustomTraceRepository { public List<CustomTrace> findAll(); public void add(Map<String,Object> trace); } -
创建 CustomTraceRepositoryImpl 实现 CustomTraceRepository 接口
@Component public class CustomTraceRepositoryImpl implements CustomTraceRepository { private final List<CustomTrace> traces = new LinkedList<CustomTrace>(); private final int MAX = 100; @Override public List<CustomTrace> findAll () { synchronized (this.traces) { return Collections.unmodifiableList(new ArrayList<>(this.traces)); } } @Override public void add (Map<String, Object> trace) { CustomTrace customTrace = new CustomTrace(new Date(),trace); synchronized (this.traces) { if(traces.size() >= MAX) { traces.remove(0); } traces.add(customTrace); } } } -
创建 CustomTraceListener 来监听 AckRemoteApplicationEvent 和 SentApplicationEvent 事件
@Component public class CustomTraceListener { private static Log log = LogFactory.getLog(CustomTraceListener.class); private CustomTraceRepository repository; public CustomTraceListener (CustomTraceRepository repository) { this.repository = repository; } @EventListener public void onAck(AckRemoteApplicationEvent event) { Map<String, Object> trace = getReceivedTrace(event); this.repository.add(trace); } @EventListener public void onSend(SentApplicationEvent event) { Map<String, Object> trace = getSentTrace(event); this.repository.add(trace); } protected Map<String, Object> getSentTrace(SentApplicationEvent event) { Map<String, Object> map = new LinkedHashMap<String, Object>(); map.put("signal", "spring.cloud.bus.sent"); map.put("type", event.getType().getSimpleName()); map.put("id", event.getId()); map.put("origin", event.getOriginService()); map.put("destination", event.getDestinationService()); if (log.isDebugEnabled()) { log.debug(map); } return map; } protected Map<String, Object> getReceivedTrace(AckRemoteApplicationEvent event) { Map<String, Object> map = new LinkedHashMap<String, Object>(); map.put("signal", "spring.cloud.bus.ack"); map.put("event", event.getEvent().getSimpleName()); map.put("id", event.getAckId()); map.put("origin", event.getOriginService()); map.put("destination", event.getAckDestinationService()); if (log.isDebugEnabled()) { log.debug(map); } return map; } } -
然后暴露一个 /trace 接口,从 Repository 中获取追踪信息
@RestController public class CommonController { private final CustomTraceRepository customTraceRepository; public CommonController (CustomTraceRepository customTraceRepository) { this.customTraceRepository = customTraceRepository; } @RequestMapping("/trace") public List<CustomTrace> trace() { return customTraceRepository.findAll(); } } -
访问 /trace 即可得到想要的数据。

 浙公网安备 33010602011771号