spring知识总结二
spring官方文档:core:https://docs.spring.io/spring-framework/docs/current/reference/html/core.html#beans-annotation-config
一、IOC创建对象的方式:
1、默认使用无惨构造方法创建
2、如果我们要是用有参构造方法,使用构造器注入
下标赋值:

类型赋值:不建议使用(如果两个类型相同)

直接通过参数名:

总结:在配置文件加载的时候,其中管理的对象就被初始化了
二、spring配置:
1、别名:
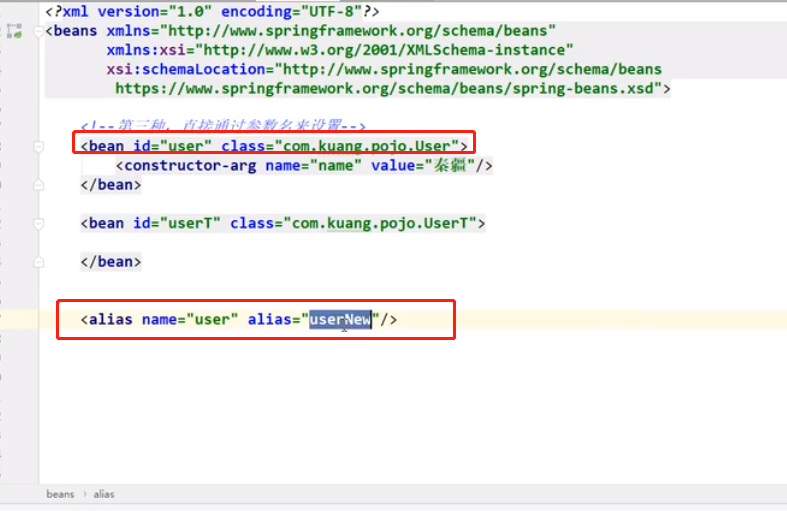
通过别名或者原始名都能取到

2、bean

3、import:一般用于团队开发,它可以将多个配置文件导入合成一个

三、DI依赖注入
1、构造器注入:上文
2、set注入【重点】:
依赖注入:set注入
依赖:bean对象的创建依赖于容器
注入:bean对象的所有属性由容器来注入
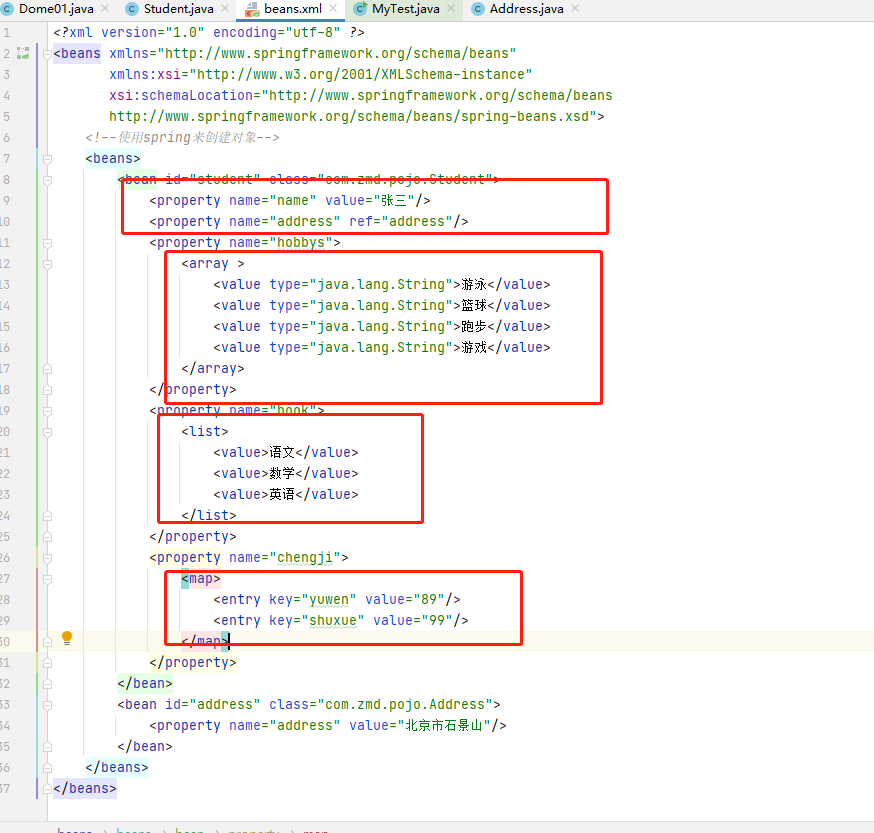
3、拓展注入
p命名空间
c命名空间
四、bean自动装配:
自动装配是spring满足bean依赖的一种方式
spring会在上下文中自动寻找,并自动给bean装配属性
在spring中有三种装配方式:
1、在xml中显示配置
2、在java中显示配置
3、隐士的自动装配bean【重要】
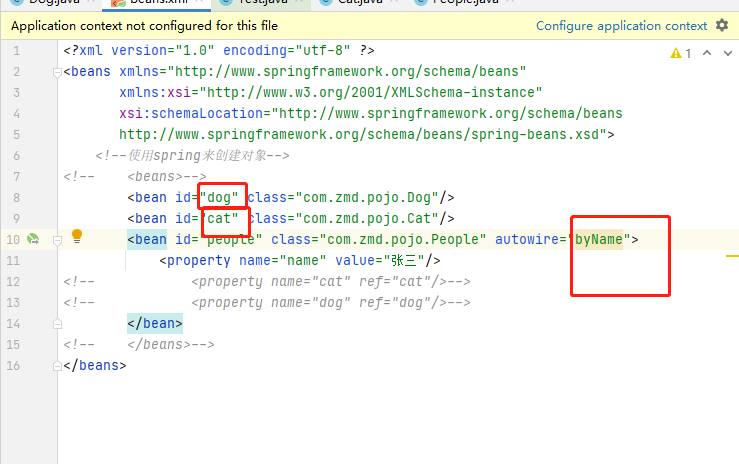
byname是需要我们配置的bean id需要和people中属性名相同
五、注解实现装配
1、使用注解须知:
导入约束:
<?xml version="1.0" encoding="UTF-8"?>
<beans xmlns="http://www.springframework.org/schema/beans"
       xmlns:xsi="http://www.w3.org/2001/XMLSchema-instance"
       xmlns:context="http://www.springframework.org/schema/context"
       xsi:schemaLocation="http://www.springframework.org/schema/beans
        https://www.springframework.org/schema/beans/spring-beans.xsd
        http://www.springframework.org/schema/context
        https://www.springframework.org/schema/context/spring-context.xsd">

    <!--开启注解支持-->
    <context:annotation-config/>
    <bean id="dog" class="com.zmd.pojo.Dog"/>
    <bean id="people" class="com.zmd.pojo.People"/>


</beans>
配置注解支持:<context:annotation-config/>

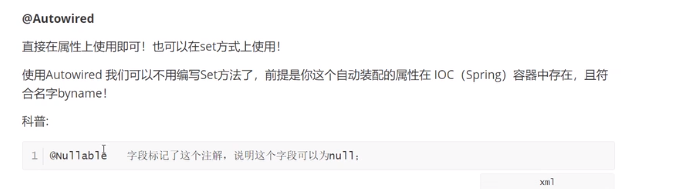
使用Autowired注意事项
六、spring通过注解开发
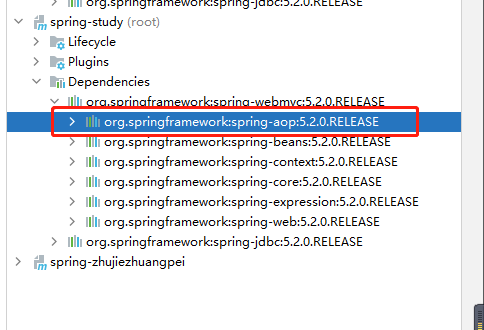
在spring4之后,要是用注解开发必须保证aop包导入
使用注解需要导入context约束,增加注解的支持
<?xml version="1.0" encoding="UTF-8"?>
<beans xmlns="http://www.springframework.org/schema/beans"
       xmlns:xsi="http://www.w3.org/2001/XMLSchema-instance"
       xmlns:context="http://www.springframework.org/schema/context"
       xsi:schemaLocation="http://www.springframework.org/schema/beans
        https://www.springframework.org/schema/beans/spring-beans.xsd
        http://www.springframework.org/schema/context
        https://www.springframework.org/schema/context/spring-context.xsd">

    <!--开启注解支持-->
    <context:annotation-config/>
    <bean id="dog" class="com.zmd.pojo.Dog"/>
    <bean id="people" class="com.zmd.pojo.People"/>
</beans>
1、bean
2、属性如何注入
3、衍生注解
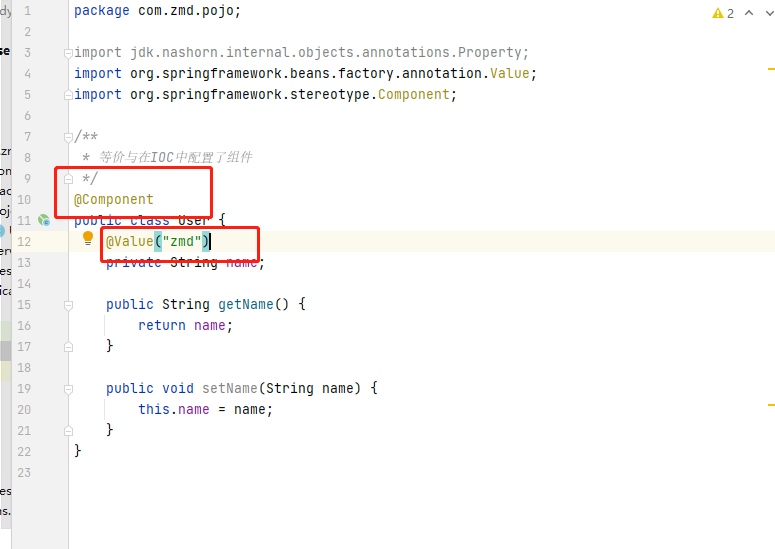
@Compontent
dao:@Repository
service:@Sercice
controller:@Controller
这四个注解都是一样的,将某个类注入到spring中
4、自动装配
同上
5、作用域
@Scope
七、使用java的方式配置spring
config类:相当于原来的配置文件
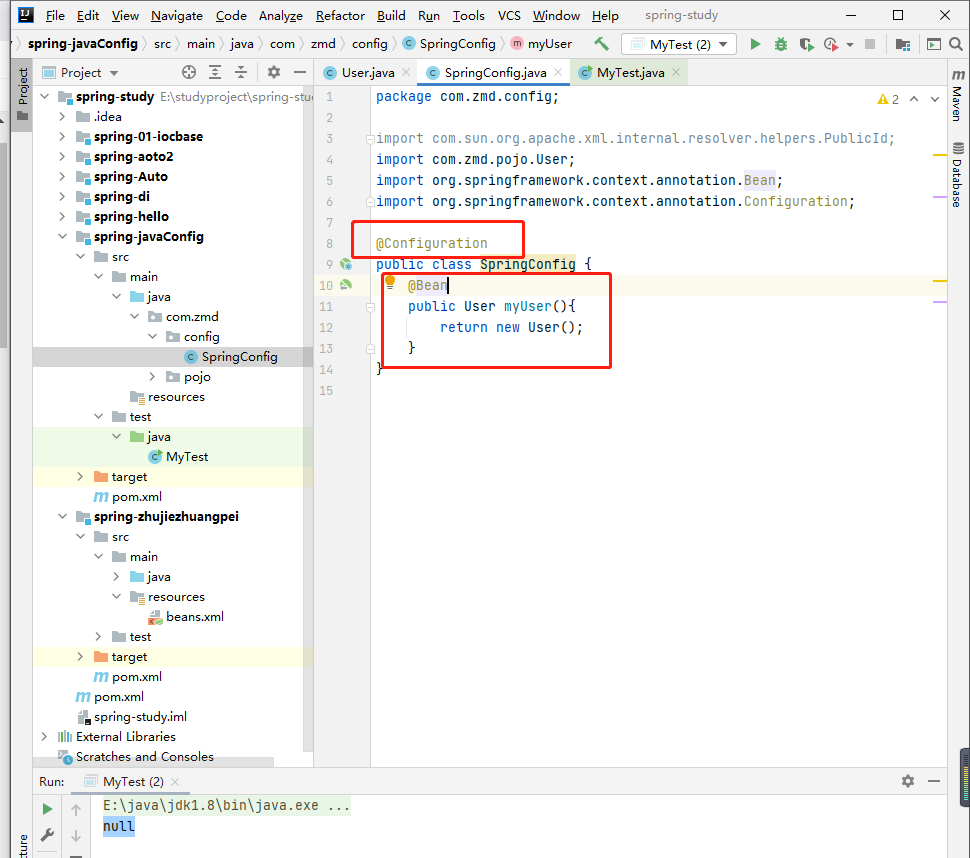
其他的正常使用

获取spring上下文换成:
ApplicationContext context = new AnnotationConfigApplicationContext(SpringConfig.class);
User user = context.getBean("myUser", User.class);
System.out.println(user.getName());

八、AOP
代理模式:就是springAOP的底层!
代理模式分类:静态代理 和 动态代理

1、静态代理:
角色分析:
存在一个抽象的角色:一般会使用接口或者抽象类解决
真实角色:被代理的角色
代理角色:代理真实角色,代理真是角色后一般会做一些附属操作
客户:访问代理对象的人
抽象的角色:一般会使用接口或者抽象类解决
package com.zmd.dome01;
//租房
public interface Rent {
    public void rent();
}
真实角色:被代理的角色
package com.zmd.dome01;

//房东
public class Host implements Rent{

    @Override
    public void rent() {
        System.out.println("房东要出租房子");
    }
}
代理角色:代理真实角色,代理真是角色后一般会做一些附属操作
package com.zmd.dome01;

public class Proxy implements Rent{
    private Host host;

    public Proxy() {
    }

    public Proxy(Host host) {
        this.host = host;
    }

    @Override
    public void rent() {
        seeHost();
        host.rent();
        fare();
    }

    // 看房
    private void seeHost(){
        System.out.println("中介带你看房");
    }
    //收中介费
    private void fare(){
        System.out.println("中介收中介费");
    }
}
客户:访问代理对象的人
package com.zmd.dome01;

public class Client {
    public static void main(String[] args) {
        Host host = new Host();
        Proxy proxy = new Proxy(host);
        proxy.rent();
    }
}
聊聊AOP
代理模式好处:
可以使真实角色更加纯粹,不用关心一些公共的业务
公共业务就交给代理角色实现了业务的分工
公共业务发生扩展的时候,方便集中管理
缺点:一个真是角色就会产生一个代理角色,代码量会翻倍,开发效率变低
动态代理:
动态代理和静态代理角色一样
动态代理的代理类是动态生成的不是我们直接写好的
动态代理分为两大类:基于接口的动态代理,基于类来实现的

基于接口---JDK动态代理【我们在这里使用】
基于类的---cglib动态代理
java字节码实现:javasist
需要了解两个类Proxy:代理 InvocationHandler:调用处理程序
InvocationHandler:接口
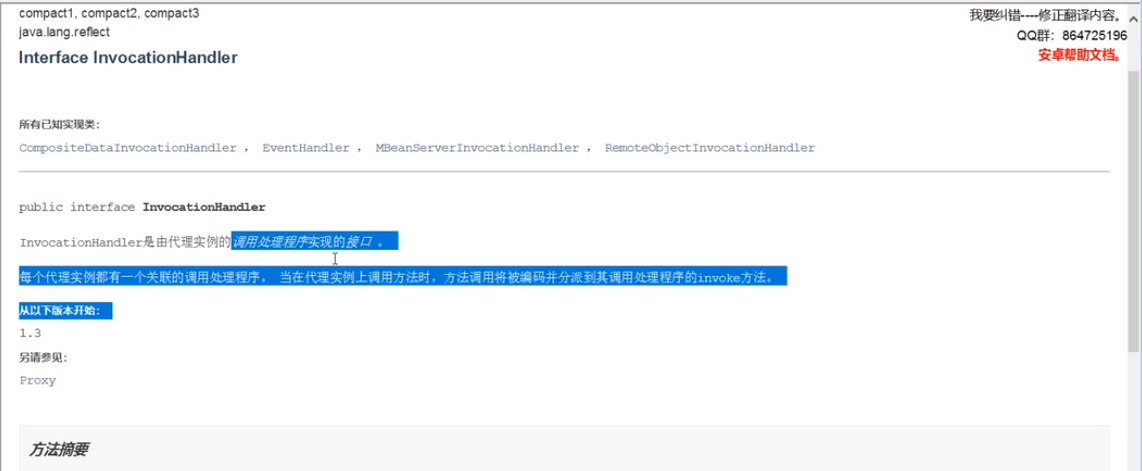
proxy:
具体实现方法:
ProxyInvocationHandler :
// 等会我们会用这个类自动生成代理类
public class ProxyInvocationHandler implements InvocationHandler {
private Object object;
public void setObject(Object object) {
this.object = object;
}
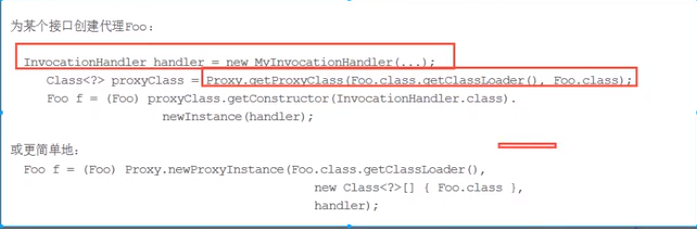
public Object getProxy(){
return Proxy.newProxyInstance(this.getClass().getClassLoader(), object.getClass().getInterfaces(),this);
}
//处理代理实例并返回结果
@Override
public Object invoke(Object proxy, Method method, Object[] args) throws Throwable {
//动态代理的本质就是反射
log(method.getName());
Object result = method.invoke(object,args);
return result;
}
public void log(String msg){
System.out.println("执行了"+msg+"方法");
}
}
测试:
public class Client {
    public static void main(String[] args) {
        //真是角色
        Host host = new Host();
        //代理角色:现在没有
        ProxyInvocationHandler proxyInvocationHandler = new ProxyInvocationHandler();
        //通过调用程序处理角色来处理我们要调用的接口对象
        proxyInvocationHandler.setObject(host);
        Rent rent = (Rent) proxyInvocationHandler.getProxy();//这里的proxy就是动态生成的,我们没有写
        rent.rent();
        rent.shouqian();
    }
}
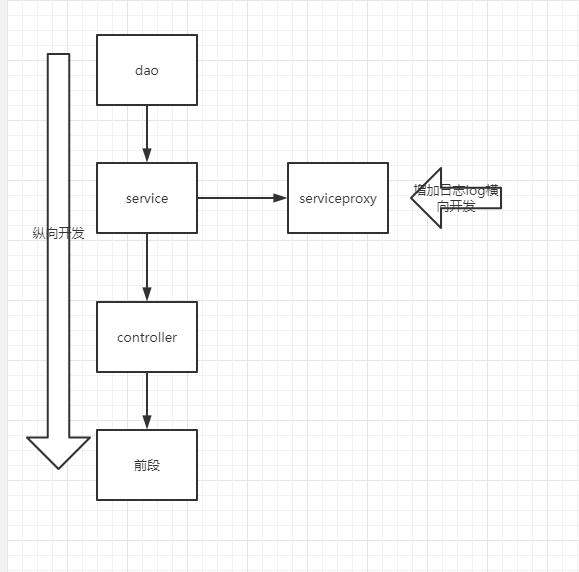
Aop

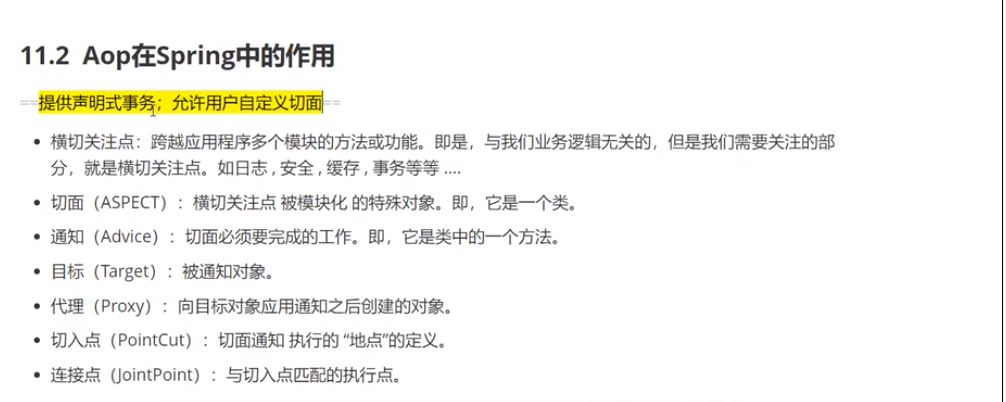
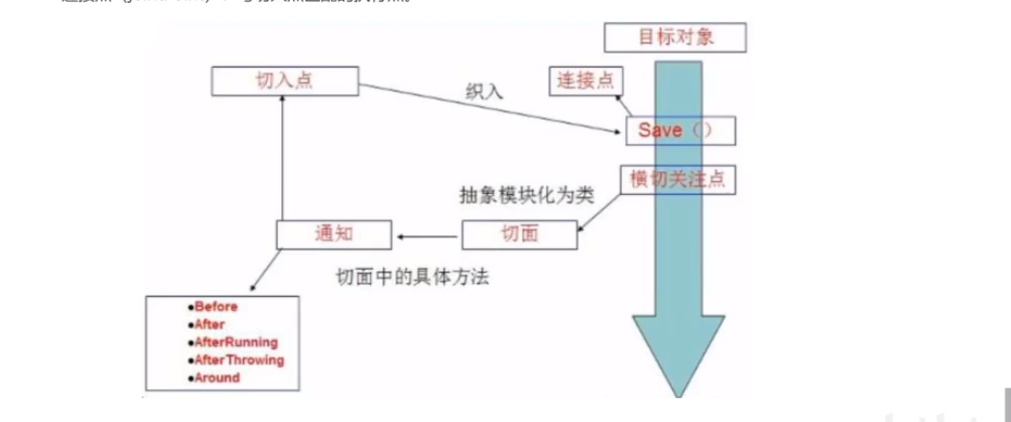
使用spring实现aop
需要导入包:
<dependency>
    <groupId>org.aspectj</groupId>
    <artifactId>aspectjweaver</artifactId>
    <version>1.9.4</version>
</dependency>
方式一:使用spring的api接口
以日志作为例子:
UserService:
package com.zmd.service;

public interface UserService {
    public void add();
    public void delect();
    public void update();
    public void select();
}
UserServiceImpl :
public class UserServiceImpl implements UserService{
    @Override
    public void add() {
        System.out.println("增加一个用户");
    }

    @Override
    public void delect() {
        System.out.println("删除一个用户");
    }

    @Override
    public void update() {
        System.out.println("修改一个用户");
    }

    @Override
    public void select() {
        System.out.println("查询一个用户");
    }
}
UserServiceImpl01 :
public class UserServiceImpl01 implements UserService{
    @Override
    public void add() {
        System.out.println("fdskljfksdafjlsk");
    }

    @Override
    public void delect() {

    }

    @Override
    public void update() {

    }

    @Override
    public void select() {

    }
}
Log :
import org.springframework.aop.MethodBeforeAdvice;

import java.lang.reflect.Method;

public class Log implements MethodBeforeAdvice {
    //method:要执行的目标对象的方法
    @Override
    public void before(Method method, Object[] args, Object target) throws Throwable {
        System.out.println(target.getClass().getName()+"的"+method.getName()+"被执行了!");
    }
}
AfterLog
import org.springframework.aop.AfterReturningAdvice;

import java.lang.reflect.Method;

public class AfterLog implements AfterReturningAdvice {
    @Override
    public void afterReturning(Object returnValue, Method method, Object[] args, Object target) throws Throwable {
        System.out.println("执行了"+method.getName()+"返回结果为"+returnValue);
    }
}
配置文件:
<?xml version="1.0" encoding="utf-8" ?>
<beans xmlns="http://www.springframework.org/schema/beans"
       xmlns:xsi="http://www.w3.org/2001/XMLSchema-instance"
       xmlns:aop="http://www.springframework.org/schema/aop"
       xsi:schemaLocation="http://www.springframework.org/schema/beans
        http://www.springframework.org/schema/beans/spring-beans.xsd
        http://www.springframework.org/schema/aop
        http://www.springframework.org/schema/aop/spring-aop.xsd">
    <!--使用spring来创建对象-->
    <bean id="userService" class="com.zmd.service.UserServiceImpl"/>
    <bean id="userService01" class="com.zmd.service.UserServiceImpl01"/>
    <bean id="log" class="com.zmd.log.Log"/>
    <bean id="afterlog" class="com.zmd.log.AfterLog"/>
    <!--方式一:使用原生spring API接口-->
    <!--配置AOP:需要导入aop约束-->
    <aop:config>
        <!--切入点:在哪个地方执行,表达式:expression(要执行的位置)-->
        <aop:pointcut id="pointcut" expression="execution(* com.zmd.service.*.*(..))"/>
        <!--执行环绕增强-->
        <aop:advisor advice-ref="log"  pointcut-ref="pointcut"/>
        <aop:advisor advice-ref="afterlog"  pointcut-ref="pointcut"/>
    </aop:config>

</beans>
测试类:
public class MyTest {
    public static void main(String[] args) {
        ApplicationContext context = new ClassPathXmlApplicationContext("applicationContext.xml");
        UserService userService = context.getBean("userService", UserService.class);
        UserService userService1 = context.getBean("userService01", UserService.class);
//        userService.add();
        userService1.add();
    }
}
方式二:自定义类实现AOP
切面的形式实现:
其他不变:将日志类改为自定义类:
public class DiyLog {
    public void bf(){
        System.out.println("------------方法执行前--------------");
    }
    public void af(){
        System.out.println("------------方法执行后--------------");
    }
}
配置文件:
<?xml version="1.0" encoding="utf-8" ?>
<beans xmlns="http://www.springframework.org/schema/beans"
xmlns:xsi="http://www.w3.org/2001/XMLSchema-instance"
xmlns:aop="http://www.springframework.org/schema/aop"
xsi:schemaLocation="http://www.springframework.org/schema/beans
http://www.springframework.org/schema/beans/spring-beans.xsd
http://www.springframework.org/schema/aop
http://www.springframework.org/schema/aop/spring-aop.xsd">
<!--使用spring来创建对象-->
<bean id="userService" class="com.zmd.service.UserServiceImpl"/>
<bean id="userService01" class="com.zmd.service.UserServiceImpl01"/>
<bean id="log" class="com.zmd.log.Log"/>
<bean id="afterlog" class="com.zmd.log.AfterLog"/>
<!--方式一:使用原生spring API接口-->
<!--配置AOP:需要导入aop约束-->
<!-- <aop:config>-->
<!-- <!–切入点:在哪个地方执行,表达式:expression(要执行的位置)–>-->
<!-- <aop:pointcut id="pointcut" expression="execution(* com.zmd.service.*.*(..))"/>-->
<!-- <!–执行环绕增强–>-->
<!-- <aop:advisor advice-ref="log" pointcut-ref="pointcut"/>-->
<!-- <aop:advisor advice-ref="afterlog" pointcut-ref="pointcut"/>-->
<!-- </aop:config>-->
<!--方式二:-->
<bean id="diy" class="com.zmd.dome01.DiyLog"/>
<aop:config>
<aop:aspect ref="diy">
<aop:pointcut id="print" expression="execution(* com.zmd.service.*.*(..))"/>
<aop:before method="bf" pointcut-ref="print"/>
<aop:after method="af" pointcut-ref="print"/>
</aop:aspect>
</aop:config>
</beans>
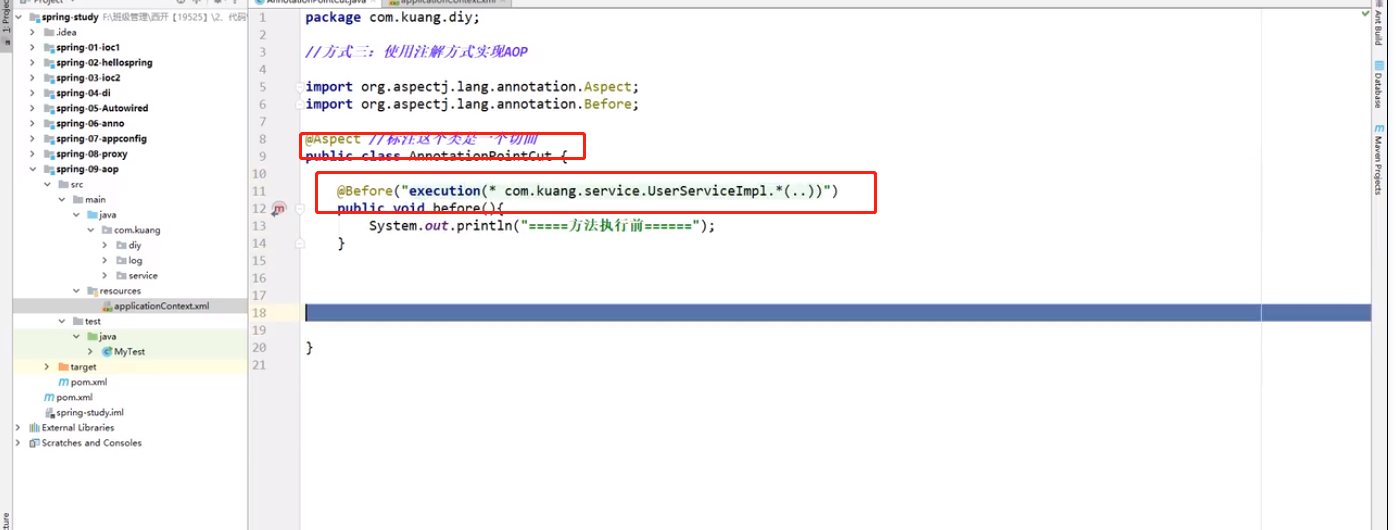
方式三:注解方式实现
整合mybatis
步骤:
1:导入相关的jar包
  junit
  mybatis
  mysql
  spring相关的
  aop织入包
  mybatis-spring
<dependency>
    <groupId>junit</groupId>
    <artifactId>junit</artifactId>
    <version>4.12</version>
</dependency>
<dependency>
    <groupId>mysql</groupId>
    <artifactId>mysql-connector-java</artifactId>
    <version>5.1.47</version>
</dependency>
<dependency>
    <groupId>org.mybatis</groupId>
    <artifactId>mybatis</artifactId>
    <version>3.5.2</version>
</dependency>
<dependency>
    <groupId>org.springframework</groupId>
    <artifactId>spring-webmvc</artifactId>
    <version>5.2.0.RELEASE</version>
</dependency>
<dependency>
    <groupId>org.springframework</groupId>
    <artifactId>spring-jdbc</artifactId>
    <version>5.2.0.RELEASE</version>
</dependency>
<dependency>
    <groupId>org.aspectj</groupId>
    <artifactId>aspectjweaver</artifactId>
    <version>1.9.4</version>
</dependency>
<dependency>
    <groupId>org.mybatis</groupId>
    <artifactId>mybatis-spring</artifactId>
    <version>2.0.6</version>
</dependency>
mybatis
1、编写实体类
2、编写核心配置文件
3、编写接口
4、编写Mapper.xml
5、测试
mybats-config.xml
<?xml version="1.0" encoding="UTF-8" ?>
<!DOCTYPE configuration
PUBLIC "-//mybatis.org//DTD Config 3.0//EN"
"http://mybatis.org/dtd/mybatis-3-config.dtd">
<configuration>
<typeAliases>
<package name="com.zmd.pojo"/>
</typeAliases>
<environments default="development">
<environment id="development">
<transactionManager type="JDBC"/>
<dataSource type="POOLED">
<property name="driver" value="com.mysql.jdbc.Driver"/>
<property name="url" value="jdbc:mysql://localhost:3306/test?useSSL=true&useUnicode=true&characterEncoding=UTF-8"/>
<property name="username" value="root"/>
<property name="password" value="root"/>
</dataSource>
</environment>
</environments>
<mappers>
<mapper class="com.zmd.mapper.StudentMapper"/>
</mappers>
</configuration>
创建对应实体对象:
@Data
public class Student {
    private String name;
    private String age;
}
创建对应mapper接口对象:
public interface StudentMapper {
    public List<Student> selectStudent();
}
创建对应mapperXML:
<?xml version="1.0" encoding="UTF-8" ?>
<!DOCTYPE mapper
        PUBLIC "-//mybatis.org//DTD Config 3.0//EN"
        "http://mybatis.org/dtd/mybatis-3-mapper.dtd">
<mapper namespace="com.zmd.mapper.StudentMapper">
    <select id="selectStudent" resultType="student">
        select * from test.student;
    </select>
</mapper>
TEST类:
public class MyTest {
    public static void main(String[] args) throws Exception{
        String resources = "mybatis-config.xml";
        InputStream in = Resources.getResourceAsStream(resources);
        SqlSessionFactory sqlSessionFactory = new SqlSessionFactoryBuilder().build(in);
        SqlSession sqlSession = sqlSessionFactory.openSession(true);

        StudentMapper studentMapper = sqlSession.getMapper(StudentMapper.class);
        List<Student> studentList = studentMapper.selectStudent();
        for (Student s:studentList) {
            System.out.println(s.getName()+s.getAge());
        }
    }
}

spring整合mybatis
 首先配置文件有三个:
1、spring.xml
<?xml version="1.0" encoding="utf-8" ?>
<beans xmlns="http://www.springframework.org/schema/beans"
xmlns:xsi="http://www.w3.org/2001/XMLSchema-instance"
xmlns:aop="http://www.springframework.org/schema/aop"
xsi:schemaLocation="http://www.springframework.org/schema/beans
http://www.springframework.org/schema/beans/spring-beans.xsd
http://www.springframework.org/schema/aop
http://www.springframework.org/schema/aop/spring-aop.xsd">
<!-- datasource:使用spring的数据源替代mybatis的配置,这里使用spring提供的JDBC-->
<bean id="dataSource" class="org.springframework.jdbc.datasource.DriverManagerDataSource">
<property name="driverClassName" value="com.mysql.jdbc.Driver"/>
<property name="url" value="jdbc:mysql://localhost:3306/test?useSSL=true&useUnicode=true&characterEncoding=UTF-8"/>
<property name="username" value="root"/>
<property name="password" value="root"/>
</bean>
<!-- sqlsessionfactory-->
<bean id="sqlSessionFactory" class="org.mybatis.spring.SqlSessionFactoryBean">
<property name="dataSource" ref="dataSource"/>
<!-- 绑定mybatis配置文件-->
<property name="configLocation" value="classpath:mybatis-config.xml"/>
<property name="mapperLocations" value="classpath:com/zmd/mapper/*.xml"/>
</bean>
<bean id="SqlSession" class="org.mybatis.spring.SqlSessionTemplate">
<!-- 只能使用构造器注入,因为他没有set方法-->
<constructor-arg index="0" ref="sqlSessionFactory"/>
</bean>
</beans>
2、mybatis.xml
<?xml version="1.0" encoding="UTF-8" ?>
<!DOCTYPE configuration
        PUBLIC "-//mybatis.org//DTD Config 3.0//EN"
        "http://mybatis.org/dtd/mybatis-3-config.dtd">
<configuration>
    <typeAliases>
        <package name="com.zmd.pojo"/>
    </typeAliases>
</configuration>
3、application.xml(总配置文件)
<?xml version="1.0" encoding="utf-8" ?>
<beans xmlns="http://www.springframework.org/schema/beans"
       xmlns:xsi="http://www.w3.org/2001/XMLSchema-instance"
       xmlns:aop="http://www.springframework.org/schema/aop"
       xsi:schemaLocation="http://www.springframework.org/schema/beans
        http://www.springframework.org/schema/beans/spring-beans.xsd
        http://www.springframework.org/schema/aop
        http://www.springframework.org/schema/aop/spring-aop.xsd">
    <!--    datasource:使用spring的数据源替代mybatis的配置,这里使用spring提供的JDBC-->
    <import resource="classpath:spring.xml"/>
    <bean id="StudentMapper" class="com.zmd.mapper.StudentMapperImpl">
        <property name="sqlSession" ref="SqlSession"/>
    </bean>
</beans>
正常除了mapple.xml 和 mapper接口还需要一个实现类
StudentMapperImpl:
package com.zmd.mapper;

import com.zmd.pojo.Student;
import org.mybatis.spring.SqlSessionTemplate;
import org.springframework.beans.factory.annotation.Autowired;

import java.util.List;

public class StudentMapperImpl implements StudentMapper{
    @Autowired
    private SqlSessionTemplate sqlSession;

    public void setSqlSession(SqlSessionTemplate sqlSession) {
        this.sqlSession = sqlSession;
    }

    @Override
    public List<Student> selectStudent() {
        return sqlSession.getMapper(StudentMapper.class).selectStudent();
    }
}
测试类:
public static void main(String[] args) {
    ApplicationContext context =  new ClassPathXmlApplicationContext("application.xml");
    StudentMapperImpl studentMapper = context.getBean("StudentMapper", StudentMapperImpl.class);

    List<Student> studentList = studentMapper.selectStudent();
    for (Student s:studentList) {
        System.out.println(s.getName() + s.getAge());
    }
}
方式二:
实现类继承sqlSessiondaosport类
配置文件省略sqlsessionTemplate配置,在注入实现类的时候注入属性sqlsessionfactory

 浙公网安备 33010602011771号