

Java-IO篇
JAVA IO
Java IO属于传统的io模式,是阻塞性IO;针对文件数据的读取,主要区分了字节流和字符流
字节流
InputStream(字节输入流)
从磁盘文件中读取数据,以流的方式读取到内存中,java.io.InputStream抽象类是所有字节输入流的父类。
InputStream 常用方法:
- read():返回输入流中下一个字节的数据。返回的值介于 0 到 255 之间。如果未读取任何字节,则代码返回 -1 ,表示文件结束。* read(byte b[ ]) : 从输入流中读取一些字节存储到数组 b 中。如果数组 b 的长度为零,则不读取。如果没有可用字节读取,返回 -1。如果有可用字节读取,则最多读取的字节数最多等于 b.length , 返回读取的字节数。这个方法等价于 read(b, 0, b.length)。
- read(byte b[], int off, int len):在read(byte b[ ]) 方法的基础上增加了 off 参数(偏移量)和 len 参数(要读取的最大字节数)。
- skip(long n):忽略输入流中的 n 个字节 ,返回实际忽略的字节数。
- available():返回输入流中可以读取的字节数。
- close():关闭输入流释放相关的系统资源。
OutputStream(字节输出流)
OutputStream用于将数据(字节信息)写入到目的地(通常是文件),java.io.OutputStream抽象类是所有字节输出流的父类。
OutputStream 常用方法:
- write(int b):将特定字节写入输出流。
- write(byte b[ ]) : 将数组b 写入到输出流,等价于 write(b, 0, b.length) 。
- write(byte[] b, int off, int len) : 在write(byte b[ ]) 方法的基础上增加了 off 参数(偏移量)和 len 参数(要读取的最大字节数)。
- flush():刷新此输出流并强制写出所有缓冲的输出字节。
- close():关闭输出流释放相关的系统资源。
字节流使用方案
除了直接操作字节的方式,Java基于字节流提供了其它便捷方式,如DataInputStream、ObjectInputStream
- DataInputStream:
提供了提供了各种数据类型的方法,可以从流内存中读取制定的数据类型- readBoolean: 读取布尔类型数据
- readByte:读取字节数据
- readShort: 读取短整数数据
- readChar:读取字符
- readInt:读取Int
- ObjectInputStream
可以读取制定长度的字节流实例化为对象- readObject:传入class,读取字节直接实例化为对象
示例代码
- readObject:传入class,读取字节直接实例化为对象
        File file = null;
        BufferedOutputStream outputStream = null;
        BufferedInputStream inputStream = null;
        try {
            // 获取文件实例
            file = new File(file_path + "test.log");
            if (!file.exists()) {
                if (!file.createNewFile()) {
                    throw new RuntimeException("创建文件失败");
                }
            }

            // 读取文件内容

            inputStream = new BufferedInputStream(new FileInputStream(file));
            byte[] content = new byte[inputStream.available()];
            inputStream.read(content);
            String contentStr = new String(content, StandardCharsets.UTF_8);
            System.out.println("原文件内容:" + contentStr);
            inputStream.close();

            // 重写内容
            outputStream = new BufferedOutputStream(new FileOutputStream(file));
            contentStr += "【我是添加内容】";
            outputStream.write(contentStr.toString().getBytes());
            outputStream.flush();
        } catch (FileNotFoundException e) {
            throw new RuntimeException(e);
        } catch (IOException e) {
            throw new RuntimeException(e);
        } finally {
            try {
                if (null != outputStream) {
                    outputStream.close();
                }
                if (null != inputStream) {
                    inputStream.close();
                }
            } catch (IOException e) {
                throw new RuntimeException(e);
            }
        }
字符流
针对字节流可读性差,而且当不知道编码类型时容易出现乱码问题,Java提供了字符流方案,虚拟机中自动将字节转为了字符输入到内存。
Reader(字符输入流)
Reader用于从源头(通常是文件)读取数据(字符信息)到内存中,java.io.Reader抽象类是所有字符输入流的父类。Reader 用于读取文本, InputStream 用于读取原始字节。
Reader 常用方法:
- read() : 从输入流读取一个字符。
- read(char[] cbuf) : 从输入流中读取一些字符,并将它们存储到字符数组 cbuf中,等价于 read(cbuf, 0, cbuf.length) 。
- read(char[] cbuf, int off, int len):在read(char[] cbuf) 方法的基础上增加了 off 参数(偏移量)和 len 参数(要读取的最大字符数)。
- skip(long n):忽略输入流中的 n 个字符 ,返回实际忽略的字符数。
- close() : 关闭输入流并释放相关的系统资源。
Writer(字符输出流)
Writer用于将数据(字符信息)写入到目的地(通常是文件),java.io.Writer抽象类是所有字符输出流的父类。
Writer 常用方法:
- write(int c) : 写入单个字符。
- write(char[] cbuf):写入字符数组 cbuf,等价于write(cbuf, 0, cbuf.length)。
- write(char[] cbuf, int off, int len):在write(char[] cbuf) 方法的基础上增加了 off 参数(偏移量)和 len 参数(要读取的最大字符数)。
- write(String str):写入字符串,等价于 write(str, 0, str.length()) 。
- write(String str, int off, int len):在write(String str) 方法的基础上增加了 off 参数(偏移量)和 len 参数(要读取的最大字符数)。
- append(CharSequence csq):将指定的字符序列附加到指定的 Writer 对象并返回该 Writer 对象。
- append(char c):将指定的字符附加到指定的 Writer 对象并返回该 Writer 对象。
- flush():刷新此输出流并强制写出所有缓冲的输出字符。
- close():关闭输出流释放相关的系统资源。
字节缓冲流
IO 操作是很消耗性能的,缓冲流将数据加载至缓冲区,一次性读取/写入多个字节,从而避免频繁的 IO 操作,提高流的传输效率。
BufferedInputStream(字节缓冲输入流)
BufferedInputStream 从源头(通常是文件)读取数据(字节信息)到内存的过程中不会一个字节一个字节的读取,而是会先将读取到的字节存放在缓存区,并从内部缓冲区中单独读取字节。这样大幅减少了 IO 次数,提高了读取效率。
BufferedOutputStream(字节缓冲输出流)
BufferedOutputStream 将数据(字节信息)写入到目的地(通常是文件)的过程中不会一个字节一个字节的写入,而是会先将要写入的字节存放在缓存区,并从内部缓冲区中单独写入字节。这样大幅减少了 IO 次数,提高了读取效率
使用示例
        File file = null;
        BufferedWriter writer = null;
        BufferedReader reader = null;
        try {
            // 获取文件实例
            file = new File(file_path + "test.log");
            if (!file.exists()) {
                if (!file.createNewFile()) {
                    throw new RuntimeException("创建文件失败");
                }
            }

            // 读取文件内容
            reader = new BufferedReader(new FileReader(file));
            StringBuilder contentStr = new StringBuilder(1024);
            String content = null;
            while ((content = reader.readLine()) != null) {
                contentStr.append(content);
            }
            System.out.println("原文件内容:" + contentStr);
            reader.close();

            // 重写内容
            writer = new BufferedWriter(new FileWriter(file));
            contentStr.append("【我是字符流添加内容】");
            writer.write(contentStr.toString());
            writer.flush();
        } catch (FileNotFoundException e) {
            throw new RuntimeException(e);
        } catch (IOException e) {
            throw new RuntimeException(e);
        } finally {
            try {
                if (null != writer) {
                    writer.close();
                }
                if (null != reader) {
                    reader.close();
                }
            } catch (IOException e) {
                throw new RuntimeException(e);
            }
        }
其它字节流
PrintStream(打印流)
System.out.print使用打印流
RandomAccessFile(随机访问流)
随机访问流指的是支持随意跳转到文件的任意位置进行读写的 RandomAccessFile;针对这个特性可用于对大文件进行分片读取
读写模式主要有下面四种:
- r : 只读模式。
- rw: 读写模式
- rws: 相对于 rw,rws 同步更新对“文件的内容”或“元数据”的修改到外部存储设备。
- rwd : 相对于 rw,rwd 同步更新对“文件的内容”的修改到外部存储设备。
RandomAccessFile 的实现依赖于 FileDescriptor (文件描述符) 和 FileChannel (内存映射文件)
使用RandomAccessFile分片读取大文件示例
点击查看代码
// 文件拷贝入口方法
    public R<String> cpBigFile() {
        logger.info("开始超大文件操作拷贝");
        long startTime = System.currentTimeMillis();
        R<String> r = R.ok("超大文件操作拷贝成功");
        File file = null;
        List<File> tempFilePaths = new ArrayList<>();
        BufferedReader reader = null;
        try {
            // 获取文件实例
            logger.info("开始获取原始大文件");
            file = new File(file_path + "big_file.log");
            if (!file.exists()) {
                if (!file.createNewFile()) {
                    throw new RuntimeException("创建文件失败");
                }
            }

            long fileSize = file.length(); // 文件大小
            long partSize = 1024*1024*50; //每个分片的大小为50M
            logger.info("开始按分片存储文件");
            try (RandomAccessFile randomAccessFile = new RandomAccessFile(file, "r")) {
                // 当前分片开始位置
                long posIndex = 0;
                // 当前分块序号
                int partIndex = 1;
                while (posIndex < fileSize) {
                    // 设置当前分片的读取位置
                    randomAccessFile.seek(posIndex);
                    // 计算当前分片的内存大小,若为最后一个分片,则取剩余数据的实际字节数
                    byte[] tempContent = new byte[(int) Math.min(partSize, fileSize - posIndex)];
                    randomAccessFile.read(tempContent);
                    // 保存当前分片数据
                    saveTempFile(tempContent, tempFilePaths, partIndex++);
                    posIndex += partSize;
                }
            }
            logger.info("分片文件存储成功,开始合并文件");
            mergeFiles(tempFilePaths, file_path + "new_big_file.log");
            logger.info("分片文件合并成功,开始删除分片文件");
            removePartFile(tempFilePaths);
            logger.info("分片文件删除成功");
            long endTime = System.currentTimeMillis();
            logger.info("拷贝过程总耗时:{}", endTime - startTime);
        } catch (IOException e) {
            throw new RuntimeException(e);
        } finally {
            try {
                if (null != reader) {
                    reader.close();
                }
            } catch (IOException e) {
                throw new RuntimeException(e);
            }
        }
        logger.info("原始大文件拷贝结束");
        return r;
    }


   // 存储临时文件
    private void saveTempFile(byte[] tempContent, List<File> tempFilePaths, int partIndex) {
        BufferedWriter writer = null;
        File file = null;
        try {
            String contentStr = new String(tempContent, StandardCharsets.UTF_8);
            // 生成MD5校验码,防止篡改
            String vailStr = MD5Utils.MD5(contentStr);
            String fileName = file_path + "temp/" + partIndex + "_" + vailStr + "_big_file.log";
            logger.info("开始文件分片{}", fileName);
            // 获取文件实例
            file = new File(fileName);
            if (!file.exists()) {
                File dir = file.getParentFile();
                if (!dir.exists() && !dir.mkdir()) {
                    throw new RuntimeException("创建目录失败");
                }
                if (!file.createNewFile()) {
                    throw new RuntimeException("创建文件失败");
                }
            }
            // 重写内容
            writer = new BufferedWriter(new FileWriter(file));
            writer.write(contentStr);
            writer.flush();
            tempFilePaths.add(file);
            logger.info("文件分片{}存储成功", fileName);
        } catch (IOException e) {
            throw new RuntimeException(e);
        } finally {
            if (null != writer) {
                try {
                    writer.close();
                } catch (IOException e) {
                    throw new RuntimeException(e);
                }
            }
        }
    }


    // 合并文件
    public void mergeFiles(List<File> fpaths, String resultPath) throws IOException {
        if (CollectionUtils.isEmpty(fpaths) || TextUtils.isEmpty(resultPath)) {
            return;
        }
        logger.info("开始生成合并文件:{}", resultPath);
        BufferedOutputStream bos = null;
        try {
            bos = new BufferedOutputStream(new FileOutputStream(resultPath));
            BufferedInputStream bis = null;
            for (File fpath : fpaths) {
                try {
                    logger.info("开始合并分片文件:{}", fpath);
                    bis = new BufferedInputStream(new FileInputStream(fpath));
                    byte[] bytes = new byte[1024];
                    int len;
                    while ((len = bis.read(bytes)) != -1) {
                        bos.write(bytes, 0, len);
                    }
                } finally {
                    if (null != bis) {
                        bis.close();
                    }
                }
            }
            bos.flush();
            logger.info("生成合并文件:{}结束", resultPath);
        } finally {
            if (null != bos) {
                bos.close();
            }
        }
    }


    // 删除分片文件
    private void removePartFile(List<File> tempFilePaths) {
        if (CollectionUtils.isEmpty(tempFilePaths)) {
            return;
        }
        for (File tempFilePath : tempFilePaths) {
            if (!tempFilePath.delete()) {
                throw new RuntimeException("文件"+tempFilePath.getName()+"删除失败");
            }
        }
    }
JAVA IO使用的设计模式
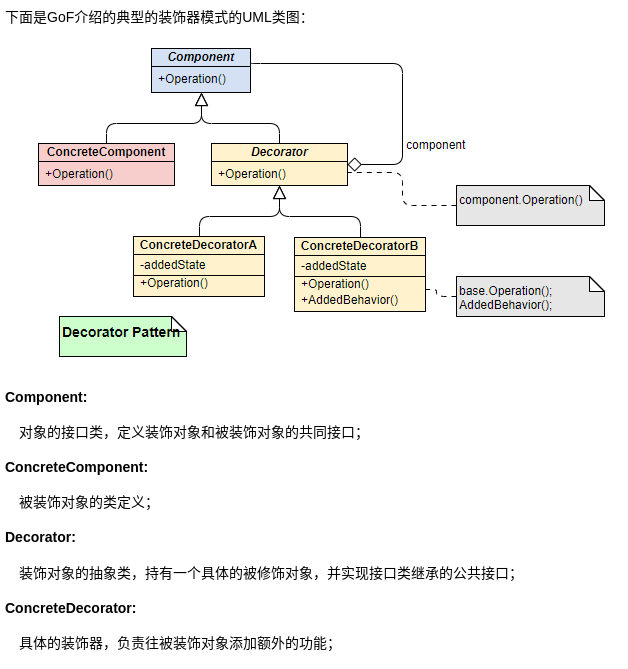
装饰者模式
装饰器(Decorator)模式 可以在不改变原有对象的情况下拓展其功能。
装饰器模式通过组合替代继承来扩展原始类的功能,在一些继承关系比较复杂的场景(IO 这一场景各种类的继承关系就比较复杂)更加实用。
如字节缓冲流(BufferedInputStream)便是对字节读取流(FileInputStream)的装饰,BufferedInputStream实例化时需要传入FileInputStream对象,FileInputStream中提供了对FileInputStream功能的扩展,但并没有改变FileInputStream的执行方式。
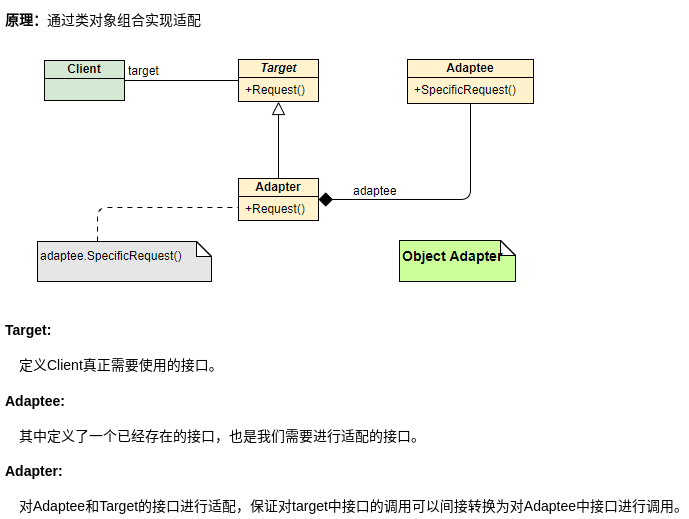
适配器模式
适配器(Adapter Pattern)模式 主要用于接口互不兼容的类的协调工作,你可以将其联想到我们日常经常使用的电源适配器。
区别于装饰器模式,适配器会提供一个新的接口,新接口会适配旧接口,并调整旧接口中不适配的方法。
IO模型详解
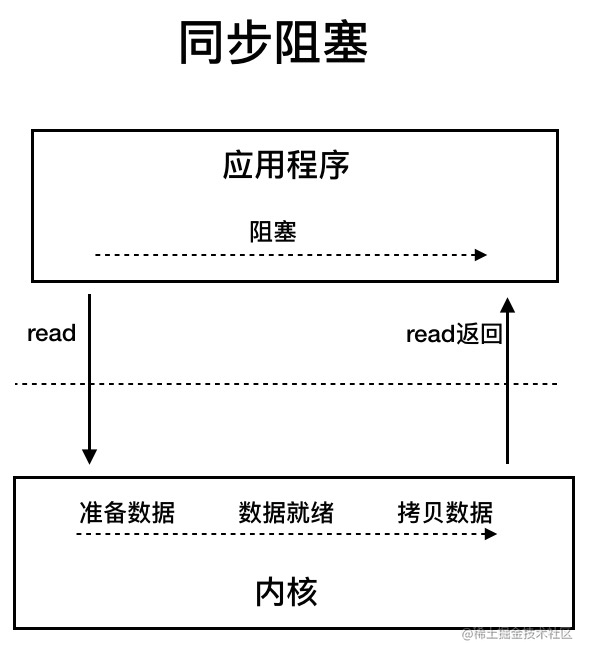
Java中常见的IO模型有同步阻塞IO(BIO)、非阻塞IO(NIO-IO多路复用)、异步IO(AIO)
- BIO
同步阻塞 IO 模型中,应用程序发起 read 调用后,会一直阻塞,直到内核把数据拷贝到用户空间。
- NIO
NIO中主线程不会阻塞等待某IO线程执行完毕,而是多个IO线程中的某个IO线程准备就绪后,主动连接主线程进行数据拷贝,主线程中使用了监听器监听多个IO进程。
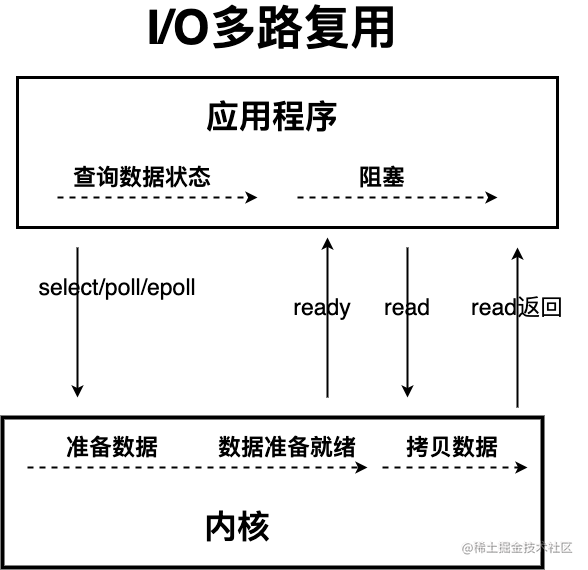
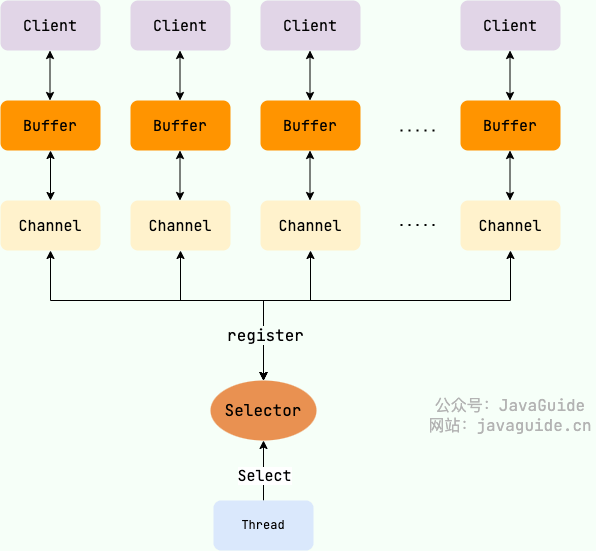
Java 中的 NIO ,有一个非常重要的选择器 ( Selector ) 的概念,也可以被称为 多路复用器。通过它,只需要一个线程便可以管理多个客户端连接。当客户端数据到了之后,才会为其服务。
- AIO
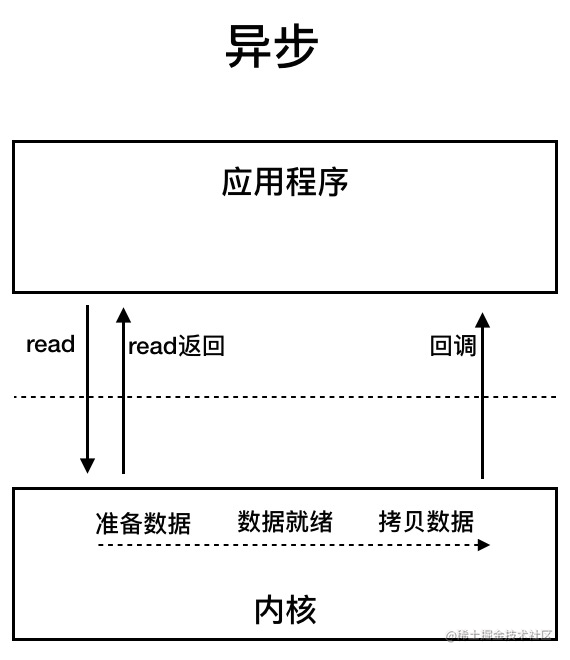
AIO是对NIO的扩展,NIO会为每个IO线程生成一个渠道(Channel),主线程使用Selector选择器连接准备就绪的Channel;AIO中使用了回调方式,当IO线程就绪后通过回调执行后续操作。
JAVA NIO核心知识
NIO 主要包括以下三个核心组件:
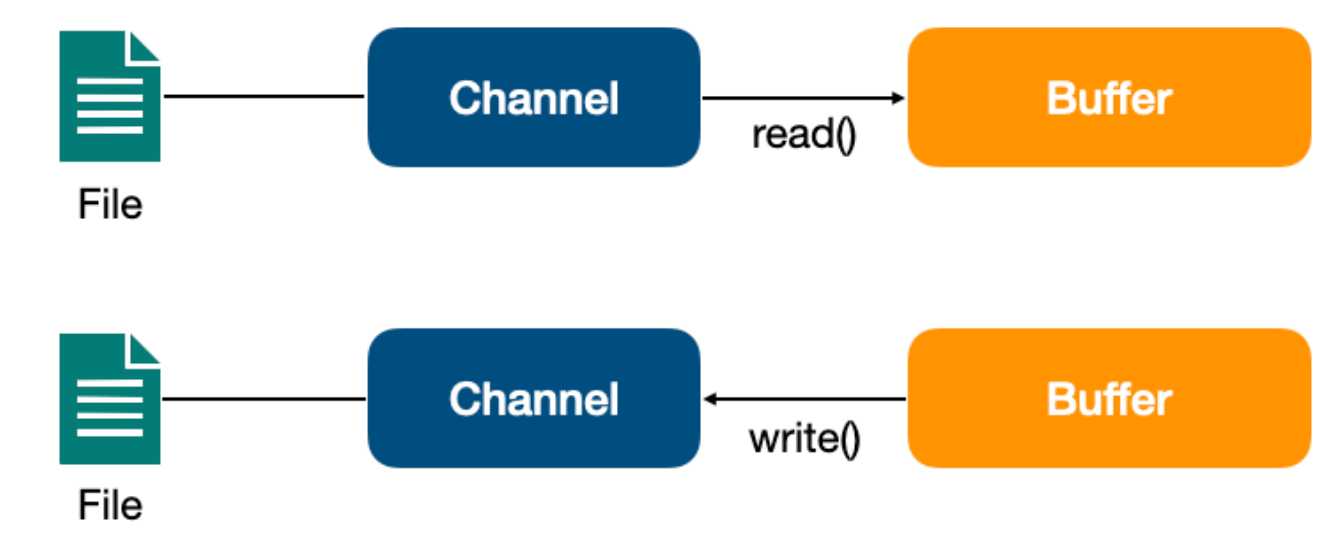
- Buffer(缓冲区):NIO 读写数据都是通过缓冲区进行操作的。读操作的时候将 Channel 中的数据填充到 Buffer 中,而写操作时将 Buffer 中的数据写入到 Channel 中。
- Channel(通道):Channel 是一个双向的、可读可写的数据传输通道,NIO 通过 Channel 来实现数据的输入输出。通道是一个抽象的概念,它可以代表文件、套接字或者其他数据源之间的连接。
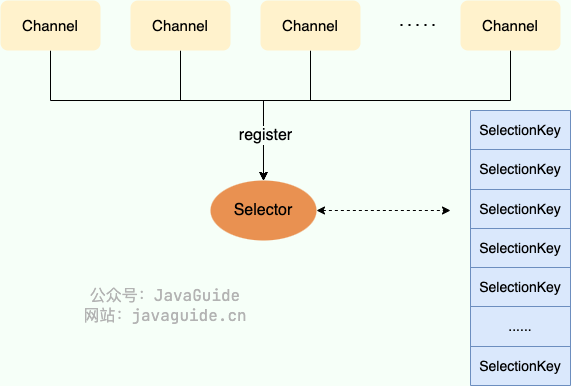
- Selector(选择器):允许一个线程处理多个 Channel,基于事件驱动的 I/O 多路复用模型。所有的 Channel 都可以注册到 Selector 上,由 Selector 来分配线程来处理事件。
Buffer(缓冲区)
NIO中跟据不同的数据类型提供了多种缓存区,缓冲区用于与Channel交互。
定义:
public abstract class Buffer {
    // Invariants: mark <= position <= limit <= capacity
    private int mark = -1;
    private int position = 0;
    private int limit;
    private int capacity;
}
- 容量(capacity):Buffer可以存储的最大数据量,Buffer创建时设置且不可改变;
- 界限(limit):Buffer 中可以读/写数据的边界。写模式下,limit 代表最多能写入的数据,一般等于 capacity(可以通过limit(int newLimit)方法设置);读模式下,limit 等于 Buffer 中实际写入的数据大小。
- 位置(position):下一个可以被读写的数据的位置(索引)。从写操作模式到读操作模式切换的时候(flip),position 都会归零,这样就可以从头开始读写了。
- 标记(mark):Buffer允许将位置直接定位到该标记处,这是一个可选属性;
Channel(通道)
Channel 是一个通道,它建立了与数据源(如文件、网络套接字等)之间的连接。我们可以利用它来读取和写入数据,就像打开了一条自来水管,让数据在 Channel 中自由流动。
Channel 与前面介绍的 Buffer 打交道,读操作的时候将 Channel 中的数据填充到 Buffer 中,而写操作时将 Buffer 中的数据写入到 Channel 中。
Selector(选择器)
Selector(选择器) 是 NIO 中的一个关键组件,它允许一个线程处理多个 Channel。Selector 是基于事件驱动的 I/O 多路复用模型,主要运作原理是:通过 Selector 注册通道的事件,Selector 会不断地轮询注册在其上的 Channel。当事件发生时,比如:某个 Channel 上面有新的 TCP 连接接入、读和写事件,这个 Channel 就处于就绪状态,会被 Selector 轮询出来。Selector 会将相关的 Channel 加入到就绪集合中。通过 SelectionKey 可以获取就绪 Channel 的集合,然后对这些就绪的 Channel 进行响应的 I/O 操作。
使用NIO读取大文件示例
import java.io.IOException;
import java.nio.ByteBuffer;
import java.nio.channels.FileChannel;
import java.nio.file.Path;
import java.nio.file.Paths;
import java.nio.file.StandardOpenOption;

public class ReadLargeFileWithNIO {
    public static void main(String[] args) {
        Path filePath = Paths.get("path/to/your/large/file");

        try (FileChannel fileChannel = FileChannel.open(filePath, StandardOpenOption.READ)) {
            long fileSize = fileChannel.size();
            int bufferSize = 8192; // 设置缓冲区大小
            long bytesRead = 0;

            ByteBuffer buffer = ByteBuffer.allocate(bufferSize);

            while (bytesRead < fileSize) {
                buffer.clear(); // 清空缓冲区
                long bytesToRead = Math.min(bufferSize, fileSize - bytesRead);
                int read = fileChannel.read(buffer);
                bytesRead += read;

                buffer.flip(); // 切换到读模式

                // 处理读取的数据,这里可以根据需要进行操作
                // 例如:将数据写入另一个文件,进行解析等
                // 注意:buffer 中的数据只有在调用 buffer.get() 方法时才会被读取
                while (buffer.hasRemaining()) {
                    // 这里假设是将读取的数据输出到控制台
                    System.out.print((char) buffer.get());
                }
            }

        } catch (IOException e) {
            e.printStackTrace();
        }
    }
}
上述示例中创建了文件通道Channel,并将Channel注册到了选择性Selector,通过选择器获取准备完成的通道,将数据读入缓冲区;针对大文件的读取,我们可以根据文件大小建立多个通过并注册在选择器中进行批量读取。
NIO 零拷贝
传统IO中会从磁盘读取数据到内存,再从内存拷贝到程序中,零拷贝使用了mmp地址映射,减少了内存拷贝的次数,可以直接在内存中操作数据。


【推荐】国内首个AI IDE,深度理解中文开发场景,立即下载体验Trae
【推荐】编程新体验,更懂你的AI,立即体验豆包MarsCode编程助手
【推荐】抖音旗下AI助手豆包,你的智能百科全书,全免费不限次数
【推荐】轻量又高性能的 SSH 工具 IShell:AI 加持,快人一步
· 被坑几百块钱后,我竟然真的恢复了删除的微信聊天记录!
· 没有Manus邀请码?试试免邀请码的MGX或者开源的OpenManus吧
· 【自荐】一款简洁、开源的在线白板工具 Drawnix
· 园子的第一款AI主题卫衣上架——"HELLO! HOW CAN I ASSIST YOU TODAY
· Docker 太简单,K8s 太复杂?w7panel 让容器管理更轻松!