
Python 3.7 在 Windows 系统下的下载、安装以及虚拟环境的安装和配置
Python 3 下载:
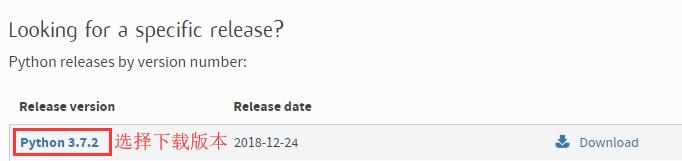
打开 https://www.python.org → Downloads → All releases → 页面跳转到 https://www.python.org/downloads/ → 单击 Python 3.7.2 链接。如下图:
页面跳转到 https://www.python.org/downloads/release/python-372/ → 选择 Windows x86-64 executable installer 进行下载,如下图:

下载后的文件名为 python-3.7.2-amd64.exe ,双击该文件进行安装。
Python 3 安装:
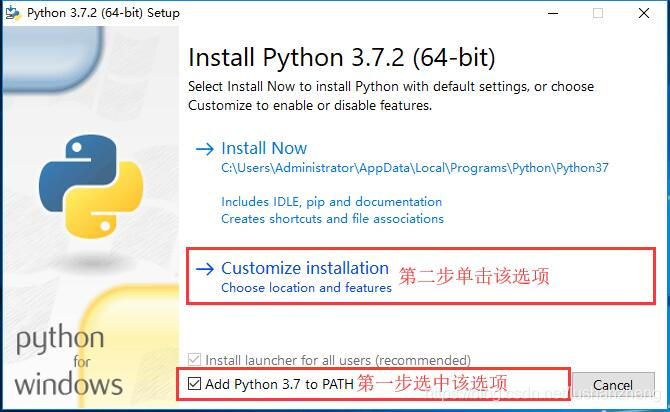
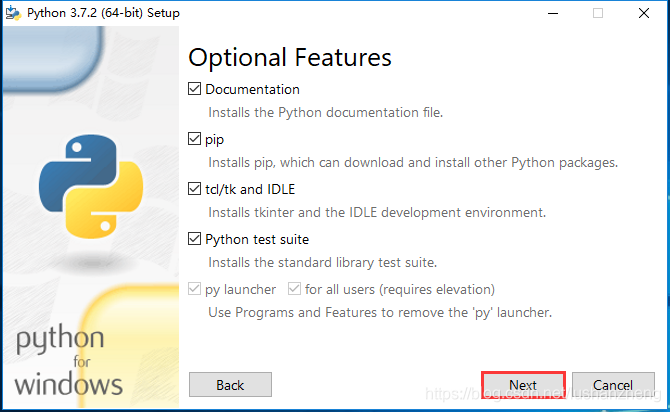
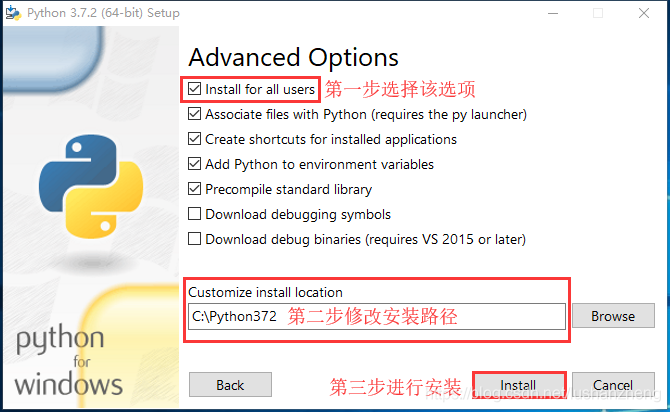
在安装界面做如下图操作:
右键单击我的电脑 → 属性 → 高级系统配置 → 环境变量 → 系统变量 → Path → 编辑,如果在第一步有选择 Add Python 3.7 to PATH ,则在 Path 中,会自动把 Python 加入进去,如下图所示:

打开 cmd 命令行,输入 python 结果如下图所示:
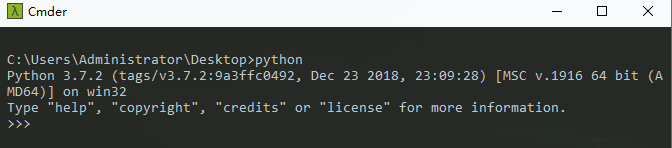
说明 Python 的安装没有问题。
虚拟环境的安装:
打开命令行输入如下命令:
pip install virtualenv结果如下:
C:\Users\Administrator\Desktop>pip install virtualenv
Collecting virtualenv
  Using cached https://files.pythonhosted.org/packages/88/b6/9f2e13a71e5a7cd458dcf4f24540a4bd39206cc6290e8393a48d8b95c11e/virtualenv-16.4.1-py2.py3-none-any.whl
Installing collected packages: virtualenv
Successfully installed virtualenv-16.4.1

C:\Users\Administrator\Desktop>
接着输入如下命令:
pip install virtualenvwrapper-win结果如下:
C:\Users\Administrator\Desktop>pip install virtualenvwrapper-win
Collecting virtualenvwrapper-win
  Using cached https://files.pythonhosted.org/packages/f5/23/4cba98733b9122219ce67177d745e4984b524b867cf3728eaa807ea21919/virtualenvwrapper-win-1.2.5.tar.gz
Requirement already satisfied: virtualenv in c:\python372\lib\site-packages (from virtualenvwrapper-win) (16.4.1)
Installing collected packages: virtualenvwrapper-win
  Running setup.py install for virtualenvwrapper-win ... done
Successfully installed virtualenvwrapper-win-1.2.5

C:\Users\Administrator\Desktop>
配置虚拟环境目录:
在 C 盘创建 PythonEnv 目录,然后,右键单击我的电脑 → 属性 → 高级系统配置 → 环境变量 → 系统变量 → 新建 WORKON_HOME 环境变量,如下图:

然后就可以创建 Python 虚拟环境了。
虚拟环境相关命令:
创建虚拟环境:
mkvirtualenv Py372Django
mkvirtualenv -p C:\Python368\python.exe Py372Django 指定 Python 版本创建虚拟环境

激活虚拟环境: workon Py372Django

退出虚拟环境: deactivate

列出虚拟环境列表: workon
到这里 Python 3 下载、安装以及虚拟环境的安装和配置就完成了。

 浙公网安备 33010602011771号