Elasticsearch之curl创建索引库
关于curl的介绍,请移步
Elasticsearch学习概念之curl
启动es,请移步
Elasticsearch的前后台运行与停止(tar包方式)
Elasticsearch的前后台运行与停止(rpm包方式)
创建索引库,我这里命名为zhouls


[hadoop@djt002 elasticsearch-2.4.3]$ curl -XPUT 'http://192.168.80.200:9200/zhouls'
{"acknowledged":true}[hadoop@djt002 elasticsearch-2.4.3]$
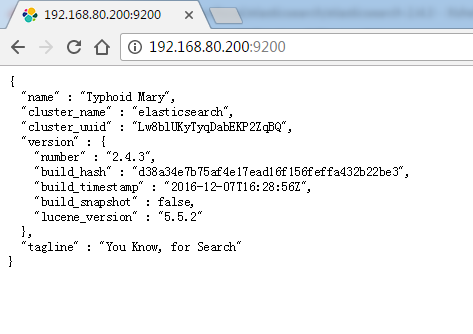
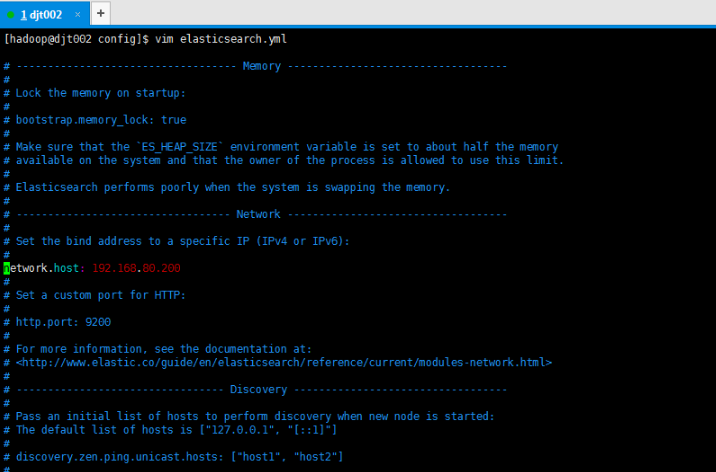
这里,是跟之前的elasticsearch.yml修改对应起来的。

我们可以验证下,输入localhost或者127.0.0.1都会出现无法连接,不信你尝试。

[hadoop@djt002 elasticsearch-2.4.3]$ curl -XPUT 'http://192.168.80.200:9200/zhouls'
{"acknowledged":true}[hadoop@djt002 elasticsearch-2.4.3]$ curl -XPUT 'http://localhost:9200/zhouls'
curl: (7) couldn't connect to host
[hadoop@djt002 elasticsearch-2.4.3]$ curl -XPUT 'http://127.0.0.1:9200/zhouls'
curl: (7) couldn't connect to host
[hadoop@djt002 elasticsearch-2.4.3]$
为了方便,更改为0.0.0.0

然后,重启es

[hadoop@djt002 elasticsearch-2.4.3]$ jps
2811 Jps
2741 Elasticsearch
[hadoop@djt002 elasticsearch-2.4.3]$ curl -XPUT 'http://localhost:9200/zhouls'
{"error":{"root_cause":[{"type":"index_already_exists_exception","reason":"already exists","index":"zhouls"}],"type":"index_already_exists_exception","reason":"already exists","index":"zhouls"},"status":400}[hadoop@djt002 elasticurl -XPUT 'http://127.0.0.1:9200/zhouls'
{"error":{"root_cause":[{"type":"index_already_exists_exception","reason":"already exists","index":"zhouls"}],"type":"index_already_exists_exception","reason":"already exists","index":"zhouls"},"status":400}[hadoop@djt002 elasticurl -XPUT 'http://192.168.80.200:9200/zhouls'
{"error":{"root_cause":[{"type":"index_already_exists_exception","reason":"already exists","index":"zhouls"}],"type":"index_already_exists_exception","reason":"already exists","index":"zhouls"},"status":400}[hadoop@djt002 elasticsearch-2.4.3]$
报这个错误,是正常的,因为,你重复创建索引库。根据经验之谈,一般用内网ip。如我的192.168.80.200。建议指定内网ip
本地回环地址:127.0.0.1
内网地址:192.168.80.200
外网地址:10.29.0.2
在这里0.0.0.0 表示可以通过上面所有ip都可以访问
以上是,Elasticsearch之curl创建索引库的方式1,以下是,Elasticsearch之curl创建索引库的方式2

[hadoop@djt002 elasticsearch-2.4.3]$ curl -XPUT 'http://192.168.80.200:9200/zhouls'
{"error":{"root_cause":[{"type":"index_already_exists_exception","reason":"already exists","index":"zhouls"}],"type":"index_already_exists_exception","reason":"already exists","index":"zhouls"},"status":400}[hadoop@djt002 elasticsearch-2.4.3]$ curl -XPOST 'http://192.168.80.200:9200/zhouls1'
{"acknowledged":true}[hadoop@djt002 elasticsearch-2.4.3]$
测试完,及时删除。

[hadoop@djt002 elasticsearch-2.4.3]$ curl -XPUT 'http://192.168.80.200:9200/zhouls'
{"error":{"root_cause":[{"type":"index_already_exists_exception","reason":"already exists","index":"zhouls"}],"type":"index_already_exists_exception","reason":"already exists","index":"zhouls"},"status":400}[hadoop@djt002 elasticsearch-2.4.3]$ curl -XPOST 'http://192.168.80.200:9200/zhouls1'
{"acknowledged":true}[hadoop@djt002 elasticsearch-2.4.3]$ curl -XDELETE 'http://192.168.80.200:9200/zhouls1'
{"acknowledged":true}[hadoop@djt002 elasticsearch-2.4.3]$
作者:大数据和人工智能躺过的坑
出处:http://www.cnblogs.com/zlslch/
本文版权归作者和博客园共有,欢迎转载,但未经作者同意必须保留此段声明,且在文章页面明显位置给出原文链接,否则保留追究法律责任的权利。
如果您认为这篇文章还不错或者有所收获,您可以通过右边的“打赏”功能 打赏我一杯咖啡【物质支持】,也可以点击右下角的【好文要顶】按钮【精神支持】,因为这两种支持都是我继续写作,分享的最大动力!


