
WPF 数据绑定实例一
前言:
数据绑定的基本步骤:
(1)先声明一个类及其属性
(2)初始化类赋值
(3)在C#代码中把控件DataContext=对象;
(4)在界面设计里,控件给要绑定的属性{Binding 绑定类的属性}
原理:监听事件机制,界面改变有TextChanged之类的事件,所以改变界面可以同步修改到对象
想让普通对象实现数据绑定,需要实现INotifyPropertyChanged接口才能监听ProperChanged。具体代码如下显示:
  class Person:INotifyPropertyChanged
    {
        private int age;

        public int Age
        {
            get
            {
                return age;
            }
            set
            {
                this.age = value;
                if (PropertyChanged != null)
                {
                   PropertyChanged(this,
                       new PropertyChangedEventArgs("Age"));
                }
            }
        }
}
BindingMode枚举值
| 名称 | 说明 |
|---|---|
| OneWay | 当源属性变化时更新目标属性 |
| TwoWay | 当源属性变化时更新目标属性,当目标属性变化时更新源属性 |
| OneTime | 最初根据源属性设置目标属性,其后的改变会忽略。 |
| OneWayToSource | 与OneWay类型相似,但方向相反。 |
| Default | 此类绑定依赖于目标属性 |
UpdateSourceTrigger
| 名称 | 说明 |
|---|---|
| Default | 默认值,与依赖属性有关 |
| Explicit | 必须在显示地调用BindingExpression.UpdateSource的情况下才更新源。 |
| LostFocus | 控件失去焦点的时候更新源值 |
| PropertyChanged | 绑定的目标值改变时更新。 |
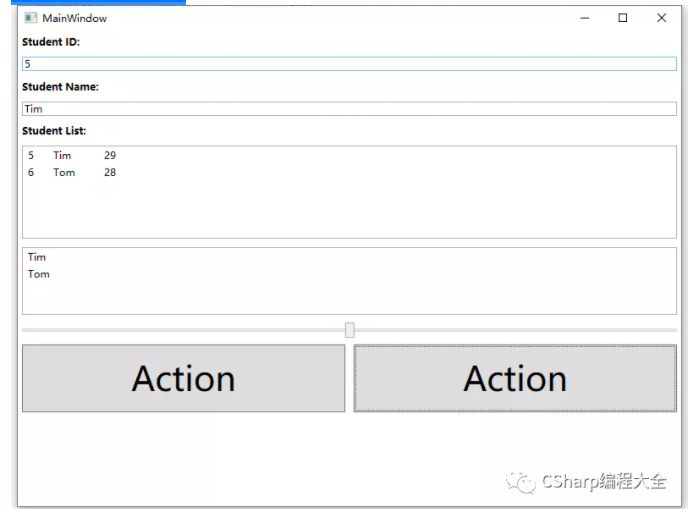
实例运行后界面如下:
MainWindow.xaml
<Window x:Class="WpfApp1.MainWindow"
        xmlns="http://schemas.microsoft.com/winfx/2006/xaml/presentation"
        xmlns:x="http://schemas.microsoft.com/winfx/2006/xaml"
        xmlns:d="http://schemas.microsoft.com/expression/blend/2008"
        xmlns:mc="http://schemas.openxmlformats.org/markup-compatibility/2006"
        xmlns:local="clr-namespace:WpfApp1"
        mc:Ignorable="d"
        Title="MainWindow" Height="600" Width="800">
    <StackPanel>
        <TextBlock Text="Student ID:" FontWeight="Bold" Margin="5"/>
        <TextBox Name="textBoxId" Margin="5" Text="{Binding Id,Mode=TwoWay}"/>
        <TextBlock Text="Student Name:" FontWeight="Bold" Margin="5"/>
        <TextBox Name="textBoxName" Margin="5" Text="{Binding Name,Mode=TwoWay}"/>
        <TextBlock Text="Student List:" FontWeight="Bold" Margin="5"/>
        <ListBox Name="listBox1" Height="110" Margin="5" >
            <ListBox.ItemTemplate>
                <DataTemplate>
                    <StackPanel Orientation="Horizontal">
                        <TextBlock Text="{Binding Path=Id}" Width="30"/>
                        <TextBlock Text="{Binding Path=Name}" Width="60"/>
                        <TextBlock Text="{Binding Path=Age}" Width="30"/>
                    </StackPanel>
                </DataTemplate>
            </ListBox.ItemTemplate>
        </ListBox>
        <ListBox Name="listBox2"  Height="80" ItemsSource="{Binding Student}" DisplayMemberPath="Id" Margin="5"/>
        <Slider Name="slider1" MinHeight="25" Value="{Binding Id}"/>
        <Grid>
            <Grid.RowDefinitions>
                <RowDefinition Height="*"></RowDefinition>
            </Grid.RowDefinitions>
            <Grid.ColumnDefinitions>
                <ColumnDefinition Width="*"/>
                <ColumnDefinition Width="*"/>
            </Grid.ColumnDefinitions>
            <Button Grid.Column="0" Content="Action" FontSize="40" Name="btnCtrl1" Height="80" Margin="5" Click="BtnCtrl1_Click"/>
            <Button Grid.Column="1" Content="Action" FontSize="40" Name="btnCtrl2" Height="80" Margin="5" Click="BtnCtrl2_Click"/>
        </Grid>
    </StackPanel>
</Window>
首先解释下C#中的Task.Delay()和Thread.Sleep()
-
Thread.Sleep()是同步延迟,Task.Delay()是异步延迟。
-
Thread.Sleep()会阻塞线程,Task.Delay()不会。
-
Thread.Sleep()不能取消,Task.Delay()可以。
-
Task.Delay()实质创建一个运行给定时间的任务,Thread.Sleep()使当前线程休眠给定时间。
-
反编译Task.Delay(),基本上讲它就是个包裹在任务中的定时器。
-
Task.Delay()和Thread.Sleep()最大的区别是Task.Delay()旨在异步运行,在同步代码中使用Task.Delay()是没有意义的;在异步代码中使用Thread.Sleep()是一个非常糟糕的主意。通常使用await关键字调用Task.Delay()。
-
我的理解:Task.Delay(),async/await和CancellationTokenSource组合起来使用可以实现可控制的异步延迟。
MainWindow.xaml.cs
using System;
using System.Collections.ObjectModel;
using System.ComponentModel;
using System.Threading.Tasks;
using System.Windows;

namespace WpfApp1
{
    /// <summary>
    /// MainWindow.xaml 的交互逻辑
    /// </summary>
    public partial class MainWindow : Window
    {
        public ObservableCollection<Student> stuList;
        public MainWindow()
        {
            InitializeComponent();
            this.DataContext = new Student() { Name="111", Id =1 };
            Task.Run(async() =>  //开启异步线程task
            {
                await Task.Delay(3000); //延时3秒
                Dispatcher.Invoke((Action)delegate //线程中主界面显示需要用委托,不然这次赋值,在界面不更新
                {
                    this.DataContext = new Student() { Name = "222", Id = 2 };
                });
            });
            this.DataContext = new Student() { Name = "333" , Id = 3 };
        }

        private void BtnCtrl1_Click(object sender, RoutedEventArgs e)
        {
            Student stu = new Student() { Id = 4, Name = "Jon", Age = 29 }; //实例化一个Student类 并给类成员赋值
            this.DataContext = stu;//将实例化得对象传给DataContext
        }
        private void BtnCtrl2_Click(object sender, RoutedEventArgs e)
        {
            ObservableCollection<Student> stuList = new ObservableCollection<Student>() //具有通知属性的list
            {
             new Student() { Id=5, Name="Tim", Age=29 },
             new Student() { Id=6, Name="Tom", Age=28 },
             };
            this.listBox1.ItemsSource = stuList;

            this.listBox2.ItemsSource = stuList;
            this.listBox2.DisplayMemberPath = "Name";
            this.DataContext = stuList;
        }
    }
    public class Student : INotifyPropertyChanged  //创建一个继承自INotifyPropertyChanged的类Student
    {

        private string name;

        public string Name
        {
            get { return name; }
            set
            {
                name = value;
                if (this.PropertyChanged != null)
                {
                    PropertyChanged(this, new PropertyChangedEventArgs("Name")); //给Name绑定属性变更通知事件
                }
            }
        }

        private int id;

        public int Id
        {
            get { return id; }
            set
            {
                id = value;
                if (this.PropertyChanged != null)
                {
                    this.PropertyChanged.Invoke(this, new PropertyChangedEventArgs("Id"));//给Id绑定属性变更通知事件
                }
            }
        }

        private int age;

        public int Age
        {
            get { return age; }
            set
            {
                age = value;
                if (this.PropertyChanged != null)
                {
                    this.PropertyChanged.Invoke(this, new PropertyChangedEventArgs("Age"));//给Age绑定属性变更通知事件
                }
            }
        }

        public int ID { get; internal set; }

        public event PropertyChangedEventHandler PropertyChanged;
    }
}
想了解更多C#知识,请扫描下方二维码

需加微信交流群的,请加小编微信号z438679770,切记备注 加群,小编将会第一时间邀请你进群!

 浙公网安备 33010602011771号