上一篇文章介绍了目前大多数人在拟合手写笔迹的时候使用的算法, 这篇文章介绍一种自己独创的算法.
这种算法具有以下优点:
1) 使用二次贝塞尔曲线拟合, 计算量大概比3次贝塞尔曲线少三分之一.
2) 不必等到用户输入了下一个点之后, 才能绘制当前两个点之间的曲线, 这种算法可以先绘当前需要拟合的线段的一部分, 能够非常及时的把用户的输入反馈给用户, 用户体验立刻提高了2个档次.
3) 不用计算控制点, 处理起来更加简单, 计算量也再次减少, 用户绘制体验得到进一步提高.
4) 笔迹拟合更加接近真实手写的笔迹.
有以下缺点:
我真尼玛没发现有缺点, 我真的不能欺骗大家, 它明明没有缺点, 我非要找一个缺点出来吗!!!?,作为一个程序员, 我不能说谎啊!!!!!O(∩_∩)O哈哈~
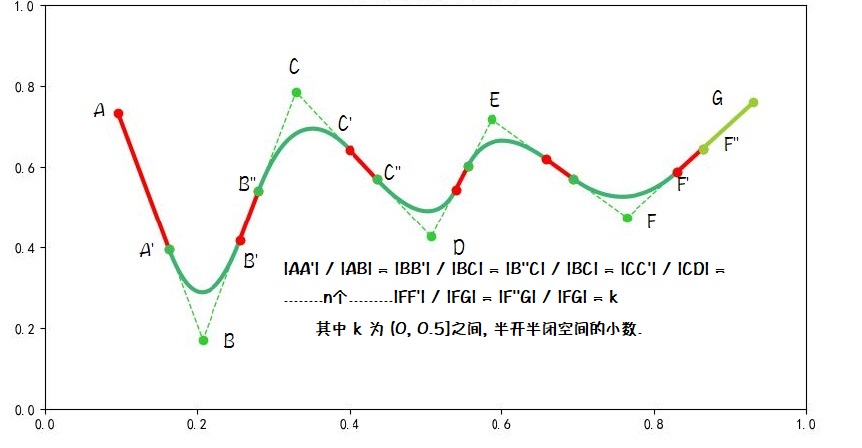
这么厉害的算法, 大家是不是已经迫不及待了. 下面就来给大家分享这个算法的思路, 先看下面的图解:

可能大家只看图就已经知道应该怎么做了. 现在按照图中的标注, 假设:ABCDEFG为原笔迹点.
1) 当用户通过点击鼠标或者点击手机屏幕手势, 输入点A时, 我们在A的位置画下一个小圆点
2) 首先需要设立一个系数k,取值为(0, 0.5]之间的小数. 当用于通过移动, 输入了第二个点B时, 我们在线段AB上找到一个点A', 使得 |A'B| / |AB| = k, 并绘制线段AA', 将其作为手写笔迹的一部分.
3) 当用户再次移动鼠标, 得到得到第三个点C时, 我们在BC上, 找到两个点, B' 和 B'', 满足 |BB'| / |BC| = |B''C| / |BC| = k, 然后将前面的 A' 和 B' 作为两个端点,
点B作为控制点, 绘制A'BB' 描述的二次贝塞尔曲线. 作为手写笔迹的一部分.
4) 连接B'B''的直线线段, 作为时候写笔迹的一部分.
5) 当用于输入点D,E,F.......时, 回到第2步, 循环执行2,3,4.
6) 当用于输入最后一个点G时, 执行2, 3步, 然后直接连接F'G, 结束绘制.
为什么要把第4步单独分离出来呢, 因为当k取值为0.5的时候, B'B'', C'C''.....F'F'' 直接重合为同一个点, 就可以直接省略弟4步.(实践证明, k值取0.5, 不但速度快, 效果还非常好!!!!)
这个算法, 初看起来, 有一些问题, 整个曲线没有经过作为原笔迹点的BCDEF, 是不是效果不理想呢???..再细想一下:
使用点ABC来举例, 虽然没有经过点B, AA'和B'B两条线段的轨迹是完全和原笔迹的连线重合的, 即使阈值取0.5的情况, 也有两个点(A', B')和原笔迹连线重合'
所以, 我们虽然放弃了一棵树,得到了一片森林;放弃一个点, 重合了无数个点, 我们还可以通过阈值k来控制曲线的拟合程度, k越小, 转角的地方越锐利; k越大, 拟合越平滑.
同样,为了大家学习方便, 我在前面一篇文章的基础上稍作修改, 把这种算法用Python实现出来, 提供大家参考和理解:
  1 #!/usr/bin/env python
  2 # -*- coding: utf-8 -*-
  3 import numpy as np
  4 from scipy.special import comb, perm
  5 import matplotlib.pyplot as plt
  6
  7 plt.rcParams['font.sans-serif'] = ['SimHei']
  8 # plt.rcParams['font.sans-serif'] = ['STXIHEI']
  9 plt.rcParams['axes.unicode_minus'] = False
 10
 11 class Handwriting:
 12     def __init__(self, line):
 13         self.line = line
 14         self.index_02 = None  # 保存拖动的这个点的索引
 15         self.press = None  # 状态标识,1为按下,None为没按下
 16         self.pick = None  # 状态标识,1为选中点并按下,None为没选中
 17         self.motion = None  # 状态标识,1为进入拖动,None为不拖动
 18         self.xs = list()  # 保存点的x坐标
 19         self.ys = list()  # 保存点的y坐标
 20         self.cidpress = line.figure.canvas.mpl_connect('button_press_event', self.on_press)  # 鼠标按下事件
 21         self.cidrelease = line.figure.canvas.mpl_connect('button_release_event', self.on_release)  # 鼠标放开事件
 22         self.cidmotion = line.figure.canvas.mpl_connect('motion_notify_event', self.on_motion)  # 鼠标拖动事件
 23         self.cidpick = line.figure.canvas.mpl_connect('pick_event', self.on_picker)  # 鼠标选中事件
 24         self.ctl_point_1 = None
 25
 26     def on_press(self, event):  # 鼠标按下调用
 27         if event.inaxes != self.line.axes: return
 28         self.press = 1
 29
 30     def on_motion(self, event):  # 鼠标拖动调用
 31         if event.inaxes != self.line.axes: return
 32         if self.press is None: return
 33         if self.pick is None: return
 34         if self.motion is None:  # 整个if获取鼠标选中的点是哪个点
 35             self.motion = 1
 36             x = self.xs
 37             xdata = event.xdata
 38             ydata = event.ydata
 39             index_01 = 0
 40             for i in x:
 41                 if abs(i - xdata) < 0.02:  # 0.02 为点的半径
 42                     if abs(self.ys[index_01] - ydata) < 0.02: break
 43                 index_01 = index_01 + 1
 44             self.index_02 = index_01
 45         if self.index_02 is None: return
 46         self.xs[self.index_02] = event.xdata  # 鼠标的坐标覆盖选中的点的坐标
 47         self.ys[self.index_02] = event.ydata
 48         self.draw_01()
 49
 50     def on_release(self, event):  # 鼠标按下调用
 51         if event.inaxes != self.line.axes: return
 52         if self.pick is None:  # 如果不是选中点,那就添加点
 53             self.xs.append(event.xdata)
 54             self.ys.append(event.ydata)
 55         if self.pick == 1 and self.motion != 1:  # 如果是选中点,但不是拖动点,那就降阶
 56             x = self.xs
 57             xdata = event.xdata
 58             ydata = event.ydata
 59             index_01 = 0
 60             for i in x:
 61                 if abs(i - xdata) < 0.02:
 62                     if abs(self.ys[index_01] - ydata) < 0.02: break
 63                 index_01 = index_01 + 1
 64             self.xs.pop(index_01)
 65             self.ys.pop(index_01)
 66         self.draw_01()
 67         self.pick = None  # 所有状态恢复,鼠标按下到稀放为一个周期
 68         self.motion = None
 69         self.press = None
 70         self.index_02 = None
 71
 72     def on_picker(self, event):  # 选中调用
 73         self.pick = 1
 74
 75     def draw_01(self):  # 绘图
 76         self.line.clear()  # 不清除的话会保留原有的图
 77         self.line.set_title('Bezier曲线拟合手写笔迹')
 78         self.line.axis([0, 1, 0, 1])  # x和y范围0到1
 79         # self.bezier(self.xs, self.ys)  # Bezier曲线
 80         self.all_curve(self.xs, self.ys)
 81         self.line.scatter(self.xs, self.ys, color='b', s=20, marker="o", picker=5)  # 画点
 82         # self.line.plot(self.xs, self.ys, color='black', lw=0.5)  # 画线
 83         self.line.figure.canvas.draw()  # 重构子图
 84
 85     # def list_minus(self, a, b):
 86     #     list(map(lambda x, y: x - y, middle, begin))
 87
 88     def controls(self, k, begin, end):
 89         if k <= 0 or k >= 1: return
 90         first_middle = begin + k * (end - begin)
 91         second_middle = begin + (1 - k) * (end - begin)
 92         return first_middle, second_middle
 93
 94
 95     def all_curve(self, xs, ys):
 96         le = len(xs)
 97         if le < 2: return
 98         self.ctl_point_1 = None
 99
100         begin = [xs[0], ys[0]]
101         end = [xs[1], ys[1]]
102         self.one_curve(begin, end)
103
104         for i in range(2, le):
105             begin = end
106             end = [xs[i], ys[i]]
107             self.one_curve(begin, end)
108
109         end = [xs[le - 1], ys[le - 1]]
110         x = [self.ctl_point_1[0], end[0]]
111         y = [self.ctl_point_1[1], end[1]]
112
113         #linestyle='dashed',
114         self.line.plot(x, y,  color='yellowgreen', marker='o', lw=3)
115
116     def one_curve(self, begin, end):
117         ctl_point1 = self.ctl_point_1
118
119         begin = np.array(begin)
120         end = np.array(end)
121
122         ctl_point2, self.ctl_point_1 = self.controls(0.4, begin, end)
123         color = 'red';
124         if ctl_point1 is None :
125             xs = [begin[0], self.ctl_point_1[0]]
126             ys = [begin[1], self.ctl_point_1[1]]
127             self.line.plot(xs, ys, color=color, marker='o', linewidth='3')
128         else :
129             xs = [ctl_point1[0], begin[0], ctl_point2[0]]
130             ys = [ctl_point1[1], begin[1], ctl_point2[1]]
131             self.bezier(xs, ys)
132             xs = [ctl_point2[0], self.ctl_point_1[0]]
133             ys = [ctl_point2[1], self.ctl_point_1[1]]
134             self.line.plot(xs, ys, color=color, marker='o', linewidth='3')
135
136     def bezier(self, *args):  # Bezier曲线公式转换,获取x和y
137         t = np.linspace(0, 1)  # t 范围0到1
138         le = len(args[0]) - 1
139
140         self.line.plot(args[0], args[1], marker='o', linestyle='dashed', color='limegreen', lw=1)
141         le_1 = 0
142         b_x, b_y = 0, 0
143         for x in args[0]:
144             b_x = b_x + x * (t ** le_1) * ((1 - t) ** le) * comb(len(args[0]) - 1, le_1)  # comb 组合,perm 排列
145             le = le - 1
146             le_1 = le_1 + 1
147
148         le = len(args[0]) - 1
149         le_1 = 0
150         for y in args[1]:
151             b_y = b_y + y * (t ** le_1) * ((1 - t) ** le) * comb(len(args[0]) - 1, le_1)
152             le = le - 1
153             le_1 = le_1 + 1
154
155         color = "mediumseagreen"
156         if len(args) > 2: color = args[2]
157         self.line.plot(b_x, b_y, color=color, linewidth='3')
158
159 fig = plt.figure(2, figsize=(12, 6))
160 ax = fig.add_subplot(111)  # 一行一列第一个子图
161 ax.set_title('手写笔迹贝赛尔曲线, 计算控制点图解')
162
163 handwriting = Handwriting(ax)
164 plt.xlabel('X')
165 plt.ylabel('Y')
166
167 # begin = np.array([20, 6])
168 # middle = np.array([30, 40])
169 # end = np.array([35, 4])
170 # handwriting.one_curve(begin, middle, end)
171 # myBezier.controls(0.2, begin, middle, end)
172 plt.show()
下一篇文章,不出意外应该是这个手写笔迹系列的最后一篇文章.
我将把我实现笔锋效果的具体原理和细节, 还有用C++对算法的具体实现, 以及可以直接运行查看效果的Demo一起分享给大家.
无良公司老板拖欠两个月工资了, 穷得叮当响, .真尼玛坑啊,我靠!!!!!!!!现在每天吃8块钱的蛋炒饭, 早上点一份,中午吃一半, 晚上吃一半, 日子真实苦啊..
大家如果大家觉得这篇文章对您有帮助, 又愿意打赏一些银两, 请拿起你的手机, 打开你的微信, 扫一扫下方二维码, 作为一个有骨气的程序员攻城狮, 我非常愿意接受大家的支助...哈哈哈!!!


