Elasticsearch-基础介绍及索引原理分析
介绍
Elasticsearch 是一个分布式可扩展的实时搜索和分析引擎,一个建立在全文搜索引擎 Apache Lucene(TM) 基础上的搜索引擎.当然 Elasticsearch 并不仅仅是 Lucene 那么简单,它不仅包括了全文搜索功能,还可以进行以下工作:
- 分布式实时文件存储,并将每一个字段都编入索引,使其可以被搜索。
- 实时分析的分布式搜索引擎。
- 可以扩展到上百台服务器,处理PB级别的结构化或非结构化数据。
基本概念
先说Elasticsearch的文件存储,Elasticsearch是面向文档型数据库,一条数据在这里就是一个文档,用JSON作为文档序列化的格式,比如下面这条用户数据:
{
    "name" :     "John",
    "sex" :      "Male",
    "age" :      25,
    "birthDate": "1990/05/01",
    "about" :    "I love to go rock climbing",
    "interests": [ "sports", "music" ]
}
用Mysql这样的数据库存储就会容易想到建立一张User表,有balabala的字段等,在Elasticsearch里这就是一个文档,当然这个文档会属于一个User的类型,各种各样的类型存在于一个索引当中。这里有一份简易的将Elasticsearch和关系型数据术语对照表:
关系数据库     ⇒ 数据库 ⇒ 表    ⇒ 行    ⇒ 列(Columns)

Elasticsearch  ⇒ 索引(Index)   ⇒ 类型(type)  ⇒ 文档(Docments)  ⇒ 字段(Fields)
一个 Elasticsearch 集群可以包含多个索引(数据库),也就是说其中包含了很多类型(表)。这些类型中包含了很多的文档(行),然后每个文档中又包含了很多的字段(列)。Elasticsearch的交互,可以使用Java API,也可以直接使用HTTP的Restful API方式,比如我们打算插入一条记录,可以简单发送一个HTTP的请求:
PUT /megacorp/employee/1
{
    "name" :     "John",
    "sex" :      "Male",
    "age" :      25,
    "about" :    "I love to go rock climbing",
    "interests": [ "sports", "music" ]
}
安装
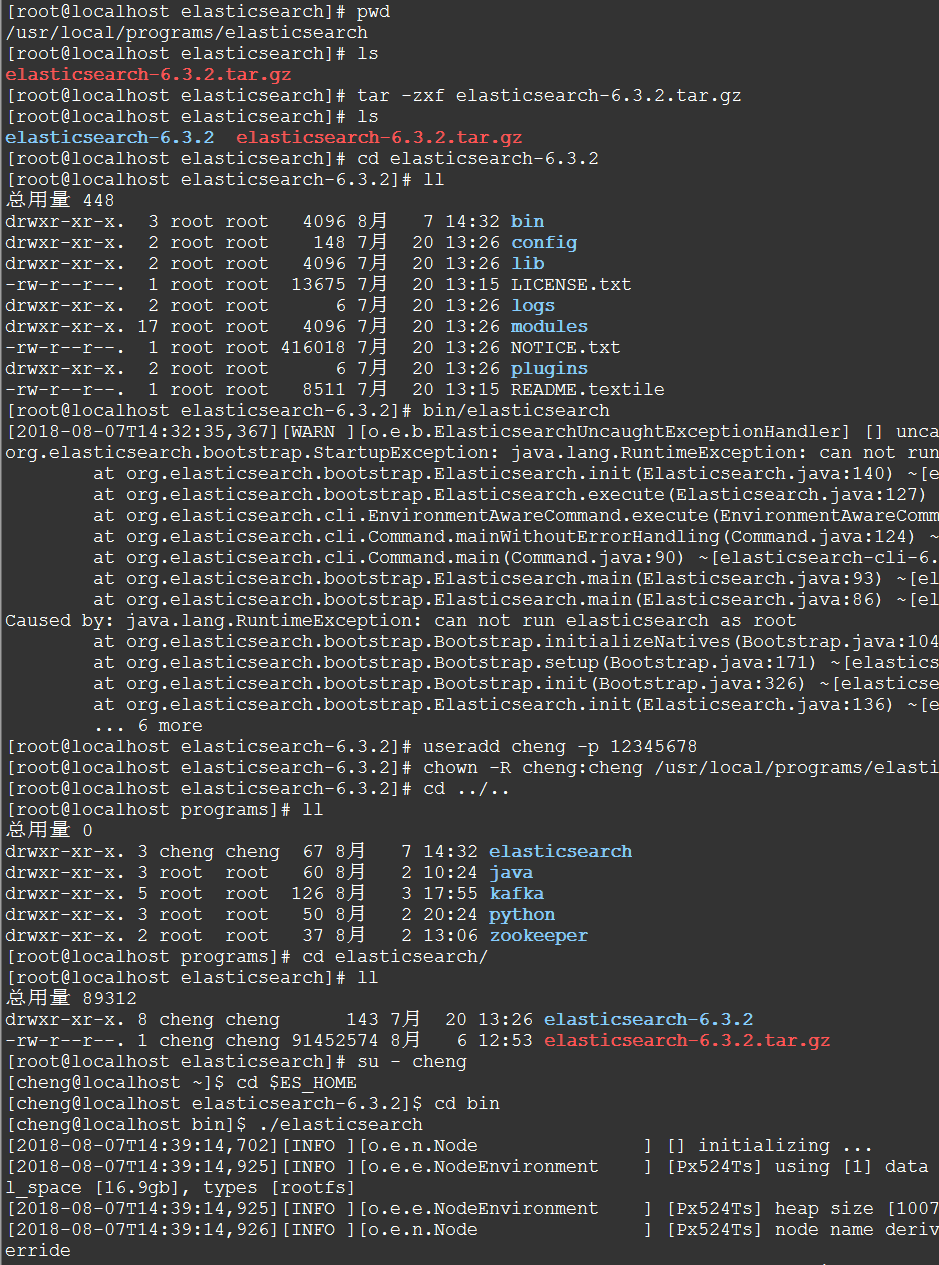
tar -zxf elasticsearch-6.3.2.tar.gz
cd elasticsearch-6.3.2/bin
./elasticsearch

注意:不能以root用户运行elasticsearch

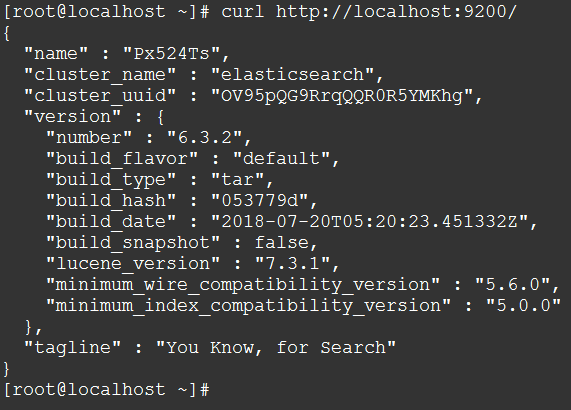
检查Elasticsearch是否正在运行:
curl http://localhost:9200/

查看全部索引
# 请求:
curl -X GET "localhost:9200/_cat/indices?v"
# 响应:
# health status index uuid pri rep docs.count docs.deleted store.size pri.store.size
上面的输出意味着:我们在集群中没有索引
创建一个索引
现在,我们创建一个名字叫“customer”的索引,然后查看索引:
# 请求:
curl -X PUT "localhost:9200/customer?pretty"
# 响应:
{
  "acknowledged" : true,
  "shards_acknowledged" : true,
  "index" : "customer"
}

# 再次请求查看全部索引
curl -X GET "localhost:9200/_cat/indices?v"
# 响应:
health status index    uuid                   pri rep docs.count docs.deleted store.size pri.store.size
yellow open   customer rG5fxdruTNmD-bdYIF5zOg   5   1          0            0      1.1kb          1.1kb
结果的第二行告诉我们,我们现在有叫"customer"的索引,并且他有5个主分片和1个副本(默认是1个副本),有0个文档。
可能你已经注意到这个"customer"索引的健康状态是yellow。回想一下我们之前的讨论,yellow意味着一些副本(尚未)被分配。
之所以会出现这种情况,是因为Elasticsearch默认情况下为这个索引创建了一个副本。由于目前我们只有一个节点在运行,所以直到稍后另一个节点加入集群时,才会分配一个副本(对于高可用性)。一旦该副本分配到第二个节点上,该索引的健康状态将变为green
索引并查询一个文档
现在,让我们put一些数据到我们的"customer"索引:
# 请求:
curl -X PUT "localhost:9200/customer/_doc/1?pretty" -H 'Content-Type: application/json' -d'{"name": "John Doe"}'

# 响应
{
  "_index" : "customer",
  "_type" : "_doc",
  "_id" : "1",
  "_version" : 1,
  "result" : "created",
  "_shards" : {
    "total" : 2,
    "successful" : 1,
    "failed" : 0
  },
  "_seq_no" : 0,
  "_primary_term" : 1
}
从上面的响应可以看到,我们在"customer"索引下成功创建了一个文档。这个文档还有一个内部id为1,这是我们在创建的时候指定的。
需要注意的是,Elasticsearch并不要求你在索引文档之前就先创建索引,然后才能将文档编入索引。在前面的示例中,如果事先不存在"customer"索引,Elasticsearch将自动创建"customer"索引。
(画外音:也就是说,在新建文档的时候如果指定的索引不存在则会自动创建相应的索引)
现在,让我重新检索这个文档:
# 请求
curl -X GET "localhost:9200/customer/_doc/1?pretty"
# 响应
{
  "_index" : "customer",
  "_type" : "_doc",
  "_id" : "1",
  "_version" : 1,
  "found" : true,
  "_source" : {
    "name" : "John Doe"
  }
}
可以看到除了"found"字段外没什么不同,"_source"字段返回了一个完整的JSON文档。
删除一个索引
现在,让我们删除前面创建的索引,然后查看全部索引
# 请求
curl -X DELETE "localhost:9200/customer?pretty"
# 响应
{
  "acknowledged" : true
}
接下来,查看一下
# 请求
curl -X GET "localhost:9200/_cat/indices?v"
响应
health status index uuid pri rep docs.count docs.deleted store.size pri.store.size
到现在为止,我们已经学习了创建/删除索引、索引/查询文档这四个命令
curl -X PUT "localhost:9200/customer"
curl -X PUT "localhost:9200/customer/_doc/1" -H 'Content-Type: application/json' -d'{"name": "John Doe"}'
curl -X GET "localhost:9200/customer/_doc/1"
curl -X DELETE "localhost:9200/customer"


【推荐】国内首个AI IDE,深度理解中文开发场景,立即下载体验Trae
【推荐】编程新体验,更懂你的AI,立即体验豆包MarsCode编程助手
【推荐】抖音旗下AI助手豆包,你的智能百科全书,全免费不限次数
【推荐】轻量又高性能的 SSH 工具 IShell:AI 加持,快人一步
· 10年+ .NET Coder 心语,封装的思维:从隐藏、稳定开始理解其本质意义
· .NET Core 中如何实现缓存的预热?
· 从 HTTP 原因短语缺失研究 HTTP/2 和 HTTP/3 的设计差异
· AI与.NET技术实操系列:向量存储与相似性搜索在 .NET 中的实现
· 基于Microsoft.Extensions.AI核心库实现RAG应用
· 10年+ .NET Coder 心语 ── 封装的思维:从隐藏、稳定开始理解其本质意义
· 地球OL攻略 —— 某应届生求职总结
· 提示词工程——AI应用必不可少的技术
· Open-Sora 2.0 重磅开源!
· 字符编码:从基础到乱码解决