Spring Security
1. SpringSecurity框架简介
1.2 概要
- Spring是非常流行和成功的Java应用开发框架,SpringSecurity正是 Spring家族的成员。SpringSecurity基于 Spring框架,提供了一套 web应用安全性的完整解决方案。正如你可能知道的关于安全方面的主要区域是"认证"和"授权"(或者访问控制),一般来说,Web应用的安全性包括用户认证(Authentication)和用户授权(Authonzation)两个部分,这两点也是 SpringSecurity重要核心功能。
- 用户认证指的是:验证某个用户是否为系统中的合法主体,也就是用户能否访问该系统。用户认证一般要求用户提供用户名和密码。系统通过校验用户名和密码来完成认证过程。通俗点说就是系统认为用户是否能登录。
- 用户授权指的是验证某个用户是否有权限执行某个操作。在一个系统中,不同用户所具有的权限是不同的。比如对一个文件来说,有的用户只能进行读取,而有的用户可以进行修改。一般来说,系统会为不同的用户分配不同的角色,而每个角色则对应一系列的权限。通俗点讲就是系统判断用户是否具有权限去做某些事情。

1.2 历史
- “Spring Security开始于2003年年底,““spring的acegi安全系统”。 起因是Spring开发者邮件列表中的一个问题,有人提问是否考虑提供一个基于spring的安全实现。
- Spring Security 以“The Acegi Secutity System for Spring” 的名字始于2013年晚些时候。一个问题提交到Spring 开发者的邮件列表,询问是否已经有考虑一个机遇Spring 的安全性社区实现。那时候Spring 的社区相对较小(相对现在)。实际上Spring自己在2013年只是一个存在于ScourseForge的项目,这个问题的回答是一个值得研究的领域,虽然目前时间的缺乏组织了我们对它的探索。
考虑到这一点,一个简单的安全实现建成但是并没有发布。几周后,Spring社区的其他成员询问了安全性,这次这个代码被发送给他们。其他几个请求也跟随而来。到2014年一月大约有20万人使用了这个代码。这些创业者的人提出一个SourceForge项目加入是为了,这是在2004三月正式成立。 - 在早些时候,这个项目没有任何自己的验证模块,身份验证过程依赖于容器管理的安全性和Acegi安全性。而不是专注于授权。开始的时候这很适合,但是越来越多的用户请求额外的容器支持。容器特定的认证领域接口的基本限制变得清晰。还有一个相关的问题增加新的容器的路径,这是最终用户的困惑和错误配置的常见问题。
Acegi安全特定的认证服务介绍。大约一年后,Acegi安全正式成为了Spring框架的子项目。1.0.0最终版本是出版于2006 -在超过两年半的大量生产的软件项目和数以百计的改进和积极利用社区的贡献。 - Acegi安全2007年底正式成为了Spring组合项目,更名为"Spring Security"。
1.3 同款产品对比
1.3.1 SpringSecurity
-
Spring下的一个项目。
-
和 Spring无缝整合
-
全面的权限控制
-
专门为 Web开发而设计
- 旧版本不能脱离 Web环境使用
- 新版本对整个框架进行了分层抽取,分成了核心模块和 Web模块。单独引入核心模块就可以脱离 Web环境。
-
重量级
1.3.2 Shiro
-
Apache 旗下的轻量级权限控制框架。
-
轻量级。Shiro主张的理念是把复杂的事情变简单。针对性能有更高要求的互联网应用有更好表现。
-
通用性。
- 好处:不限于 Web环境,可以脱离 Web环境使用。
- 缺陷:在 Web环境下一些特定的需求需要手动编写代码定制。
1.4 模块划分
- Core —spring-security-core.jar
- Remoting —spring-security-remoting.jar
- Web —spring-security-web.jar
- Config —spring-security-config.jar
- LDAP —spring-security-ladp.jar
- OAuth 2.0 Core —spring-security-oauth2-core.jar
- OAuth 2.0 Client —spring-security-oauth2-client.jar
- OAuth 2.0 JOSE —spring-security-oauth2-jose.jar
- OAuth 2.0 Resource Server —spring-security-oauth2-resource-server.jar
- ACL —spring-security-acl.jar
- CAS —spring-security-cas.jar
- OpenID —spring-security-openid.jar
- Test —spring-security-test.jar
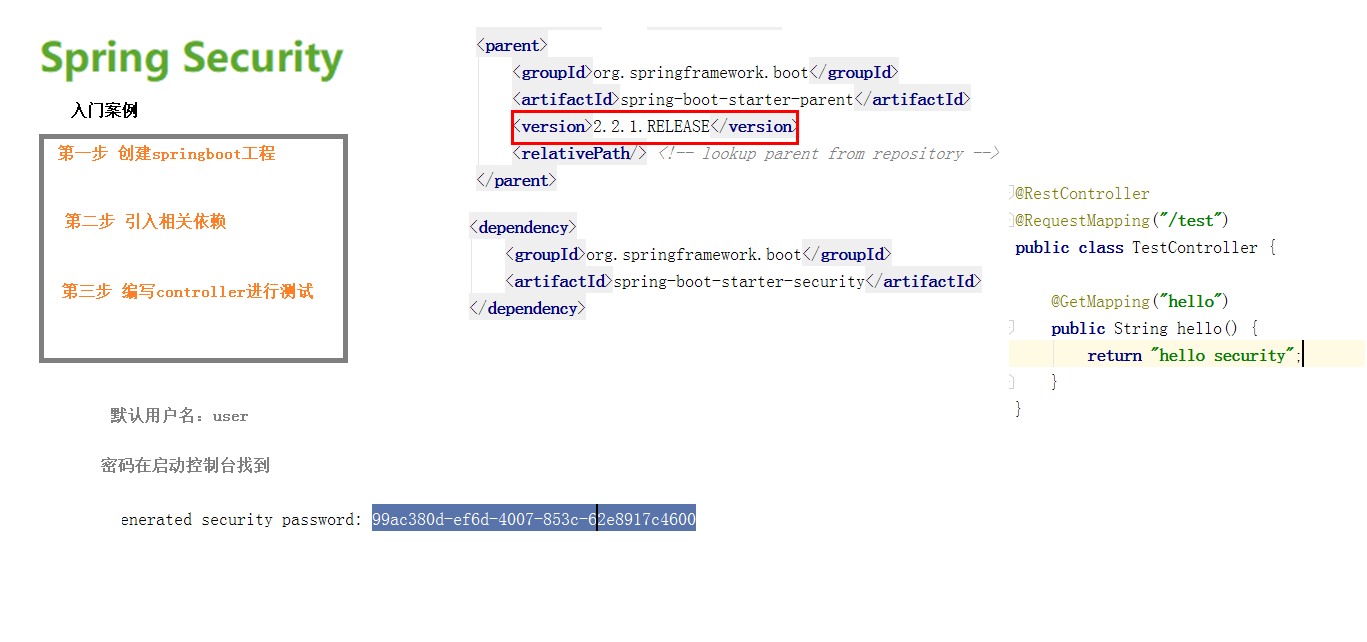
2. SpringSecurity入门案例
- 创建 SpringBoot工程
- 引入相关依赖
- 编写 controller进行测试
2.1 pom
<parent>
    <groupId>org.springframework.boot</groupId>
    <artifactId>spring-boot-starter-parent</artifactId>
    <version>2.2.1.RELEASE</version>
    <relativePath/>
</parent>

<dependencies>
    <dependency>
        <groupId>org.springframework.boot</groupId>
        <artifactId>spring-boot-starter-web</artifactId>
    </dependency>
    <dependency>
        <groupId>org.springframework.boot</groupId>
        <artifactId>spring-boot-starter-security</artifactId>
    </dependency>
    <dependency>
        <groupId>org.springframework.boot</groupId>
        <artifactId>spring-boot-starter-test</artifactId>
        <scope>test</scope>
    </dependency>
</dependencies>
2.2 controller
@RestController
@RequestMapping("/test")
public class TestController {
    @GetMapping("hello")
    public String hello(){
        return "springSecurity";
    }
}
2.3 运行这个项目
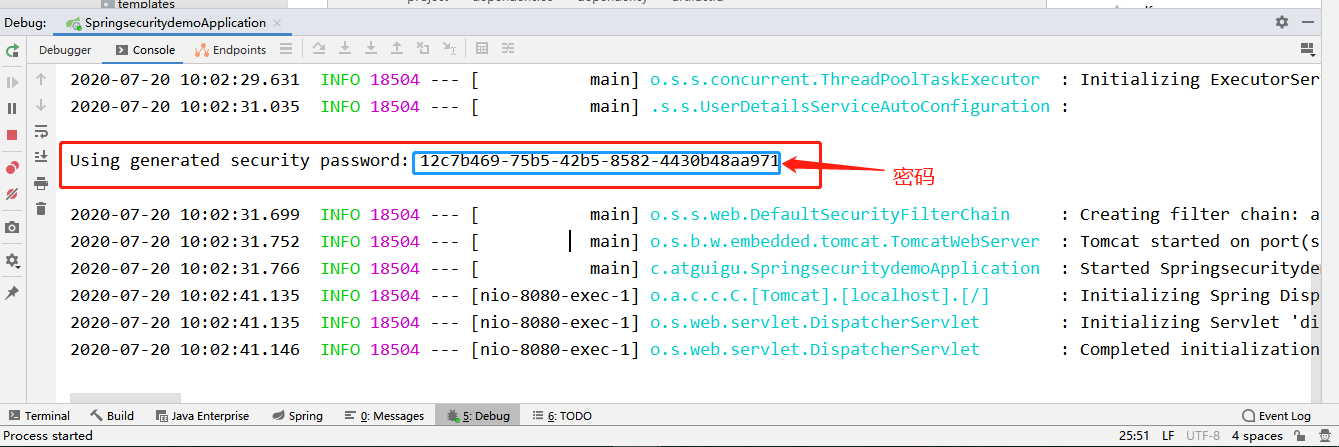
- 访问 localhost:8080 ,弹出登录页面
- 默认用户名:user
- 默认密码:这个项目的控制台(每次启动密码都会变化)
2.4 权限管理中的相关概念
- 主体
英文单词:principal
使用系统的用户或设备或从其他系统远程登录的用户等等。简单说就是谁使用系统谁就是主体。 - 认证
英文单词:authentication
权限管理系统确认一个主体的身份,允许主体进入系统。简单说就是“主体”证明自己是谁。笼统的认为就是以前所做的登录操作。 - 授权
英文单词:authorization
将操作系统的“权力”“授予”“主体”,这样主体就具备了操作系统中特定功能的能力。所以简单来说,授权就是给用户分配权限。
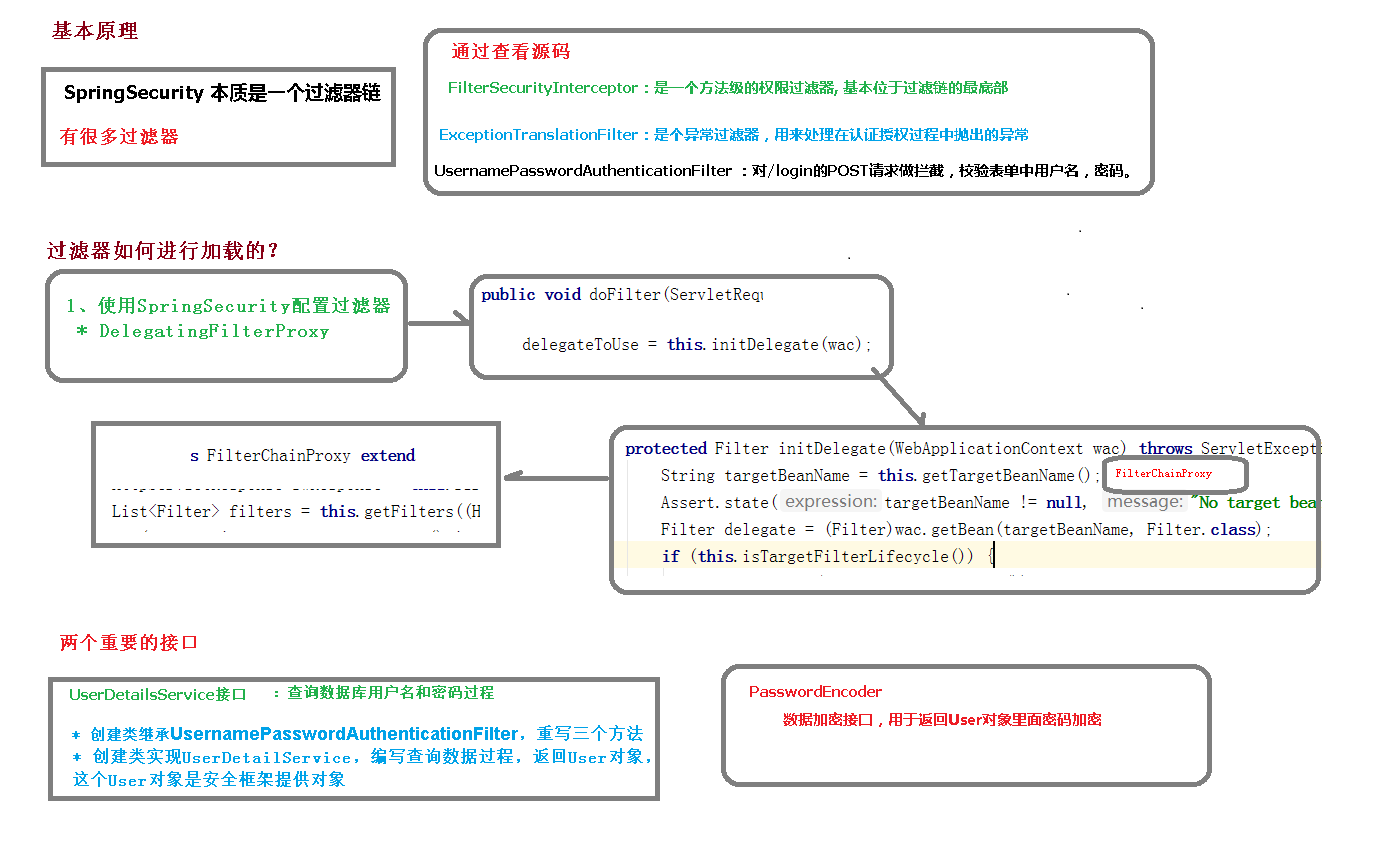
2.5 SpringSecurity的基本原理
- SpringSecurity本质就是一个过滤器链
我们可以从控制台看到(配置文件 debug=true)
org.springframework.security.web.context.request.async.WebAsyncManagerIntegrationFilter
org.springframework.security.web.context.SecurityContextPersistenceFilter
org.springframework.security.web.header.HeaderWriterFilter
org.springframework.security.web.csrf.CsrfFilter
org.springframework.security.web.authentication.logout.LogoutFilter
org.springframework.security.web.authentication.UsernamePasswordAuthenticationFilter
org.springframework.security.web.authentication.ui.DefaultLoginPageGeneratingFilter
org.springframework.security.web.authentication.ui.DefaultLogoutPageGeneratingFilter
org.springframework.security.web.savedrequest.RequestCacheAwareFilter
org.springframework.security.web.servletapi.SecurityContextHolderAwareRequestFilter
org.springframework.security.web.authentication.AnonymousAuthenticationFilter
org.springframework.security.web.session.SessionManagementFilter
org.springframework.security.web.access.ExceptionTranslationFilter
org.springframework.security.web.access.intercept.FilterSecurityInterceptor
- 代码底层流程:重点看三个过滤器:
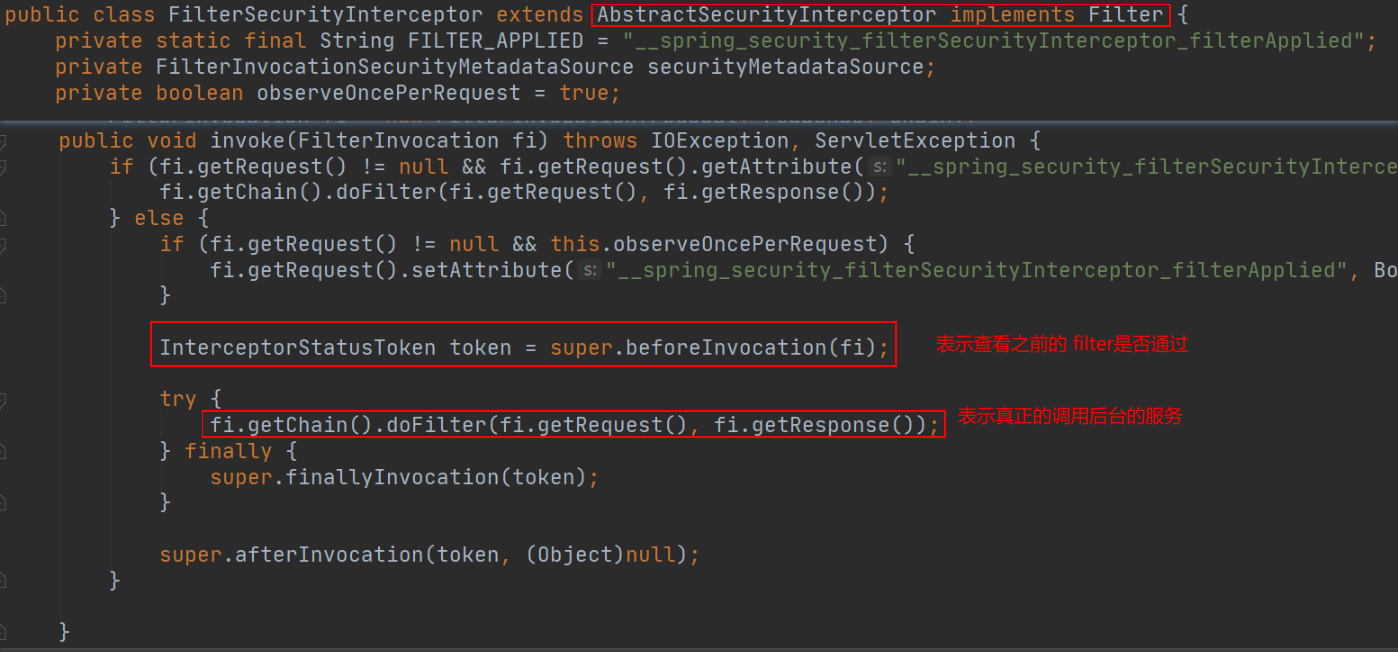
2.5.1 FilterSecurityInterceptor
- 是一个方法级的权限过滤器, 基本位于过滤链的最底部
2.5.2 ExceptionTranslationFilter
- 是个异常过滤器,用来处理在认证授权过程中抛出的异常

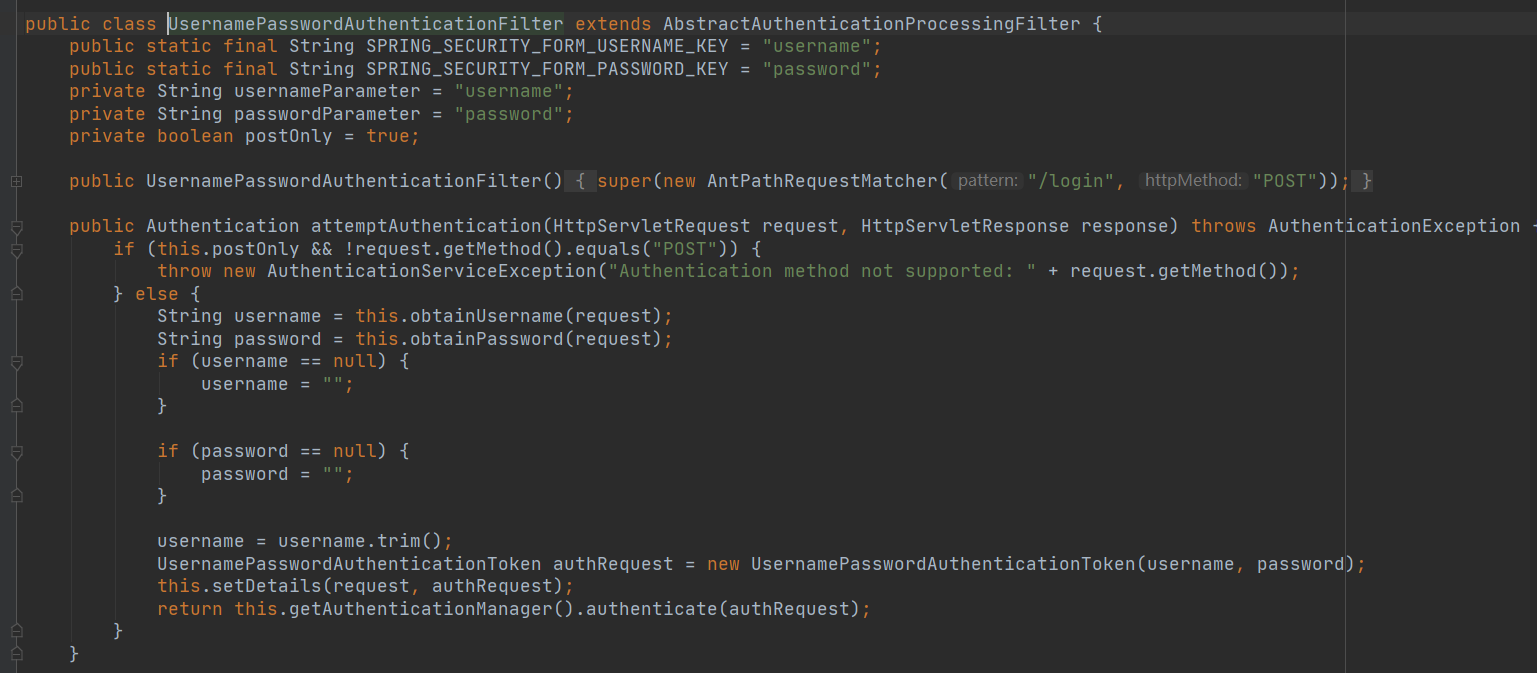
2.5.3 UsernamePasswordAuthenticationFilter
- 对/login 的 POST 请求做拦截,校验表单中用户名,密码
2.5.4 过滤器如何加载
2.6 UserDetailsService接口讲解
-
查询数据库用户名和密码的过程
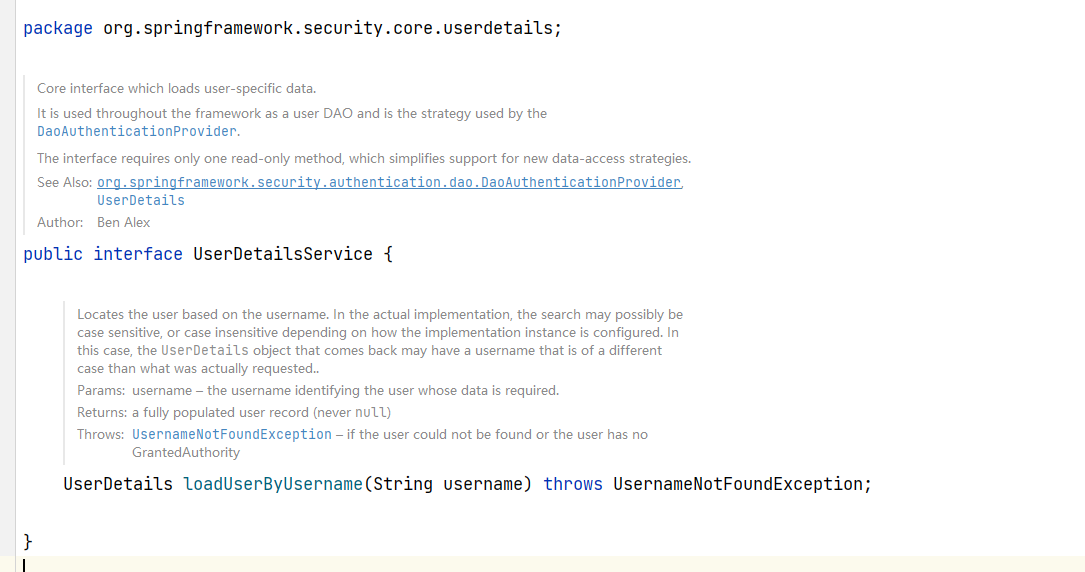
-
返回值 UserDetails 这个类是系统默认的用户“主体”

package org.springframework.security.core.userdetails;

import java.io.Serializable;
import java.util.Collection;
import org.springframework.security.core.GrantedAuthority;

public interface UserDetails extends Serializable {
    // 表示获取登录用户所有权限 Collection getAuthorities();
    Collection<? extends GrantedAuthority> getAuthorities();
    // 表示获取密码 String getPassword();
    String getPassword();
    // 表示获取用户名 String getUsername();
    String getUsername();
    // 表示判断账户是否过期 boolean isAccountNonExpired();
    boolean isAccountNonExpired();
    // 表示判断账户是否被锁定 boolean isAccountNonLocked();
    boolean isAccountNonLocked();
    // 表示凭证{密码}是否过期 boolean isCredentialsNonExpired();
    boolean isCredentialsNonExpired();
    // 表示当前用户是否可用 boolean isEnabled();
    boolean isEnabled();
}
2.7 PasswordEncoder接口
- 数据加密接口,用户返回User里的密码的加密
package org.springframework.security.crypto.password;

public interface PasswordEncoder {
    // 表示把参数按照特定的解析规则进行解析
    String encode(CharSequence var1);
    // 表示验证从存储中获取的编码密码与编码后提交的原始密码是否匹配。如果密码匹配,则返回 true;如果不匹配,则返回 false。第一个参数表示需要被解析的密码。第//二个参数表示存储的密码。
    boolean matches(CharSequence var1, String var2);
    // 表示如果解析的密码能够再次进行解析且达到更安全的结果则返回 true,否则返回false。默认返回 false。
    default boolean upgradeEncoding(String encodedPassword) {
        return false;
    }
}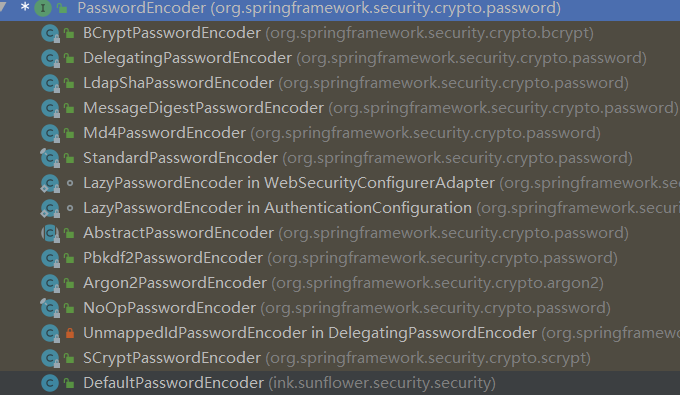
BCryptPasswordEncoder是Spring Security官方推荐的密码解析器,平时多使用这个解析器。是对 bcrypt强散列方法的具体实现。是基于 Hash算法实现的单向加密。可以通过strength控制加密强度,默认10.- 方法演示
@SpringBootTest
class Securitydemo1ApplicationTests {

    @Test
    public void test01() {
        // 创建密码解析器
        BCryptPasswordEncoder bCryptPasswordEncoder = new BCryptPasswordEncoder();
        // 对密码进行加密
        String atguigu = bCryptPasswordEncoder.encode("atguigu");
        // 打印加密之后的数据
        System.out.println("加密之后数据:\t" + atguigu);
        //判断原字符加密后和加密之前是否匹配
        boolean result = bCryptPasswordEncoder.matches("atguigu", atguigu);
        // 打印比较结果
        System.out.println("比较结果:\t" + result);
    }
}
加密之后数据: $2a$10$SjDXwMnKwR1.BtdHBlCf7.Qogrrj.fYXr9OGaaP4Olg3brfgrZYeu 比较结果: true
2.8 SpringBoot 对Security的自动配置
3. Spring Security Web权限方案
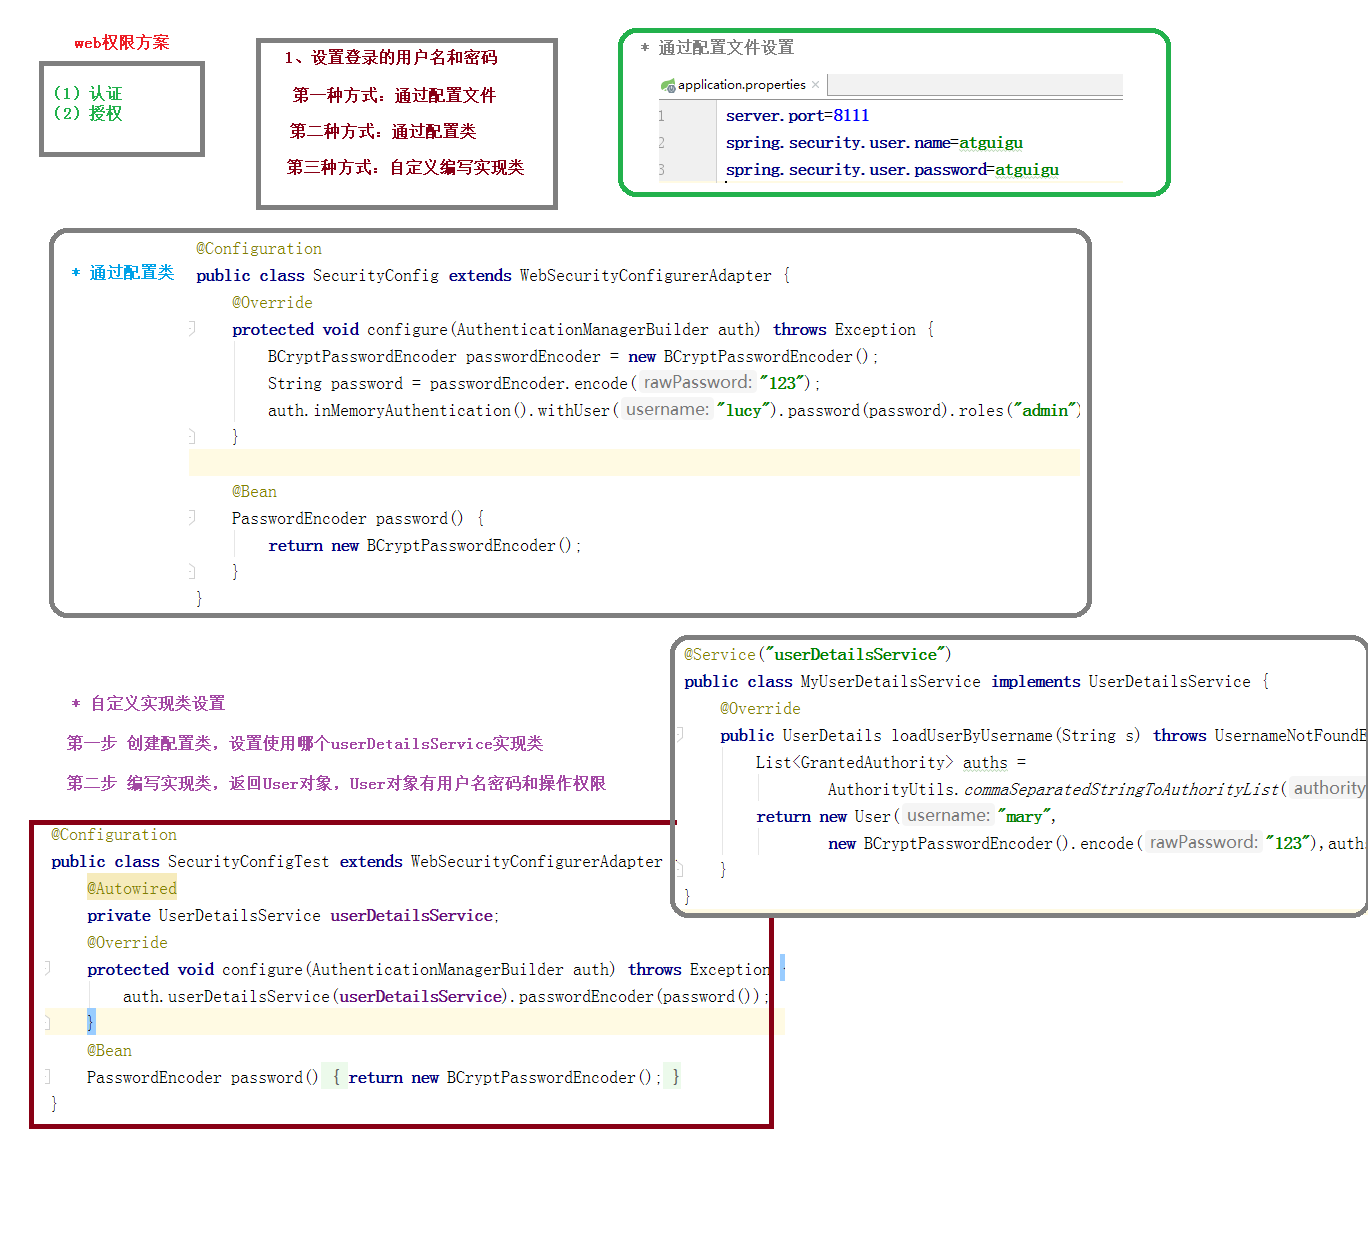
3.1 设置登录系统的账号和密码
- 方式一:在 application.properties
spring.security.user.name=user spring.security.password=user - 方式二:编写类实现接口
@Configuration public class SecurityConfig extends WebSecurityConfigurerAdapter { @Override protected void configure(AuthenticationManagerBuilder auth) throws Exception { //加密类 BCryptPasswordEncoder passwordEncoder = new BCryptPasswordEncoder(); String password = passwordEncoder.encode("123"); //往内存中写入用户名和密码还有角色 auth.inMemoryAuthentication().withUser("lucy").password(password).roles("admin"); } // 注入 PasswordEncoder 类到 spring 容器中 @Bean PasswordEncoder password() { return new BCryptPasswordEncoder(); } }@Configuration public class SecurityConfig extends WebSecurityConfigurerAdapter { @Override protected void configure(AuthenticationManagerBuilder auth)throws Exception{ //加密类 BCryptPasswordEncoder passwordEncoder = new BCryptPasswordEncoder(); String encode = passwordEncoder.encode("123"); //往内存中写入用户名和密码还有角色 auth.inMemoryAuthentication().passwordEncoder(new BCryptPasswordEncoder()).withUser("admin").password(encode).roles("root"); } } - 方式三:自定义编写实现类
如果有配置类或者配置文件,先从这里查找出用户名和密码,如果没有则去查找UserDetialService接口去寻找//第一步 创建配置类,设置使用那个 userDetailsService实现类 @Service("userDetailsService") public class MyUserDetailsService implements UserDetailsService { @Override public UserDetails loadUserByUsername(String username) throws UsernameNotFoundException { //权限信息 List<GrantedAuthority> auths = AuthorityUtils.commaSeparatedStringToAuthorityList("admin"); //参数:用户名,用户密码密文,权限 return new User("root", new BCryptPasswordEncoder().encode("123"),auths); } } //第二步 编写实现类,返回 User对象,User对象有用户名密码和 操作权限等 @Configuration public class SecurityConfigTest extends WebSecurityConfigurerAdapter { @Autowired //这里注入的上面的对象 (Service括号里面) private UserDetailsService userDetailsService; @Override protected void configure(AuthenticationManagerBuilder auth)throws Exception{ //往内存中写 userDetailsService对象 和 加密类 auth.userDetailsService(userDetailsService).passwordEncoder(new BCryptPasswordEncoder()); } }
3.2 实现数据库认证来完成用户登录
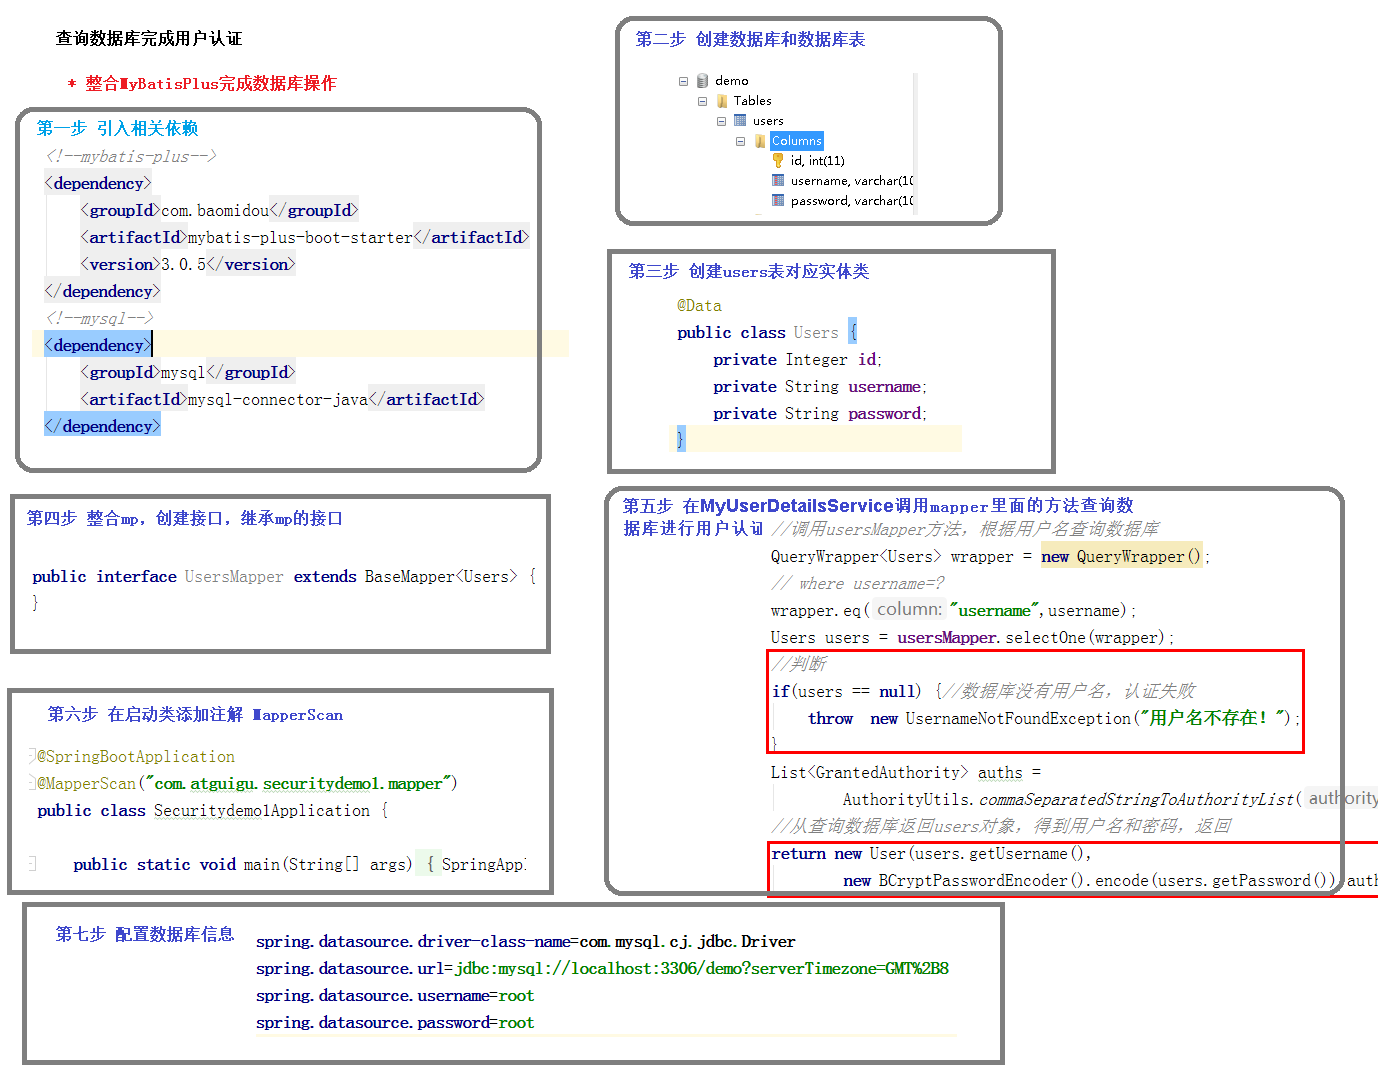
3.2.1 sql
CREATE TABLE users (
    id BIGINT PRIMARY KEY AUTO_INCREMENT,
    username VARCHAR (20) UNIQUE NOT NULL,
    PASSWORD VARCHAR (100)
) ;
-- 密码atguigu
INSERT INTO users VALUES(1,'张san','$2a$10$2R/M6iU3mCZt3ByG7kwYTeeW0w7/UqdeXrb27zkBIizBvAven0/na');
-- 密码atguigu
INSERT INTO users VALUES(2,'李si','$2a$10$2R/M6iU3mCZt3ByG7kwYTeeW0w7/UqdeXrb27zkBIizBvAven0/na');
CREATE TABLE role(
    id BIGINT PRIMARY KEY AUTO_INCREMENT,
    NAME VARCHAR(20)
);
INSERT INTO role VALUES(1,'管理员');
INSERT INTO role VALUES(2,'普通用户');
CREATE TABLE role_user(
    uid BIGINT,
    rid BIGINT
);
INSERT INTO role_user VALUES(1,1);
INSERT INTO role_user VALUES(2,2);
CREATE TABLE menu(
    id BIGINT PRIMARY KEY AUTO_INCREMENT,
    NAME VARCHAR(20),
    url VARCHAR(100),
    parentid BIGINT,
    permission VARCHAR(20)
);
INSERT INTO menu VALUES(1,'系统管理','',0,'menu:system');
INSERT INTO menu VALUES(2,'用户管理','',0,'menu:user');
CREATE TABLE role_menu(
    MID BIGINT,
    rid BIGINT
);
INSERT INTO role_menu VALUES(1,1);
INSERT INTO role_menu VALUES(2,1);
INSERT INTO role_menu VALUES(2,2);
3.2.2 maven
<dependencies>
    <dependency>
        <groupId>org.springframework.boot</groupId>
        <artifactId>spring-boot-starter-web</artifactId>
    </dependency>
    <dependency>
        <groupId>org.springframework.boot</groupId>
        <artifactId>spring-boot-starter-security</artifactId>
    </dependency>

    <dependency>
        <groupId>org.springframework.boot</groupId>
        <artifactId>spring-boot-starter-test</artifactId>
        <scope>test</scope>
    </dependency>

    <!--mybatis-plus-->
    <dependency>
        <groupId>com.baomidou</groupId>
        <artifactId>mybatis-plus-boot-starter</artifactId>
        <version>3.0.5</version>
    </dependency>
    <!--mysql-->
    <dependency>
        <groupId>mysql</groupId>
        <artifactId>mysql-connector-java</artifactId>
    </dependency>
    <!--lombok用来简化实体类-->
    <dependency>
        <groupId>org.projectlombok</groupId>
        <artifactId>lombok</artifactId>
    </dependency>

    <dependency>
        <groupId>org.springframework.boot</groupId>
        <artifactId>spring-boot-starter-thymeleaf</artifactId>
    </dependency>
</dependencies>
3.2.3 实体类
@Data
@AllArgsConstructor
@NoArgsConstructor
public class Users {
    private Integer id;
    private String username;
    private String password;
}
3.2.4 整合mybatisplus
@Mapper
public interface UserMapper extends BaseMapper<Users> {
}
3.2.5 配置文件
# mysql 数据库连接
spring.datasource.driver-class-name=com.mysql.cj.jdbc.Driver
spring.datasource.url=jdbc:mysql://localhost:3306/demo?serverTimezone=GMT%2B8
spring.datasource.username=root
spring.datasource.password=root
3.2.6 在UserDetailsService中调用Mapper
@Service("userDetailsService")
public class MyUserDetailsService implements UserDetailsService {

    @Autowired
    private UsersMapper usersMapper;

    @Override
    public UserDetails loadUserByUsername(String username) throws UsernameNotFoundException {
        //调用usersMapper方法,根据用户名查询数据库
        QueryWrapper<Users> wrapper = new QueryWrapper();
        // where username=?
        wrapper.eq("username",username);
        Users users = usersMapper.selectOne(wrapper);
        //判断
        if(users == null) {//数据库没有用户名,认证失败
            throw  new UsernameNotFoundException("用户名不存在!");
        }
        List<GrantedAuthority> auths =
                AuthorityUtils.commaSeparatedStringToAuthorityList("admin,ROLE_sale");
        //从查询数据库返回users对象,得到用户名和密码,返回
        return new User(users.getUsername(),
                new BCryptPasswordEncoder().encode(users.getPassword()),auths);
    }
}
3.2.7 启动类设置 mapper扫描位置
@MapperScan("xxx.xxx.xx")
3.3 自定义登录页面
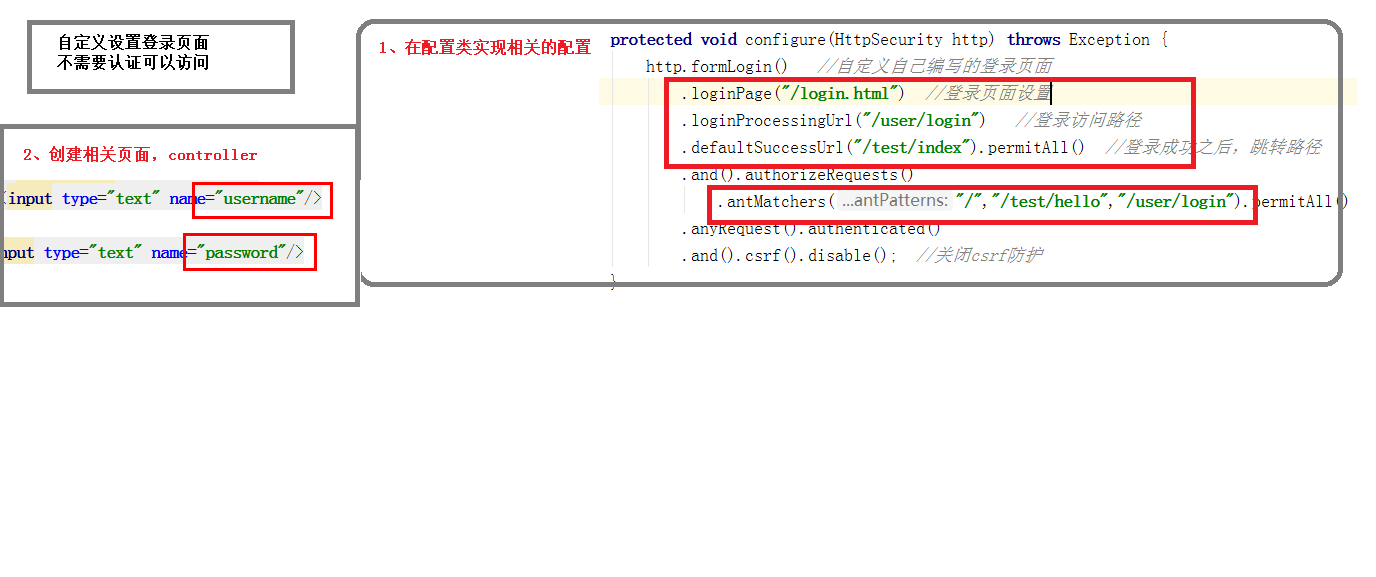
- 注意:页面提交方式必须为 post请求,用户名,密码必须为 username,password
<form action="/user/login"  method="post">
    <input type="text" name="username" />
    <input type="text" name="password" />
    <input type="submit" />
</form>
@Configuration
public class SecurityConfigTest extends WebSecurityConfigurerAdapter {
    @Override
    protected void configure(HttpSecurity http) throws Exception {
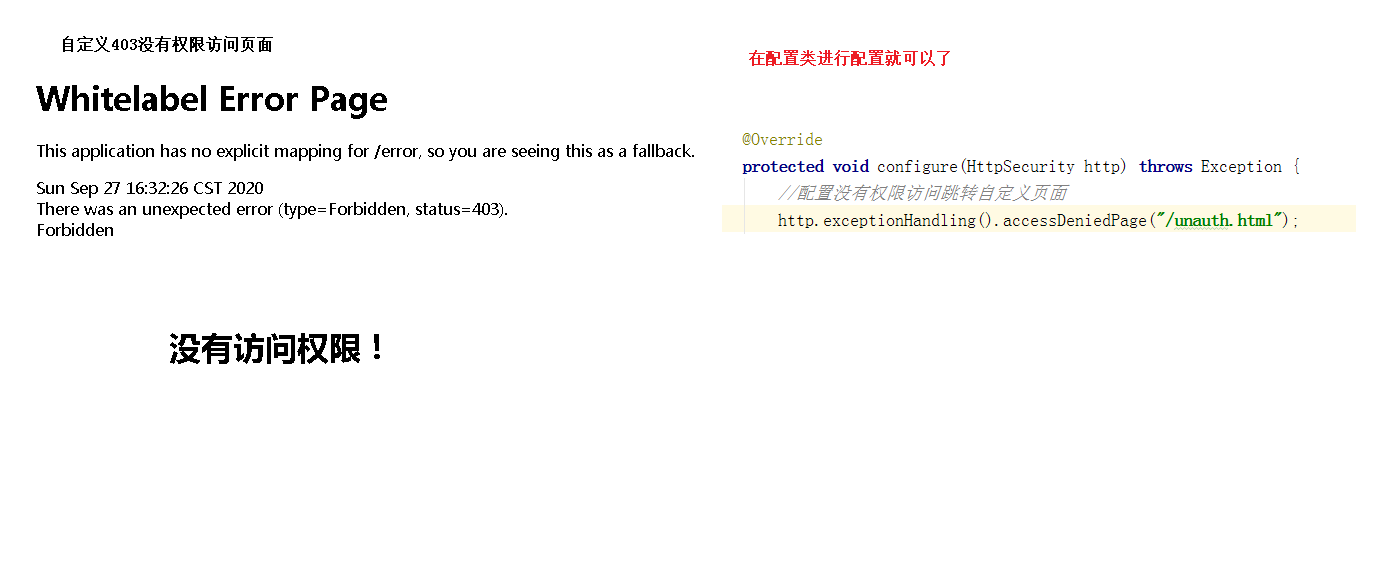
        //配置没有权限访(403页面)问跳转自定义页面
        http.exceptionHandling().accessDeniedPage("/unauth.html");
        http.formLogin()   //自定义自己编写的登录页面
            .loginPage("/on.html")  //登录页面设置
            .loginProcessingUrl("/user/login")   //登录访问路径
            .successForwardUrl("/success") //登录成功之后跳转那个url
            .defaultSuccessUrl("/success.html").permitAll()  //登录成功之后,跳转路径
            .and().authorizeRequests().antMatchers("/","/test/hello","/user/login") //表示匹配的路径
            //permitAll() 不管登入,不登入 都能访问
            .permitAll() //设置哪些路径可以直接访问,不需要认证(指定url无需保护)
            .anyRequest().authenticated() //任何请求都必须经过身份验证
            .and().csrf().disable();  //关闭csrf防护
    }
}
- 在执行登录的时候会走一个过滤器 UsernamePasswordAuthenticationFilter
- 如果修改登录页面的 name属性,可以调用 usernameParameter(name属性)和passwordParameter(name属性)方法
3.4 基于角色或权限进行访问
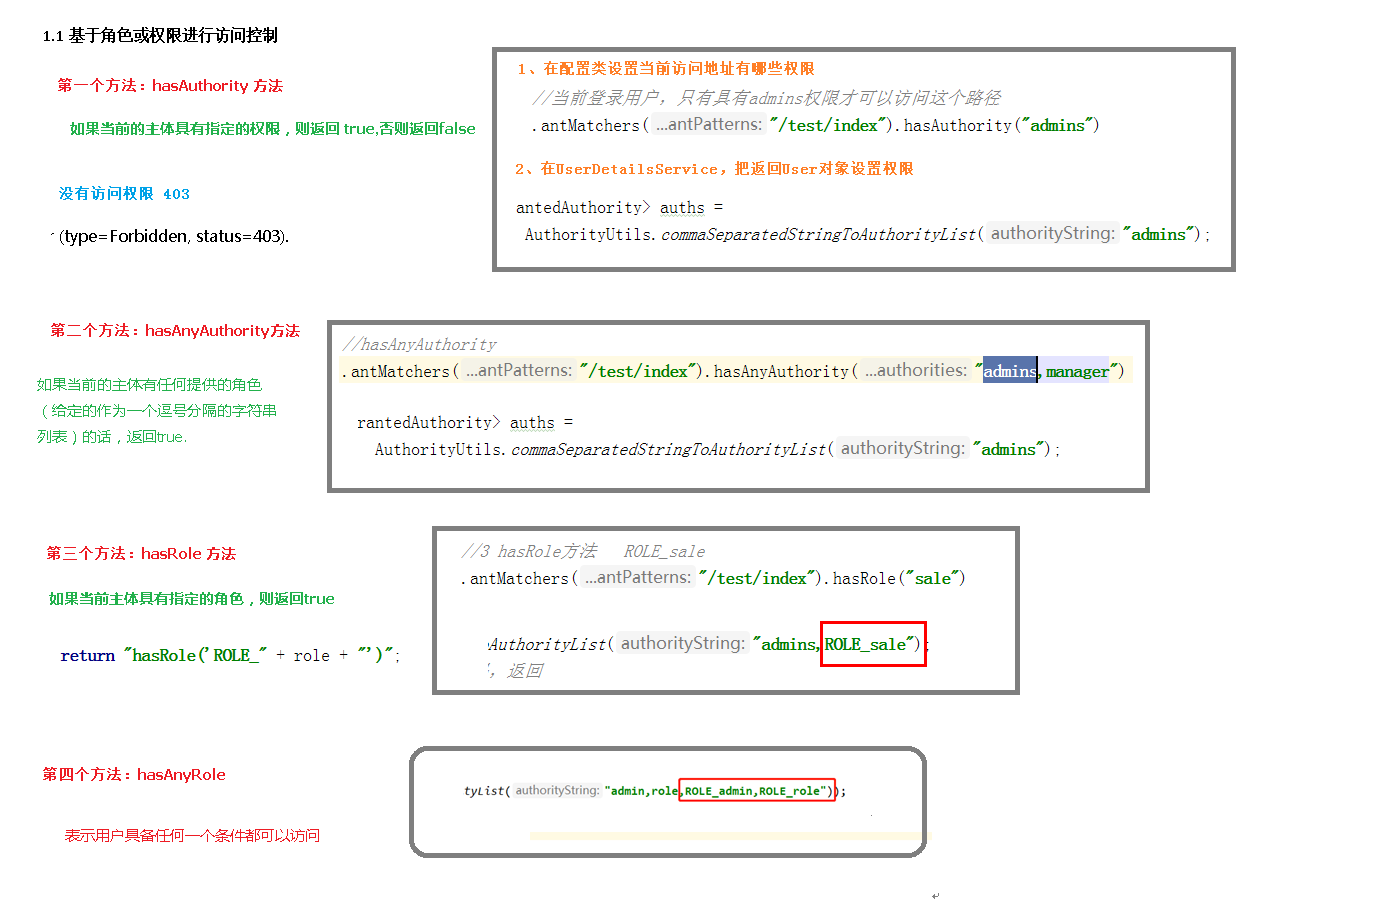
3.4.1 hasAuthority
- 如果当前的主体具有指定的权限,则返回true,否则返回 false
3.4.2 hasAnyAuthority
- 如果当前的主体有任何提供的角色(给定的作为一个逗号分隔的字符串列表)的话,返回true
3.4.3 hasRole
- 如果用户具备给定角色就允许访问,否则出现403,如果当前主体具有指定的角色,则返回 true
//底层源码
private static String hasRole(String role) {
    Assert.notNull(role, "role cannot be null");
    if (role.startsWith("ROLE_")) {
        throw new IllegalArgumentException("role should not start with 'ROLE_' since it is automatically inserted. Got '" + role + "'");
    } else {
        return "hasRole('ROLE_" + role + "')";
    }
}
- 注意配置文件中不需要添加”ROLE_“,因为上述的底层代码会自动添加与之前的进行匹配
3.4.4 hasAnyRole
- 表示用户具备任何一个条件都可以访问
3.7 注解使用
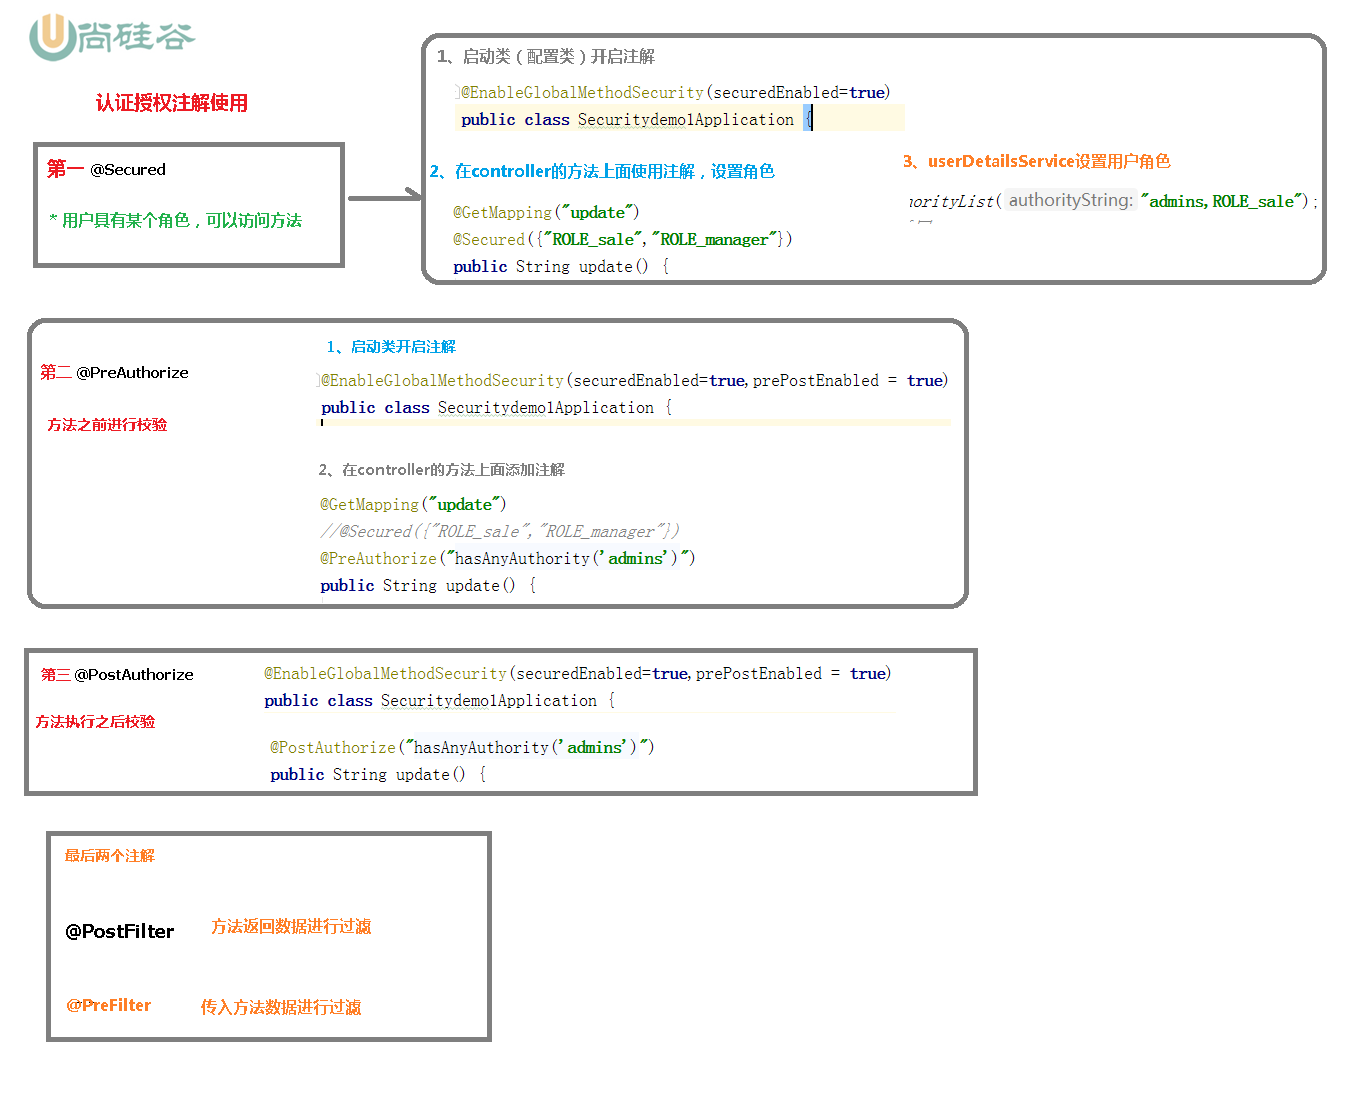
3.7.1 @Secured
- 判断是否具有角色,另外需要注意的是这里匹配的字符串需要添加前缀“ROLE_“。
- 使用该注解需要在启动类上开启
@SpringBootApplication @EnableGlobalMethodSecurity(securedEnabled=true) //开启Secured注解功能 public class DemosecurityApplication { public static void main(String[] args) { SpringApplication.run(DemosecurityApplication.class, args); } } - 在控制器方法上添加注解
@GetMapping("/helloUser")
//拥有owq或者admin角色的用户都可以方法helloUser()方法
// 如果我们要求,只有同时拥有admin & noremal的用户才能方法helloUser()方法,这时候@Secured就无能为力了。
@Secured({"ROLE_owq","ROLE_admin"})
public String helloUser() {
    return "hello,user";
}
3.7.2 @PreAuthorize
- 使用该注解需要在启动类上开启
@EnableGlobalMethodSecurity(prePostEnabled=true) - @PreAuthorize:注解适合进入方法前的权限验证, @PreAuthorize可以将登录用户的 roles/permissions 参数传到方法中。
- Spring的 @PreAuthorize/@PostAuthorize 注解更适合方法级的安全,也支持Spring 表达式语言,提供了基于表达式的访问控制。
@GetMapping("update")
@PostAuthorize("hasAnyAuthority('admins')")
public String update() {
    System.out.println("update......");
    return "hello update";
}
3.7.3 @PostAuthorize
- 使用该注解需要在启动类上开启
@EnableGlobalMethodSecurity(prePostEnabled = true) - @PostAuthorize 注解使用并不多,在方法执行后再进行权限验证,适合验证带有返回值的权限.
@GetMapping("update")
@PostAuthorize("hasAnyAuthority('admins')")
public String update() {
    System.out.println("update......");
    return "hello update";
}
3.7.4 @PostFilter
- @PostFilter :权限验证之后对数据进行过滤 留下用户名是admin1的数据
- 表达式中的 filterObject 引用的是方法返回值List中的某一个元素
@GetMapping("getAll")
@PostAuthorize("hasAnyAuthority('admins')")
@PostFilter("filterObject.username == 'admin1'")
public List<Users> getAllUser() {
    ArrayList<Users> list = new ArrayList<>();
    list.add(new Users(11, "admin1", "6666"));
    list.add(new Users(21, "admin2", "888"));
    System.out.println(list);
    return list;
}
3.7.5 @PreFilter
- @PreFilter: 进入控制器之前对数据进行过滤
@RequestMapping("getTestPreFilter")
@PreAuthorize("hasRole('admins')")
@PreFilter(value = "filterObject.id%2==0")
@ResponseBody
public List<UserInfo> getTestPreFilter(@RequestBody List<UserInfo> list) {
    list.forEach(t -> {
        System.out.println(t.getId() + "\t" + t.getUsername());
    });
    return list;
}
3.8 用户注销和记住我
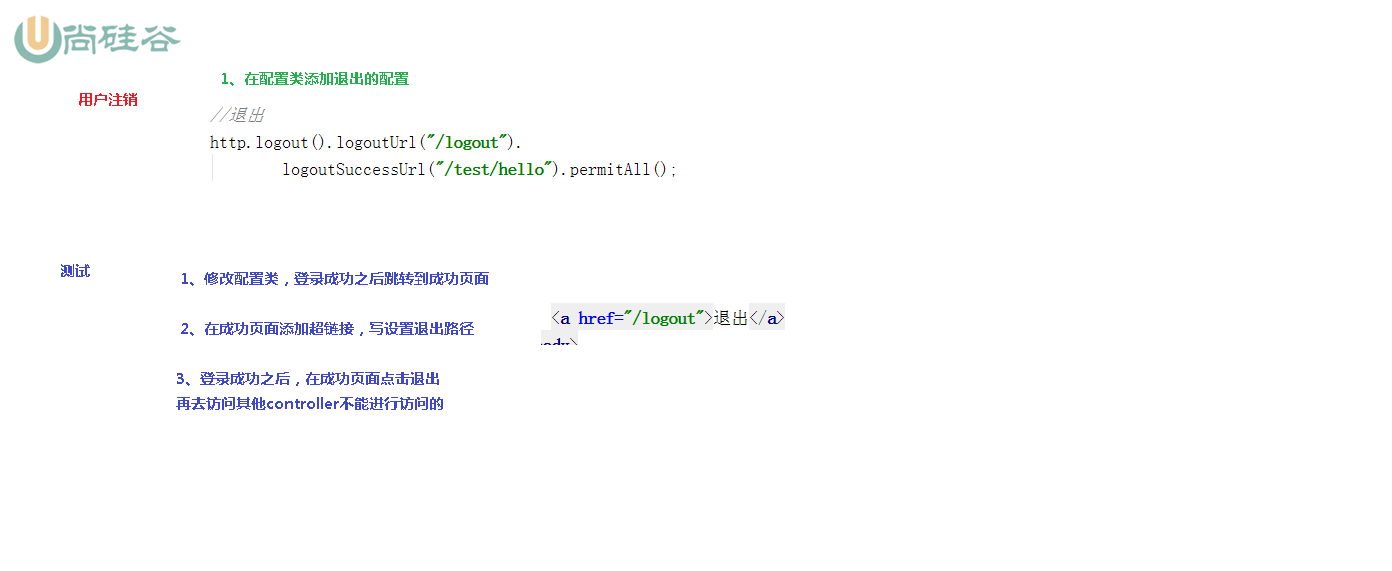
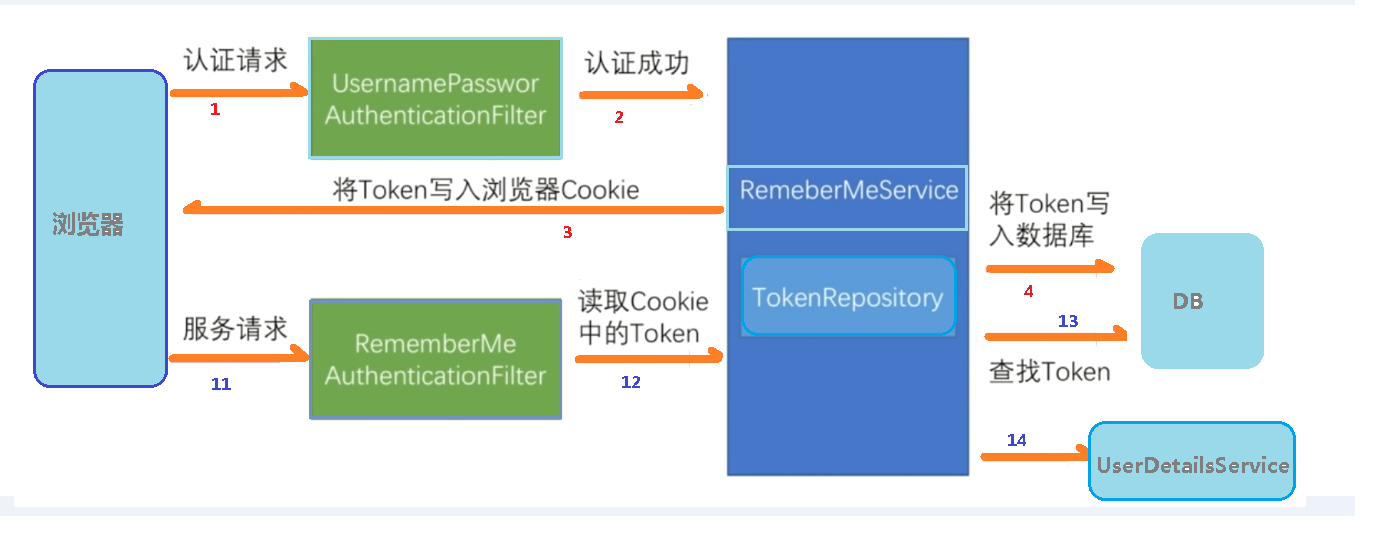
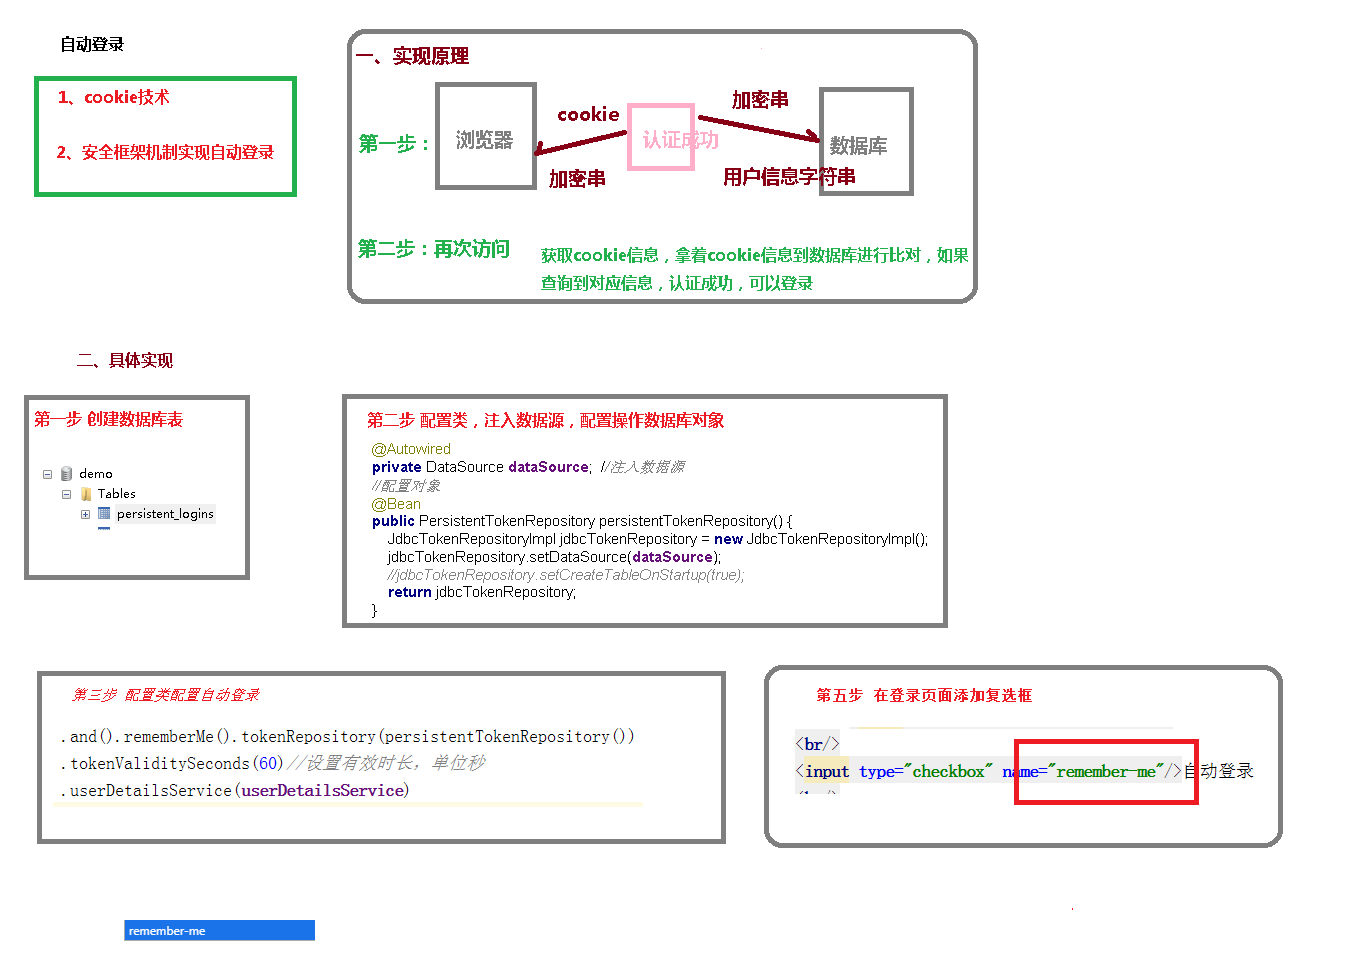
@Configuration
public class SecurityConfigTest extends WebSecurityConfigurerAdapter {
    @Autowired
    private UserDetailsService userDetailsService;
    //注入数据源
    @Autowired
    private DataSource dataSource;
    //配置对象
    @Bean
    public PersistentTokenRepository persistentTokenRepository() {
        JdbcTokenRepositoryImpl jdbcTokenRepository = new JdbcTokenRepositoryImpl();
        //赋值数据源
        jdbcTokenRepository.setDataSource(dataSource);
        //自动创建表,第一次执行会创建,以后执行就要删掉
        //jdbcTokenRepository.setCreateTableOnStartup(true);
        return jdbcTokenRepository;
    }
    @Override
    protected void configure(HttpSecurity http) throws Exception {
        http.rememberMe().tokenRepository(persistentTokenRepository()) ////开启记住我
            .tokenValiditySeconds(60)//设置有效时长,单位秒
            .userDetailsService(userDetailsService);
            .csrf().disable(); //关闭csrf
    }
}
<inplut type="checkbox" name="remember-me"/>自动登录
3.9 CSRF
- 跨站请求伪造(英语:Cross-site request forgery),也被称为 one-click attack 或者 session riding,通常缩写为 CSRF 或者 XSRF, 是一种挟制用户在当前已登录的Web应用程序上执行非本意的操作的攻击方法。跟跨网站脚本(XSS)相比,XSS利用的是用户对指定网站的信任,CSRF 利用的是网站对用户网页浏览器的信任。
- 跨站请求攻击,简单地说,是攻击者通过一些技术手段欺骗用户的浏览器去访问一个自己曾经认证过的网站并运行一些操作(如发邮件,发消息,甚至财产操作如转账和购买商品)。由于浏览器曾经认证过,所以被访问的网站会认为是真正的用户操作而去运行。这利用了web中用户身份验证的一个漏洞:简单的身份验证只能保证请求发自某个用户的浏览器,却不能保证请求本身是用户自愿发出的。
- 从Spring Security 4.0开始,默认情况下会启用CSRF保护,以防止CSRF攻击应用程序,Spring Security CSRF会针对PATCH,POST,PUT和DELETE方法进行防护。
3.9.1 案例
- 在登录页面添加一个隐藏域
<input type="hidden"th:if="${_csrf}!=null"th:value="${_csrf.token}"name="_csrf"/> - 关闭安全配置的类中的 csrf
// http.csrf().disable(); - 原理
https://blog.csdn.net/qq_43437874/article/details/118676337



【推荐】国内首个AI IDE,深度理解中文开发场景,立即下载体验Trae
【推荐】编程新体验,更懂你的AI,立即体验豆包MarsCode编程助手
【推荐】抖音旗下AI助手豆包,你的智能百科全书,全免费不限次数
【推荐】轻量又高性能的 SSH 工具 IShell:AI 加持,快人一步
· 无需6万激活码!GitHub神秘组织3小时极速复刻Manus,手把手教你使用OpenManus搭建本
· Manus爆火,是硬核还是营销?
· 终于写完轮子一部分:tcp代理 了,记录一下
· 别再用vector<bool>了!Google高级工程师:这可能是STL最大的设计失误
· 单元测试从入门到精通