Spring之AOP
AOP
- aop(aspect oriented programming),即面向切面编程,可以说 oop(object oriented programming 面向对象编程)的补充和完善。oop引入封装,继承,多态等概念来建立一种对象层次结构,用于模拟公共行为的一个集合。不过 oop允许开发者帝国一纵向的关系,但不适合定义横向的关系,例如日志功能。日志代码往往横向的散布在所有对象层次中,而它对应的对象的核心功能毫无关系对于其他类型的代码,如安全性,异常处理和透明的持久性也都是如此。这种散步在各处无关的代码被称为横切(cross cutting),在 oop设置中,他导致大量代码的重复,而不利于各个模块的重用。
- aop技术恰恰相反,他利用一种称为”横切“的技术,抛解开封装的对象内部,并将那些影响多个类的公共行为封装到一个可重用模块,并将其命名为”Aspect“,即为”切面“,。所谓”切面“,简单说就是那些与业务无关,却为业务模块所共同调用的逻辑或责任封装起来,便于减少系统的重复代码,降低模块之间的耦合度,并有利于未来的可操作性和可维护性。
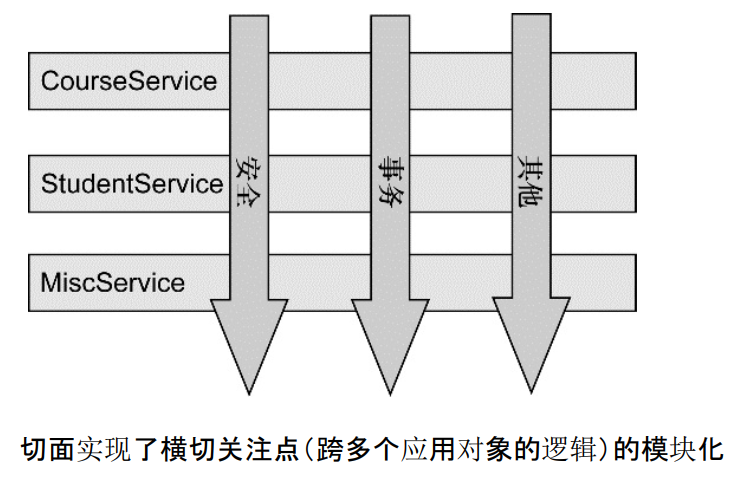
- 使用”横切“技术,aop把软件系统分为两部分:”核心关注点“和”横切关注点“。业务处理的主要流程是核心关注点,与之关系不大的部分就是横切关注点。横切关注点的一个特点是,他们经常发生核心关注点的多处,而各处基本相似,比如权限认知,日志事务。aop的作用在与分离系统中的各种关注点,将核心关注点和横切关注点分离开来。
aop 核心概念
- 横切关注点
对那些方法进行拦截,拦截后怎么处理,这些关注点称为横切关注点。 - 切面 aspect
类是对物体特征的抽象,切面都是对横切关注点的抽象 - 连接点 joinpoint
被拦截到的点,因为 spring只支持方法类型的连接点,所以在 spring中连接点指的就是被拦截的方法,实际上连接点还可以是字段或者构造器 - 切入点 pointcut
对连接点进行拦截的定义 - 通知 advice
所谓通知指的就是连接到连接点之后要执行的代码。通知分为前置,后置,异常,最终环绕通知5类。 - 目标对象
代理的目标对象 - 织入 weave
将切面应用到目标对象并导致代理对象创建的过程 - 引入 introduction
在不修改代码的前提下,引入可以在运行期为类动态的添加一些方法或字段
spring aop五大通知类型
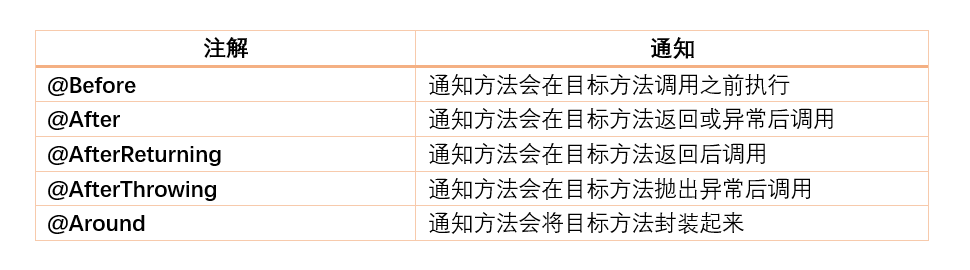
1. 前置通知
- before
- 在目标方法之前执行的通知
- 前置通知方法,可以没有参数,可以额外接收一个 JoinPoint,spring会自动将该对象传入,代表当前的连接点,通过该对象可以获取目标对象和目标方法的相关信息
- 注意:如果 接收 JointPoint,必须保证为方法的第一个参数,否则报错.
2. 环绕通知
- around
- 在目标方法执行之前和执行之后都可以额外代码的通知
- 在环绕通知必须显示的调用目标方法,目标方法才会执行,这个现实调用通过
ProceedingJoinPoint来实现的,可以在环绕通知中接收一个此类型的形参,spring容器会自动将该对象传入,注意这个参数必须处在环绕通知的第一个形参位置。 - 要注意,只有环绕通知可以接口
ProceedingJoinPoint,而其他通知只能接收JoinPoint。
环绕通知需要返回返回值,否则真正调用者将拿不到返回值,只能得到一个 null。
环绕通知由目标方法是否执行,有控制是否返回值,有改变返回值的能力。
环绕通知虽然有这样的能力,但是一定要慎用,不是技术上不可行,而是要小心不要破环了软件分层的”高内聚,低耦合”的目标。
3. 后置通知
- after-returning
- 在目标方法执行之后执行的通知。
- 在后置通知也可以选择性的接受一个 JoinPoint来获取连接点的额外信息,但是这个参数必须处在参数列表的第一个。
- 在后置通知中,还可以通过配置获取返回值,一定要保证
JoinPoint出于参数列表的第一位,否则报异常。
4. 异常通知
- after-throwing
- 在目标方法抛出异常时执行的通知。
- 可以配置传入
JoinPoint获取目标对象和目标方法相关信息,但是必须处在参数列表第一位。 - 另外,还可以配置参数,让异常可以接口接收到目标方法抛出的异常对象。
5. 最终通知
- after
- 是在目标方法执行之后执行的通知。
和后置通知不同之处在于,后置是方法正常返回执行的通知,如果方法没有正常返回,例如抛出异常,则后者通知不会执行。
而最终通知无论如何都会在目标方法调用后执行,即使目标方法没有正常的执行完成。
另外,后置通知可以通过配置的到返回值,而最终通知无法得到。 - 最终通知也可以额外接口一个
JoinPoint参数,来获取目标对象和目标方法相关信息,但是一定要保证必须是第一个参数。
五种通知的执行顺序
1. 在目标方法没有抛出异常的情况下
前置通知
环绕通知的调用目标方法之前的代码
目标方法
环绕通知的调用目标方法之后的代码
后置通知
最终通知
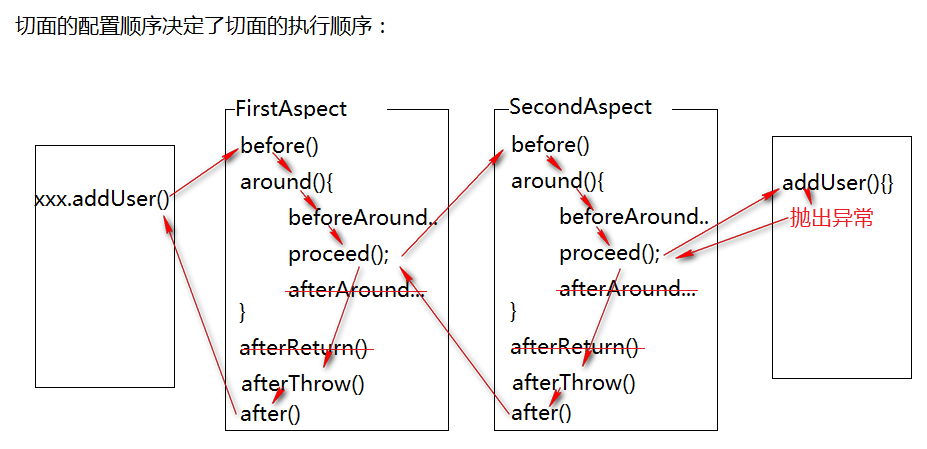
2. 在目标表方法抛出异常的情况下
前置通知
环绕通知的调用目标方法之前的代码
目标方法 抛出异常 异常通知
最终通知
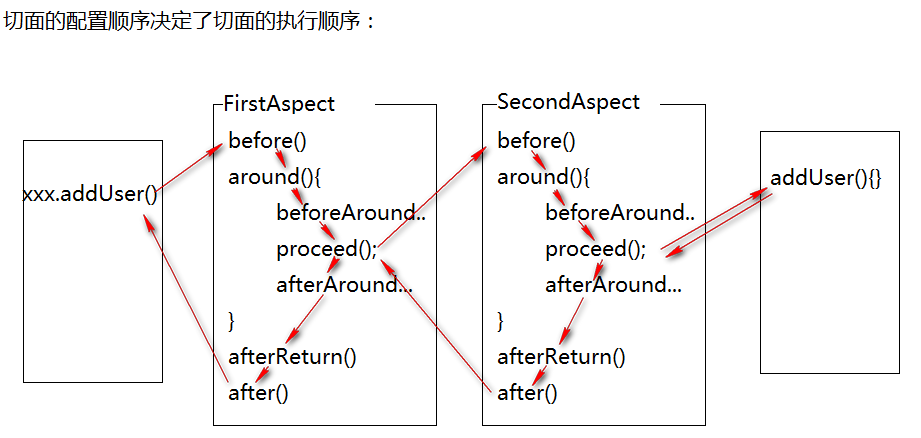
3. 如果存在多个切面
- 多个切面执行时,采用了责任链设置模式
- 切面的配置顺序决定了切面的执行顺序,多个切面的过程,类似方法调用的过程,在环绕通知的 proceed()执行时,去执行下一个切面如果没有下一个切面执行目标方法,从而打成如下的过程
如果目标方法抛出异常
五种通知的常见使用场景
| 环绕通知 | 控制事务权限控制 |
|---|---|
| 后置通知 | 记录日志(方法已经成功调用) |
| 异常通知 | 异常处理 控制事务 |
| 最终通知 | 记录日志(方法已经调用,但不一定成功) |
spring 对 aop的支持
- spring中 aop代理由 spring的 ioc容器负责生成,管理,其依赖关系也有 ioc容器负责管理。因此 aop代理可以直接使用容器的其他 bean示例作为目标,这种关系由 ioc容器的依赖注入提供。spring 创建代理的规则为:
- 默认使用 java动态代理来创建 aop代理,这样可以为任何接口实例创建代理。
- 当需要代理的类不是代理接口的时候,spring会切换使用 cglib代理,也可以强制使用 cglib
- aop编程起始是很简单的事情,纵观 aop编程,程序员只需参与三部分。
- 定义业务普通业务组件
- 定义切入点,一个切入点可能横切多个业务组件
- 定义增强处理,增强处理就是在 aop框架为普通业务组件织入的处理动作。
- 所以进行 aop编程的关键就是定义切入点和定义增强处理,一旦定义了合适的切入点和增强处理,aop框架将自动生成 aop代理,即:代理对象的方法=增强处理+被代理对象的方法
aop 准备
- spring狂降一般是基于 aspectj实现 ao操作
- 声明是 aspectj?
aspectj不是 spring组成部分,独立 aop框架,一般把 aspectj和spring框架一起使用,进行 aop操作
- 声明是 aspectj?
- 基于 aspect实现 aop操作
- 基于 xml配置文件实现
- 基于 注解方式实现
- 在项目引入 aop其他 jar包
com.springsource.net.sf.cglib-2.2.0.jar
com.springsource.org.aopalliance-1.0.0.jar,
com.springsource.org.aspectj.weaver-1.6.8.release.jar - 切入点表达式
- 作用:对符合切入点表达式的类,会自动生成代理对象。
- 语法:改语句在 spring框架下载 的姐也报-》docs-》reference-》core.html->5.4.3 Declaring a Pointcut-》Examples
访问修饰符 返回值类型(必填) 包和类 方法(必填) 参数 异常 execution(modifiers-pattern? ret-type-pattern declaring-type-pattern?name-pattern(param-pattern) throws-pattern?) execution(<修饰符模式>? <返回类型模式> <方法名模式>(<参数模式>) <异常模式>?) - 表达式通配符
- :匹配所有字符
.. :一般用于匹配多个包,多个参数
+ :表示类及其子类
- :匹配所有字符
- 支持逻辑运算符:&& || !
- 注意:
除了返回类型模式,方法模式和参数模式外,其他选项都是可选的 - 示例
1.最全的写法
拦截返回void,指定类的指定方法,参数必须有两个:int、String
execution(public void
com.sunny.service.Impl.AccountServiceImpl.save(int,java.lang.String))
2.省略访问修饰符,返回值任意的指定类的save方法,无参数
execution(* com.sunny.service.Impl.AccountServiceImpl.save())
3.拦截com包下所有的类、以及其子包下所有的类的save()方法
execution(void com..*.save()) 包名与类名或方法名称都可以使用*
4.拦截save()方法/拦截所有方法
execution(* save()) //拦截save()
execution(* *()) //拦截所有方法
5.不拦截save()方法
!execution(* save())
not execution(* save()) 注意not前面要有空格
6.拦截save()方法或者update()方法
execution(* save()) || execution(* update()))
execution(* save()) or execution(* update()))
7.拦截所有方法,参数任意,但必须有参数
execution(* *(*))
8.拦截所有方法,参数任意,参数可有可无
execution(* *(..))
9.对IOC容器中以Service结尾的类,生成代理对象
bean(*Service)
10.最常用
execution(* com.sunny..*ServiceImpl.*(..))
表示com.sunny包及其子包下所有的以ServiceImpl结尾的类生成代理对象
``
配置 Spring aop
使用 xml + ProxyFactoryBean配置 Spring aop
1. 业务接口类和业务实现类
interface StudentInterface {
    int add(int a, int b);

    void study();

    void eat(String food);
}


class Student implements StudentInterface {
    private String sname;
    private Integer sid;

    public int add(int a, int b) {
        System.out.println(1 / 0);
        System.out.println("学生正" + sname + "在算数:" + "a + b = " + (a + b));
        return a + b;
    }

    public void study() {
        System.out.println("学生正" + sname + "正在睡觉!!");
    }

    public void eat(String foot) {
        System.out.println("学生正" + sname + "在吃" + foot);
    }

    @Override
    public String toString() {
        return "Student{" +
                "sname='" + sname + '\'' +
                ", sid=" + sid +
                '}';
    }

    public Student() {
    }

    public Student(String sname, Integer sid) {
        this.sname = sname;
        this.sid = sid;
    }

    public String getSname() {
        return sname;
    }

    public void setSname(String sname) {
        this.sname = sname;
    }

    public Integer getSid() {
        return sid;
    }

    public void setSid(Integer sid) {
        this.sid = sid;
    }
}
2. 方法通知类(增强类)
- 注意一点!!!类单独放一个文件别放在一个文件下,我报错了!
//方法前置通知
class MyBeforeAdvice implements MethodBeforeAdvice {

    /**
     * @param method 目标对象
     * @param args   目标对象的方式实参
     * @param target 目标对象
     * @throws Throwable
     */
    @Override
    public void before(Method method, Object[] args, Object target) throws Throwable {
        System.out.println("before 方法之前的通知:" + method.getName() + "(" + Arrays.toString(args) + ")");
    }
}

//方法后置增强 //测试了会报错 没有这个!!!
/*class MyAfterAdvice implements AfterAdvice {
    public void after(Object returnValue, Method method, Object[] args, Object target) throws Throwable {
        System.out.println("after 方法返回后的通知:" + method.getName() + "(" + Arrays.toString(args) + ")");
    }
}*/

//方法返回后通知【后置通知】
class MyAfterReturningAdvice implements AfterReturningAdvice {

    /**
     * @param returnValue 方法的返回值
     * @param method      目标对象的方法
     * @param args        目标对象的方法实参
     * @param target      目标对象
     * @throws Throwable
     */
    @Override
    public void afterReturning(Object returnValue, Method method, Object[] args, Object target) throws Throwable {
        System.out.println("afterReturning 方法返回后的通知:" + method.getName() + "(" + Arrays.toString(args) + ")");
    }
}

//方法环绕通知
class MyAroundAdvice implements MethodInterceptor {

    /**
     * @param invocation 方法调用连接点
     * @return 调用的结果可能会被拦截
     * @throws Throwable 如果拦截器或目标对象抛出异常
     */
    @Override
    public Object invoke(MethodInvocation invocation) throws Throwable {
//        System.out.println("invocation = " + invocation);
        System.out.println("Around invoke 前" + invocation.getMethod().getName() + ":" + Arrays.toString(invocation.getArguments()));
        Object result = invocation.proceed();//执行方法
        System.out.println("Around invoke 后" + invocation.getMethod().getName() + ":" + Arrays.toString(invocation.getArguments()));
        return result;
    }
}

//方法异常通知
class MyExceptionAdvice implements ThrowsAdvice {
    public void afterThrowing(Method method, Object[] args, Object target, Exception ex) {
        System.out.println(method.getName() + "(" + Arrays.toString(args) + ")::出现异常了!" + ex);
    }
}
3. spring 核心配置文件
<?xml version="1.0" encoding="UTF-8"?>
<beans xmlns="http://www.springframework.org/schema/beans"
       xmlns:xsi="http://www.w3.org/2001/XMLSchema-instance"
       xsi:schemaLocation="http://www.springframework.org/schema/beans
	http://www.springframework.org/schema/beans/spring-beans-3.0.xsd">

    <!--1. 创建目标对象bean -->
    <bean name="stu" class="com.zhiyou100.Student">
        <property name="sid" value="1001"/>
        <property name="sname" value="韩梅梅"/>
    </bean>

    <!--2. 创建辅助功能类对应的bean -->
    <bean name="beforeAdvice" class="com.zhiyou100.MyBeforeAdvice"/>

<!--    <bean name="afterAdvice" class="com.zhiyou100.MyAfterAdvice"/>-->
    <bean name="afterReturningAdvice" class="com.zhiyou100.MyAfterReturningAdvice"/>

    <bean name="aroundAdvice" class="com.zhiyou100.MyAroundAdvice"/>
    <bean name="exceptionAdvice" class="com.zhiyou100.MyExceptionAdvice"/>

    <!--3. 通过 ProxyFactoryBean的方法 动态获取一个代理对象bean -->
    <bean name="stuProxy" class="org.springframework.aop.framework.ProxyFactoryBean">
        <property name="target" ref="stu"/>
        <property name="interceptorNames">
            <list>
                <value>beforeAdvice</value>
<!--                <value>afterAdvice</value>-->
                <value>afterReturningAdvice</value>
                <value>aroundAdvice</value>
                <value>exceptionAdvice</value>
            </list>
        </property>
    </bean>
</beans>
4. 测试
    @Test
    public void test1() {
        ClassPathXmlApplicationContext
                application = new ClassPathXmlApplicationContext("conf\\application-conf.xml");
        StudentInterface stuProxy = (StudentInterface) application.getBean("stuProxy");
        System.out.println(stuProxy.add(1, 2));
        application.close();
    }

结果:
1. 没有异常
before 方法之前的通知:add([1, 2])
Around invoke 前add:[1, 2]
学生正韩梅梅在算数:a + b = 3
Around invoke 后add:[1, 2]
afterReturning 方法返回后的通知:add([1, 2])
3

2. 有异常
before 方法之前的通知:add([1, 2])
Around invoke 前add:[1, 2]
add([1, 2])::出现异常了!java.lang.ArithmeticException: / by zero
升级使用切入点 RegexpMethodPointcutAdvisor类
- 核心配置文件
<?xml version="1.0" encoding="UTF-8"?>
<beans xmlns="http://www.springframework.org/schema/beans"
       xmlns:xsi="http://www.w3.org/2001/XMLSchema-instance"
       xsi:schemaLocation="http://www.springframework.org/schema/beans
	http://www.springframework.org/schema/beans/spring-beans-3.0.xsd">

    <!--1. 创建目标对象bean -->
    <bean name="stu" class="com.zhiyou100.Student">
        <property name="sid" value="1001"/>
        <property name="sname" value="韩梅梅"/>
    </bean>

    <!--2. 创建辅助功能类对应的bean -->
    <bean name="beforeAdvice" class="com.zhiyou100.MyBeforeAdvice"/>
<!--    <bean name="afterAdvice" class="com.zhiyou100.MyAfterAdvice"/>-->
    <bean name="afterReturningAdvice" class="com.zhiyou100.MyAfterReturningAdvice"/>
    <bean name="aroundAdvice" class="com.zhiyou100.MyAroundAdvice"/>
    <bean name="exceptionAdvice" class="com.zhiyou100.MyExceptionAdvice"/>


    <!-- 创建切面bean:通过 RegexpMethodPointcutAdvisor类-->
    <bean name="afterPointCutAdvice" class="org.springframework.aop.support.RegexpMethodPointcutAdvisor">
        <property name="advice" ref="afterReturningAdvice"/>
        <property name="pattern" value=".*add.*"/><!-- .任意字符 *次数>=0次 -->
    </bean>
    <bean name="beforePointCutAdvice" class="org.springframework.aop.support.RegexpMethodPointcutAdvisor">
        <property name="advice" ref="beforeAdvice"/>
        <property name="pattern" value=".*add.*"/><!-- .任意字符 *次数>=0次 -->
    </bean>
    <bean name="aroundPointCutAdvice" class="org.springframework.aop.support.RegexpMethodPointcutAdvisor">
        <property name="advice" ref="aroundAdvice"/>
        <property name="pattern" value=".*add.*"/><!-- .任意字符 *次数>=0次 -->
    </bean>


    <!--3. 通过 ProxyFactoryBean的方法 动态获取一个代理对象bean -->
    <bean name="stuProxy" class="org.springframework.aop.framework.ProxyFactoryBean">
        <property name="target" ref="stu"/>
        <!--设置拦截器-->
        <property name="interceptorNames">
            <list>
                <value>beforePointCutAdvice</value>
<!--                <value>afterAdvice</value>-->
                <value>afterPointCutAdvice</value>
                <value>aroundPointCutAdvice</value>
                <value>exceptionAdvice</value>
            </list>
        </property>
    </bean>
</beans>
通过 aop标签使用
1. 创建业务接口类和业务实现类
//业务类接口
interface Person {
    void eat(String foot);

    int arithmetic(int a, int b);
}

//创建主流业务的实体类
class Student implements Person {
    private String name;

    public void eat(String foot) {
        System.out.println(name + "同学,正在吃" + foot);
    }

    public int arithmetic(int a, int b) {
        System.out.println(name + "同学,正在算数: a * b = " + (a * b));
        return a * b;
    }
//略 set get tostring 无参 有参
}
2. 定义切入类(辅助类)
//创建实体类封装所有的赋值功能
class MyAdvice {
	//最终通知
    public void after1AdviceMethod() {
        System.out.println("after1AdviceMethod111111111");
    }
	//最终通知
    public void after2AdviceMethod() {
        System.out.println("after2AdviceMethod222222222");
    }
	//前置通知
    public void beforeAdviceMethod() {
        System.out.println("beforeAdviceMethodbbbbb");
    }
	//异常通知
    public void exceptionAdviceMethod(Exception e) {
        System.out.println("exceptionAdviceMethodeeeee:" + e);
    }
	//环绕通知
    public Object aroundAdviceMethod(ProceedingJoinPoint pjp) {
        Object result = null;
        try {
            System.out.println("aroundAdviceMethod rrr前");
            result = pjp.proceed();
            System.out.println("aroundAdviceMethod rrr后");
        } catch (Throwable e) {
            throw new RuntimeException(e);
        }
        return result;
    }
}
3. Spring 核心配置文件
- 先引入命名空间 context和 aop。
- 创建业务类
- 创建通知 bean
- 设置通知 bean,设置切入点,设置通知
<?xml version="1.0" encoding="UTF-8"?>
<beans xmlns="http://www.springframework.org/schema/beans"
       xmlns:xsi="http://www.w3.org/2001/XMLSchema-instance"
       xmlns:aop="http://www.springframework.org/schema/aop"

       xsi:schemaLocation="http://www.springframework.org/schema/beans
	http://www.springframework.org/schema/beans/spring-beans-3.0.xsd
	http://www.springframework.org/schema/aop
	http://www.springframework.org/schema/aop/spring-aop-3.0.xsd">

    <!--1. 引入 context和 aop的命名空间和 xsd文件-->
    <!--2. 创建 bean:目标bean-->
    <bean name="stu" class="com.zhiyou100.service.Student">
        <property name="name" value="吉良吉影"/>
    </bean>
    <!--3. 创建bean:通知bean-->
    <bean name="advice" class="com.zhiyou100.service.MyAdvice"/>
    <!--4. 通过 aop标签,指定切入点
    execution(* com.zhiyou100.*.*.eat(..))
    指定切入点的正则
        第一个* 表示方法的返回值时任意的
        第二个* 表示任意任意包
        第三个* 表示任意类
    -->
    <aop:config>
        <aop:aspect ref="advice">
            <aop:pointcut id="myCut" expression="execution(* com.zhiyou100.*.*.eat(..))"/>
            <aop:before method="beforeAdviceMethod" pointcut-ref="myCut"/>
            <!--这里配置了两个 after先输出 2后输出1,【如果2在前,1在后,先输出1在输出2;类似 栈】-->
            <aop:after method="after1AdviceMethod" pointcut-ref="myCut"/>
            <aop:after method="after2AdviceMethod" pointcut-ref="myCut"/>
            <aop:around method="aroundAdviceMethod" pointcut-ref="myCut"/>
            <aop:after-throwing method="exceptionAdviceMethod" pointcut-ref="myCut" throwing="e"/>
        </aop:aspect>
    </aop:config>
</beans>
4. 测试
    @Test
    public void test1() {
        ClassPathXmlApplicationContext
                application = new ClassPathXmlApplicationContext("conf\\application-conf2.xml");
        Person stuProxy = (Person) application.getBean("stu");
        stuProxy.eat("鸡腿");
        application.close();
    }
/*
==》没有异常
beforeAdviceMethodbbbbb
aroundAdviceMethod rrr前
吉良吉影同学,正在吃鸡腿
aroundAdviceMethod rrr后
after2AdviceMethod222222222
after1AdviceMethod111111111
==》有异常
beforeAdviceMethodbbbbb
aroundAdviceMethod rrr前
exceptionAdviceMethodeeeee:java.lang.ArithmeticException: / by zero
after2AdviceMethod222222222
after1AdviceMethod111111111
*/
- 好处
可以代理所有符合条件的 bean,bena中的方法与 aop-config中的正则匹配。
注解形式
步骤
- 核心配置文件引入 context和 aop命名空间
- 开启组件扫描
- 开启 Aspect生成代理对象,在类中找 @Aspect注解,如果有就把这个对象生成代理对象
- 创建业务逻辑接口和业务实现类
- 进行通知配置
- 辅助类上添加 @Aspect生成代理对象
- @Pointcut 定义切入点
- 使用增强方法的注解 。。。
- 声明增强方法的业务逻辑
1. spring核心配置文件
<?xml version="1.0" encoding="UTF-8"?>
<beans xmlns="http://www.springframework.org/schema/beans"
       xmlns:xsi="http://www.w3.org/2001/XMLSchema-instance"
       xmlns:aop="http://www.springframework.org/schema/aop"
       xmlns:context="http://www.springframework.org/schema/context"

       xsi:schemaLocation="http://www.springframework.org/schema/beans
	http://www.springframework.org/schema/beans/spring-beans-3.0.xsd
	http://www.springframework.org/schema/aop
	http://www.springframework.org/schema/aop/spring-aop-3.0.xsd
	 http://www.springframework.org/schema/context
	 https://www.springframework.org/schema/context/spring-context.xsd">

    <!--1. 引入 context和 aop的命名空间和 xsd文件-->
    <!--2. 通过context标签component-scan:指定扫描的实体类包  为添加注解的实体类创建bean  -->
    <context:component-scan base-package="com.zhiyou100.annotation"/>
    <!--3. 通过 aop标签 spect-autoproxy 实现自动植入-->
    <aop:aspectj-autoproxy/>
</beans>
2. 业务接口类和实现类
//业务接口类
interface Person {
    int add(int a, int b);

    void study();

    void eat(String food);
}

//业务实现类
@Component
        //创建对象
class Student implements Person {
    @Value("DIO") //自动注入值
    private String sname;
    @Value("555")
    private Integer sid;

    public int add(int a, int b) {
//        System.out.println(1 / 0);
        System.out.println("学生正" + sname + "在算数:" + "a + b = " + (a + b));
        return a + b;
    }

    public void study() {
        System.out.println("学生正" + sname + "正在睡觉!!");
    }

    public void eat(String foot) {
        System.out.println("学生正" + sname + "在吃" + foot);
    }
//略 set get tostring 无参 有参
}
3. 切面类(通知类配置/增强类)
//通知类
@Component //创建对象
@Aspect//生成代理对象
class MyAdvice {
    //@Pointcut 定义切入点表达式
    @Pointcut("execution(* com.zhiyou100.annotation.*.add(..))") //
    public void addPointCyt() {//方法名即为切入点的 id
    }

    @Pointcut("execution(* com.zhiyou100.annotation.*.*(..))")
    public void allPointCut() {//方法名即为切入点的 id
    }

    @Pointcut("execution(* com.zhiyou100.annotation.*.eat(..))")
    public void earPointCut() {//方法名即为切入点的 id
    }
//方法增强逻辑
	//最终通知
    @After(value = "allPointCut()")
    public void afterAdviceMethod(JoinPoint jp) {
        System.out.println("afterAdviceMethod1 " + jp.getSignature().getName());
    }
	//后置通知、返回通知
    @AfterReturning(value = "addPointCyt()", returning = "result")
    public void afterReturningAdviceMethod(Object result) {
        System.out.println("afterReturningAdviceMethod2 返回值:" + result);
    }
	//前置通知
    @Before(value = "addPointCyt()")
    public void beforeAdviceMethod(JoinPoint jp) {
        System.out.println("beforeAdviceMethod " + jp.getSignature().getName());
    }
	//异常通知
    @AfterThrowing(value = "allPointCut()", throwing = "e")
    public void exceptionAdviceMethod(Exception e) {
        System.out.println("exceptionAdviceMethod " + e);
    }
	//环绕通知
    @Around(value = "addPointCyt()")
    public Object aroundAdviceMethod(ProceedingJoinPoint pjp) {
        Object result = null;
        try {
            System.out.println("aroundAdviceMethod 前");
            result = pjp.proceed();//执行方法
            System.out.println("aroundAdviceMethod 后");
        } catch (Throwable e) {
            throw new RuntimeException(e);
        }
        return result;
    }
}
4. 测试
    @Test
    public void test1() {
        ClassPathXmlApplicationContext application =
                new ClassPathXmlApplicationContext("conf\\application-conf3.xml");
        Person person = (Person) application.getBean("student");
        System.out.println(person.add(3, 5));
        application.close();
    }
/*
==》没有异常
aroundAdviceMethod 前
beforeAdviceMethod add
学生正DIO在算数:a + b = 8
afterReturningAdviceMethod2 返回值:8
afterAdviceMethod1 add
aroundAdviceMethod 后
8
==》有异常
aroundAdviceMethod 前
beforeAdviceMethod add
exceptionAdviceMethod java.lang.ArithmeticException: / by zero
*/

 浙公网安备 33010602011771号