腾讯云短信
目录
一、腾讯云短信
1.1 腾讯云短信申请
# 发送短信功能
	-网上会有第三方短信平台,为我们提供api,花钱,向它的某个地址发送请求,携带手机号,内容--->它替我们发送短信

    -腾讯云短信--->以这个为例
    -阿里 大于短信
    -容联云通信

# 申请一个公众号---> 自行百度---> 个人账号


# 如何申请腾讯云短信
	-1 地址:https://cloud.tencent.com/act/pro/csms
    -2 登录后,进入控制台,搜短信https://console.cloud.tencent.com/smsv2
    -3 创建签名:使用公众号
    	-身份证,照片
    -4 模板创建
    -5 发送短信
    	-使用腾讯提供的sdk发送
        -https://cloud.tencent.com/document/product/382/43196
1.2 什么是API,什么是SDK
	-API:api接口---->发送http请求,到某些接口,携带需要携带的数据,就能完成某些操作
    	-python发送http请求,目前不会=====> requests模块
    -sdk:集成开发工具包,跟语言有关系--->官方提供的,使用某种语言对api接口做了封装--->使用难度很低

    -有sdk优先用sdk--->正统用法,下载,导入,类实例化--->调用类的某个方法完成功能
二、测试发送短信
-1 安装
pip install --upgrade tencentcloud-sdk-python
# upgrap是,如果没有安装,就安装最新版本
-2 复制代码修改:https://cloud.tencent.com/document/product/382/43196
-3 创建密钥
https://console.cloud.tencent.com/cam/capi
scripts/sms_send_demo.py
from tencentcloud.common import credential
from tencentcloud.common.exception.tencent_cloud_sdk_exception import TencentCloudSDKException
# 导入对应产品模块的client models。
from tencentcloud.sms.v20210111 import sms_client, models

# 导入可选配置类
from tencentcloud.common.profile.client_profile import ClientProfile
from tencentcloud.common.profile.http_profile import HttpProfile

try:
    # 必要步骤:
    # 实例化一个认证对象,入参需要传入腾讯云账户密钥对secretId,secretKey。
    # 这里采用的是从环境变量读取的方式,需要在环境变量中先设置这两个值。
    # 你也可以直接在代码中写死密钥对,但是小心不要将代码复制、上传或者分享给他人,
    # 以免泄露密钥对危及你的财产安全。
    # SecretId、SecretKey 查询: https://console.cloud.tencent.com/cam/capi
    cred = credential.Credential("", "")
    # cred = credential.Credential(  # 可以把密钥设置到环境变量中,增加安全性
    #     os.environ.get(""),
    #     os.environ.get("")
    # )

    # 实例化一个http选项,可选的,没有特殊需求可以跳过。
    httpProfile = HttpProfile()
    # 如果需要指定proxy访问接口,可以按照如下方式初始化hp(无需要直接忽略)
    # httpProfile = HttpProfile(proxy="http://用户名:密码@代理IP:代理端口")
    httpProfile.reqMethod = "POST"  # post请求(默认为post请求)
    httpProfile.reqTimeout = 30  # 请求超时时间,单位为秒(默认60秒)
    httpProfile.endpoint = "sms.tencentcloudapi.com"  # 指定接入地域域名(默认就近接入)

    # 非必要步骤:
    # 实例化一个客户端配置对象,可以指定超时时间等配置
    clientProfile = ClientProfile()
    clientProfile.signMethod = "TC3-HMAC-SHA256"  # 指定签名算法
    clientProfile.language = "en-US"
    clientProfile.httpProfile = httpProfile

    # 实例化要请求产品(以sms为例)的client对象
    # 第二个参数是地域信息,可以直接填写字符串ap-guangzhou,支持的地域列表参考 https://cloud.tencent.com/document/api/382/52071#.E5.9C.B0.E5.9F.9F.E5.88.97.E8.A1.A8
    client = sms_client.SmsClient(cred, "ap-guangzhou", clientProfile)

    # 实例化一个请求对象,根据调用的接口和实际情况,可以进一步设置请求参数
    # 你可以直接查询SDK源码确定SendSmsRequest有哪些属性可以设置
    # 属性可能是基本类型,也可能引用了另一个数据结构
    # 推荐使用IDE进行开发,可以方便的跳转查阅各个接口和数据结构的文档说明
    req = models.SendSmsRequest()

    # 基本类型的设置:
    # SDK采用的是指针风格指定参数,即使对于基本类型你也需要用指针来对参数赋值。
    # SDK提供对基本类型的指针引用封装函数
    # 帮助链接:
    # 短信控制台: https://console.cloud.tencent.com/smsv2
    # 腾讯云短信小助手: https://cloud.tencent.com/document/product/382/3773#.E6.8A.80.E6.9C.AF.E4.BA.A4.E6.B5.81

    # 短信应用ID: 短信SdkAppId在 [短信控制台] 添加应用后生成的实际SdkAppId,示例如1400006666
    # 应用 ID 可前往 [短信控制台](https://console.cloud.tencent.com/smsv2/app-manage) 查看
    req.SmsSdkAppId = "1400832701"
    # 短信签名内容: 使用 UTF-8 编码,必须填写已审核通过的签名
    # 签名信息可前往 [国内短信](https://console.cloud.tencent.com/smsv2/csms-sign) 或 [国际/港澳台短信](https://console.cloud.tencent.com/smsv2/isms-sign) 的签名管理查看
    req.SignName = "想养一只狗狗公众号"
    # 模板 ID: 必须填写已审核通过的模板 ID
    # 模板 ID 可前往 [国内短信](https://console.cloud.tencent.com/smsv2/csms-template) 或 [国际/港澳台短信](https://console.cloud.tencent.com/smsv2/isms-template) 的正文模板管理查看
    req.TemplateId = "1842991"
    # 模板参数: 模板参数的个数需要与 TemplateId 对应模板的变量个数保持一致,,若无模板参数,则设置为空
    req.TemplateParamSet = ["7329", '5']  # 我设置了两个
    # 下发手机号码,采用 E.164 标准,+[国家或地区码][手机号]
    # 示例如:+8613711112222, 其中前面有一个+号 ,86为国家码,13711112222为手机号,最多不要超过200个手机号
    req.PhoneNumberSet = ["+8618088773335"]
    # # 用户的 session 内容(无需要可忽略): 可以携带用户侧 ID 等上下文信息,server 会原样返回
    # req.SessionContext = ""
    # # 短信码号扩展号(无需要可忽略): 默认未开通,如需开通请联系 [腾讯云短信小助手]
    # req.ExtendCode = ""
    # # 国内短信无需填写该项;国际/港澳台短信已申请独立 SenderId 需要填写该字段,默认使用公共 SenderId,无需填写该字段。注:月度使用量达到指定量级可申请独立 SenderId 使用,详情请联系 [腾讯云短信小助手](https://cloud.tencent.com/document/product/382/3773#.E6.8A.80.E6.9C.AF.E4.BA.A4.E6.B5.81)。
    # req.SenderId = ""

    resp = client.SendSms(req)

    # 输出json格式的字符串回包
    print(resp.to_json_string(indent=2))
except TencentCloudSDKException as err:
    print(err)
三、封装发送短信
第三方的发送短信,封装成包。不仅仅在django中使用,后期在其它任意的项目中都可以使用。
创建一个包,放置在libs包中
send_tx_sms
    __init__.py
    settings.py
    sms.py
init.py
from .sms import get_code, send_sms_by_mobile
settings.py
SECRET_ID = ''
SECRET_KEY = ''
SMS_SDK_APP_ID = '1400832701'
SIGN_NAME = '想养一只狗狗公众号'
TEMPLATE_ID = '1842991'
sms.py
from tencentcloud.common import credential
from tencentcloud.common.exception.tencent_cloud_sdk_exception import TencentCloudSDKException
from tencentcloud.sms.v20210111 import sms_client, models
from tencentcloud.common.profile.client_profile import ClientProfile
from tencentcloud.common.profile.http_profile import HttpProfile
from . import settings
import random
def get_code(num=4):
# 生成验证码
code = ''
for i in range(num):
res = random.randint(0, 9)
code += str(res) # 强类型,字符串不能加数字
return code
def send_sms_by_mobile(mobile, code):
# 发送短信的方法
try:
# 实例化一个认证对象,入参需要传入腾讯云账户密钥对secretId,secretKey。
cred = credential.Credential(settings.SECRET_ID, settings.SECRET_KEY)
httpProfile = HttpProfile()
httpProfile.reqMethod = "POST"
httpProfile.reqTimeout = 30
httpProfile.endpoint = "sms.tencentcloudapi.com"
# 实例化一个客户端配置对象,可以指定超时时间等配置
clientProfile = ClientProfile()
clientProfile.signMethod = "TC3-HMAC-SHA256" # 指定签名算法
clientProfile.language = "en-US"
clientProfile.httpProfile = httpProfile
client = sms_client.SmsClient(cred, "ap-guangzhou", clientProfile)
req = models.SendSmsRequest()
# 基本类型的设置:
req.SmsSdkAppId = settings.SMS_SDK_APP_ID
req.SignName = settings.SIGN_NAME
req.TemplateId = settings.TEMPLATE_ID
# 模板参数:
req.TemplateParamSet = [code, '5']
# 手机号
req.PhoneNumberSet = ["+86" + mobile]
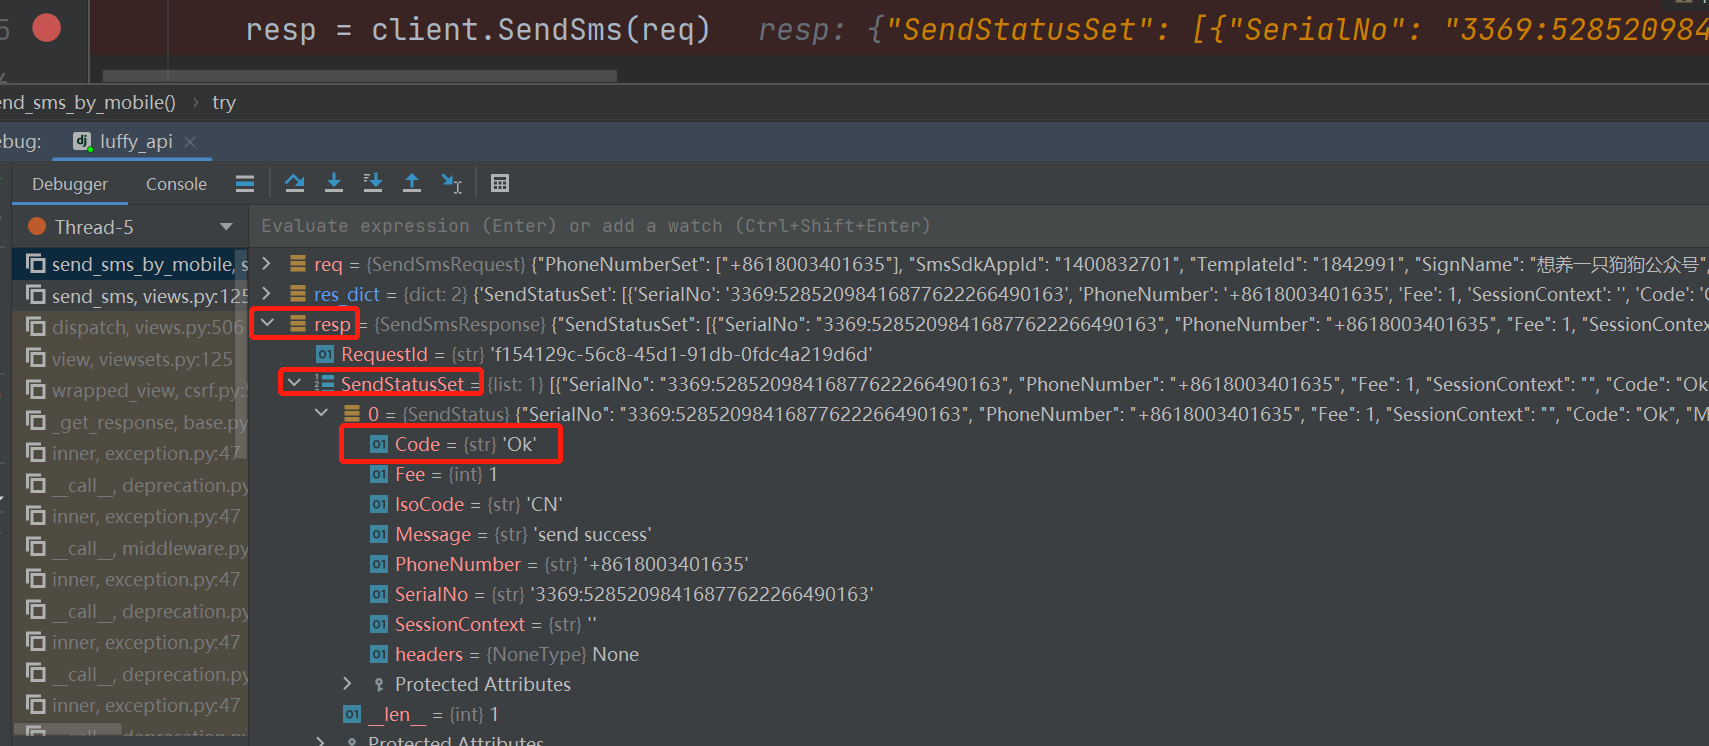
resp = client.SendSms(req)
# 输出json格式的字符串回包
res_dict = resp._serialize(allow_none=True)
if res_dict['SendStatusSet'][0]['Code'] == "Ok":
return True
else:
return False
except TencentCloudSDKException as err:
print(err) # 记录日志
return False
四、短信验证码接口
	@action(methods=['GET'], detail=False)
    # 发送短信接口
    def send_sms(self, request):
        # 前端需要把要发送的手机号传入 在地址栏中
        mobile = request.query_params.get('mobile', None)
        code = get_code()  # 把code存起来,放到缓存中
        cache.set('send_sms_code_%s' % mobile, code)
        # 想要从缓存中取
        # cache.get('send_sms_code_%s' % mobile)
        if mobile and send_sms_by_mobile(mobile, code):
            return APIResponse(msg='发送成功')
        raise APIException('发送短信出错')
拓展:咱们的短信验证码不安全
-1 频率:限制ip,限制手机号
	-代理池解决
-2  携带一个特定加密串(两端token串)--->post请求
	-data:base64编码的串.base64编码串
    -{phone:11111,ctime:323453422}.签名
    	-判断超时
        -验证签名
五、异步发送短信
# 原来的发送短信,是同步
	-前端输入手机号--->点击发送短信--->前端发送ajax请求---->到咱们后端接口--->取出手机号---->调用腾讯发送短信--->腾讯去发短信--->发完后---->回复给我们后端发送成功--->我们后端收到发送成功--->给我们前端返回发送成功

# 把腾讯发送短信的过程,变成异步
-前端输入手机号--->点击发送短信--->前端发送ajax请求---->到咱们后端接口--->取出手机号---->开启线程,去调用腾讯短信发送(异步)--->我们后端继续往后走---->直接返回给前端,告诉前端短信已发送
-另一条发短信线程线程会去发送短信,至于是否成功,我们不管了
视图类
    @action(methods=['GET'], detail=False)
    def send_sms(self, request, *args, **kwargs):
        mobile = request.query_params.get('mobile', None)
        code = get_code()  # 把code存起来,放到缓存中,目前在内存,后期换别的
        cache.set('send_sms_code_%s' % mobile, code)
        if mobile:
            # 开启一个线程,执行发送短信
            t = Thread(target=send_sms_by_mobile, args=[mobile, code])
            t.start()
            return APIResponse(msg='短信已发送')
        raise APIException('手机号没有携带')
序列化类加入万能验证码
    def _get_user(self, attrs):
        # attrs 中有手机号和验证码
        mobile = attrs.get('mobile')
        code = attrs.get('code')
        # 验证验证码是否正确
        old_code = cache.get('send_sms_code_%s' % mobile)
        # 如果是 debug模式,有个万能验证码,这样就不用真正发送短信了
        if code == old_code or (settings.DEBUG and code == '8888'):
            # 验证码正确,查user
            user = User.objects.filter(mobile=mobile).first()
            if user:
                return user
            else:
                raise APIException('手机号没注册')
        else:
            raise APIException('验证码错误')
六、短信登录接口
视图类
    def get_serializer_class(self):
        print(self)  # self是视图类对象
        if self.action == 'sms_login':
            return LoginUserSMSSerializer
        # return super().get_serializer_class()
        return self.serializer_class

    @action(methods=['POST'], detail=False)
    # 手机号短信登录接口
    def sms_login(self, request, *args, **kwargs):
        # 前端传入的数据是 {'mobile':180, 'code':8888}
        # 验证用户存在、签发token的逻辑都写在序列化类中,但要重新写一个序列化类,不能跟多方式登录使用同一个序列化类
        # 想要根据路由的不同使用不同的序列化类,就需要重写get_serializer_class方法
        return self._common_login(request, *args, **kwargs)

    def _common_login(self, request, *args, **kwargs):
        # 多方式登录和手机验证码登录都有相同的代码,就可以抽出来,写成一个内部使用的方法,不同方式直接调用即可
        ser = self.get_serializer(data=request.data)
        ser.is_valid(raise_exception=True)
        username = ser.context.get('username')
        icon = ser.context.get('icon')
        token = ser.context.get('token')
        return APIResponse(username=username, token=token, icon=icon)
序列化类
from rest_framework.exceptions import ValidationError, APIException
from rest_framework import serializers
from rest_framework_jwt.settings import api_settings
from django.conf import settings
from .models import *
from django.db.models import Q
from django.core.cache import cache

jwt_payload_handler = api_settings.JWT_PAYLOAD_HANDLER
jwt_encode_handler = api_settings.JWT_ENCODE_HANDLER
公共序列化
class CommonLoginSerializer():
    def _get_user(self, attrs):
        raise APIException('必须重写该方法')

    def _get_token(self, user):
        # jwt签发token
        payload = jwt_payload_handler(user)
        token = jwt_encode_handler(payload)
        return token

    def validate(self, attrs):
        # 验证用户名密码逻辑---->签发token逻辑
        # 查询用户
        user = self._get_user(attrs)
        # 签发token
        token = self._get_token(user)

        # 把用户,token放在,序列化类的context中【上下文】
        # self.username = user.username    # 这样写容易污染ser的数据
        self.context['username'] = user.username
        # user.icon是个文件对象,直接获取user.icon.url,而传给前端的需要写全地址
        self.context['icon'] = settings.BACKEND_URL + user.icon.url
        self.context['token'] = token
        return attrs
多方式登录的序列化
class LoginUserSerializer(CommonLoginSerializer, serializers.ModelSerializer):
    # CommonLoginSerializer一定要放在前面,因为ModelSerializer继承的Serializer中有validate方法,它直接return attrs,自己写的公共序列化不放到前面,就不会经过自己写的全局钩子校验

    # 字段自己的规则,会走唯一性校验--->就过不了---->必须要重写该字段
    username = serializers.CharField(max_length=32, required=True)

    class Meta:
        model = User
        fields = ['username', 'password']  # 只做数据校验--->只写校验的字段

    def _get_user(self, attrs):
        # username字段可能是 用户,手机号,邮箱--->正则匹配--->换一种方式 使用Q查询
        # 校验用户的方法
        username = attrs.get('username')
        password = attrs.get('password')

        # user=User.objects.filter(username=username || mobile=username || email=username)
        # 可以使用正则if验证,或者使用Q查询
        user = User.objects.filter(Q(username=username) | Q(mobile=username) | Q(email=username)).first()
        if user and user.check_password(password):
            # 先是用户名存在,再校验密码
            return user
        else:
            raise APIException('用户名或者密码错误')
手机号验证码登录的序列化
# class LoginUserSMSSerializer(CommonLoginSerializer, serializers.ModelSerializer):
# fields = ['mobile', 'code'] # 验证码不是表中的数据,要自己写,手机号映射过来的有唯一性校验,也要自己写,所以可以直接继承Serializer
class LoginUserSMSSerializer(CommonLoginSerializer, serializers.Serializer):
code = serializers.CharField(max_length=4)
mobile = serializers.CharField()
def _get_user(self, attrs):
# attrs中数据格式 {'mobile':13977927, 'code':8888}
# 取出数据
mobile = attrs.get('mobile')
code = attrs.get('code')
# 从缓存中取出保存的code
old_code = cache.get('send_sms_code_%s' % mobile)
# 验证验证码是否正确
if code == old_code:
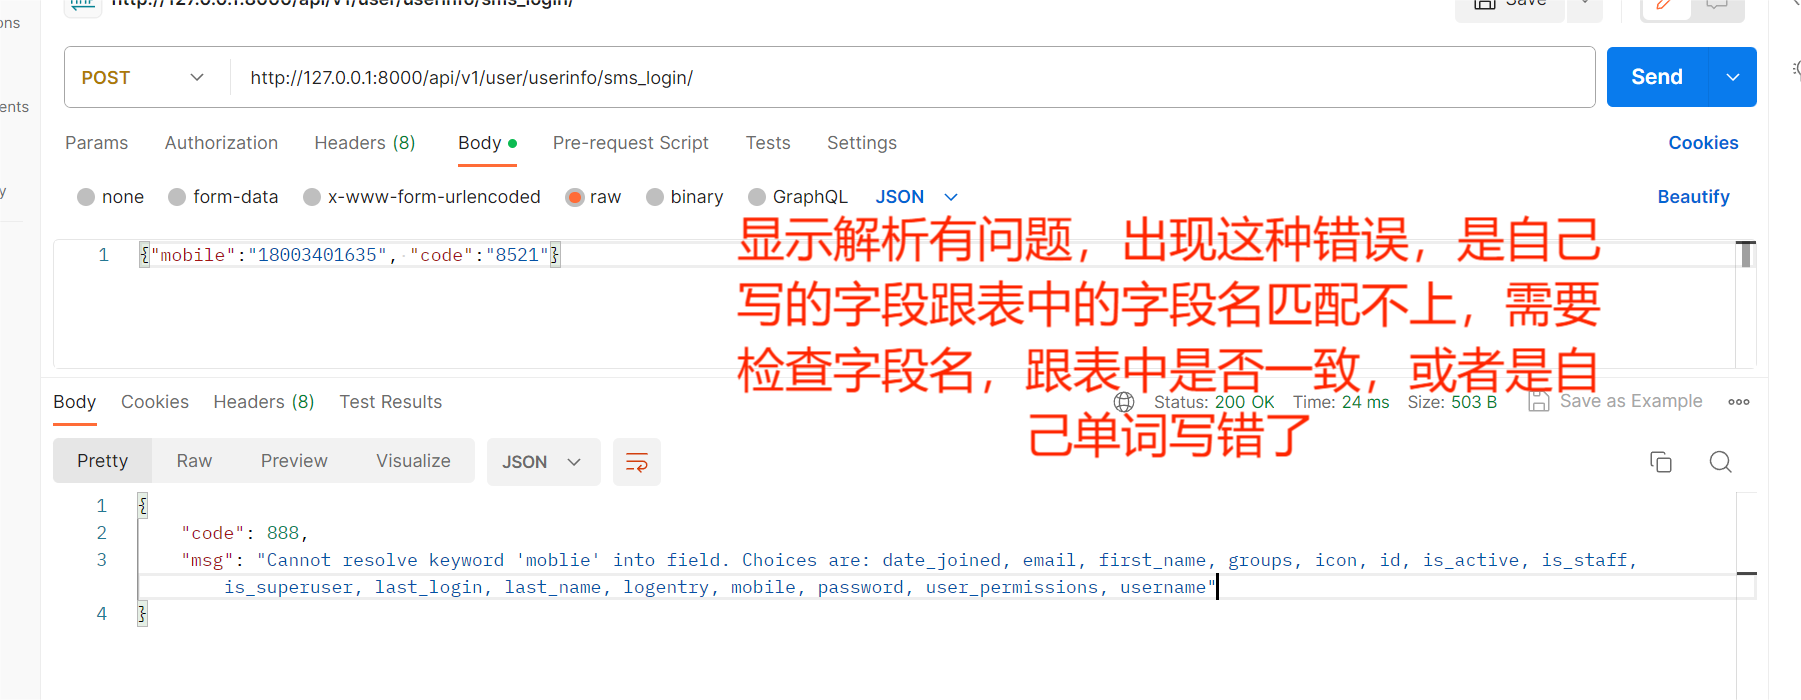
# 验证码正确,才能从库中查询用户
user = User.objects.filter(moblie=mobile).first()
if user:
return user
raise APIException('手机号没注册')
else:
raise APIException('验证码错误')
短信登录出错

 浙公网安备 33010602011771号