Vue高级 - vuex通信,Router路由,localstorage、sessionstorage和cookie
一 vuex使用
1.1 概念
- vuex :状态管理器---> 存数据(变量)的地方,所有组件都可以操作
在Vue中实现集中式状态(数据)管理的一个Vue插件,对vue应用中多个组件的共享状态进行集中式的管理(读/写),也是一种组件间通信的方式,且适用于任意组件间通信 - 多个组件需要共享数据时,就需要使用vuex 了
- vuex只在当前会话中生效,只要刷新页面或者关闭页面,就会失效,恢复到原来的数据
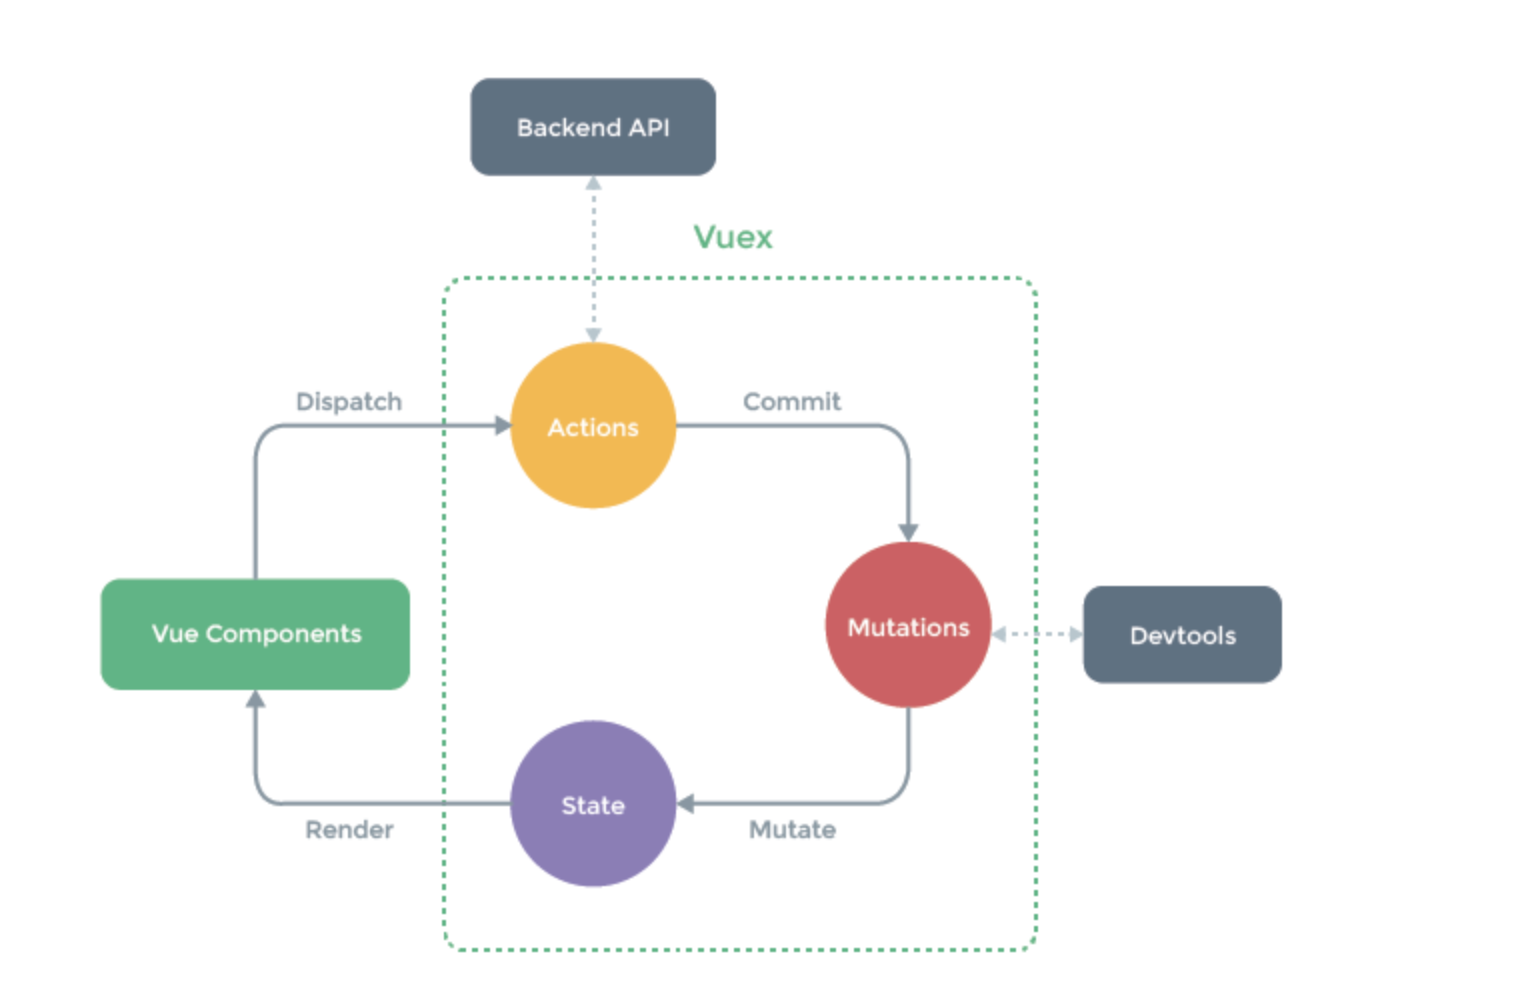
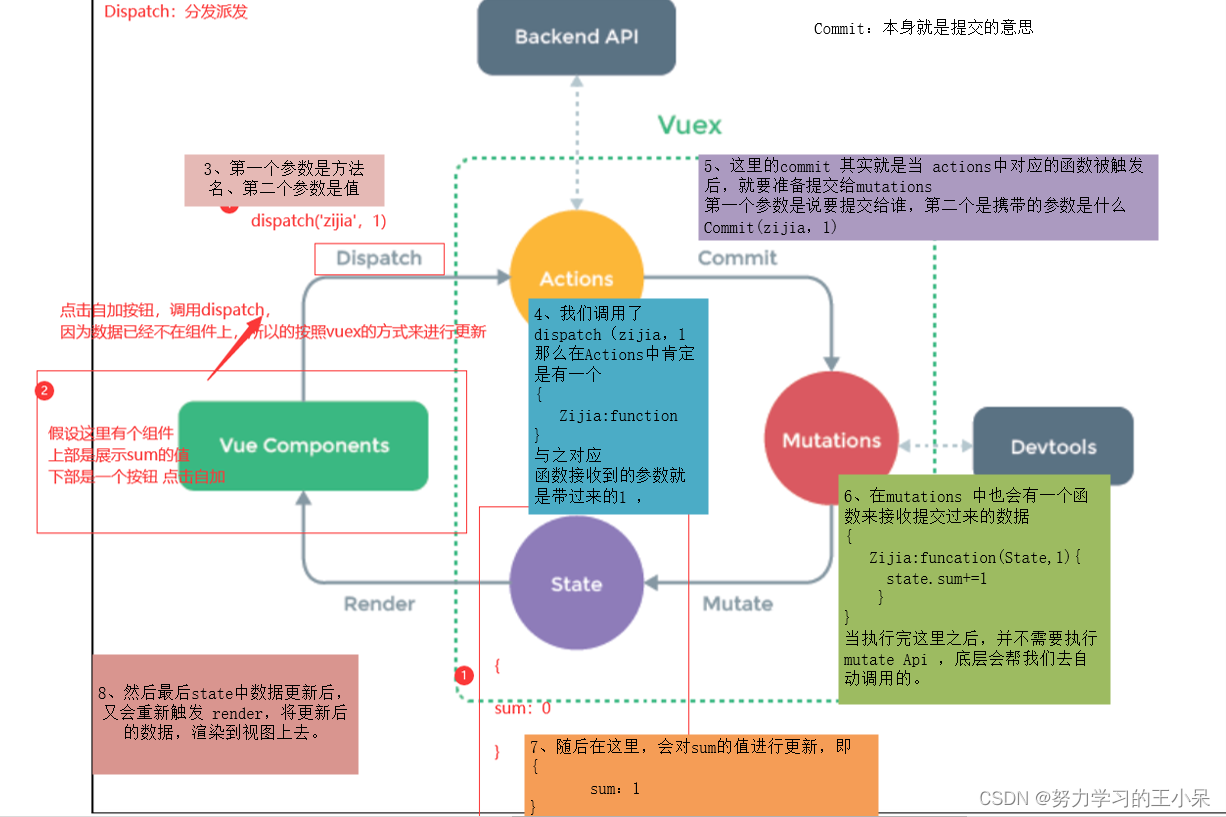
# 是可以越过步骤,直接去操作每一层。
# actions中可以去链接后端,让后端去完成操作数据库,完成数据的校验工作,或者像后端发起请求,让后端的数据库更改数据
# 安装vuex插件后自动创建store文件夹
组件间通信总结
1.父传子:自定义属性。子传父:自定义变量
2.ref属性,通过this.$refs可以获取到组件对象
3.vuex插件,集中管理数据
1.2 案例1:显示购物车商品数量
HomeView.vue
<template>
  <div class="home">
    <h1>1 vuex的使用 -基本使用(操作state的数据)</h1>
    <!--这个是在main.js中导入,并在Vue对象中注册,所以使用this.$store就能获取到Vuex.Store对象-->
    <!--其中的this可以不写-->
    购物车商品数量:{{ $store.state.num }}
    <br>
    <button @click="handleAdd">点我加购物增1</button>
  </div>
</template>

<script>
export default {
  name: 'HomeView',
  methods: {
    handleAdd() {
      // 正统方式
      // 1 通过dispatch触发actions
      this.$store.dispatch('add', 2)  //add 必须是action中得函数
    },
  }
}
</script>
src/store/index.js
import Vue from 'vue'
import Vuex from 'vuex'

Vue.use(Vuex)

export default new Vuex.Store({
    actions: {
        // 2 axtions中有一个add函数,触发mutations中函数执行
        // 默认传入一个参数,context上下文对象
        // count才是真正传入的参数2
        add(context, count) {
            // console.log(context)
            // console.log(count)

    		// 使用commit,触发mutations中得函数
            context.commit('mAdd', count)  // 会触发mutations中得mAdd的执行
        },
    },
    mutations: {
        // 3 mutations中有一个mAdd函数
        // 也默认传入一个参数,是state对象
        mAdd(state, count) {
            // console.log(state)
            // console.log(count)
            state.num = state.num + count
            // 这样一些,就修改了state中的num的值,这样页面中就显示新的值
        }
    },
    state: {
        num: 10,
    },
})


1.3 直接操作每一层
1.页面组件中直接使用state中定义的数据
HomeView.vue
<template>
  <div class="home">
    <h1>1 vuex的使用 -基本使用(操作state的数据)</h1>
    购物车商品数量:{{ $store.state.num }}
    <br>
    <button @click="handleAdd">点我加购物增1</button>
  </div>
</template>

<script>
export default {
  name: 'HomeView',
  methods: {
    handleAdd() {
      // 直接操作state中的数据
      this.$store.state.num += 1
    }
  },
}
</script>
src/store/index.js
import Vue from 'vue'
import Vuex from 'vuex'
Vue.use(Vuex)

export default new Vuex.Store({
    actions: {},
    mutations: {},
    state: {
        num: 10,
    },
})
2.页面组件通过操作mutations来操作state中的数据
HomeView.vue
<template>
  <div class="home">
    <h1>1 vuex的使用 -基本使用(操作state的数据)</h1>
    购物车商品数量:{{ $store.state.num }}
    <br>
    <button @click="handleAdd">点我加购物增1</button>
  </div>
</template>

<script>
export default {
  name: 'HomeView',
  methods: {
    handleAdd() {
      // 直接操作mutations
      this.$store.commit('mAdd', 3)
    }
  },
}
</script>
src/store/index.js
import Vue from 'vue'
import Vuex from 'vuex'

Vue.use(Vuex)

export default new Vuex.Store({
    actions: {},
    mutations: {
        // mutations中有一个mAdd函数
        // 也默认传入一个参数,是state对象
        mAdd(state, count) {
            // console.log(state)
            // console.log(count)
            state.num = state.num + count
            // 这样一些,就修改了state中的num的值,这样页面中就显示新的值
        },
    },
    state: {
        num: 10
    },
})

3.在actions中直接操作state的数据
HomeView.vue
<template>
  <div class="home">
    <h1>1 vuex的使用 -基本使用(操作state的数据)</h1>
    购物车商品数量:{{ $store.state.num }}
    <br>
    <button @click="handleAdd">点我加购物增1</button>
  </div>
</template>

<script>
export default {
  name: 'HomeView',
  methods: {
    handleAdd() {
      // 通过dispatch触发actions
      this.$store.dispatch('add', 2)  //add 必须是action中得函数
    }
  },
}
</script>
src/store/index.js
import Vue from 'vue'
import Vuex from 'vuex'

Vue.use(Vuex)

export default new Vuex.Store({
    actions: {
        // axtions中有一个add函数,触发mutations中函数执行
        // 可以直接修改state中的数据
        add(context, count) {
            // console.log(context)
            // console.log(count)

            // 上下文对象中也有state,可以直接操作state的数据
            // context.state.num = context.state.num + count
            context.state.num = 66
        },
    },
    mutations: {},
    state: {
        num: 10,
    },
})

1.4 案例2:组件间通信
HomeView.vue
<template>
  <div class="home">
    <h1>vuex的组件间通信:父传子</h1>
    <div>父传子,父组件中点击加号,子组件ShoppingCard中的列表就会加对应水果</div>
    <ul>
      <li>苹果
        <button @click="Add('苹果')">+</button>
      </li>
      <li>桃子
        <button @click="Add('桃子')">+</button>
      </li>
      <li>梨
        <button @click="Add('梨')">+</button>
      </li>
    </ul>
    <hr>
    <ShoppingCard></ShoppingCard>
    <hr>

  </div>
</template>

<script>
import ShoppingCard from "@/components/ShoppingCard.vue";

export default {
  name: 'HomeView',
  methods: {
    Add(name) {
      // 1 直接操作
      // this.$store.state.goods.push(name)

      //2 正常套路
      this.$store.dispatch('addShopping', name)
    }
  },
  components: {
    ShoppingCard
  }
}
</script>
src/store/index.js
import Vue from 'vue'
import Vuex from 'vuex'

Vue.use(Vuex)

export default new Vuex.Store({
    actions: {
        addShopping(context, name) {
            // 这里可以跟后端交互,发起ajax请求,检查name库存够不够
            // 假设库存不够,弹个不够的消息
            // alert('库存不够了')
            // return
            // 库存充足,继续执行,else

            context.commit('addShopping', name)
        }
    },
    mutations: {
        addShopping(state, name) {  // 与actions中的方法名可以重复
            state.goods.push(name)
        }
    },
    state: {
        goods: []
    },
})
ShoppingCard.vue
<template>
  <div>
    <h2>我是购物车小组件</h2>
    购物车商品:{{ $store.state.goods }}
  </div>
</template>

<script>
export default {
  name: "ShoppingCard"
}
</script>

<style scoped>

</style>
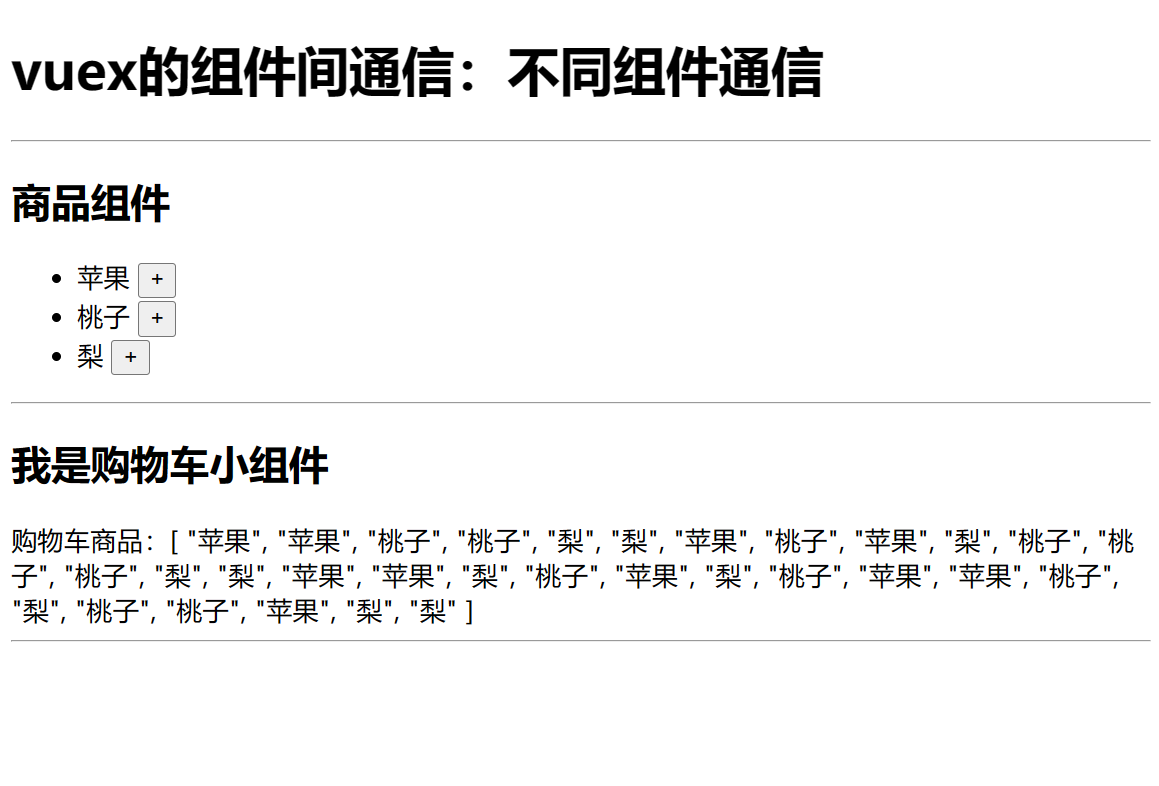
1.5 案例3:两个组件间通信
HomeView.vue
<template>
  <div class="home">
    <h1>vuex的组件间通信:不同组件通信</h1>
    <hr>
    <Good></Good>
    <hr>
    <ShoppingCard></ShoppingCard>
    <hr>

  </div>
</template>

<script>
import ShoppingCard from "@/components/ShoppingCard.vue";
import Good from "@/components/Good.vue";

export default {
  name: 'HomeView',
  components: {
    ShoppingCard,
    Good
  }
}
</script>
src/store/index.js
import Vue from 'vue'
import Vuex from 'vuex'

Vue.use(Vuex)

export default new Vuex.Store({
    actions: {
        addShopping(context, name) {
            context.commit('addShopping', name)
        }
    },
    mutations: {
        addShopping(state, name) {
            state.goods.push(name)
        }
    },
    state: {
        goods: []
    },
})
Good.vue
<template>
  <div>
    <h2>商品组件</h2>
    <ul>
      <li>苹果
        <button @click="Add('苹果')">+</button>
      </li>
      <li>桃子
        <button @click="Add('桃子')">+</button>
      </li>
      <li>梨
        <button @click="Add('梨')">+</button>
      </li>
    </ul>
  </div>
</template>

<script>
export default {
  name: "Good",
  methods: {
    Add(name) {
      // 1 直接操作
      // this.$store.state.goods.push(name)

      //2 正常套路
      this.$store.dispatch('addShopping', name)
    }
  }
}
</script>
ShoppingCard.vue
<template>
  <div>
    <h2>我是购物车小组件</h2>
    购物车商品:{{ $store.state.goods }}
  </div>
</template>

<script>
export default {
  name: "ShoppingCard"
}
</script>
二 Router使用
2.1 说明
-
官方提供的用来实现SPA 的vue 插件
-
vue是单页面应用,可以借助于Router实现页面组件的跳转
-
下载:
npm install vue-router --save -
引入
router的index.js
import Vue from 'vue'
import VueRouter from 'vue-router'

// 引入页面路由
import HomeView from '../views/HomeView.vue'

// 使用vue-router插件
Vue.use(VueRouter)

// 页面的一个个路由
const routes = [
  {
    path: '/',  // 访问路径
    name: 'home',  // 路由别名,可以通过别名找到该路由
    component: HomeView
  },
  {
    path: '/about',
    name: 'about',
    component: () => import(/* webpackChunkName: "about" */ '../views/AboutView.vue')
  }
]

const router = new VueRouter({
  mode: 'history',
  base: process.env.BASE_URL,
  routes
})


// 默认导出
export default router
main.js中注册路由
import router from './router'

new Vue({
  router,
})
2.1.1 简单使用
# 1 简单使用
	-浏览器中实现页面跳转(咱们之前学过了)
    -写个页面组件
    -在router--->index.js--->routes数组中加入一个路由即可

# 2 组件中实现页面跳转
	-两种方式
    	-方式一:使用 router-link 标签,to 地址
         	<router-link to="/about"></router-link>
		-方式二:js控制
        	this.$router.push('/about')

# 3 to值的不同类型
	-可以是个字符串,写路径地址后缀
    	<router-link to="/about"></router-link>
    -使用属性指令
        <router-link :to="url"></router-link>
        export default {
          data(){
            return {
              url: '/about'
            }}}
    -可以使用对象,属性指令才能写js变量,就可以使用对象了
    	<router-link :to="{name:'about'}"></router-link>
2.1.2 路由跳转时,使用对象
-1 通过对象跳转路由,name形式:
	<router-link :to="{name:'about'}"></router-link>

-2 通过对象跳转路由,path形式:
	<router-link :to="{path:'/about'}"></router-link>

-3 对象中可以有query属性,是个对象类型,会把里面的key-value拼到路径后面
	<router-link :to="{path: '/about', query: {id: 1, name: 'kevin'}}"></router-link>
	# http://localhost:8080/about?id=1&name=kevin

-4 在另一个页面中取出地址栏中数据:
	console.log(this.$route.query)

-5 这种传递方式和 3  一样
	<router-link to="/about?name=lqz&age=19">

-6 注意区分:
    this.$route:当前路由对象,当前路径地址,别名,携带的query参数,传递数据...
    this.$router:(index.js中new出来的VueRouter对象)整个路由对象,主要做跳转、后退使用

-7 路径中分割出 参数
    -配置:
        {
            path: '/detail/:pk',  # 变量pk,一定要加冒号
            name: 'detail',
            component: DetailView
        },
    -在路由中取:
    	this.$route.params.pk

-8 路由跳转时,使用 7 的样子
    -this.$router.push({name: 'detail', params: {pk: 999}})
    -<router-link :to="{name:'detail',params:{pk:88}}">

2.1.3 this.router 的一些方法
this.$router.push(path): 相当于点击路由链接(可以返回到当前路由界面)
this.$router.replace(path): 用新路由替换当前路由(不可以返回到当前路由界面)
this.$router.back(): 请求(返回)上一个记录路由
this.$router.go(-1): 请求(返回)上一个记录路由
this.$router.go(1): 请求下一个记录路由
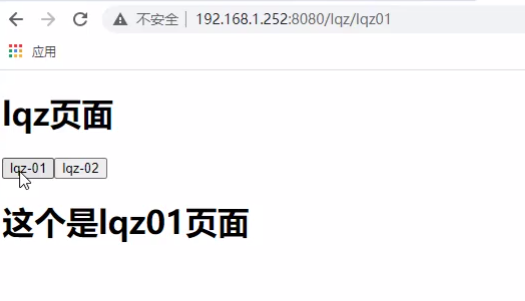
2.2 多级路由
# 使用步骤:
	- 1 新建一个页面组件(LqzView),配置路由(在router的index.js中)
    	  {
            path: '/lqz',
            name: 'lqz',
            component: LqzView,
        },
    -2 在页面中,想再显示页面组件,实现点击切换的效果
    	   <h1>lqz页面</h1>
            <router-link to="lqz01">  // 只写后缀就行,不要加前面的路径,也不要加/
              <button>lqz-01</button>
            </router-link>
            <router-link to="lqz02">
              <button>lqz-02</button>
            </router-link>

            <router-view>
            # 以后这里变换页面组件,多级路由
            </router-view>
    -3 新建两个页面组件,Lqz01.vue,Lqz02.vue,配置路由children
        {
            path: '/lqz',
            name: 'lqz',
            component: LqzView,
            children: [ //通过children配置子级路由
                {
                    path: 'lqz01',  //此处一定不要写:/lqz01
                    component: Lqz01
                },
                {
                    path: 'lqz02',//此处一定不要写:/lqz02
                    component: Lqz02
                }
            ]
        },
2.3 路由守卫
# 前置路由守卫,再进入路由之前做判断
# 写在router-index.js中,以后访问任意一个路由,都会执行这个代码
router.beforeEach((to, from, next) => {
    # to是前往的路由对象
    # from是来的路由的对象,可以打印一下
    console.log('前置路由守卫', to, from)
    // 要是访问lqz01,都不能跳转
    // 如果没有登录,不能访问
    if (to.path == '/lqz/lqz01') {
        alert('你没有权限')
    } else {
        next() # 继续访问
    }
2.4 路由的两种工作模式
路由器的两种工作模式
1 对于一个url来说,什么是hash值 —— ?及其后面的内容就是hash值。
2 hash值不会包含在 HTTP 请求中,即:hash值不会带给服务器。
3 hash模式:
    地址中永远带着#号,不美观 。
    若以后将地址通过第三方手机app分享,若app校验严格,则地址会被标记为不合法。
    兼容性较好。
4 history模式:
    地址干净,美观 。
    兼容性和hash模式相比略差。
    应用部署上线时需要后端人员支持,解决刷新页面服务端404的问题
router的index.js中
const router = new VueRouter({
  // mode修改路由的模式
  mode: 'history',
  // mode: 'hash',
  base: process.env.BASE_URL,
  routes
})
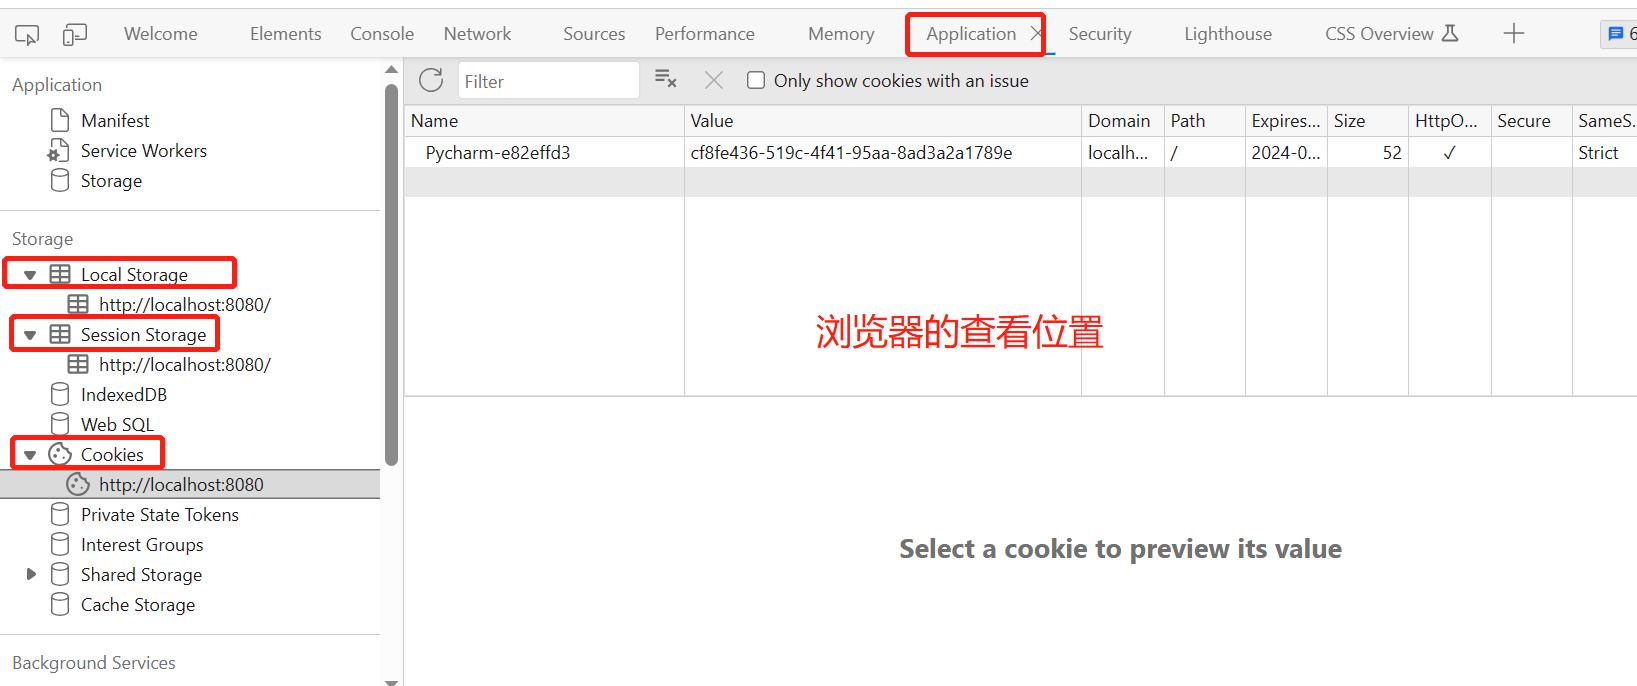
三 localstorage和sessionstorage,和cookie
# 前端存储数据
	- 登录成功,有token,存本地
    - 不登陆加购物车

# 前端可以存数据的位置:
	localstorage:永久存储,除非你删除,关闭浏览器,再打开还会在
    sessionstorage:只在当前会话生效,关闭浏览器,就没了
    cookie:有过期时间,到了过期时间,自动删除

# 操作这三个位置
3.1 操作localstorage
<template>
  <div class="home">
    <h1>操作localstorage,永久存储</h1>
    <button @click="addLocalstorage">增加</button>
    <button @click="getLocalstorage">查</button>
    <button @click="deleteLocalstorage">删除</button>

  </div>
</template>

<script>

export default {
  name: 'HomeView',
  methods: {
    addLocalstorage() {
      var userinfo = {name: 'lqz', age: 19}
      localStorage.setItem('userinfo', JSON.stringify(userinfo))  // 需要转成字符串形式才能写入

    },
    getLocalstorage() {
      var userinfo = localStorage.getItem('userinfo')
      console.log(JSON.parse(userinfo).name)

    },
    deleteLocalstorage() {
      localStorage.clear()
      localStorage.removeItem('userinfo')

    },
  }
}
</script>
3.2 操作sessionstorage
<template>
  <div class="home">
    <h1>操作sessiostorage,当前会话,关闭浏览器</h1>
    <button @click="addSessiostorage">增加</button>
    <button @click="getSessiostorage">查</button>
    <button @click="deleteSessiostorage">删除</button>

  </div>
</template>

<script>

export default {
  name: 'HomeView',
  methods: {
    addSessiostorage() {
      var userinfo = {name: '彭于晏', age: 19}
      sessionStorage.setItem('userinfo', JSON.stringify(userinfo))

    },
    getSessiostorage() {
      var userinfo = sessionStorage.getItem('userinfo')
      console.log(JSON.parse(userinfo).name)

    },
    deleteSessiostorage() {
      sessionStorage.clear()
      sessionStorage.removeItem('userinfo')

    },
  }
}
</script>
3.3 操作cookie
使用:https://blog.csdn.net/z591102/article/details/117961384
<template>
  <div class="home">
    <h1>操作cookie,有过期时间</h1>
    <button @click="addCookie">增加</button>
    <button @click="getCookie">查</button>
    <button @click="deleteCookie">删除</button>

  </div>
</template>

<script>

export default {
  name: 'HomeView',
  methods: {
    addCookie() {
      // 需要借助于第三方  vue-cookies
      // cnpm install -S vue-cookies
      this.$cookies.set('name', '刘亦菲', '300s')

    },
    getCookie() {
      console.log(this.$cookies.get('name'))
    },
    deleteCookie() {
      this.$cookies.remove('name')
    },
  }
}
</script>
