element MessageBox弹窗的使用
elemenUI的messageBox弹窗 提供了 $alert、$confirm、$prompt、$msgbox
1.$alert、$confirm、$prompt 这几个用法比较相似 可参考 官网
$alert(message, title, options) 或 $alert(message, options)
$confirm(message, title, options) 或 $confirm(message, options)
$prompt(message, title, options) 或 $prompt(message, options)
这三种主要通过官网的api进行配置option,
2.$msgbox 是 $alert、$confirm、$prompt的低配版
原因是: $alert、$confirm、$prompt是基于$msgbox进行封装的
$msgbox(option)只接受一个参数对象,相比于封装好的,页面的可配置样式更灵活
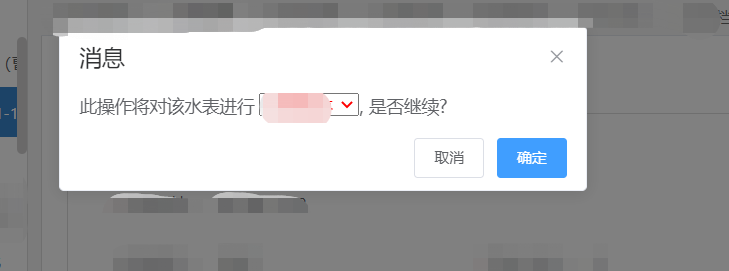
出现这种页面 只有$msgbox可以实现
const h = this.$createElement; let select='欠费报停' this.$msgbox({ title: '消息', message: h('div', {attrs:{id:'msgbox',ref:'msgbox'}}, [ h('span', null, '此操作将对该水表进行 '), h('select', { style: 'color: red;width:80px',domProps:{value:select},placeholder:'请选择'}, [ h('option',{label:'欠费报停',attrs:{value:'欠费报停'}},'欠费报停'), h('option',{label:'用户报停', attrs:{value:'用户报停'}},'用户报停'), ]), h('span', null, ', 是否继续? '), ]), showCancelButton: true, confirmButtonText: '确定', cancelButtonText: '取消', beforeClose: (action, instance, done) => { if (action === 'confirm') { instance.confirmButtonLoading = true; instance.confirmButtonText = '执行中...'; setTimeout(() => { done(); setTimeout(() => { instance.confirmButtonLoading = false; }, 300); }, 3000); } else { done(); } } }).then((action, instance, done) => { this.$message({ message: "报停成功", type: "success", }); select='欠费报停' }).catch((action, instance, done)=>{ select='欠费报停' }) })
可编辑区域在js massage中使用$createElement 进行创建
$createElement是vue里面提供的一种js创建dom的一种方式
vue.$createElement(dom,optionObj,content)
接收三个参数 (要创建标签 ,标签内的属性样式,标签内容)
const h = this.$createElement; h('div', {attrs:{id:'msgbox',ref:'msgbox'}}, [ h('span', null, '此操作将对该水表进行 '), h('select', { style: 'color: red;width:80px',domProps:{value:select},placeholder:'请选择'}, [ h('option',{label:'欠费报停',attrs:{value:'欠费报停'}},'欠费报停'), h('option',{label:'用户报停', attrs:{value:'用户报停'}},'用户报停'), ]), h('span', null, ', 是否继续? '), ])
第一个参数,跟第三个参数 很好理解 主要是第二个参数的使用
使用过jq的同学应该很熟悉里面的写法,其实这个对象里面写的就是相应标签的属性样式
style attrs placeholder type 写原生标签样式时 自带的样式通常都是标签内直接写,自己设定的私有属性通过attrs来设定,domProps设定相应的显示内容
写element-ui结构
const h = this.$createElement; h('div', {attrs:{id:'msgbox',ref:'msgbox'}}, [ h('span', null, '此操作将对该水表进行 '), h('el-select', { style: 'color: red;width:100px',props:{value:select,label:'欠费报停'},on:{ change:(e)=>{ console.log(select,e) }, input:(e)=>{ console.log(e) } },placeholder:'请选择'}, [ h('el-option',{props:{value:'欠费报停',label:'欠费报停'}},'欠费报停'), h('el-option',{props:{value:'用户报停',label:'用户报停'}},'用户报停'), ]), h('span', null, ', 是否继续? '), ]),
通过$createElement ui框架通过 props进行设置 自定义属性


【推荐】国内首个AI IDE,深度理解中文开发场景,立即下载体验Trae
【推荐】编程新体验,更懂你的AI,立即体验豆包MarsCode编程助手
【推荐】抖音旗下AI助手豆包,你的智能百科全书,全免费不限次数
【推荐】轻量又高性能的 SSH 工具 IShell:AI 加持,快人一步
· 基于Microsoft.Extensions.AI核心库实现RAG应用
· Linux系列:如何用heaptrack跟踪.NET程序的非托管内存泄露
· 开发者必知的日志记录最佳实践
· SQL Server 2025 AI相关能力初探
· Linux系列:如何用 C#调用 C方法造成内存泄露
· 无需6万激活码!GitHub神秘组织3小时极速复刻Manus,手把手教你使用OpenManus搭建本
· Manus爆火,是硬核还是营销?
· 终于写完轮子一部分:tcp代理 了,记录一下
· 别再用vector<bool>了!Google高级工程师:这可能是STL最大的设计失误
· 单元测试从入门到精通