我的windows开发环境设定与日常使用指南
开发相关的软件包安装、设定
Visual Studio
VS别安装在C盘
工作中需要同时处理多个版本VS的库,VS2013/2015/2017都装了,VS2019也跃跃欲试,都放在C盘是放不下的;不装其中某个,又没法干活儿。
索性都装到其他盘好了。目前的工作机D盘没有什么空间,soft都是装在e:/soft,lib都装在e:/lib
VS2015 update3 安装时注意勾选通用Windows开发工具
VS2015 update3安装时,注意勾选"Windows和Web开发->通用Windows应用开发工具->Tools(1.4.1)和Windows 10 SDK(10.0.14393)"
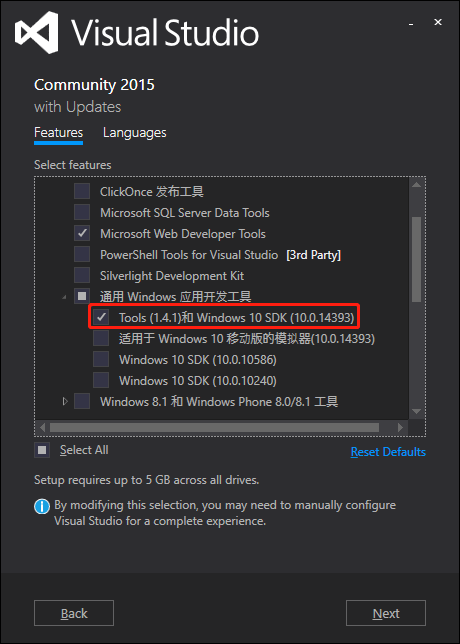
否则会出现一些使用异常,例如利用vcvarsall.bat召唤了vs2015的环境,然后用ninja编译但编译报错,翻看CMake的错误输出发现是rc.exe命令找不到。
mkdir build
cd build
cmake .. -GNinja
参考:rc.exe no longer found in VS 2015 Command Prompt
默认设定
除了visual studio,其他软件都安装到:统一设定为D:/soft
例如d:/soft/git
鼠标右键添加"在此处打开cmd"选项
创建xxx.reg文件,内容如下,保存后双击运行。
Windows Registry Editor Version 5.00

[HKEY_LOCAL_MACHINE\SOFTWARE\Classes\Directory\background\shell\cmd_here]

@="open cmd here"
"Icon"="cmd.exe"


[HKEY_LOCAL_MACHINE\SOFTWARE\Classes\Directory\background\shell\cmd_here\command]

@="\"C:\\Windows\\System32\\cmd.exe\""


[HKEY_LOCAL_MACHINE\SOFTWARE\Classes\Folder\shell\cmdPrompt]

@="open cmd here"


[HKEY_LOCAL_MACHINE\SOFTWARE\Classes\Folder\shell\cmdPrompt\command]

@="\"C:\\Windows\\System32\\cmd.exe\" \"cd %1\""


[HKEY_LOCAL_MACHINE\SOFTWARE\Classes\Directory\shell\cmd_here]

@="open cmd here"
"Icon"="cmd.exe"


[HKEY_LOCAL_MACHINE\SOFTWARE\Classes\Directory\shell\cmd_here\command]

@="\"C:\\Windows\\System32\\cmd.exe\""
git
Git-2.21.0-64-bit.exe
装好后会自带vim(不带gvim)。
添加D:\soft\git\cmd到PATH。
添加D:\soft\Git\usr\bin到PATH并且放在c/Windows/System32/OpenSSH/ssh之前。(否则VSCode远程连接容易掉线)
设定git默认参数:开git-bash,vim编辑~/.gitconfig,粘贴:
[alias]
    co = checkout
    ci = commit
    st = status
    br = branch
    hist = log --pretty=format:'%h %ad | %s%d [%an]' --graph --date=short
    type = cat-file -t
    dump = cat-file -p

[user]
        email = imzhuo@foxmail.com
        name = Zhuo Zhang
[core]
        autocrlf = true
gvim
gvim81.exe。不装YCM插件。
git clone https://github.com/zchrissirhcz/dotvim ~/.vim_runtime
sh ~/.vim_runtime/install_awesome_vimrc.sh
然后在git-bash或cmd中开vim,输入:PlugInstall来安装插件。
notepad++
用来临时存放文件的,重启电脑后也还在的。
npp.7.6.4.Installer.exe
VSCode-Insider
安装的是VSCode Insider版本,绿色图标的。Insider版本能更早用上新功能,例如remote development。
不管是VSCode还是VSCode-Insider,都记得安装时选中两个“添加到PATH”,后续使用会很方便:
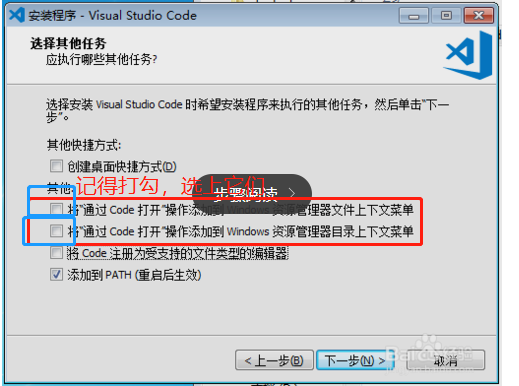
插件:
- remote development
- python
- c++
- cmake
- 图标(icon),找一个漂亮的
CMake
添加到PATH: D:\soft\cmake-3.14.3-win64-x64\bin
Ninja
ninja 1.9.0
添加到PATH
android ndk会用到ninja
TDM-GCC 64位
tdm64-gcc-5.1.0-2.exe
在git-bash中直接用gcc,想必是一件很爽的事。编译出的可执行文件是.exe格式,相当可以。
sublime text3
Sublime Text Build 3200 x64 Setup.exe
notepad++的备胎
Python环境:Miniconda3
添加到PATH: D:\soft\Miniconda3
添加到PATH:D:\soft\Miniconda3\Scripts
添加到PATH:D:\soft\Miniconda3\Library\bin
创建C:/Users/xx/pip/pip.ini,内容:
[global]
index-url = http://mirrors.aliyun.com/pypi/simple/

[install]
trusted-host=mirrors.aliyun.com
安装必要的Python包:
pip install numpy scipy matplotlib easydict cython nvgpu ipython
使用conda
配置conda使用tuna镜像:
conda config --add channels https://mirrors.tuna.tsinghua.edu.cn/anaconda/pkgs/free/
conda config --add channels https://mirrors.tuna.tsinghua.edu.cn/anaconda/pkgs/main/
conda config --set show_channel_urls yes
update@2019-7-5 16:48:08
conda的配置文件condarc里面最好是把"default"一行删掉,否则下载可能还是失败。
e.g.:
~/.condarc
channels:
  - https://mirrors.ustc.edu.cn/anaconda/pkgs/main/
  - https://mirrors.ustc.edu.cn/anaconda/pkgs/free/
show_channel_urls: true
新建python虚拟环境:
conda create -n py27 python=2.7
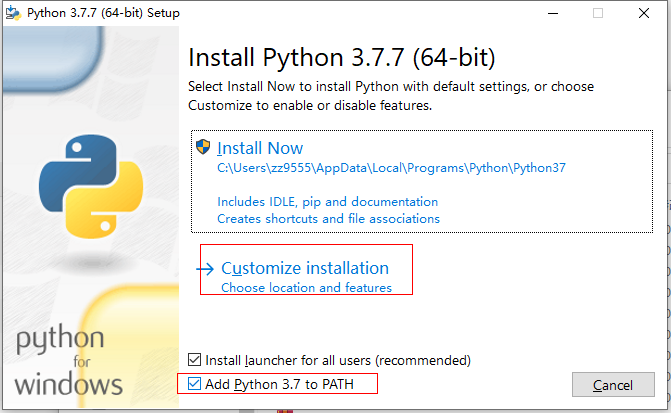
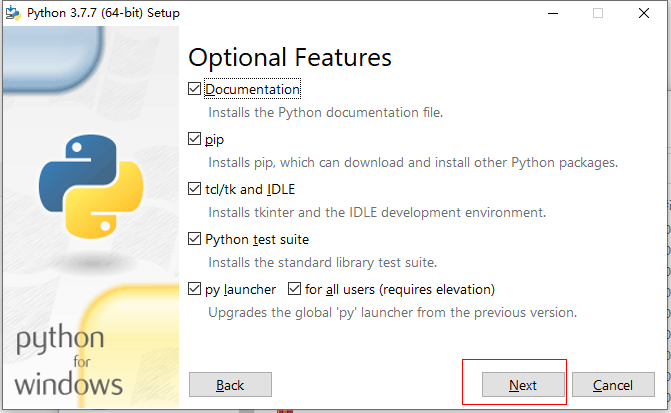
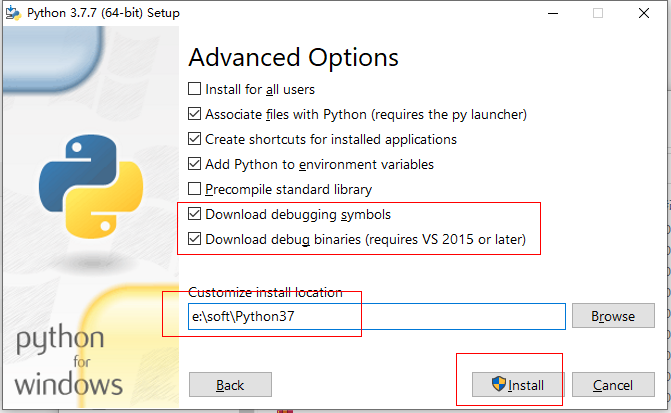
P.S. 如果是源码编译OpenCV,并且需要编译和调试到Python模块中,则需要Python Debug库。Miniconda/Anaconda目前提供的Python不带调试信息,并且官方也说了不一定能支持。
靠谱的办法是,安装原生Python,并且勾选里面的“安装调试信息”等。Python2建议不予考虑,Python3.7测试下来很容易。P.P.S现在的Python用pip装numpy已经非常简单了。
比较与合并工具WinMerge
WinMerge-2.16.2-x64-Setup.exe,开源。
安装时勾选“添加到PATH”
tortoisegit
TortoiseGit-2.8.0.0-64bit.msi
方便的查看文件夹的git状态
AndroidStudio
-
下载安装AS
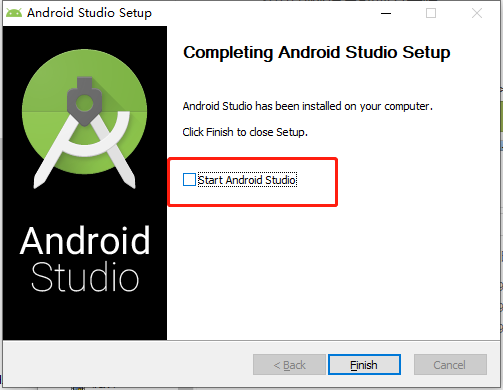
下载android studio 64位,zip或.exe版本均可。此处选择.exe版本,能方便生成快捷方式。注意安装结束后取消勾选打开,因为要修改掉.AndroiStudio目录的位置:
-
挪走C:/Users/xxx/下的.AndroidStudio和.gradle目录
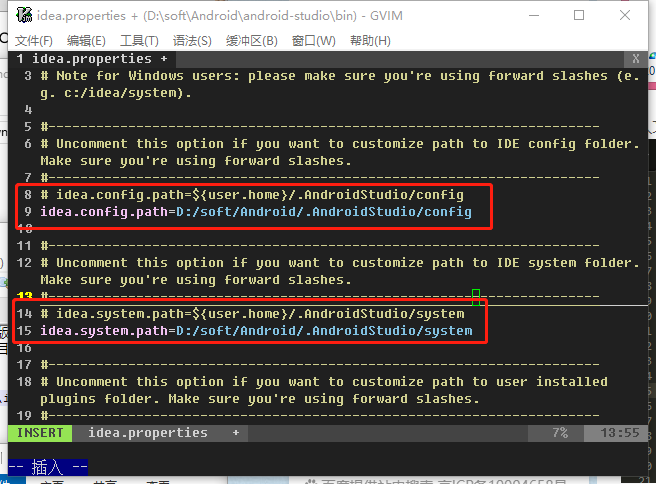
挪走.AndroidStudio目录:经过尝试,只能挪走这个目录下的system和config两个子目录,好在这两个子目录确实是占空间比较大的。C盘仍然有C:/users/xxx/.AndroidStudio但是很小。方法:
打开D:\soft\Android\Android Studio\bin\idea.properties,修改idea.config.path和idea.system.path的取值,它们默认是放到C:/Users/xxx/.AndroidStudio目录下的,挪走以节省C盘空间:
#---------------------------------------------------------------------
# Uncomment this option if you want to customize path to IDE config folder. Make sure you're using forward slashes.
#---------------------------------------------------------------------
# idea.config.path=${user.home}/.AndroidStudio/config
idea.config.path=D:/soft/Android/.AndroidStudio/config

#---------------------------------------------------------------------
# Uncomment this option if you want to customize path to IDE system folder. Make sure you're using forward slashes.
#---------------------------------------------------------------------
# idea.system.path=${user.home}/.AndroidStudio/system
idea.system.path=D:/soft/Android/.AndroidStudio/system
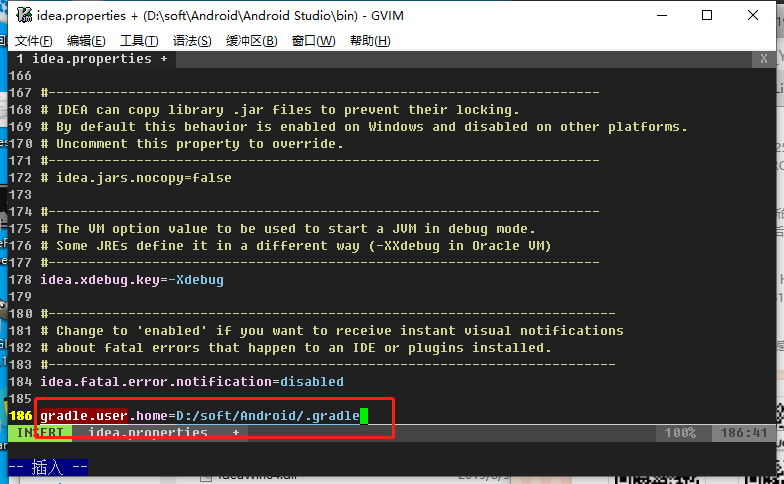
挪走.gradle目录:idea.properties文件最后,添加一行:
gradle.user.home=D:/soft/Android/.gradle
3.修改gradle默认下载地址为本地文件:
需要修改AS的模板文件,而不是在项目中一次又一次的修改(Android Studio3.4有效,Android Studio3.5无效。等官方修bug。)
编辑文件D:\soft\Android\AndroidStudio\plugins\android\lib\templates\gradle\wrapper\gradle\wrapper\gradle-wrapper.properties,
(mac下的位置:/Applications/Android Studio.app/Contents/plugins/android/lib/templates/gradle/wrapper/gradle/wrapper)
#distributionUrl=https\://services.gradle.org/distributions/gradle-4.8-bin.zip
distributionUrl=file\:///D:/soft/gradle/distributions/gradle-5.4.1-all.zip
本地文件路径中,把下载好的gradle的zip压缩包拷过去即可。我放到了D:/soft/gradle/distributions目录下:

怎样下载所有的gradle的zip包?先用爬虫爬取对应的url然后扔给迅雷,使用如下脚本获取url列表,一劳永逸:
#!/usr/bin/env python
#coding: utf-8

from __future__ import print_function

import requests
from html.parser import HTMLParser
import time
import os

class MyHtmlParser(HTMLParser):

    a_text = False
    goods = []

    def handle_starttag(self, tag, attr):
        if tag == 'a':
            self.a_text = True

    def handle_endtag(self, tag):
        if tag == 'a':
            self.a_text = False

    def handle_data(self, data):
        if self.a_text and data.endswith('-all.zip') and 'rc' not in data and 'milestone' not in data:
            version = data.split('-')[1]
            if (version > '3.0'):
                self.goods.append(data)

def get_gradle_distributions():
    url = 'https://services.gradle.org/distributions/'
    r = requests.get(url)

    parser = MyHtmlParser()
    parser.feed(r.text)
    parser.close()
    goods = parser.goods

    print(goods)
    return goods


if __name__ == '__main__':
    dists = get_gradle_distributions()
    #dists = ['gradle-5.5.1-all.zip']
    for dist in dists:
        url = 'https://services.gradle.org/distributions/' + dist
        #downloadFile(dist, url)
        #print('-- saved ' + dist)
        print(url)
    print('=== Done')
为什么gradle还是从google下载而不是加载我本地的zip压缩包:应该配置新一些的gradle版本,例如andriod studio3.5(192版)对应到gradle-5.4.1-all.zip
-
挪走C:/Users/xxx/.android目录
设定环境变量:

-
Android SDK:
第一次启动Android Studio,会问SDK装在哪里,和Android Studio放到一起比较方便,我的是D:/soft/Android/sdk:

由于先前在idea.properties中配置了gradle的目录,因此可以看到已经不是C盘了:
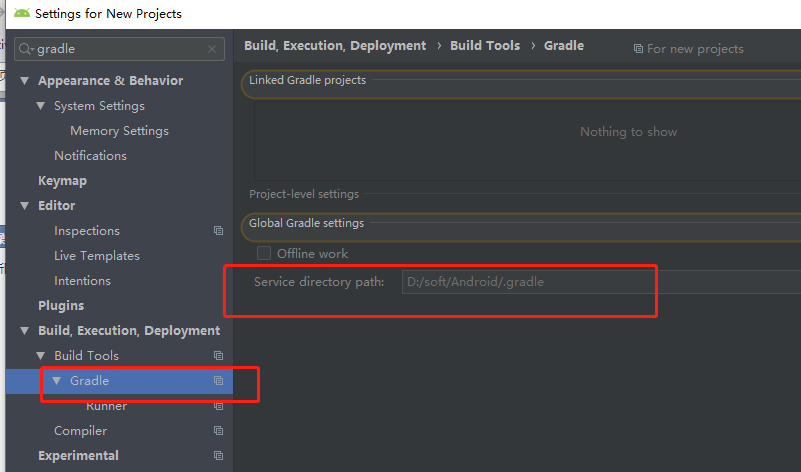
- NDK设定:
Android Studio中通过SDK Manager可以下载ndk,但是往往是最新稳定版,例如当前(2019年9月28日 17:52:48)是ndk-r20。老版本的ndk需要自行下载配置。
下载地址:https://developer.android.google.cn/ndk/downloads/older_releases.html
存放目录:e.g. D:/soft/Android/ndk-r17b
IntelliJ IDEA
IDEA用的社区版。默认的配置文件会被放在C:/Users/zz/.IdeaIC2019.3。创建工程后,很容易发生javac编译失败的情况,很可能是Windows Defender的问题,但关闭防火墙终归不是很安全的事。
解决方法:修改D:/soft/JetBrains/IDEA/bin/idea.properties,修改其中的config路径和system路径:
#---------------------------------------------------------------------
# Uncomment this option if you want to customize path to IDE config folder. Make sure you're using forward slashes.
#---------------------------------------------------------------------
# idea.config.path=${user.home}/.IdeaIC/config
idea.config.path=D:/soft/JetBrains/.IdeaIC/config

#---------------------------------------------------------------------
# Uncomment this option if you want to customize path to IDE system folder. Make sure you're using forward slashes.
#---------------------------------------------------------------------
# idea.system.path=${user.home}/.IdeaIC/system
idea.system.path=D:/soft/JetBrains/.IdeaIC/system
各种开发工具
vcpkg
git clone https://github.com/Microsoft/vcpkg.git
cd vcpkg
.\bootstrap-vcpkg.bat
.\vcpkg integrate install
然后看到提示:
Applied user-wide integration for this vcpkg root.

All MSBuild C++ projects can now #include any installed libraries.
Linking will be handled automatically.
Installing new libraries will make them instantly available.

CMake projects should use: "-DCMAKE_TOOLCHAIN_FILE=E:/soft/vcpkg/scripts/buildsy
stems/vcpkg.cmake"
各种库,开发相关的依赖包
统一设定
这些依赖包通常源码是C/C++源码,用cmake从源码编译即可。安装路径指定为D:/lib/<PackageName>/<Version>/<vc_version>。
OpenCV
C/C++的module,自行编译。
2.4.9的python模块无法自行编译,直接拷贝了预编译包里面的。
glfw
vs2013的要单独编译。
vs2015和vs2017的估计是通用的,vs2015可以直接用vs2017的静态库的。
Caffe
bvlc版本比较好编译。
weiliu89的还在移植中。
## 日常操作相关搭配、习惯
执行cmake
VSCode打开工程目录,写build/vs2013-x64.bat,或用fc_build.py生成;
cmd下执行cmake;
cmake-gui查看cmake缓存,必要时用cmake-gui修改缓存,一般是改cmakelists.txt
ssh连接
用git bash
find/grep/gcc命令
用git bash
各种日常工具,不做开发也需要的
迅雷
Thunder9.1.46.998.exe
果然还是充会员才有速度。
WinRAR 64位
winrar-x64-571scp.exe
微信
有道词典
QQ9.1.0.24712.exe
网易云音乐
cloudmusicsetup_2.5.2.197409.exe
lantern
走夜路需要一盏灯
百度网盘
BaiduNetDisk6.7.1.9.exe
PotPlayer
视频播放器
unlocker
Unlocker1.9.2.0.exe
删除占用文件的神器。
GIMP2
gimp-2.10.10-setup.exe
blender
blender-2.80-81b68f7279cd-win64.zip
建模软件。
Dism++
清理C盘空间的神器
Dism++10.1.1000.100_2d2bf466baca088c4b35248f5a7316f4e00cac0b
QQ拼音
QQPinyin_Setup_6.1.5306.400.exe
cuda
cuda默认装C盘,太占空间了。比如我习惯装最新3个版本的cuda,C盘放不下的。安装时选择“自定义”,指定安装路径。

远程操作相关
samba访问
需要在远程linux主机上配置samba服务,windows仅仅是作为client而存在。
windows上主要的问题是,如何清除访问凭证。方法:
进入cmd:
control userpasswords2
打开【用户管理】,点击【高级】-【管理密码】
找到对应的网络路径,点击编辑或删除相关凭据
关掉原来开的资源管理器(文件夹),重新开一个资源管理器,重新输入samba地址。此时,删掉的凭证就真的没有了。(可用来测试不同用户的访问权限等)
P.S. 如果发现突然无法samba访问某个目录,并且这个目录是需要账号密码登录的,而且linux服务器上也重新改过了密码、重启了smbd服务,windows上还是无法访问。则重启windows系统应该就可以进去了。
Office相关
Win10+Office2016应该是不错的体验了。激活方法:先关闭defender(否则用浏览器下载工具后会被删,即使用百度网盘客户端下载了,执行程序时仍然被删):https://jingyan.baidu.com/article/d169e186168094436611d8f7.html
然后下载工具,按照博客上的步骤来:https://blog.csdn.net/qq_41785863/article/details/83619401
PPT教程:https://www.bilibili.com/video/av54625494?from=search&seid=4951232231982346299
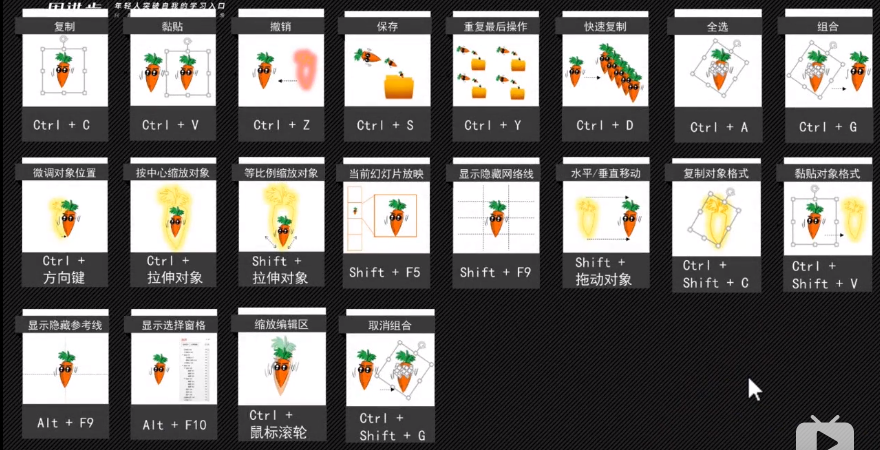
关闭迷你弹窗新闻
https://jingyan.baidu.com/article/9225544664c4dc851748f46a.html
清理C盘空间
- 网易云音乐
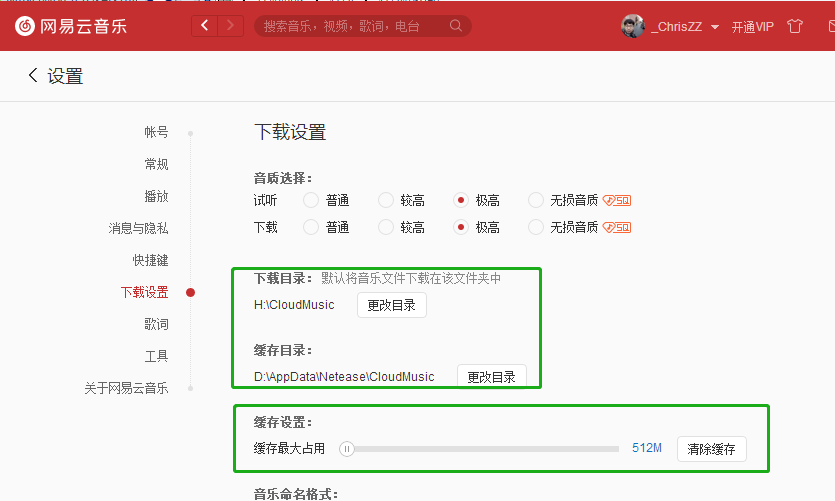
默认占用1G缓存。减少缓存容量,并且从C盘挪走:
- Google Chrome
作为我的默认浏览器,缓存内容也很多。把缓存目录从C盘挪到D盘。放到了D:\AppData\Google\Chrome\Cache。参考:
https://jingyan.baidu.com/article/4ae03de3d6c4c53eff9e6be2.html
- VSCode / VSCode-Insider
作为我的附注编辑器和跨平台调试IDE,VSCode的缓存居然达到4G。简直要把C盘吃掉了。果断挪到D盘去。放到了D:\AppData\Microsoft\Code - Insiders
https://blog.csdn.net/asty9000/article/details/90202510


 浙公网安备 33010602011771号