[python] 3 、基于串口通信的嵌入式设备上位机自动测试程序框架(简陋框架)
星期一, 20. 八月 2018 01:53上午 - beautifulzzzz

1、前言
做类似zigbee、ble mesh...无线网络节点性能测试的时候,手动操作然后看表象往往很难找出真正的原因,而且有些深层次问题隐藏在弱网环境中、或大量测试中,因在上位机上用脚本实现自动化挂机测试便显得尤为重要。
本文介绍一种用python写的基于串口通信的上位机自动测试程序框架(简陋框架)。

2、代码框架介绍
如下:整个代码包含两层app+bsp,其中:
- bsp层放硬件相关的代码(比如linux系统用python2.7写的串口驱动类);
- app层中包含两个应用程序
app_app_auto_test_0xda_0xdb_adapter和app_app_auto_test_off_line;
其中应用程序是基于bsp中的代码实现的,进入每个独立的应用程序文件夹,运行make all则可以运行~
➜  mesh_test_toos git:(master) ✗ tree
.
├── app
│   ├── app_app_auto_test_0xda_0xdb_adapter
│   │   ├── app_auto_test.py
│   │   ├── app_frame.py
│   │   ├── main.py
│   │   └── makefile
│   └── app_app_auto_test_off_line
│       ├── app_frame.py
│       ├── app_frame.pyc
│       ├── main.py
│       └── makefile
└── bsp
    ├── bsp_serial.py
    ├── bsp_serial.pyc
    ├── bsp_system.py
    └── bsp_system.pyc

4 directories, 12 files

3、bsp代码介绍
bsp_system.py: 该文件目前只放了一个获取当前时间戳的函数,精确到毫秒:
#!/usr/bin/env python
# coding=utf-8

import time


def get_time_stamp():
    ct = time.time()
    local_time = time.localtime(ct)
    data_head = time.strftime("%Y-%m-%d %H:%M:%S", local_time)
    data_secs = (ct - long(ct)) * 1000
    time_stamp = "[%s.%03d] " % (data_head, data_secs)
    return time_stamp

version = '0.1'
bsp_serial.py: 该文件在pyserial上封装了一个bsp_serial类,该类包含下面几个成员函数:
- 实例化函数:自动读取系统中所有串口,如果有多个则会让你选择一个,并进行打开,产生一个ser成员变量
- iswaiting函数:读取之前要先调用该函数,看看是否有数据
- read函数:读取一字节
- write函数:写一个数组的数据
- close函数:关闭函数
A demo for read:
ser1 = bsp_serial.bsp_serial(9600)
while 1<2:
	if ser1.iswaiting() > 0:
		x = ser1.read()
		print x
note: If you want to write datas when reading, you should use the thread (next will show you) !

4、app_app_auto_test_off_line demo介绍
该脚本为自动测试无线网络中的某一个节点的长挂机情况下是否有掉线情况:

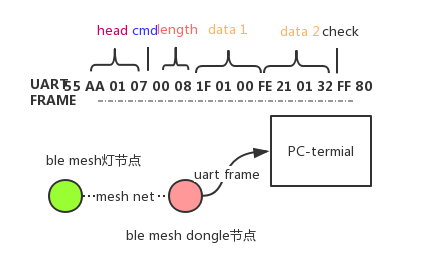
该网络中有一个mesh灯节点和一个和PC相连的dongle mesh节点,由于ble mesh的特性:
处于同一mesh网络中的节点中维护一个全部节点的在线/离线状态的表
因此如果想实现监听灯节点的在线/离线状态,只需要周期性地从dongle节点中读取状态表即可!这里每隔15S dongle节点将状态表以图中所示FRAME的格式传给PC:
- head为帧头,固定的
- cmd为帧命令,同步状态表时其值为0x07
- length为数据长度,这里为8
- data1、data2为数据,每4个字节表示一个节点的状态,第1字节表示节点ID,第二字节为0表示离线
- check为校验,为除该位其它位数据和模256
app_frame.py 中实现的则是用于解析数据包的类:
#!/usr/bin/env python
# coding=utf-8

import sys
import termios

class FRAME:
    HEAD1=0
    HEAD2=1
    VERSION=2
    CMD=3
    LEN1=4
    LEN2=5
    LEN_HEAD=6

    MAX_DATA_BUF_SIZE = 1000

    def __init__(self,fun_analysis):
	self.data_buf = ""
	self.fun_analysis = fun_analysis


    '''
    judge frame is ok
    '''
    def frame_ok(self,str):
	start_pos = 0
	fram_len = 0
	end_pos = 0
	str_len = len(str)
	while start_pos<str_len:
	    pos = start_pos
	    if((ord(str[pos]) == 0x55) and (pos!=str_len-1) and (ord(str[pos+1]) == 0xAA)):
	        break
	    start_pos = start_pos+1

	if(start_pos == str_len):#no find
	    return (-1,start_pos,end_pos)

	if(start_pos + FRAME.LEN_HEAD < str_len):
	    #print str_len,start_pos,FRAME.LEN2
	    fram_len = ord(str[start_pos+FRAME.LEN2])
	    end_pos = start_pos + FRAME.LEN_HEAD +fram_len
	    #print fram_len,end_pos
	    if(end_pos < str_len):
	        return (0,start_pos,end_pos)

	return (-2,start_pos,end_pos)


    '''
    insert data to frame fifo
    '''
    def insert_data(self,data):
	self.data_buf+=data
	if len(self.data_buf) > self.MAX_DATA_BUF_SIZE:
	    self.data_buf = ""


    '''
    analysis frame and perform
    '''
    def run(self):
	while 1<2:
	    (ret,start_pos,end_pos) = self.frame_ok(self.data_buf)
	    #print (ret,start_pos,end_pos)
	    if(ret == 0):
	        self.fun_analysis(self.data_buf[start_pos:end_pos+1])
	        self.data_buf = self.data_buf[end_pos:]
FRAME类的实例化函数需要注册一个命令解析函数fun_analysis;frame_ok用于判断数据包是否正确;insert_data用于将串口收到的数据插入到FIFO中,接收插入数据和处理分开;run函数用于不断从FIFO中取出数据并判断是否是一个有效数据包,并进而调用fun_analysis进行解析及后续处理。
note: run函数需要独占一个线程!

则在main.py中分别开两个线程 —— 串口接收线程和帧RUN线程:
import threading
import app_frame
import sys

sys.path.append('../../bsp')
import bsp_serial
import bsp_system


def init():
    #......(略)

def analysis_cmd(str):
    #......(略)

def ser_receive():
    global ser1
    global frame

    while 1<2:
	if ser1.iswaiting() > 0:
	    x = ser1.read()
	    frame.insert_data(x)


total_num = 0
fail_times = 0
ser1 = bsp_serial.bsp_serial(9600)
frame = app_frame.FRAME(analysis_cmd)


try:
    init()

    threads = []
    t1 = threading.Thread(target=ser_receive)
    t2 = threading.Thread(target=frame.run)

    threads.append(t1)
    threads.append(t2)

    for t in threads:
	t.setDaemon(True)
	t.start()

    t.join()

except Exception, e:
    ser1.close()             # close port
    print("safe exit"+str(e))
- 串口接收线程不断读取串口数据,并插入到帧对象的FIFO中
- 帧RUN函数不断解析FIFO中的数据,若检测到一个有效数据包,则调用analysis_cmd处理
最终效果如下:


5、app_app_auto_test_0xda_0xdb_adapter demo介绍
这个例子和上面的很像,用于测试一条GET STATE命令的成功率:
- 1)整个mesh网路的架构还是dongle+1个node灯;
- 2)PC通过串口发请求命令给dongle;
- 3)dongle收到cmd1立刻通过串口应答该命令,并向灯节点请求状态;
- 4)灯收到请求将状态返回给dongle,dongle再通过串口给PC;
可见:自动化测试整个流程不像DEMO1中的那么简单,这里有多次应答,因此我们必须注意设置timeout!
因此在app_auto_test.py实现如下:
#...略
class AUTO_PROCESS:
	START=0
	PROCESS1=1
	PROCESS2=2
	FINISH=3

	def __init__(self,ser):
		self.auto = AUTO_PROCESS.START
		self.ser = ser

	def analysis_cmd(self,str):
		#...略
		if cmd1 == 0x08:
		print "\033[1;34m>> \033[0m",
		self.auto = self.PROCESS2

	def run(self):
		#...略
		all_times = 0
		fail1_times = 0
		fail2_times = 0

		while 1<2:
			if self.auto == self.START:
				all_times = all_times + 1
				time.sleep(2)
				self.ser.write(cmd_get_status_all)
				self.auto = AUTO_PROCESS.PROCESS1
				time.sleep(2)
			elif self.auto == self.PROCESS1:
				fail1_times = fail1_times + 1
				print "fail %d" %self.auto
				self.auto = self.START
			elif self.auto == self.PROCESS2:
				fail2_times = fail2_times + 1
				print "fail %d" %self.auto
				self.auto = self.START
			else:
				print "success %d total:%d fail1:%d fail2:%d" %(self.auto,all_times,fail1_times,fail2_times)
				self.auto = self.START
FRAME的analysis_cmd函数用于解析串口返回的命令,来判断改变成员变量auto的值;run函数用于主动发送请求并等待返回,如果超时未收到返回,则会改变auto为失败,并打印结果。

链接
- 工程GITHUB地址:https://github.com/nbtool/auto_test_tool

@beautifulzzzz
智能硬件、物联网,热爱技术,关注产品
博客:http://blog.beautifulzzzz.com
园友交流群:414948975


【推荐】国内首个AI IDE,深度理解中文开发场景,立即下载体验Trae
【推荐】编程新体验,更懂你的AI,立即体验豆包MarsCode编程助手
【推荐】抖音旗下AI助手豆包,你的智能百科全书,全免费不限次数
【推荐】轻量又高性能的 SSH 工具 IShell:AI 加持,快人一步
· 开发者必知的日志记录最佳实践
· SQL Server 2025 AI相关能力初探
· Linux系列:如何用 C#调用 C方法造成内存泄露
· AI与.NET技术实操系列(二):开始使用ML.NET
· 记一次.NET内存居高不下排查解决与启示
· 阿里最新开源QwQ-32B,效果媲美deepseek-r1满血版,部署成本又又又降低了!
· 开源Multi-agent AI智能体框架aevatar.ai,欢迎大家贡献代码
· Manus重磅发布:全球首款通用AI代理技术深度解析与实战指南
· 被坑几百块钱后,我竟然真的恢复了删除的微信聊天记录!
· AI技术革命,工作效率10个最佳AI工具