Downloading C# ActiveX Components through CAB File(转)
Introduction
This article describes how we solve the problem of registering the C# component after downloading it through CAB file and invoke it through script. It also gives the focus on how to update the latest version of component on the client machine when the component is getting installed through INF file execution.
Background
In case of client side components created in C++, COM and ATL, the procedure is well defined and convenient as we just need to create the ActiveX component which exposes the Interface and create the CAB file including the INF file which describes whether to register it and where to copy it. This is not the case with ActiveX components created in C# as the Registerserver=Yes in INF file simply calls the regsvr32 on a given component, which is not useful to register the C# components.
Using the Code
Here the main focus is on how to create the CAB file and deploy it on the server. For that, create the C# application which exposes the COM interface. The following code demonstrates the simple C# component exposes the COM interface.
using System;
using System.Windows.Forms;
using System.Collections.Generic;
using System.Runtime.InteropServices;
namespace DownloadedApp
{
[Guid("D1E40FCE-E964-4dfd-B07E-BDE49D3519A1")] interface IDownload
{
void InvokeMethod();
}
///
/// COM exposed .NET class.
///
[ClassInterface(ClassInterfaceType.AutoDual)]
[Guid("A47C22B1-3CC3-45bc-801E-3FCC4FFD3E45")]
public class Download : IDownload
{
///
/// COM exposed .NET Method.
///
public void InvokeMethod()
{
MessageBox.Show("Clientside component invoked successfully!!", "Clientside component", MessageBoxButtons.OK,MessageBoxIcon.Information);
}
}
}
Now create the MSI Setup project in Visual Studio 2005 and give the output of this COM application to that project.

In the properties of Added output file in Setup project, make sure that the Register property is set to vsdrpCOM. Setting this property ensures the MSI file to register the ActiveX component using regasm tool in .NET. During installation, the installer itself takes care of registering this C# component to expose the COM interface.
Creating the CAB File
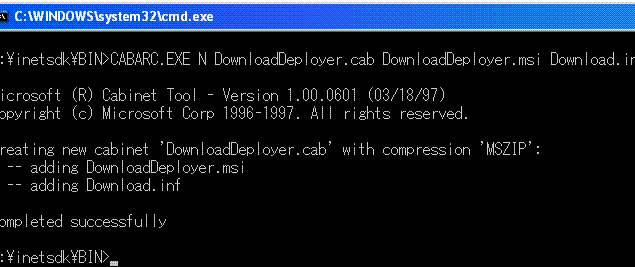
Using Microsoft InetSDK CABARC tool, we can create the CAB file including this DownloadDeployer.msi and INF file. This tool is freely available on Microsoft downloads website. For better execution and CAB download, it is good to sign the CAB file, we can get the code signing for our Component from the Microsoft site. It is beyond the scope of this article.

[version] signature="$CHICAGO$" AdvancedINF=2.0 [Setup Hooks] hook1=hook1 [hook1] run=msiexec.exe /i "%EXTRACT_DIR%\DownloadDeployer.msi" /qn
The script will contain code to invoke the ActiveX component. As the registration will already be done by the MSI installer, there will not be any problem while invoking the component through script. The script will be as mentioned below:
<html> <head> <script LANGUAGE="JavaScript1.2"> function Scrape( ) { var objDownload = new ActiveXObject( "DownloadedApp.Download" ); try { objDownload.InvokeMethod( ); } catch(exception) { alert( "Failed" ); } } </script> </head> <body> <table align="center"> <td> <a href="javascript:Scrape( )">Invoke Component</a> </td> </table> <p>Please Wait...Downloading components...</p> <object name="secondobj" style='display:none' id='TestActivex' classid='CLSID:A47C22B1-3CC3-45bc-801E-3FCC4FFD3E45' codebase='DownloadDeployer.cab#version=1,0,0,0'></object> </body> </html>
Here the version is the version of MSI file which we can modify by opening the *.vdproj file in Notepad, search for Product Version and change the version for any new updates. As given below, the view of *.vdproj file when opened in Notepad:
"Product" { "Name" = "8:Microsoft Visual Studio" "ProductName" = "8:DownloadDeployer" "ProductCode" = "8:{82CC6087-5430-4343-9F8B-207A889F92A1}" "PackageCode" = "8:{9D5DFC79-5E0F-4A6E-8796-10F08758FD2E}" "UpgradeCode" = "8:{21D008FF-E2BB-4C7B-A985-B20B9CB0C2D8}" "RestartWWWService" = "11:FALSE" "RemovePreviousVersions" = "11:TRUE" "DetectNewerInstalledVersion" = "11:TRUE" "InstallAllUsers" = "11:FALSE" "ProductVersion" = "8:1.0.0" "Manufacturer" = "8:Company Name" "ARPHELPTELEPHONE" = "8:" "ARPHELPLINK" = "8:" "Title" = "8:DownloadDeployer" "Subject" = "8:" "ARPCONTACT" = "8:Company Name" "Keywords" = "8:" "ARPCOMMENTS" = "8:" "ARPURLINFOABOUT" = "8:" "ARPPRODUCTICON" = "8:" "ARPIconIndex" = "3:0" "SearchPath" = "8:" "UseSystemSearchPath" = "11:TRUE" "TargetPlatform" = "3:0" "PreBuildEvent" = "8:" "PostBuildEvent" = "8:" "RunPostBuildEvent" = "3:0" }
In this file, the two important fields are ProductVersion and ProductCode. When we update the version of our component, make sure you change the Version of MSI file also. Which we can do by increasing ProductVersion manually by opening the *.vdproj file. Here one important thing to keep in mind is to change the ProductCode CLSID every time you increment the Version, but the UpgradeCode should be the same always to get the Component updated automatically on the client machine when we deploy the latest. Also make sure to change the RemovePreviousVersions toTRUE which will avoid creating multiple copies of the same component.
Points of Interest
The interesting point here is we have to increment the major version in object tag every time we increment the version of MSI file. It is because we have only 3 digit ProductVersion in the MSI file. One more thing is that the ProductCode should contain capital alphabets in its CLSID otherwise Visual Studio 2005 will give a compilation error while creating the MSI file.
原文:http://www.codeproject.com/KB/cs/C__Deployment.aspx
demo:https://files.cnblogs.com/zjoch/DownloadedApp_DemoProject.zip


 浙公网安备 33010602011771号