(五)Spring Cloud教程——Config(F版本)
Spring Cloud Config 实现配置中心,看这一篇就够了
1. 简介
Spring Cloud Config 是 Spring Cloud 家族中最早的配置中心,虽然后来又发布了 Consul 可以代替配置中心功能,但是 Config 依然适用于 Spring Cloud 项目,通过简单的配置即可实现功能。
对于一些简单的项目来说,我们一般都是直接把相关配置放在单独的配置文件中,以 properties 或者 yml 的格式出现,更省事的方式是直接放到 application.properties 或 application.yml 中。但是这样的方式有个明显的问题,那就是,当修改了配置之后,必须重启服务,否则配置无法生效。
在 Spring Boot 项目中集成 Spring Cloud Config,可以使用 github 作为配置存储。除了 git 外,还可以用数据库、svn、本地文件等作为存储。下面主要从以下三块来说一下 Config 的使用。
- 基础版的配置中心(不集成 Eureka);
- 结合 Eureka 版的配置中心;
- 实现配置的自动刷新;
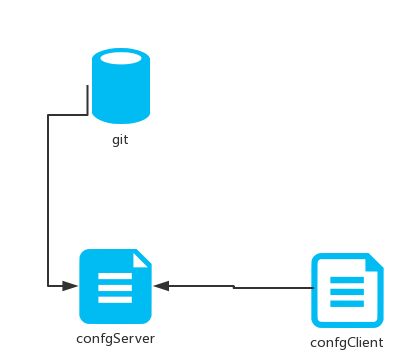
2. 基础版
在Spring Cloud Config 组件中,分两个角色,一是Config Server,二是Config Client。下面实现最简单的配置中心,就是启动一个服务作为服务方,之后各个需要获取配置的服务作为客户端来这个服务方获取配置。
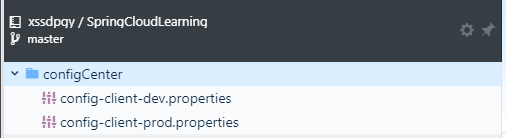
2.1 在 github 仓库中增加配置文件
2.2 构建Config Server
创建父工程,pom.xml文件:
<?xml version="1.0" encoding="UTF-8"?>
<project xmlns="http://maven.apache.org/POM/4.0.0"
         xmlns:xsi="http://www.w3.org/2001/XMLSchema-instance"
         xsi:schemaLocation="http://maven.apache.org/POM/4.0.0 http://maven.apache.org/xsd/maven-4.0.0.xsd">
    <modelVersion>4.0.0</modelVersion>

    <groupId>com.zang</groupId>
    <artifactId>sc-f-config</artifactId>
    <version>0.0.1-SNAPSHOT</version>
    <packaging>pom</packaging>

    <modules>
        <module>config-server</module>
        <module>config-client</module>
    </modules>

    <name>sc-f-config</name>
    <description>Demo project for Spring Boot</description>

    <parent>
        <groupId>org.springframework.boot</groupId>
        <artifactId>spring-boot-starter-parent</artifactId>
        <version>2.0.3.RELEASE</version>
        <relativePath/>
    </parent>


    <properties>
        <project.build.sourceEncoding>UTF-8</project.build.sourceEncoding>
        <project.reporting.outputEncoding>UTF-8</project.reporting.outputEncoding>
        <java.version>1.8</java.version>
        <spring-cloud.version>Finchley.RELEASE</spring-cloud.version>
    </properties>

    <dependencies>
        <dependency>
            <groupId>org.springframework.boot</groupId>
            <artifactId>spring-boot-starter-test</artifactId>
            <scope>test</scope>
        </dependency>
    </dependencies>

    <dependencyManagement>
        <dependencies>
            <dependency>
                <groupId>org.springframework.cloud</groupId>
                <artifactId>spring-cloud-dependencies</artifactId>
                <version>${spring-cloud.version}</version>
                <type>pom</type>
                <scope>import</scope>
            </dependency>
        </dependencies>
    </dependencyManagement>

    <build>
        <plugins>
            <plugin>
                <groupId>org.springframework.boot</groupId>
                <artifactId>spring-boot-maven-plugin</artifactId>
            </plugin>
        </plugins>
    </build>


</project>
创建一个spring-boot项目,取名为config-server,pom.xml如下:
<?xml version="1.0" encoding="UTF-8"?>
<project xmlns="http://maven.apache.org/POM/4.0.0" xmlns:xsi="http://www.w3.org/2001/XMLSchema-instance"
    xsi:schemaLocation="http://maven.apache.org/POM/4.0.0 http://maven.apache.org/xsd/maven-4.0.0.xsd">
    <modelVersion>4.0.0</modelVersion>

    <groupId>com.zang</groupId>
    <artifactId>config-server</artifactId>
    <version>0.0.1-SNAPSHOT</version>
    <packaging>jar</packaging>

    <name>config-server</name>
    <description>Demo project for Spring Boot</description>

    <parent>
        <groupId>com.zang</groupId>
        <artifactId>sc-f-config</artifactId>
        <version>0.0.1-SNAPSHOT</version>
    </parent>

    <dependencies>
        <dependency>
            <groupId>org.springframework.boot</groupId>
            <artifactId>spring-boot-starter-web</artifactId>
        </dependency>
        <dependency>
            <groupId>org.springframework.cloud</groupId>
            <artifactId>spring-cloud-config-server</artifactId>
        </dependency>
    </dependencies>
    <build>
        <plugins>
            <plugin>
                <groupId>org.springframework.boot</groupId>
                <artifactId>spring-boot-maven-plugin</artifactId>
            </plugin>
        </plugins>
    </build>
</project>
在程序的入口Application类加上@EnableConfigServer注解开启配置服务器的功能:
import org.springframework.boot.SpringApplication;
import org.springframework.boot.autoconfigure.SpringBootApplication;
import org.springframework.cloud.config.server.EnableConfigServer;


@SpringBootApplication
@EnableConfigServer
public class ConfigServerApplication {

    public static void main(String[] args) {
        SpringApplication.run(ConfigServerApplication.class, args);
    }
}
在程序的配置文件application.properties文件配置以下:
spring.application.name=config-server
server.port=8888

spring.cloud.config.server.git.uri=https://github.com/xssdpgy/SpringCloudLearning/
spring.cloud.config.server.git.searchPaths=configCenter
spring.cloud.config.label=master
spring.cloud.config.server.git.username=
spring.cloud.config.server.git.password=
- spring.cloud.config.server.git.uri:配置git仓库地址
- spring.cloud.config.server.git.searchPaths:配置仓库路径
- spring.cloud.config.label:配置仓库的分支
- spring.cloud.config.server.git.username:访问git仓库的用户名
- spring.cloud.config.server.git.password:访问git仓库的用户密码
如果Git仓库为公开仓库,可以不填写用户名和密码,如果是私有仓库需要填写,本例子是公开仓库,放心使用。
远程仓库 https://github.com/xssdpgy/SpringCloudLearning/ 中有个文件config-client-dev.properties文件中有一个属性:
foo = 001
启动服务,接下来测试一下。
Spring Cloud Config 有它的一套访问规则,我们通过这套规则在浏览器上直接访问就可以。
/{application}/{profile}[/{label}]
/{application}-{profile}.yml
/{label}/{application}-{profile}.yml
/{application}-{profile}.properties
/{label}/{application}-{profile}.properties
- {application} 就是应用名称,对应到配置文件上来,就是配置文件的名称部分,例如上面创建的配置文件。
- {profile} 就是配置文件的版本,我们的项目有开发版本、测试环境版本、生产环境版本,对应到配置文件上来就是以 application-{profile}.properties加以区分,例如application-dev.properties、application-prod.properties。
- {label} 表示 git 分支,默认是 master 分支,如果项目是以分支做区分也是可以的,那就可以通过不同的 label 来控制访问不同的配置文件了。
如上,根据第五条规则,拼接地址访问,可以正常返回数据,则说明配置中心服务端一切正常。

2.3 构建config client
创建一个springboot项目,取名为config-client,其pom文件:
<?xml version="1.0" encoding="UTF-8"?>
<project xmlns="http://maven.apache.org/POM/4.0.0" xmlns:xsi="http://www.w3.org/2001/XMLSchema-instance"
    xsi:schemaLocation="http://maven.apache.org/POM/4.0.0 http://maven.apache.org/xsd/maven-4.0.0.xsd">
    <modelVersion>4.0.0</modelVersion>

    <groupId>com.zang</groupId>
    <artifactId>config-client</artifactId>
    <version>0.0.1-SNAPSHOT</version>
    <packaging>jar</packaging>

    <name>config-client</name>
    <description>Demo project for Spring Boot</description>

    <parent>
        <groupId>com.zang</groupId>
        <artifactId>sc-f-config</artifactId>
        <version>0.0.1-SNAPSHOT</version>
    </parent>

    <dependencies>
        <dependency>
            <groupId>org.springframework.boot</groupId>
            <artifactId>spring-boot-starter-web</artifactId>
        </dependency>
        <dependency>
            <groupId>org.springframework.cloud</groupId>
            <artifactId>spring-cloud-starter-config</artifactId>
        </dependency>
    </dependencies>

    <build>
        <plugins>
            <plugin>
                <groupId>org.springframework.boot</groupId>
                <artifactId>spring-boot-maven-plugin</artifactId>
            </plugin>
        </plugins>
    </build>
</project>
其配置文件命名为bootstrap.properties:
spring.application.name=config-client
spring.cloud.config.label=master
spring.cloud.config.profile=dev
spring.cloud.config.uri= http://localhost:8888/
server.port=8881
- spring.cloud.config.label 指明远程仓库的分支
- spring.cloud.config.profile
- dev开发环境配置文件
- test测试环境
- pro正式环境
- spring.cloud.config.uri= http://localhost:8888/ 指明配置服务中心的网址。
程序的入口类,写一个API接口“/hi”,返回从配置中心读取的foo变量的值,代码如下:
import org.springframework.beans.factory.annotation.Value;
import org.springframework.boot.SpringApplication;
import org.springframework.boot.autoconfigure.SpringBootApplication;
import org.springframework.web.bind.annotation.RequestMapping;
import org.springframework.web.bind.annotation.RestController;

@SpringBootApplication
@RestController
public class ConfigClientApplication {

    public static void main(String[] args) {
        SpringApplication.run(ConfigClientApplication.class, args);
    }

    @Value("${foo}")
    String foo;
    @RequestMapping(value = "/hi")
    public String hi(){
        return foo;
    }
}
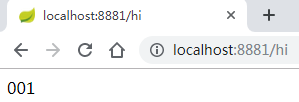
打开网址访问:http://localhost:8881/hi,网页显示:
3. 结合 Eureka 版的配置中心
以上讲了 Spring Cloud Config 最基础的用法,但是如果我们的系统中使用了 Eureka 作为服务注册发现中心,那么 Spring Cloud Config 也应该注册到 Eureka 之上,方便其他服务消费者使用,并且可以注册多个配置中心服务端,以实现高可用。

下面对基础版工程进行改造。
3.1 创建Eureka Server
pom.xml文件引入Eureka的起步依赖spring-cloud-starter-netflix- eureka-server。
<dependency>
    <groupId>org.springframework.cloud</groupId>
    <artifactId>spring-cloud-starter-netflix-eureka-server</artifactId>
</dependency>
<dependency>
    <groupId>org.springframework.boot</groupId>
    <artifactId>spring-boot-starter-web</artifactId>
</dependency>
在配置文件application.yml上,指定服务端口为8889,加上作为服务注册中心的基本配置:
server:
  port: 8889

eureka:
  instance:
    hostname: localhost
  client:
    registerWithEureka: false
    fetchRegistry: false
    serviceUrl:
      defaultZone: http://${eureka.instance.hostname}:${server.port}/eureka/
入口类:
import org.springframework.boot.SpringApplication;
import org.springframework.boot.autoconfigure.SpringBootApplication;
import org.springframework.cloud.netflix.eureka.server.EnableEurekaServer;

@EnableEurekaServer
@SpringBootApplication
public class EurekaServerApplication {

    public static void main(String[] args) {
        SpringApplication.run(EurekaServerApplication.class, args);
    }
}
3.2 改造config-server
基于原pom.xml,在其pom.xml文件加上EurekaClient的起步依赖spring-cloud-starter-netflix-eureka-client:
<dependency>
    <groupId>org.springframework.cloud</groupId>
    <artifactId>spring-cloud-starter-netflix-eureka-client</artifactId>
</dependency>
配置文件application.properties,保持原有配置不变,新增指定服务注册地址为http://localhost:8889/eureka/:
eureka.client.serviceUrl.defaultZone=http://localhost:8889/eureka/
在 @EnableConfigServer 的基础上增加 @EnableEurekaClient,另外也可以用 @EnableDiscoveryClient 代替 @EnableEurekaClient。
import org.springframework.boot.SpringApplication;
import org.springframework.boot.autoconfigure.SpringBootApplication;
import org.springframework.cloud.client.discovery.EnableDiscoveryClient;
import org.springframework.cloud.config.server.EnableConfigServer;

@SpringBootApplication
@EnableConfigServer
@EnableDiscoveryClient
//@EnableEurekaClient
public class ConfigServerApplication {

    public static void main(String[] args) {
        SpringApplication.run(ConfigServerApplication.class, args);
    }
}
3.3 改造config-client
基于原pom.xml,在其pom.xml文件加上EurekaClient的起步依赖spring-cloud-starter-netflix-eureka-client:
<dependency>
   <groupId>org.springframework.cloud</groupId>
   <artifactId>spring-cloud-starter-netflix-eureka-client</artifactId>
</dependency>
配置文件bootstrap.properties,加上服务注册地址为http://localhost:8889/eureka/
spring.application.name=config-client
spring.cloud.config.label=master
spring.cloud.config.profile=dev
#spring.cloud.config.uri= http://localhost:8888/

eureka.client.serviceUrl.defaultZone=http://localhost:8889/eureka/
spring.cloud.config.discovery.enabled=true
spring.cloud.config.discovery.serviceId=config-server
server.port=8881
- spring.cloud.config.discovery.enabled 是从配置中心读取文件。
- spring.cloud.config.discovery.serviceId 配置中心的servieId,即服务名。
在启动类上添加@EnableDiscoveryClient注解,启动即可。
4. Spring Cloud Bus
如果只有一个 client 端的话,那我们用 webhook ,设置手动刷新都不算太费事,但是如果端比较多的话呢,一个一个去手动刷新未免有点复杂。这样的话,我们可以借助 Spring Cloud Bus 的广播功能,让 client 端都订阅配置更新事件,当配置更新时,触发其中一个端的更新事件,Spring Cloud Bus 就把此事件广播到其他订阅端,以此来达到批量更新。

Spring Cloud Bus 核心原理其实就是利用消息队列做广播,所以要先有个消息队列,目前官方支持 RabbitMQ 和 kafka。
4.1 搭建RabbitMQ
这里用的是 RabbitMQ, 所以先要搭一套 RabbitMQ 环境。过程略。
下面对代码进行继续改造。
4.2 改造config-client
在pom文件加上起步依赖spring-cloud-starter-bus-amqp。
<dependency>
      <groupId>org.springframework.cloud</groupId>
      <artifactId>spring-cloud-starter-bus-amqp</artifactId>
</dependency>
在配置文件application.properties中加上RabbitMq的配置,包括RabbitMq的地址、端口,用户名、密码。并需要加上spring.cloud.bus的三个配置,具体如下:
spring.rabbitmq.host=localhost
spring.rabbitmq.port=5672
spring.rabbitmq.username=guest
spring.rabbitmq.password=guest

spring.cloud.bus.enabled=true
spring.cloud.bus.trace.enabled=true
management.endpoints.web.exposure.include=bus-refresh
ConfigClientApplication启动类代码如下:
import org.springframework.beans.factory.annotation.Value;
import org.springframework.boot.SpringApplication;
import org.springframework.boot.autoconfigure.SpringBootApplication;
import org.springframework.cloud.client.discovery.EnableDiscoveryClient;
import org.springframework.cloud.context.config.annotation.RefreshScope;
import org.springframework.web.bind.annotation.RequestMapping;
import org.springframework.web.bind.annotation.RestController;

@SpringBootApplication
@EnableDiscoveryClient
@RestController
@RefreshScope
public class ConfigClientApplication {

    /**
     * http://localhost:8881/actuator/bus-refresh
     */

    public static void main(String[] args) {
        SpringApplication.run(ConfigClientApplication.class, args);
    }

    @Value("${foo}")
    String foo;

    @RequestMapping(value = "/hi")
    public String hi(){
        return foo;
    }
}
依次启动eureka-server、config-server,启动两个config-client,端口为:8881、8882。
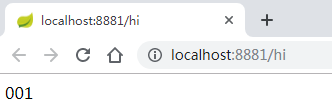
访问http://localhost:8881/hi 或者http://localhost:8882/hi 浏览器显示:
4.3 实现配置自动刷新
这时我们去代码仓库改变配置文件foo的值。如果是传统的做法,需要重启服务,才能达到配置文件的更新。此时,我们只需要发送post请求http://localhost:8881/actuator/bus-refresh,你会发现config-client会重新读取配置文件

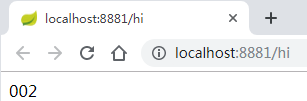
此时再访问http://localhost:8881/hi 或者http://localhost:8882/hi ,浏览器显示:
另外,/actuator/bus-refresh接口可以指定服务,即使用”destination”参数,比如 “/actuator/bus-refresh?destination=customers:**” 即刷新服务名为customers的所有服务。
题外话:
目前有一些用的比较多的开源的配置中心,比如携程的 Apollo、蚂蚁金服的 disconf 等,对比 Spring Cloud Config,这些配置中心功能更加强大。有兴趣的可以拿来试一试。

 浙公网安备 33010602011771号