# 前言
代码生成器插件选择去这里:https://www.cnblogs.com/zixq/p/16726534.html
相关插件在那里面已经提到了
# 上手
MyBatis-Plus 是一个 MyBatis 的增强工具,在 MyBatis 的基础上只做增强不做改变,为简化开发、提高效率而生
PS:要打开官网需要将浏览器的广告拦截插件添加白名单,具体操作访问官网即可看到
1、依赖
<!-- 这个starter包含对mybatis的自动装配,完全可以替换掉Mybatis的starter -->

<!-- Spring Boot2 -->
<dependency>
    <groupId>com.baomidou</groupId>
    <artifactId>mybatis-plus-boot-starter</artifactId>
    <version>3.5.7</version>
</dependency>


<!-- Spring Boot3 -->
<dependency>
    <groupId>com.baomidou</groupId>
    <artifactId>mybatis-plus-spring-boot3-starter</artifactId>
    <version>3.5.7</version>
</dependency>
2、接口 extends BaseMapper<T>。该接口定义了单表CRUD的一些常用API
// 泛型 User 是与数据库对应的实体类
public interface UserMapper extends BaseMapper<User> {
}
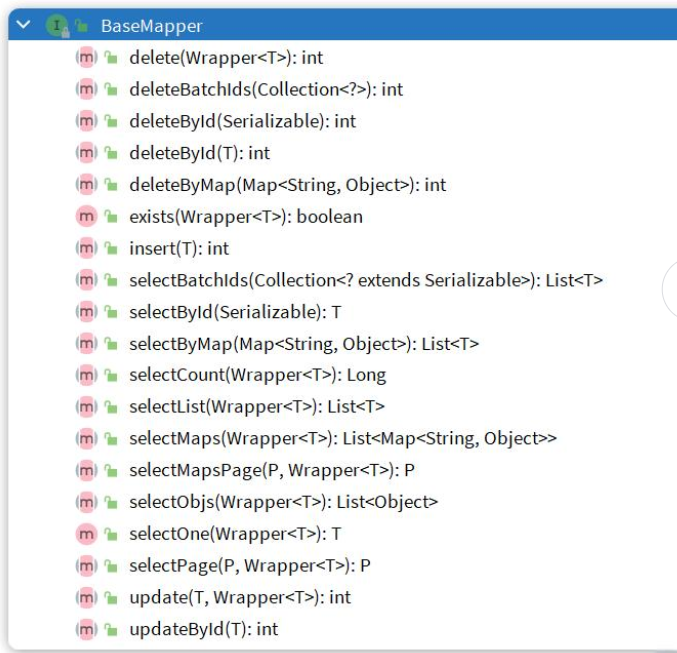
Mybatis-Plus就是根据PO实体的信息来推断出表的信息,从而生成SQL的。默认情况下:
-
MybatisPlus会把PO实体的类名驼峰转下划线作为表名
-
MybatisPlus会把PO实体的所有变量名驼峰转下划线作为表的字段名,并根据变量类型推断字段类型
-
MybatisPlus会把名为id的字段作为主键
但很多情况下,默认的实现与实际场景不符,因此MybatisPlus提供了一些注解便于我们声明表信息
3、然后就可以像调用自定义mapper接口方法一样调用了
# 注解
@TableName:用来指定表名
@TableId:用来指定表中的主键字段信息。IdType枚举如下
- AUTO:数据库自增长
- INPUT:通过set方法自行输入
- ASSIGN_ID:分配 ID(默认方式),接口IdentifierGenerator的方法nextId来生成id,默认实现类为DefaultIdentifierGenerator雪花算法
@TableField:用来指定表中的普通字段信息
使用@TableField的常见场景:
- 成员变量名与数据库字段名不一致
- 成员变量名以is开头,且是布尔值
- 成员变量名与数据库关键字冲突
- 成员变量不是数据库字段
# 配置
兼容MyBatis的配置
另外更多配置,查看官网:https://www.baomidou.com/reference/
mybatis-plus:
	type-aliases-package: com.zixq.mp.domain.po # 别名扫描包
	mapper-locations: "classpath*:/mapper/**/*.xml" # Mapper.xml文件地址,默认值
	configuration: map-underscore-to-camel-case: true # 是否开启下划线和驼峰的映射
	cache-enabled: false # 是否开启二级缓存
	global-config:
		db-config:
            id-type: assign_id # id为雪花算法生成	这个优先级没有使用 @TableId 注解高
            update-strategy: not_null # 更新策略:只更新非空字段
# 全局逻辑删除的实体字段名(since 3.3.0,配置后可以忽略不配置步骤2)
            logic-delete-field: deleted
            logic-delete-value: 1 # 逻辑已删除值(默认为 1)
            logic-not-delete-value: 0 # 逻辑未删除值(默认为 0)
逻辑删除进行上面配置后mp就可自动实现delete变update操作了,但逻辑删除会占用空间,影响性能,所以可采用删除前将数据迁移到另一张表中
如果要表删除标志字段没统一的话,可以使用 @TableLogic 来指定
@TableLogic
private Boolean deleted;
# 条件构造器
1、QueryWrapper 和 LambdaQueryWrapper一般用来构建select、delete、update的where条件部分
2、UpdateWrapper 和 LambdaUpdateWrapper通常只有在set语句比较特殊才使用,如set的是
money = money - 10003、尽量使用LambdaQueryWrapper 和 LambdaUpdateWrapper,避免硬编码
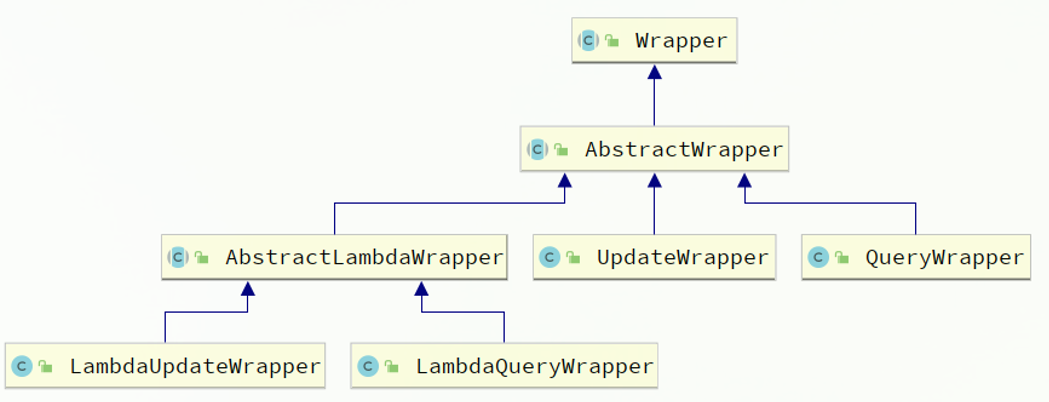
BaseMapper包含的Wrapper构建起
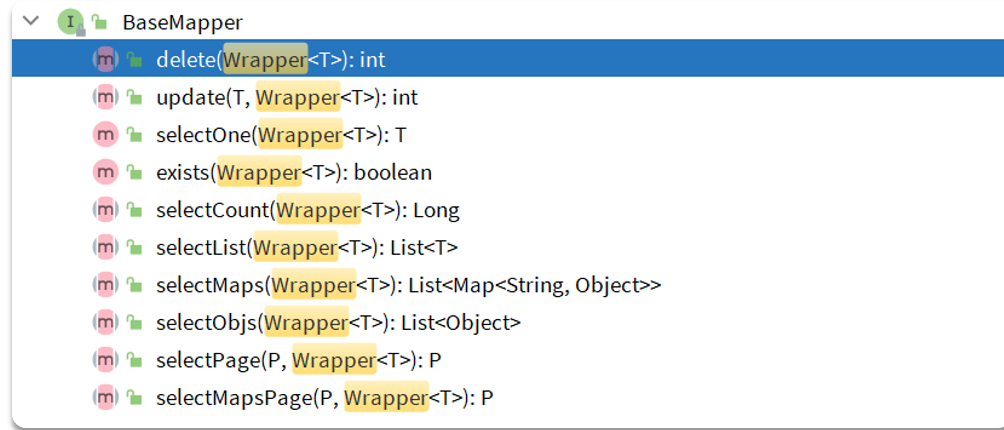
AbstractWrapper
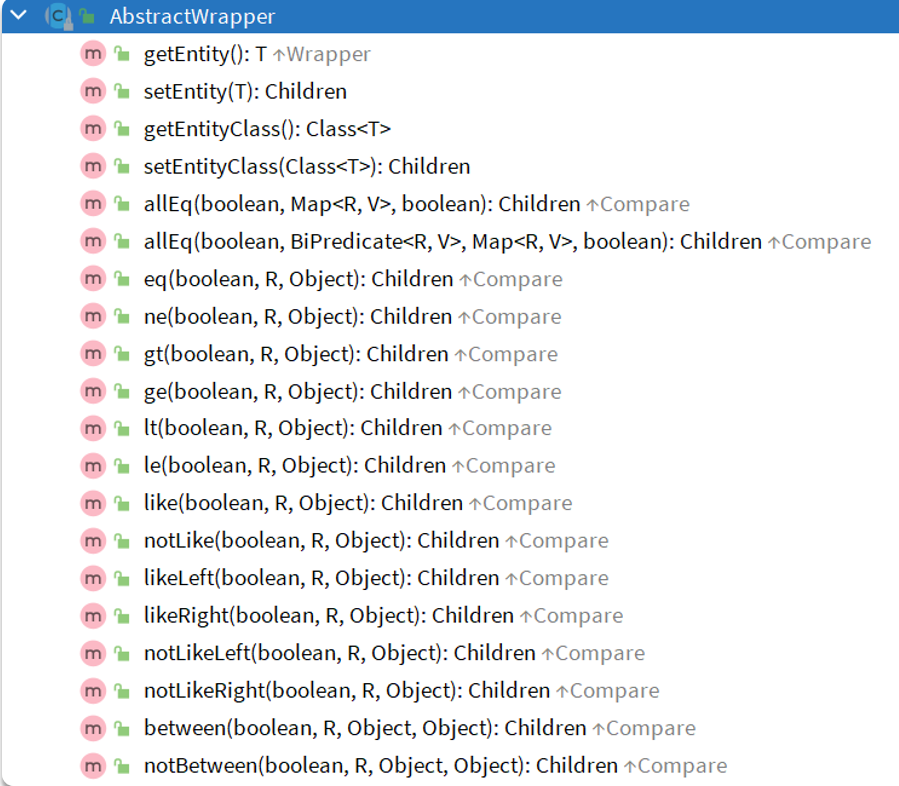
QueryWrapper
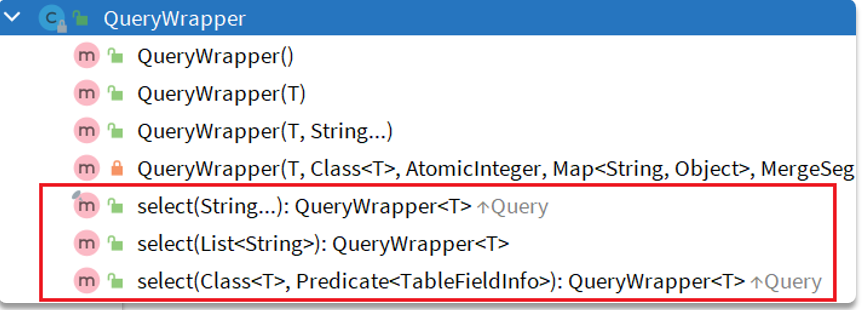
UpdateWrapper

# 示例
1、QueryWrapper根据指定字段和条件查询
SQL
SELECT id, username, info, balance
FROM `user`
WHERE username LIKE ? AND  balance >= ?;
mp构建:
// 1、构建查询条件
Querywrapper<User> wrapper = new QueryWrapper<User()
    .select("id", "username", "info","balance")
    .like("username", "o")
    ·ge("balance", 1000);

// 2、查询
List<User> users = userMapper.selectList(wrapper);


// 使用 LambdaWrapper 的方式
LambdaQueryWrapper<User> wrapper = new LambdaQueryWrapper<User()
    .select(User::getId, User::getUsername, User::getInfo,User::getBalance)
    .like(User::getUsername, "o")
    ·ge(User::getBalance, 1000);

// 2、查询
List<User> users = userMapper.selectList(wrapper);
2、QueryWrapper更新构建
SQL
UPDATE `user`
SET balance = 2000
WHERE username = "jack"
mp构建:
// 1、要更新的数据
User user = new User();
user.setBalance(2000);

// 2、更新的条件
QueryWrapper<User> wrapper = new Querywrapper<User>()
    .eq("username", "jack");

// 3、执行更新
userMapper.update(user, wrapper);
3、UpdateWrapper构建set的特殊情况
SQL:
UPDATE user
SET balance = balance - 200
WHERE id in (1, 2, 4)
mp构建:
UpdateWrapper<User> wrapper = new UpdateWrapper<User>()
    .setSql("balance = balance - 200")
    .in("id", List.of(1L, 2L, 4L));

userMapper.update(null, wrapper) ;
# 自定义SQL
适用场景:要构建的SQL除了where条件之外的语句很复杂,那么就让mp帮我们构建where条件部分,其他部分由我们自己构建
上手
SQL:
UPDATE user
SET balance = balance - 200
WHERE id in (1, 2, 4)
mp构建:
UpdateWrapper<User> wrapper = new UpdateWrapper<User>()
    .setSql("balance = balance - 200")
    .in("id", List.of(1L, 2L, 4L));

userMapper.update(null, wrapper) ;
setSql("balance = balance -2oo") 这部分应该在mapper层,而不是在业务层,所以需要进行传递,然后在mapper层进行SQL拼接
1、业务层
// 1、准备自定义查询条件
List<Long> ids = List.of(1L, 2L, 4L);
QueryWrapper<User> wrapper = new QueryWrapper<User>()
    .in("id", ids);

// 2、调用mapper的自定义方法,直接传递Wrapper
userMapper.deductBalanceByIds(200, wrapper);
2、mapper层
public interface UserMapper extends BaseMapper<User> {

    /**
     * <p>
     * 		@Param("ew")	参数名必须是这个	也可以使用 @Param(Constants.WRAPPER)
     *		${ew.customSqlSegment}	是mp自动解析自定义SQL片段
     * </p>
     */
    @Select("UPDATE user SET balance = balance - #{money} ${ew.customSqlSegment}")
    void deductBalanceByIds(@Param("money") int money,
                            @Param("ew") QueryWrapper<User> wrapper);
}
# 多表关联
MyBatis构建的方式:
<select id="queryUserByIdAndAddr" resultType="com.itheima.mp.domain.po.User">
      SELECT *
      FROM user u
	      INNER JOIN address a ON u.id = a.user_id
      WHERE u.id
      <foreach collection="ids" separator="," item="id" open="IN (" close=")">
          #{id}
      </foreach>
      AND a.city = #{city}
  </select>
利用Wrapper来构建查询条件,然后手写SELECT及FROM部分,实现多表查询
业务层:
// 1、准备自定义查询条件
QueryWrapper<User> wrapper = new QueryWrapper<User>()
        .in("u.id", List.of(1L, 2L, 4L))
        .eq("a.city", "北京");

// 2、调用mapper的自定义方法
List<User> users = userMapper.queryUserByWrapper(wrapper);
mapper层:
@Select("SELECT u.* FROM user u INNER JOIN address a ON u.id = a.user_id ${ew.customSqlSegment}")
List<User> queryUserByWrapper(@Param("ew")QueryWrapper<User> wrapper);
# IService接口
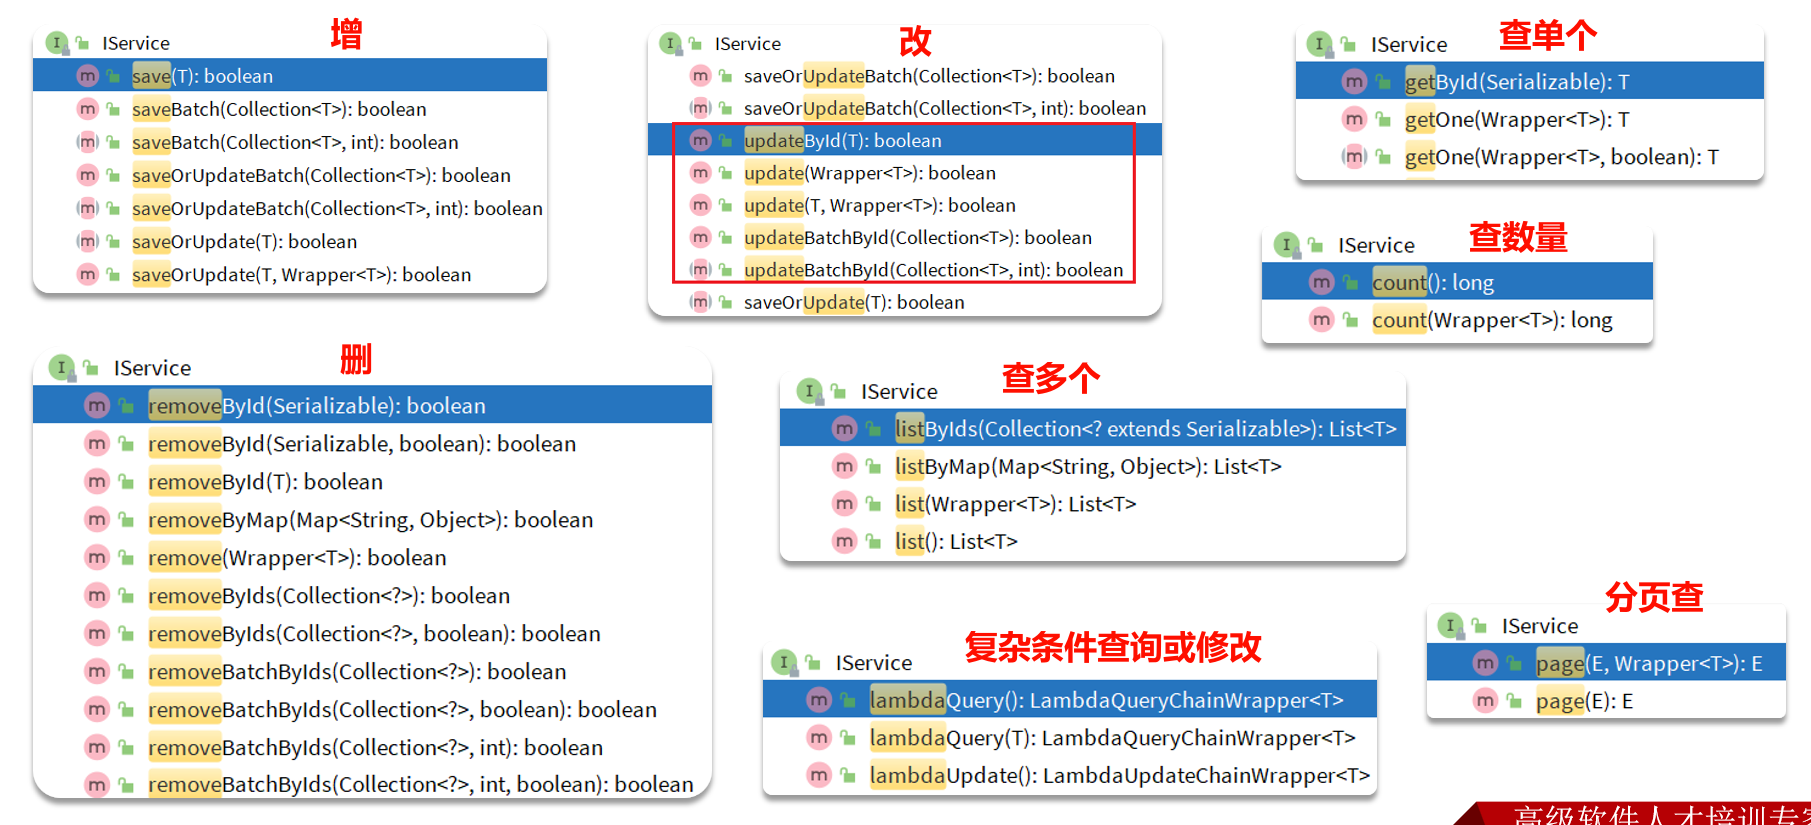
MybatisPlus不仅提供了BaseMapper,还提供了通用的Service接口及默认实现,封装了一些常用的service模板方法
通用接口为IService,默认实现为ServiceImpl
# 上手
如果直接继承
IService接口,则需要实现里面的方法,因此mp提供的一个默认实现ServiceImp
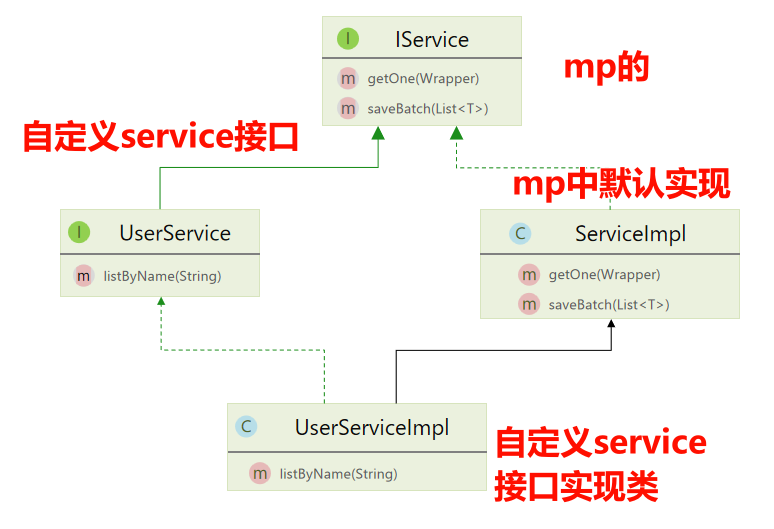
1、自定义Service接口
public interface IUserService extends IService<User> {}
2、自定义Service接口实现类:继承mp的 ServiceImpl<M, T>
/**
 *	ServiceImpl<UserMapper, User>	UserMapper指定对应的mapper	User指定对应的实体类
 */
public class UserServiceImpl extends ServiceImpl<UserMapper, User>
    implements IUserService {}
3、正常使用上面那些增删改、单个查、多个查之类的API即可
# Lambda
IService中还提供了Lambda功能来简化我们的复杂查询(LambdaQuery)及更新功能(LambdaUpdate)
# LambdaQuery
根据复杂条件查询用户的接口,查询条件如下:
- name:用户名关键字,可以为空
- status:用户状态,可以为空
- minBalance:最小余额,可以为空
- maxBalance:最大余额,可以为空
GetMapping("/list")
@ApiOperation("根据id集合查询用户")
public List<UserVO> queryUsers(UserQuery query){
    // 1、组织条件
    String username = query.getName();
    Integer status = query.getStatus();
    Integer minBalance = query.getMinBalance();
    Integer maxBalance = query.getMaxBalance();

    // 2、查询用户
    List<User> users = userService.lambdaQuery()
            .like(username != null, User::getUsername, username)
            .eq(status != null, User::getStatus, status)
            .ge(minBalance != null, User::getBalance, minBalance)
            .le(maxBalance != null, User::getBalance, maxBalance)
            .list();	// 告诉MP我们的调用结果需要的是一个list集合	上面是构建条件

    // 3、处理vo
    return BeanUtil.copyToList(users, UserVO.class);
}
UserQuery实体
@Data
@ApiModel(description = "用户查询条件实体")
public class UserQuery {
    @ApiModelProperty("用户名关键字")
    private String name;
    @ApiModelProperty("用户状态:1-正常,2-冻结")
    private Integer status;
    @ApiModelProperty("余额最小值")
    private Integer minBalance;
    @ApiModelProperty("余额最大值")
    private Integer maxBalance;
}
除了list(),还可选的方法有:
one():最多1个结果list():返回集合结果count():返回计数结果
# LambdaUpdate
根据id修改用户余额,如果扣减后余额为0,则将用户status修改为冻结状态2
public class UserServiceImpl extends ServiceImpl<UserMapper, User>
    implements IUserService {

    @Override
    @Transactional(rollbackFor = Exception.class)
    public void deductBalance(Long id, Integer money) {

        // 1、查询用户
        User user = this.getById(id);
        // 2.校验用户状态
        if (user == null || user.getStatus() == 2) {
            throw new RuntimeException("用户状态异常!");
        }

        // 3、校验余额是否充足
        if (user.getBalance() < money) {
            throw new RuntimeException("用户余额不足!");
        }

        // 4.扣减余额 update tb_user set balance = balance - ?
        int remainBalance = user.getBalance() - money;
        lambdaUpdate()
                .set(User::getBalance, remainBalance) // 更新余额
                .set(remainBalance == 0, User::getStatus, 2) // 动态判断,是否更新status
                .eq(User::getId, id)
                .eq(User::getBalance, user.getBalance()) // 乐观锁
                .update();	// 上面为构建条件,这一步才为真正去修改
    }
}
# saveBatch 批量新增 说明
YAML中datesource的url后添加参数
rewriteBatchedStatements=true
private User buildUser(int i) {
    User user = new User();
    user.setUsername("user_" + i);
    user.setPassword("123");
    user.setPhone("" + (18688190000L + i));
    user.setBalance(2000);
    user.setInfo("{\"age\": 24, \"intro\": \"英文老师\", \"gender\": \"female\"}");
    user.setCreateTime(LocalDateTime.now());
    user.setUpdateTime(user.getCreateTime());
    return user;
}


@Test
void testSaveBatch() {
    // 准备10万条数据
    List<User> list = new ArrayList<>(1000);
    long b = System.currentTimeMillis();
    for (int i = 1; i <= 100000; i++) {
        list.add(buildUser(i));
        // 每1000条批量插入一次
        if (i % 1000 == 0) {
            userService.saveBatch(list);
            list.clear();
        }
    }
    long e = System.currentTimeMillis();
    System.out.println("耗时:" + (e - b));
}
saveBatch() 源码
@Transactional(rollbackFor = Exception.class)
@Override
public boolean saveBatch(Collection<T> entityList, int batchSize) {

    String sqlStatement = getSqlStatement(SqlMethod.INSERT_ONE);
    return executeBatch(entityList, batchSize, (sqlSession, entity) -> sqlSession.insert(sqlStatement, entity));
}


// ...SqlHelper
public static <E> boolean executeBatch(Class<?> entityClass, Log log, Collection<E> list, int batchSize, BiConsumer<SqlSession, E> consumer) {

    Assert.isFalse(batchSize < 1, "batchSize must not be less than one");
    return !CollectionUtils.isEmpty(list) && executeBatch(entityClass, log, sqlSession -> {
        int size = list.size();
        int idxLimit = Math.min(batchSize, size);
        int i = 1;
        for (E element : list) {
            consumer.accept(sqlSession, element);
            if (i == idxLimit) {
                sqlSession.flushStatements();
                idxLimit = Math.min(idxLimit + batchSize, size);
            }
            i++;
        }
    });
}
可见Mybatis-Plus的批处理是基于PrepareStatement的预编译模式,形成的SQL是如下样式:
Preparing: INSERT INTO user ( username, password, phone, info, balance, create_time, update_time ) VALUES ( ?, ?, ?, ?, ?, ?, ? )
Parameters: user_1, 123, 18688190001, "", 2000, 2023-07-01, 2023-07-01
Parameters: user_2, 123, 18688190002, "", 2000, 2023-07-01, 2023-07-01
Parameters: user_3, 123, 18688190003, "", 2000, 2023-07-01, 2023-07-01
而我们要的是合并成一条SQL,从而提高性能
INSERT INTO user ( username, password, phone, info, balance, create_time, update_time )
VALUES
(user_1, 123, 18688190001, "", 2000, 2023-07-01, 2023-07-01),
(user_2, 123, 18688190002, "", 2000, 2023-07-01, 2023-07-01),
(user_3, 123, 18688190003, "", 2000, 2023-07-01, 2023-07-01),
(user_4, 123, 18688190004, "", 2000, 2023-07-01, 2023-07-01);
这就需要修改SQL的配置,添加 &rewriteBatchedStatements=true: 参数
spring:
  datasource:
    url: jdbc:mysql://127.0.0.1:3306/mp?useUnicode=true&characterEncoding=UTF-8&autoReconnect=true&serverTimezone=Asia/Shanghai&rewriteBatchedStatements=true
这样配置之后,性能可以得到极大地提升
# Db 静态工具类
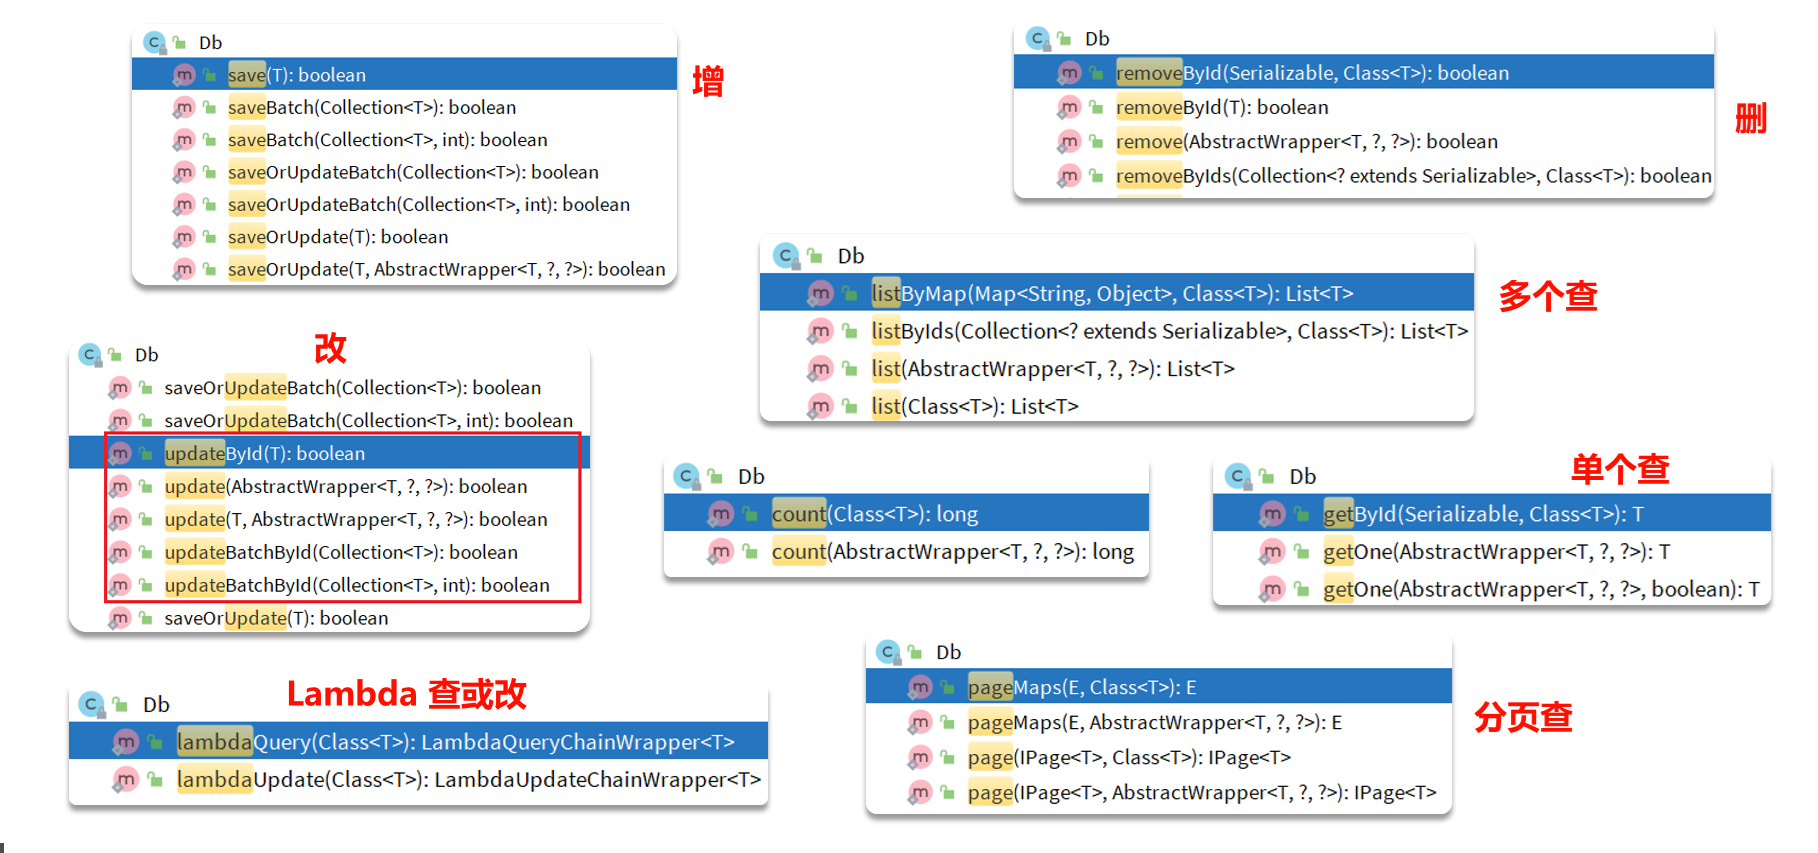
Db这个类里面的静态方法就是IService中的方法,实现方式有点区别(提供Class对象)
适用场景:A类中注入B类来进行调用问题。使用该静态工具就不需要注入,直接使用Class就可进行调用了,从而减少循环依赖风险
注意
- 使用 Db Kit 前,需要确保项目中已注入对应实体的 BaseMapper。
- 当参数为 Wrapper 时,需要在 Wrapper 中传入 Entity 或者 EntityClass,以便寻找对应的 Mapper。
- 不建议在循环中频繁调用 Db Kit 的方法,如果是批量操作,建议先将数据构造好,然后使用
Db.saveBatch(数据)等批量方法进行保存
示例:
@Override
public UserVO queryUserAndAddressById(Long userId) {

    // 1、查询用户
    User user = getById(userId);
    if (user == null) {
        return null;
    }

    // 2、查询收货地址	不需要注入 AddressSerivce 了
    List<Address> addresses = Db.lambdaQuery(Address.class)
            .eq(Address::getUserId, userId)
            .list();

    // 3、处理vo
    UserVO userVO = BeanUtil.copyProperties(user, UserVO.class);
    userVO.setAddresses(BeanUtil.copyToList(addresses, AddressVO.class));

    return userVO;
}
# 枚举处理器
解决Java枚举类型和数据库类型转换
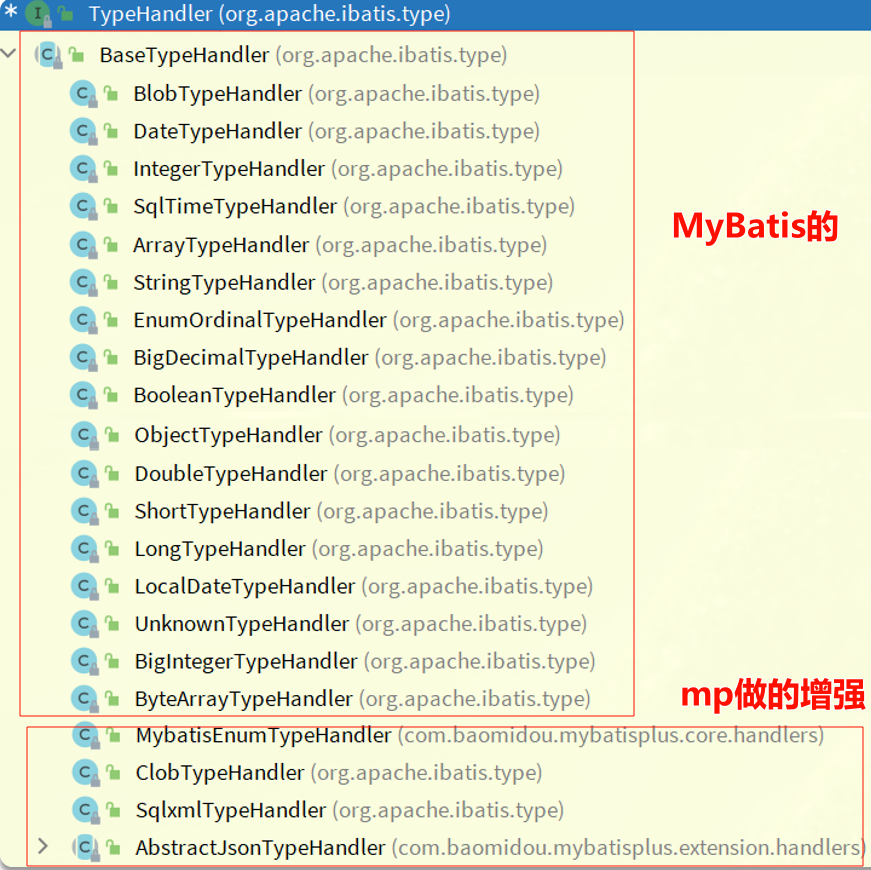
@Data
public class UserEntity {
    // ......................

    // 0 正常	1禁用
    private Integer status;
}
上面这种和数据库int类型转换方便,但是不符合编码,因为0和1得手动输入,代码多了很麻烦且容易弄错甚至混乱不堪(不信邪的可以去看若依项目:RuoYi-Vue),因此我们需要统一状态,即枚举
@Getter
public enum UserStatusEnum {
    NORMAL(1, "正常"),
    FREEZE(2, "冻结")
    ;
    private final int value;
    private final String desc;

    UserStatus(int value, String desc) {
        this.value = value;
        this.desc = desc;
    }
}
实体类
@Data
public class UserEntity {
    // ......................

    // 0 正常	1禁用
    private UserStatusEnum status;
}
但此时实体是 UserStatusEnum 而数据库是int,涉及类型转换,这就需要mp来做了
1、YAML配置
mybatis-plus:
  configuration:
    default-enum-type-handler: com.baomidou.mybatisplus.core.handlers.MybatisEnumTypeHandler
2、@EnumValue 标记枚举中哪个值为数据库字段值
@Getter
public enum UserStatusEnum {
    NORMAL(0, "正常"),
    FREEZE(1, "冻结")

    ;

    @EnumValue
    private final int value;
    @JsonValue	// Jackson的,返回前端的值是正常或冻结 而不是 NORMAL 这种	SpringMVC底层使用的是 Jackson
    private final String desc;

    UserStatus(int value, String desc) {
        this.value = value;
        this.desc = desc;
    }
}
# JSON类型处理器
官网:https://www.baomidou.com/guides/type-handler/
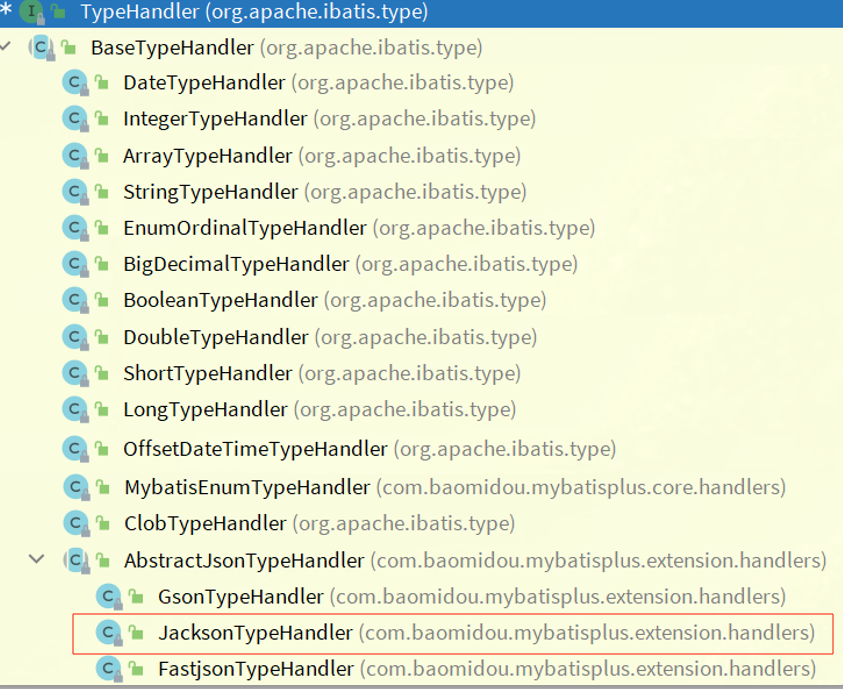
数据库中字段是JSON格式,和Java实体类对应字段进行适配,方便操作JSON格式
mp提供的JSON处理器默认是JacksonHandler,也推荐使用它,因为安全

Java定义JSON对应的类
@Data
public class Userlnfo {
    private Integer age;
    private String intro;
    private String gender;
}
Java实体类
@Data
@TableName(value="user", autoResultMap = true)	// 操作1
public class User{
    private Long id;
    private String username;
    @TableField(typeHandler = JacksonTypeHandler.class)	// 操作2
    private String UserInfoinfo
# 分页插件
# 上手
1、注册插件
@Configuration
public class MybatisConfig {

    @Bean
    public MybatisPlusInterceptor mybatisPlusInterceptor() {
        // 初始化核心插件
        MybatisPlusInterceptor interceptor = new MybatisPlusInterceptor();
        // 分页插件
        PaginationInnerInterceptor pgInterceptor = new PaginationInnerInterceptor(DbType.MYSQL);
        // 设置分页最大条数
        pgInterceptor.setMaxLimit(1000);
        // 注册分页插件
        interceptor.addInnerInterceptor();

        return interceptor;
    }
}
使用分页:
int pageNo = 1, pageSize = 2;

// 1、准备分页条件
// 1.1、分页条件
Page<User> page = Page.of(pageNo,pageSize);
// 1.2、排序条件	true 为升序 false 为降序
page.addorder(new OrderItem("balance", true));
page.addorder(new OrderItem("id", true));	// balance 相同下,以 id 排序

// 2、分页查询
Page<User> p = userservice.page(page);

// 3、解析
long total = p·getTotal();	// 总条数
System.out.println("total = " + total);
long pages = p.getPages();	// 总页数
System.out.println("pages = " ++ pages);

List<User> users = p·getRecords();	// 分页后的数据
# 企业级mp相关设计
直接去看这个项目:RuoYi企业级改造版:AgileBoot-Back-End-Basic
对应md文档
链接:MyBatis-Plus。文件格式:md

